XSAT CD.TV410 User manual

SUMMARY
29
TABLE OF CONTENTS
1 - Important warning ................................................... p. 30/31
2 - Your digital receiver ................................................. p. 32/35
3 - The remote control .................................................. p. 36/37
4 - Using the remote control - Main menu ................... p. 38/39
5 - Connection and first-time use................................. p. 40/42
6 - Reception adjustment ............................................. p. 43/44
7 - Channel scan........................................................... p. 45/46
8 - Program lists............................................................ p. 47/49
9 - Electronic Program Guide ....................................... p. 50/51
10 - Parental lock and Smart card................................ p. 52
11 - Timer - Wake-up.................................................... p. 53
12 - Technical characteristics .......................................
p. 54
13 - Glossary ..................................................................... p. 55

30
These instructions include special information which must not be made
available to children under 18.
INTRODUCTION
Thank you for having chosen this digital receiver. Carefully follow the instructions in this manual to enjoy all
the advantages of satellite TV and radio reception (DVB standard). We advise following the use instructions
and recommendations supplied with the digital receiver, especially for first-time use. This receiver fully
complies with international DVB (Digital Video Broadcasting) standards and includes one or several
conditional access systems. It is compatible with televisions and video machines equipped with a standard
SCART/Peritel connector.
RECOMMENDATIONS
The packaging of the receiver includes cardboard and plastic which can be recycled to protect
the environment.
Storage If this receiver is not used directly after purchase, it can be stored in its original packaging,
in a cool dry place, at a temperature of between -6° C and +50° C. Before use, wait until the
receiver has reached an ambient temperature.
Electrical power supply
This receiver is designed to operate with 90/240 Volts AC power at 50/60 Hz. Its maximum
energy consumption is 25 watts. The receiver comes with an AC power cable. For your own
personal safety, do not touch the receiver outside normal conditions of use (e.g.: humidity).
Unplug the receiver in the event of prolonged periods of non-use and storms.
Satellite dish installation
Although not supplied with the receiver, we advise reading the satellite dish installation
instructions. When in doubt, contact your satellite dish specialist.
Remote control batteries
The remote control supplied with your receiver comes with two alkaline batteries, type LR03-AAA.
Always replace with batteries of this type. Insert the batteries without forcing and according to the
polarities indicated (+ and -). We wish to remind you that used alkaline batteries must never be
thrown into a fire. To protect out environment, we recommend recycling them.
Location of your receiver
Your receiver has ventilation slots (on the bottom and on the top). To ensure the correct ventila-
tion of your receiver and hence its service life and normal functions (constant and low internal
temperature), these slots must never be obstructed. This receiver is designed to operate with
temperatures of between 0°C to +40°C. Installation in premises which are confined or subject to
changes in temperature or humidity (sheds, attics, small cellars, etc.) may cause receiver
overheating, premature wear or problems not covered by the warranty.
Leave a space of at least 4 centimetres around and above the apparatus. Never cover with
fabric, paper (magazines), plastic bags, etc. Place your receiver in a dry, dust-free location. It is
not designed for outdoor use.
Digital receiver maintenance
To clean your receiver, dust with a dry cloth only or dampen with distilled water for the front face.
Never use detergents of any kind. Before cleaning, always disconnect the receiver from the mains
and from the satellite coaxial cable.
INTRODUCTION
1

IMPORTANT
31
IMPORTANT
We draw your attention to the fact that the recording of programs, pictures, sounds, videograms,
broadcasts, software transmitted via terrestrial, satellite or cable, individual or collective antenna,
and their rebroadcasting or commercial use outside the home may constitute a violation
of copyright laws.
FOR YOUR PERSONAL SAFETY
Never open the receiver. It contains no part that can be repaired by the user. The opening,
modification of circuits or connection of any non-compliant equipment renders the warranty null
and void. For maintenance or repair, bring the receiver to your dealer if under warranty, or to a qua-
lified technician in all other cases. In order to limit the risk of fire, electrocution or damage caused
to other equipment or people, protect the apparatus from damp, bad weather conditions, dust,
sand, radiation, sun, cold or high temperature (refer to technical information for more details).
REMARKS CONCERNING ELECTRICAL DEVICE
This receiver complies with the low voltage directive (European standard EN 60.065) and the “electromagnetic
compatibility” directive (European standard EN 55.013). It also complies with the European Community
directive governing radio interference (89/336/CE). The manufacturer declaims all responsibility in the event
of any use which does not comply with the recommendations in this manual and made available to
customers by mail, telephone, telematics, or broadcast. The manufacturer cannot be held responsible
for direct or indirect fraudulent use of the device (example: counterfeiting, piracy, or illicit copying).
REGARDING THE ASSOCIATED SATELLITE DISH
Our receiver can support a large number of configurations and was designed to facilitate use, even with
a double reception satellite receiver (i.e. Eutelsat 13°E + Astra). This receiver generates DiSEqC (Level 1.1)
control signals to facilitate the reception of these two satellites, as well as DiSEqC 1.2 integrated positioner
handling in order to receive a large number of satellites with only one dish. We recommend the use of a universal
LNB reception head (L.O. : 9.750 and 10.600 MHz). For the installation of the dish and/or an additional
satellite receiver (not supplied), an “installation kit” can be purchased from your dealer which includes coaxial
cable, a light tools and various connectors.
PROGRAM ACCESS RESTRICTION
Access to certain programs is exclusively reserved for adults (18 years of age and over). To block access,
these channels can be locked through the use of a parental code. Moreover, a number of conditionnal
access are designed to indicate a maturity rating, protected by a secret code. In compliance with law,
children under 18 years of age must not be given access to this secret code. We wish to draw the attention
of adults to the above law. The manufacturer cannot be held responsible for the use of this secret code by
children under the age of 18.
SUBSCRIPTIONS
The reception of Pay TV programs and services is linked to the use of a conditionnal access card.
1

32
2
ORANGE light :
digital TV signal
detected on
the antenna
CD.TV410
Optional smart card reader
(chip upside)
Power supply indicator
GREEN : in function
RED : standby Standby button

33
2
YOUR DIGITAL RECEIVER
Remote control activation
indicator (infrared)
Navigator
Smart card reader
(chip upside)
GREEN light : auxiliary
source indicator
(video recorder, other
satellite receiver…) OK/List button

34
CD.TV410
2
RCA plugs to connect
to the Hi-Fi system.
If you have a Surround
sound Hi-Fi, the spatial
effects will be restored
(if the program is in
Surround stereo
sound).
Composite
Video
Electrical supply
to connect to
the mains (90/240
volts - 50/60 Hz
Terrestrial
antenna output
to connect
to TV or video
recorder
"S-VHS" outlet for an S-Video
(Y/C) inlet television or a S-VHS
or Hi-8 video recorder.
Terrestrial
antenna input
• Terrestrial antenna connection
(optional remodulator)
The remodulator allows the channel
received by satellite to be added to the
channels received by the UHF/VHF
network to link CD.TV410 to a remote
television. A channel is chosen using the
Configuration/Television menu. Use the
same channel number on your television.
The CD.TV410 is preconfigured with
channel 36.
• Analogue audio connections
For stereo sound, use a stereo Cinch
cable to link the Cinch audio connec-
tors (AUDIO L/R) to the stereo Hi-Fi
system.

YOUR DIGITAL RECEIVER
35
2
Scart plug
(VCR/AUX)
to connect to an
external source
(video recorder
or another satellite
receiver).
Scart plug (TV)
to connect to
the television
set.
Peripheral
sockets for
computer system
link (serial),
for future
applications.
Satellite antenna input
Satellite antenna output
S/PDIF digital audio output.
Remove the cover before use.
• Connecting the satellite signal
Connect the "INPUT" to the satellite dish,
using a coaxial cable with a F plug. If there
is no F plug fitted on the cable: isolate the
cable as shown in the diagram below and
carefully screw it onto the cable until it
stops. While fitting the plug, make sure
there is no contact between the outer
metal strap and the core, to prevent
a short-circuit.
• Digital audio connection
You can connect your CD.TV410 to
a Hi-Fi or Home-Cinema system with an
optical fibre cable via the S/PDIF socket.
This will give you access to digital quality
sound.
IMPORTANT: the S/PDIF socket is
protected by a dust cover.
Remove the cover before plugging in
the optical fibre cable connector. Keep
the cover in a safe place for future use.
The cover is designed to protect the
socket from dust.

36
CD.TV410
3
Some keys of the receiver's remote control give access to settings and confi-
guration menus.
OK
Freeze
TV/Radio InfoGuideAudio
AuxTV/Sat
RetQuitMenu
Format
123
456
78
0
9
Vol
For some settings,
you simply need
to press directly
on the remote
control keyboard
(keys 0 to 9).
The "Guide" key
displays the details
of the current
program and gives
access to the
Electronic Program
Guide (up to 8 days
information).
These keys are used
to scroll the alphabet,
and to scroll up and
down some screen-
pages.
The TV/SAT key can
be used to return to
the television mode.
However, the receiver
remains in use
(possibility to record
a satellite program
while watching
a "terrestrial"program
on the TV set).
These keys are used
to navigate in the
menus.

THE REMOTE CONTROL
37
3
OK
OK
OK
0
9
Vol
Start up / Standby of the receiver.
Number keypad
direct selection of the channels
Increase / decrease
the sound volume
Selection of the following or
previous screen-pages
Radio/TV mode selection
Normal image selection (4/3)
or large image selection (16/9)
Displays on the main menu screen
(settings)
Returns to the previous selection
Leaves a screen (without saving)
Digital freeze-frame
Temporary sound cut
Red, Green, Yellow, Blue keys
Special functions
Available information (current
program) and program guide
(if broadcasted by the operator)
Access to the audio configuration
(languages, mono/stereo)
of the current program
Satellite programs or television
set selection
Selection of the receiver's image
or the one of the auxiliary source
(VCR, 2nd receiver)
Technical information of the current
program
Selects following channel/upward
selection
Selects previous channel/downward
selection
Moves to the left and the right
List selection
Validation of a command
(e.g. : memorization)
Displays on the screen the list
of the favourite channels
Freeze
Quit
Ret.
Menu
Format
TV/Radio
Guide
Mute
Audio
TV/sat
Aux
info

38
All the functions of your CD.TV410
receiver can be accessed using the
remote control.
The main uses are :
1. Daily use
- Program selection
- Favourite lists selection
- Sound adjustment
- Display of information on current
program and Electronic Program Guide
(EPG).
- Parental code activation/deactivation
- Timer programming for VCR
2. Occasional use
- Selection of the favourite programs and
organisation into named lists for an easy
and personalised access.
- Updating of the programs broadcast.
3. Installation configuration
This configuration must be made during
the first installation of your receiver, or
after any equipment modification (dish,
LNB, positioner, switch, TV).
Your receiver comes with very complete
software. To keep up with any technology
or operator-based developments, new
functional capabilities can be developed.
New versions of the software could be
made available. For better service, these
new versions are available via selected
satellites.
DAILY USE
With your receiver, you can access a
large number of programs available via
satellite, by creating personalised
program 'lists". Chapter 8 describes this
list function in depth.
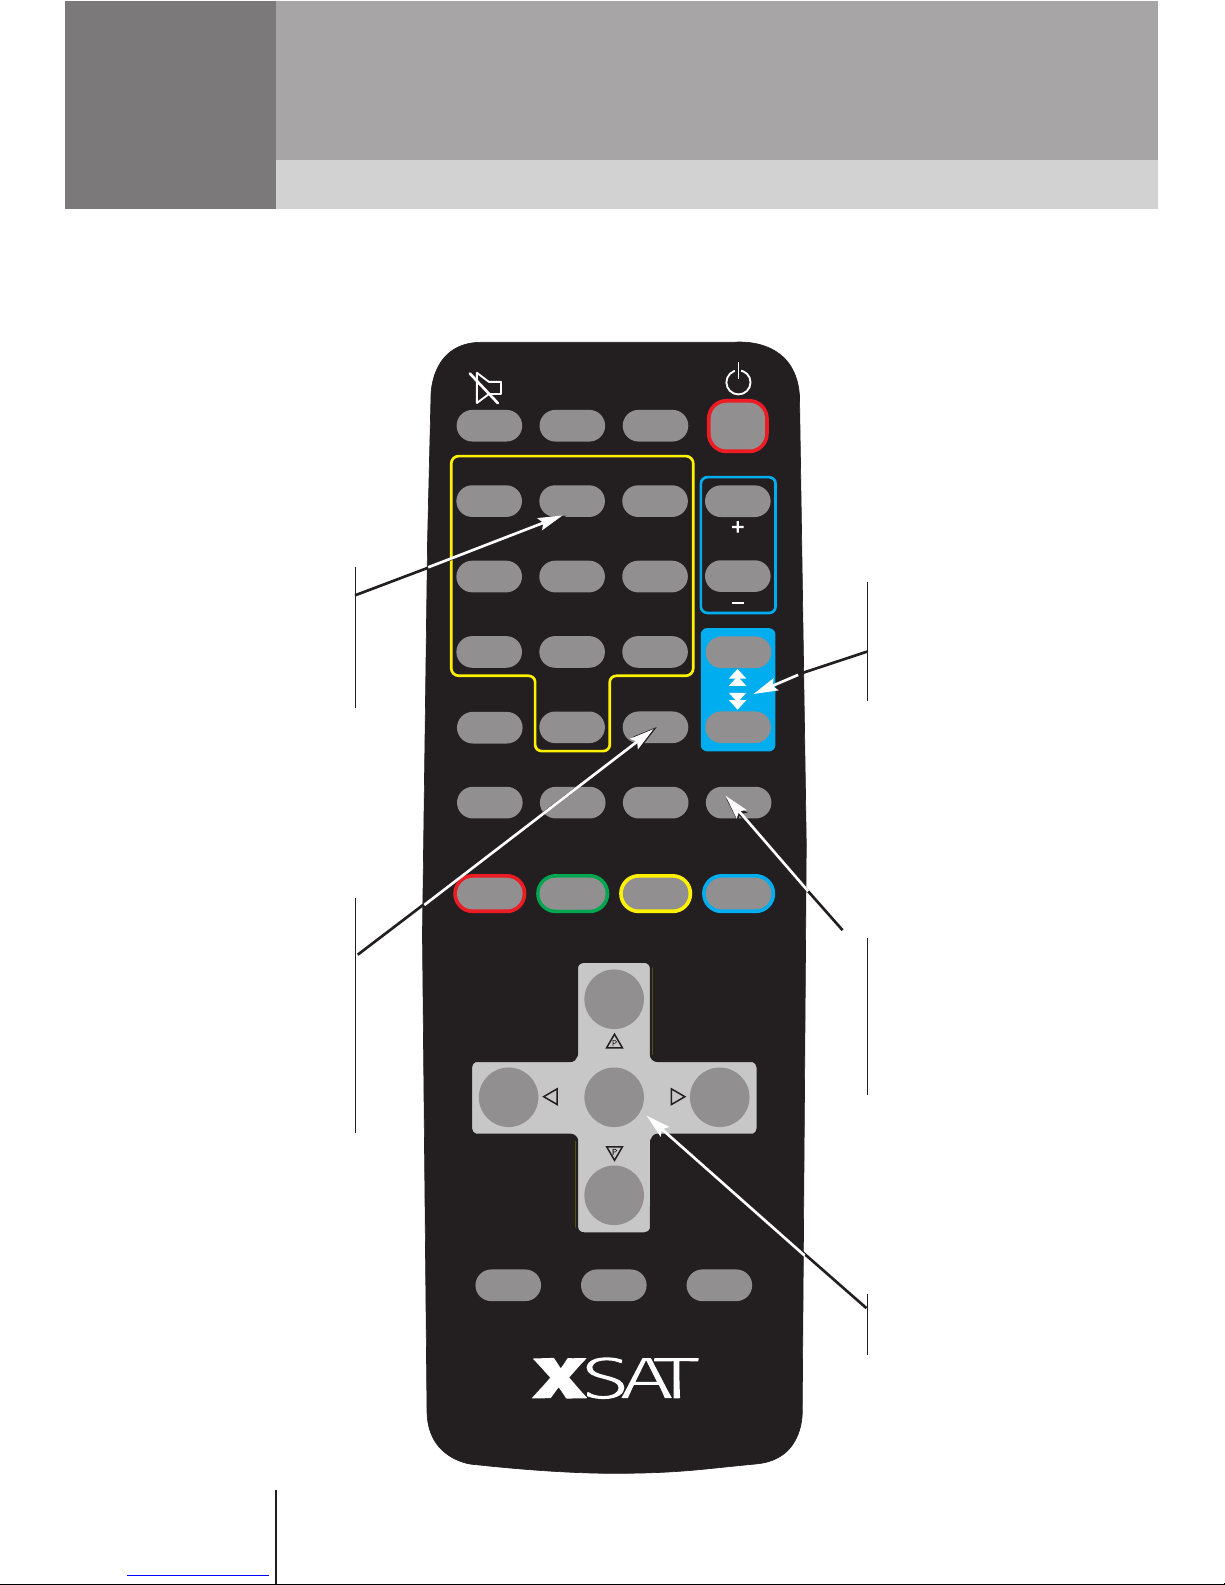
Program selection
Navigator gives you access to all the
programs. When you change channels,
a banner appears at the bottom of the
screen displaying the channel name,
current list name and channel number
from the list. The buttons are used
to change channel in the current list. The
buttons are used to change the
current list. The name of the selected list
appears at the bottom-right of the
screen. After first installation, two lists
are available : “All” and “Free” for chan-
nels without conditional access (FTA,
or Free-To-Air). You can also select
a channel by pressing its number on the
digital keypad.
Program lists
By pressing the button, the complete
list will appear on the screen. Use the
buttons to go to the previous/next
line, or the buttons to go to the
previous/next page.
Sound volume adjustment
Use the Vol+ and Vol- buttons to adjust
the sound volume. Use the button
to mute the sound temporarily.
A pictogram appears on the screen.
Press this button again to restore sound.
PP
OK
PP
USING THE REMOTE CONTROL
4

MAIN MENU
39
Electronic Program Guide
To access the Electronic Program Guide,
press the button. This function is
detailed in chapter 9.
Choice of language
A number of programs are broadcasted
with several different simultaneous sound
tracks. You can view the available
languages and choose one by pressing
the button.
CONFIGURATION MENU
Press the button to access the other
menu functions. The menu is very easy
to use. The following chapters explain
a certain specific points to enable you to
use all the power and flexibility of the
CD.TV410.
The buttons are used to go up or
down, left or right. Press the
button to validate your choice and/or
open the next screen. Press the
button to return to the previous screen.
Press the button to leave the config-
uration menu.
Chapter 8 describes “Your TV lists”, “Your
Radio lists” and “Channel list” functions.
The “Configuration” function is detailed
in chapters 5 and 6.
The "Parental lock" and “Smart card”
functions are described in chapter 10.
The Wake-up function is detailed
in chapter 11.
LANGUAGE MENU
The “Language” menu is always at the
bottom of the list. It is therefore easy
to find even if your CD.TV410 was
configured with an unknown language.
After selecting a new language, wait
a few seconds to allow the CD.TV410
to reinitialise.
QUIT
RET
OK
PP
MENU
AUDIO
GUIDE
4
Your TV lists
Your radio lists
Channel list
Configuration
Parental lock
Wake up
Language
Main menu

5CONNECTION
AND FIRST-TIME USE
Although designed for installers, this
section will give you a clearer unders-
tanding of how your receiver operates.
Read the “Recommendations” section
carefully.
CONNECTING THE CD.TV410
RECEIVER (see drawing in chapter 2)
• Connecting the satellite signal
Connect the "Input" to the satellite dish,
using a coaxial cable with a F plug.
If there is no F plug fitted on the cable:
isolate the cable as shown in the diagram
below and carefully screw it onto the
cable until it stops.
While fitting the plug, make sure there is
no contact between the outer metal strap
and the core, to prevent a short-circuit.
• Connecting a TV and VCR
Connect the receiver (Scart plug) and the
television set with the Scart cable. If your
TV set is in stereo, the scart cable will
provide you with stereo sound. Also
connect your video recorder to the
receiver using a Scart cable (Scart plug
VCR/AUX)
• Connecting a second TV
With this connection, you can connect
a second TV several tens of metres away
from the receiver. Connect this TV set to
the "TV output" using a VHF/UHF cable.
• Connecting to a terrestrial antenna
This connection allows you to receive
terrestrial TV programs on the second
television. Connect the terrestrial antenna
to the "ANT input" using a VHF/UHF
cable.
• Audio connection
If you want to send the sound to a Hi-Fi
sound system, connect the RCA Cinch
audio connectors and the Hi-Fi system
with a Cinch cable.
• Digital audio connection
You can also connect your CD.TV410
to a Home-Cinema system with an
optical fibre cable via the S/PDIF socket.
This will give you access to digital quality
sound.
IMPORTANT: the S/PDIF socket
is protected by a dust cover.
40

5
SWITCHING ON THE CD.TV410
RECEIVER
Turn on the television. Select an "AV"
or "AUX" program (refer to the television
instructions). Plug in the CD.TV410
receiver, which then initialises (INIT). The
XSAT logo will then appear on the tele-
vision. If your receiver has not yet been
configured, it will display a series of
screens to guide you through the initial
configuration. If your receiver goes into
standby mode when turned on, either
press the button on the front or on the
remote-control.
CD.TV410 RECEIVER
CONFIGURATION
When first turned on, your CD.TV410
receiver will guide you through the
configuration, by displaying the neces-
sary menus.
Local Time configuration
To configure local time, the difference
between local time and Greenwich Mean
Time (GMT) has to be indicated. In the
United Kingdom, select GMT+1 during
the summer and GMT in winter.
Installation configuration
Installation is summarised in detail on
only one screen.
First select your own configuration using
the buttons. Standard configurations
are:
- Standard LNB : use of one dish with
one LNB ; allows you to receive one
satellite.
- Tone Burst monobloc double head :
only one dish with a monobloc double
head to receive two close satellites
(e.g: Astra and HotBird in Europe).
CONNECTION
AND FIRST-TIME USE
Antenna
Save
OK
PP
Tone Burst monobloc double head
41
Hotbird Astra

- DiSEqC 2 inputs + standard LNB :
two LNB (one or two dishes) with
a DiSEqC switch, allows you to receive
two satellites.
- Twinsat Motor + standard LNB :
only one dish with a dual position motor
for receiving two close or remote
satellites.
- DiSEqC motor + standard LNB :
to receive a large number of satellites
with only one LNB and a DiSEqC 1.2
compatible motor.
A number of other configurations with
one or two switch levels are also available.
Use the buttons P+/P- to move vertically,
to configure each level of the installation,
from the satellite(s) received to the
CD.TV410.
To modify the configuration of an item,
select it with the navigator keys and press
.
Press the Blue button to record your
configuration.
Use the Blue or button to save the
configuration.
OK
OK
5CONNECTION
AND FIRST-TIME USE
42

ADJUSTING RECEPTION
43
Your CD.TV410 makes it easy to
control the quality of the reception and
helps you to point your dish in the
direction of a satellite, even in the case
of a motorised mounting, using a
DISEqC 1.2-compatible positioner.
However, we recommend that initial
settings are carried out by a profes-
sional, who will have all the equipment
and invaluable experience required for
this.
INFO BUTTON
To control program reception quality,
press the Info button. Information on the
current program is displayed, including
the reception level and the digital
signal/noise ratio.
If the signals are weak, this could be
because your dish is badly positioned.
Nevertheless, check the reception of
other programs before changing your
dish positioning.
CONFIGURATION / INSTALLATION
POSITIONING ANTENNA MENU
This menu can be accessed from the
"Configuration” menu and is useful in
a number of ways:
- Standard dish: first installation or if
a violent wind has moved the positioning
of the dish.
- Motorised dish: first installation or to
add new satellites to your receiver; this
screen displays a graphic which repre-
sents the reception level and digital
signal/noise ratio.
You receive digital signals
You must tell your receiver which
transponder these readings should
be taken from (frequency, polarization
and symbol rate). This depends on the
satellite. For example, you can choose:
Hotbird 13° E 12245 H 27500
Astra 19,2° E 12402 V 27500
You can use the buttons to choose
different operating modes. The first thing
to do is to position your dish. Use a
plumb line to check that the mounting is
vertical. Adjust the elevation by following
the instructions.
FIRST INSTALLATION
STANDARD DISH
(NOT MOTORISED)
Access the "Configuration/Installa-
tion/Positioning antenna" menu, choose
"Scan with manual stop" mode. Position
your dish to obtain maximum reception
level and signal/noise ratio. Then lock the
dish in position.
Dish rotation
If your mounting is motorised, it can
be controlled using a number of buttons.
The buttons are used to turn it to the
West or to the East. To stop rotation,
press . To finely adjust the position,
use the colour buttons for a coarse or
fine adjustment. Wait to allow the
signal/noise levels to stabilise each time
the dish has been moved.
OK
PP
6

44
FIRST INSTALLATION
MOTORISED DISH
If your positioner accepts the command
“GOTO X”, select pre-positioning mode;
if not, skip to the following paragraph.
Use the graph supplied with your
positioner to calculate the azimuth of one
of your satellites. This depends on the
latitude and longitude of the location.
Press the Info key and indicate this value
in tenths of a degree East or West.
Press to preposition your motorised
dish.
Manually position your dish to obtain
maximum reception levels and
signal/noise ratio. Then lock the dish
in position. Go to the "Adding a satellite"
paragraph.
MOTORISED DISH WITHOUT
PREPOSITIONING
Activate the "Go to position 0"
command, to position your dish towards
the south, or activate the "Scan with
manual stop" command and position
your motorised dish at "0" using the
buttons (East or West). Position your dish
in a southerly direction. Use a compass
taking into account the magnetic drift of
the location. Lock your dish in place.
Activate the "Go to preset position"
command. Adjust the position of your
dish using the movement buttons. When
the signals are at maximum, validate the
position with the button.
"Scan with auto stop" mode can
also be chosen. After pressing one of
the buttons, the receiver stops the
motor automatically as soon as there are
satisfactories signal level and signal/noise
ratio.
ADDING A SATELLITE
To adjust the position for another
satellite, add it in the Antenna menu, and
adjust the position in the "Positioning
antenna" menu. When correctly
positioned, press the button to
memorise it.
The "Recalculate" command can then
be reactivated if your dish positioning
system supports this command.
All memorised satellite positions will
be adjusted.
OK
PP
OK
PP
OK
ADJUSTING RECEPTION
6

45
7
Scanning mode
Satellite
Scan satellite
NIT parameters
RET
OK
Fast (NIT)
ASTRA
CHANNEL SCAN
With the "Channel List/Scan satellite"
menu, you can scan the available
channels on selected satellite(s).
Only the satellites defined on the config-
uration screen can be used.
Three scan modes are available:
- Fast (NIT)
- Exhaustive
- Frequency
Use the buttons to select the mode.
Fast scan (NIT)
This is the fastest scan (normally less
than two minutes for a complete satellite).
It uses an information table broadcasted
by the satellite in accordance with the
DVB standard (NIT: Network Information
Table). This table includes most of the
programs available on the satellite.
This method is quick and easy, although
it can only find the services defined by
the NIT. This depends on the operator.
Press the Blue button to change NIT
parameters.
Press to start the fast scan. A screen
displays:
In the “Fast Scan” progress screen you
can read:
- the number of transponders (frequen-
cies) found,
- then, during the scan, the number
of TV and radio programs found.
Press to validate the scan result.
Wait a few seconds for the CD.TV410
to save the scan result.
OK
OK
CHANNEL SCAN

46
7CHANNEL SCAN
Exhaustive scan
With the exhaustive scan, you can scan
all the frequencies of a selected satellite
broadcasted with a specific symbol rate.
You can specify up to four different
symbol rates.
If your satellite comprises more than four
symbol rates, activate the command
several times.
Frequency Scan
This mode is used to specify a frequency,
a polarization and a specific symbol rate.
Use this mode for scanning specific
transponders (SCPC type, for example),
or to add a new transponder, for instance
when a transponder is switched from
analogue to digital mode.
Scanning mode
Satellite
Symbol rate (kS/s)
Scan satellite
Exhaustive
HotBird
27 500
29 900 0
22 000
RET
OK

47
8
CHANNEL LISTS
You can enjoy thousands of TV and radio
programs with your CD.TV410. These
programs are all available from the
"All channels" list. Your CD.TV410 makes
it easy to find your favourites from among
all those available, by organising program
lists.
TV/Radio Mode
You can switch between TV and Radio
mode, using the TV/Radio button. When
Radio mode is selected, a logo appears
on the TV screen ; all other information
is available as for TV programs. As it
offers the same possibilities as TV mode,
radio mode will not be discussed further.
Free TV
When scanning a satellite, the CD.TV410
detects unencrypted channels. You can
access these channels from the "Free
TV" list.
Important : a channel may be free at
certain times and encrypted
at others. The operator is
also free to decide to
change access to a
channel. Therefore, there
is no guarantee as to
whether a channel is free
or encrypted. Moreover,
some unencrypted channels
are not suitable for all
viewers, especially young
or sensitive people.
Therefore, we advise you
to lock these channels (see
end of chapter).
Favourite channel lists
With your CD.TV410, you can person-
alise up to 8 favourite channel lists.
Use the buttons for this function
CREATING CHANNEL LISTS
Select "Your TV lists" in the menu, then
select one of the eight lists displayed on
the screen. These lists are initially called
TV1, TV2, ..., TV8.
The next screen is then displayed.
The right-hand column contains the
names of the channels added to this list.
NOTE: the same channel may appear
in several lists.
PROGRAM LISTS
Channel
Operator
Satellite
Frequency
Encryption
1 Channel 1
2 Channe 2
> 3 Channe 3
4 Channe 4
5 Channe 5
6
7
8
9
10
11
List
Add channels Remove
Move selection Change position
Rename list Save
OK

48
8PROGRAM LISTS
Name of the list
To change the name of the list, press the
button. The "Rename list' screen
appears. Use the buttons to access
to the letters of the alphabet. To validate
a letter and move on to the next, press
the button.
Adding channels
Press the Blue button. Using the
buttons, choose the list of all channels
or free channels.
To select a channel, press . A cross
(X) appears next to the name of the
channel. To deselect it, press once
again.
Validate your selection by pressing the
Blue button.
Changing the numbering
To change the number of a channel:
- press the Yellow button to give it a
particular number,
- or press the Green button to move
it using the buttons.
Deleting channels
Press the Red button to delete a
channel from the favourite list. This does
not remove it from global lists. To do this,
use "Menu/Channel list/Edit channel list".
The name appears with a red line through
it. Several names can be deleted in this
way. Deletion is definitive only once
the button has been pressed to record
changes made to the list.
OK
PP
OK
OK
Table of contents