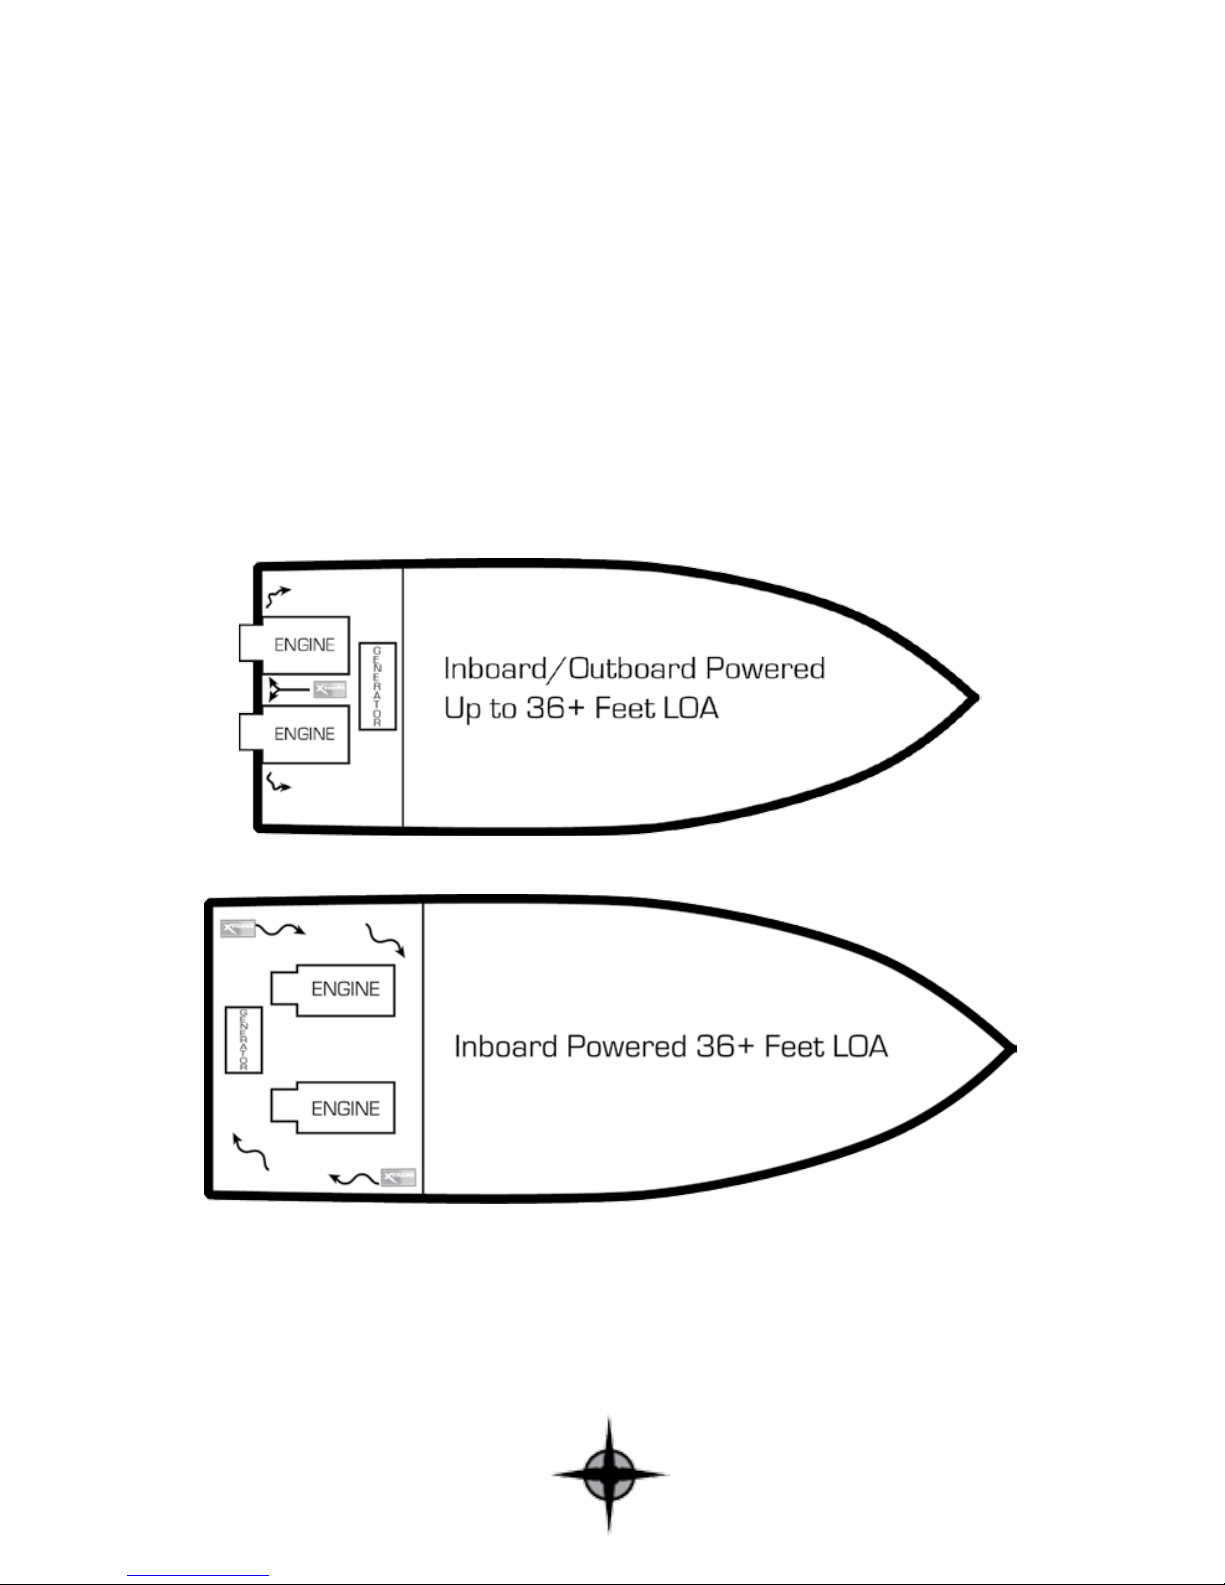
Xtreme Heaters Heater User manual

www.xtremeheaters.com
877-360-HEAT (4328)

1
2
3
6
8
Page

1
Introduction & Registration
Thank you for purchasing an Xtreme Heater!
It is our privilege to have you as a customer and want you to have the best experience
possible with your new Xtreme Engine Compartment Heater. Your Xtreme Heater
is the best engineered, highest quality and best supported product of its kind.
Designed to last the life of your boat, careful attention to these installation and
care instructions will assure many years of trouble-free operation and maximum
performance from your Xtreme Heater.
Before getting started with the installation, take time to register your heater purchase
with us. Register by recording your model and serial number (labeled on the under-
side of your heater) below, and filling out the registration form on the Xtreme website:
www.xtremeheaters.com/warrantyform
Serial Number: ______________________________________
Purchase/Install Date: _________________________________
Your Xtreme Engine Compartment Heater is designed to provide a reliable heating
source when installed properly and connected to a reliable electrical supply.
Installation instructions and tips are provided in this manual, with additional detail
found on our website:
Your heater is factory-calibrated to operate automatically when the engine
compartment temperature falls below 40 °F (approximately), and to continue
operating until an ambient temperature of 50 °F (approximately) has been attained.
By operating within this temperature range, extreme cold conditions are avoided.
All heaters are sealed as there are no user serviceable components. Please do not
attempt to open or alter your heater as this will void your warranty. If your heater
ever requires service, do not return it to your retailer, rather contact us directly
via our website (www.xtremeheaters.com) or call toll free: 877-360-HEAT(4328)
for an RMA number. Package your heater carefully, preferably in its original
packaging, and send it to:
Xtreme Heaters,
Att. WARRANTY
5322 Palmero Court, Suite 300
Buford, GA 30518
www.xtremeheaters.com.

2
How your Heater Works
Xtreme Engine Compartment Heaters are designed specifically to keep your engine space
safely above freezing temperature, without wasting energy heating the space to unnecessary
levels. Our fixed thermostat is factory-set to turn on the Xtreme Heater at 40° Fahrenheit
(+/-3°) and off at 50 °F, keeping your bilge space safely above freezing temperatures.
The graph below represents a 74-hour log recorded on a boat equipped with an Xtreme
Heater. The boat is stored in a wet slip over the winter. The top line of the graph, labeled
Sensor 1, represents a sensor that was placed near the Xtreme Heater, and the 2nd (lighter)
line, labeled Sensor 2 is a sensor that was placed further away from the heater. The lowest
line, labeled outside air, recorded the air temperature outside of the boat.
As you can see from this illustration, outside air temperatures and engine compartment
temperatures fell on a similar curve, until they approach the Xtreme Zone of Protection.
When the engine compartment reaches 40 °F (+/-3), the Xtreme Heater takes action, running
until the engine compartment reaches 50 °F (+/-3). The small peaks and valleys illustrate
the heater cycling to maintain our target temperature range. The engine compartment was
never allowed to reach freezing levels, nor was energy wasted to heat the space to unnecessary,
“human” levels of comfort.
Toward the end of the series, as the outside air temperature rises back above freezing, the
engine compartment temperature curve begins to flatten. The Xtreme Heater, sensing less
need for heat, cycles less frequently, and finally returns to stand-by mode.
How often the heater cycles, and how long it runs is dependent on how well your boat is
prepared to maintain the heat generated. For example, on a boat with open vents to the
engine compartment, the heater will cycle more frequently, working harder to overcome heat
loss through the uncovered vents. Review the tips section of this manual for suggestions
regarding how to preserve the heat generated by your Xtreme Heater, maximizing the
efficiency and level of protection provided by your heater.

3
Installing your Heater
Follow these installation instructions carefully to ensure maximum
effectiveness, safety and efficiency from your Xtreme Heater. Additional
installation tips, including tips for specific types of boats can be found on
our website: www.xtremeheaters.com.
Installing your Xtreme heater is as easy as selecting a mounting location and plugging in
the heater. Your Xtreme Heater can be installed permanently, or easily installed for winter
and removed for boating season, without tools, using our optional quick release bracket (see
inside back cover).
The design of the Xtreme Heater takes advantage of true forced air, opening up a wider
range of location options in your engine compartment Your heater can be mounted in any
orientation, including upside down, to maximize air flow and circulation throughout your
engine compartment.
Choosing a Location
First, examine your engine compartment to determine what your heater will be protecting.
In addition to preventing freeze damage to the engine(s), is there a generator, sea strainers,
pumps or any other equipment that require protection? Select a location that offers
maximum airflow and circulation, directing airflow toward the most critical components
in the engine compartment. Since heat naturally rises, try to locate your heater as low in
the engine compartment as possible, directing airflow toward the bottom of the engine(s).
Select a location that minimizes the chances of immersion in bilge water, as your heater,
while resistant to moisture, is not designed for immersion.
Single Engine Runabout
For a runabout with an inboard/outboard power plants, direct the flow toward the
outdrive connection to the engine. The exposed outdrive can conduct cold into the engine
compartment. This is particularly true if the boat is stored out of the water on a trailer or
lift. In the right conditions, wind can direct cold air through the propeller exhaust port, up
through the risers and into the engine.

4
Installing your Heater
Twin Engine Cruisers and Houseboats
Single and twin engine cruisers or houseboats may have a generator and other
systems to protect. The engine compartments on these boats are often packed
tightly with additional equipment such as generators, pumps and plumbing. Try
to place the heater in a location that directs airflow to the lower portion of the
engine(s), where the water jackets and pumps are located. Consider the location
of additional equipment that needs protection, and try to direct airflow to those
areas. A single heater placed between the engines, blowing from front to back will
create a pattern of circulation that should evenly distribute heat throughout the
compartment. If you are installing two Xtreme Heaters, place them outboard of
the engines, facing in opposite directions, to promote a circular flow of air in the
engine compartment.

5
Installing your Heater
Vents
Engine compartments are vented to supply fresh air for your engine, and to allow
fumes to escape. During the winter, the vents also allow heat to escape. As heat
rises, a “chimney effect” can literally begin to suck the warm air out of your bilge,
reducing the effectiveness of your Xtreme Heater. Cover or plug your vents during
periods that the heater will be working, and be sure to uncover your vents and run
your blowers before operating the boat!
Mounting
If you are mounting your Xtreme Heater permanently in the engine compartment,
consider the location and material that you are mounting too. If your heater is
being mounted upright, on a flat surface, the included self-tapping screws will
work fine to secure the heater in place. If the surface is wood, be sure to seal the
holes with a bit of caulk to keep water out. If mounting your heater horizontally,
or upside-down, consider through-bolting the heater to the surface, using fender
washers for additional support and nylon lock nuts to prevent loosening from
vibration. Again, if the mounting surface is wood, seal the holes to prevent
moisture intrusion.
Wiring
If you wish to wire your heater permanently into the boats electrical system, the
power cord on the Xtreme Heater was chosen based ABYC requirements for engine
space wiring and is suitable for permanent wiring to a spare breaker on your boats
110v panel. The 20’ cord should reach most panels without splicing of additional
wire into the circuit. We strongly suggest your Xtreme Heater be installed on a
dedicated circuit with its own breaker. If you are installing two heaters, we suggest
each be installed on a separate breaker. Check the breaker requirement for the
heater(s) you have selected to be sure the circuit breaker(s) are of adequate capacity.
Wiring should be routed away from moving parts such as belts and pulleys in the
engine space. Wiring should be secured and protected from chafing on sharp
edges along the run.
CAUTION: We strongly recommend a qualified marine electrician
be contracted to permanently wire your heater(s) into your boats
electrical system, following ABYC Specifications. If you choose to
perform your own electrical work, make sure the boat is disconnected
from shore power and your generator is off.

6
Tips for Maximum Performance and Efficiency
Tip: Vents
Your Xtreme Heater will operate more efficiently when you have covers over the vents on your
boat. Consider having a canvas or upholstery shop, make a set of simple “snap-on” covers
to fit over the vents. When you are ready to use the boat, remove the vent covers. When
you leave the boat, snap the covers back on. Other Xtreme owners have reported using boat
shrink wrap material, or shrink wrap seam tape, which is designed to be removed without
leaving a residue on your boat. Left uncovered, your vents will allow heat to escape which
could prevent the heater from performing to its full potential, greatly reducing efficiency.
Tip: Trailer-/Lift-Stored Boats
A boat on a lift or a trailer will get much colder than a boat in the water. If you store your
boat suspended on a lift, in addition to covering your bilge blower vents, you might wish
to consider covering the outdrive unit. During extreme cold, consider lowering the boat
into the water to keep cold air from circulating around the bottom of the boat, and allow
the boat to extract heat from the water. You can also use a heavy mil plastic to slip over the
outdrive unit and/or exhaust ports and tie it at the top to prevent the heat in the engine
compartment from being lost by dissipation through the metal of the outdrive unit.
Tip: Cabin Spaces
Remember, your Xtreme heater is only going to protect the area it is placed in. A heater
placed in the engine compartment, will not protect the hoses running the plumbing in the
cabin area (sinks, showers, ice makers, etc). Some customers add additional Xtreme Heaters
to their cabin area to prevent freezing of cabin plumbing. When using an Xtreme Heater
in your cabin, it is best to open cabinets and drawers to let the warmth circulate to hidden
plumbing lines and fixtures.
Tip: Keep the Boat Covered
Keeping your cockpit cover on the boat will help preserve heat, reducing heater runtime and
maximizing effectiveness and efficiency of your heater.
Tip: Prepare for the Unexpected
Xtreme Heaters require a reliable source of power to operate properly. Should a storm knock
out your power, you will have a short window of time before freezing occurs. Always have
a backup plan.
Weather can be an unpredictable foe. Even if power remains on, if you’ve sized your heater(s)
for “normal” conditions in your area, they may not protect your boat as effectively during
extreme weather events. It is up to you to monitor your boat, and take the appropriate
precautions when extreme weather conditions threaten. Have supplies on hand, and be
prepared to winterize your boat according to the manufacturer’s instructions.

7
Electrical Information
Wire Idencaon
110 V 230 V
Neutral White Neutral Blue
Hot Black Hot Black
Ground Green Ground Yellow/Green
115V Heater Specicaon
230V Heater Specicaon
Small
XHEAT
Medium
XXHEAT
Large
XXXHEAT
Nominal Power (was) 300 450 600
Typical in-rush current
last 2 seconds (Amps) 10 13 16
Typical operang current (Amps) 346
Suggested fuse rang (Amps) 10 15 20
Fan volumetric ow (CFM) 32 32 32
Small
XHEAT
Medium
XXHEAT
Large
XXXHEAT
Nominal Power (was) 300 450 600
Typical in-rush current
last 2 seconds (Amps) 8 10 14
Typical operang current (Amps) 1.5 2 3
Suggested fuse rang (Amps) 10 15 20
Fan volumetric ow (CFM) 32 32 32

8
Testing Your Heater
The LED power light on all Xtreme Heaters indicate that you heater is powered
up and ready for use.
If you would like to test your heater further by simulating freezing conditions,
this can be accomplished using refrigerant (or freeze) spray commonly found in
electronics supply stores and also available from www.xtremeheaters.com. Direct
a 3-4 second burst of the spray toward the test port labeled on your heater where
the thermostat control is located. After
the burst of freeze spray, the thermostat
should click, the fan should start and heat
can typically be felt within a few seconds.
It is a good idea to test your heater
periodically, particularly at the start
of each cold season to ensure proper
operation.
If you can’t find refrigerant spray anywhere,
it is possible to test the heater by placing
it in an environment below freezing, such
as a freezer. Leave the heater in the freezer
for at least 1 full hour. It takes time for
the metal to cool enough to fool the heater
into thinking it’s winter! Plug the heater
in immediately after removing it from the
freezer, and it should activate.
It is also a good idea to test your heater after the boat has been serviced by a
third party. Depending on the work done, the heater may have been moved, wires
may have been disconnected or tapped into for additional equipment, or circuit
breakers may have been turned off.
Direct Freeze Spray Toward Thermostat

9
We recommend that you test your heater at the beginning of each Winter season
Testing Your Heater
Date Pass/Fail Notes

10
Two Year Limited Warranty
To activate your warranty, please register your purchase at www.xtremeheaters.com. Your
original receipt may also be used as proof of purchase.
Xtreme Heaters warrants your heater to be free from defects in materials and craftsmanship
under normal use and service by the original consumer for a period of two (2) years from
the date of purchase. This limited warranty does not apply if the heater has been damaged by
accident, improper installation, unreasonable use, submerged, lack of proper maintenance,
unauthorized repairs or modifications, or other causes not originating from defects in
materials and craftsmanship.
The obligation of Xtreme Heaters under this warranty is limited to the repair or replacement
at Xtreme Heaters discretion, any part or component thereof, which examination discloses to
our satisfaction to have been nonconforming or defective. Xtreme Heaters, after establishing
customer’s purchase date and determining problem to be under warranty, will repair the
product at our facility. Transportation charges are the responsibility of the customer.
Heaters that are repaired or replaced under warranty will continue to be warranted for the
remainder of the original warranty period. Xtreme Heaters shall in no event be liable to
BUYER for any incidental or consequential damages, or loss of use, or other losses, however
occasioned.
Implied Warranties of merchantability and of the fitness of the product for any purpose
are warranted for a period of two (2) years on parts and labor. Xtreme Heaters makes no
warranties, expressed or implied after that time. This warranty gives you specific legal rights,
and you may also have other rights which vary from state to state.
Returning your heater for repair:
Do not return your heater to a retailer. Send your heater directly to Xtreme for repair/
replacement under warranty. All returns must include an RMA (Return to Manufacturer)
number. Heaters shipped to Xtreme Heaters without a corresponding RMA number will be
returned. Please call 877-360-HEAT(4328) to obtain an RMA number prior to returning
product. Include a note describing the problem, your return shipping address and a phone
number at which we may reach you. Pack your heater well to avoid shipping damage, using
the original packaging if possible. Send your heater to:
Xtreme Heaters | Att. WARRANTY | 5322 Palmero Ct | Suite 300 Buford | GA 30518

11
Make of Boat_____________________________________ Model_______________ Length__________ Year___________________
Make of Motor_______________________________ Motor Size ______________________ Single __________ Twins ___________
Boat stays: In the water ________ On a li ________ On a trailer ________ Other _________________________________________
Primary Use: Cruising _____Fishing _____Water Sports _____Transportaon _____Commercial _____Other___________________
Model Number (on top of box) ________________________ Heater Serial Number (on boom of heater) _______________________--___
Place of Purchase___________________________________________________ Date of Purchase ____________________________
Owner Name_________________________________________________________________________________________________
Address_____________________________________________________________________________________________________
City____________________________________________ State____________________________________ Zip_________________
Email Address _________________________________________________ Phone _________________________________________
Comments___________________________________________________________________________________________________
I have read and understand the above warranty (Signature)_____________________________________________________________
Mail to: Xtreme Heaters, Att. REGISTRATION, 5322 Palmero Court, Suite 300, Buford, GA 30518
Also available online: www.xtremeheaters.com/warrantyform
Mail-In Heater Registration Page

12
Installing the Quick Release Bracket
Step 1.
Slide the rear mounting foot of the Heater under the raised flange of the
Quick Release Bracket.
Step 2.
Swivel Quick Release
Clip into place

Xtreme Freeze Spray
Driven by customer demand, our
Quick Release Bracket was designed
specifically for your Xtreme Heater, and
allows you to easily install and remove
your heater(s) in seconds, without the
need for tools, leaving just the low profile
bracket installed and ready to go.
Buy yours now from our website,
www.xtremeheaters.com.
Order the small (for XHEAT models)
or medium/large (for the XX- and
XXXHEAT models).
Quick Release Bracket
The BEST way to test your Heater is with
Freeze Spray. We recommend testing upon
installation, at the beginning of each season and
periodically during the cold season.
Purchase your freeze spray at
www.xtremeheaters.com

5322 Palmero Court - Suite 300 | Buford, GA 30518
Tel: 1-877-360-HEAT (4328) | Fax: 1- 678-550-XTRM (9876)
Marine Shore Power Adapter
Fender Anchor
Safe and Damage-Free Docking
Tired of your fenders sliding or rolling
out of position when you need them
most? Anchor your fenders in place with
Fender Anchor to protect your boat
from dock contact and maintain a neat
appearance. Hang fenders vertically or
horizontally to protect swim platforms and
hull sides. Great for PWC’s and dinghies
too!
Made from injection-molded, reinforced
and UV-resistant plastic, the fender anchor
withstands harsh marine environments.
The anchor easily attaches to your dock
with included hardware.
Buy yours now at
www.xtremeheaters.com
Buy yours now at
www.xtremeheaters.com
Plug into your Power Pedestal!
Power adapter plug converts 30amp
shore power receptacle to standard
3-prong plug.
Run tools such as drills and buffer, and
appliances such as your vacuum directly
from your dock pedestal.
- Heavy Duty Over Molded Construction
- Custom Grip for Comfort
- 5-Year Warranty
Buy yours now at
www.xtremeheaters.com
Buy yours now at
www.xtremeheaters.com
This manual suits for next models
3
Table of contents
Popular Boating Equipment manuals by other brands

Furuno
Furuno FELCOM 250 Operator's manual

Ultraflex
Ultraflex A97 Installation and maintenance manual

Seastar Solutions
Seastar Solutions Seastar PROTAP Controller Installation instructions and owner's manual

SPORT MARINE TECHNOLOGIES
SPORT MARINE TECHNOLOGIES SE Sport 400 manual

Koden
Koden CVG-200 Operation manual

Roswell
Roswell Classic Vamp Spin Speakers Installation & Usage Instructions