XtremepowerUS 75067 Original instruction manual

SAVE THIS MANUAL: KEEP THIS MANUAL FOR SAFETY WARNINGS, PRECAUTIONS, ASSEMBLY,
OPERATING, INSPECTION, MAINTENANCE AND CLEANING PROCEDURES. WRITE THE PRODUCT’S
SERIAL NUMBER ON THE BACK OF THE MANUAL NEAR THE ASSEMBLY DIAGRAM (OR MONTH
AND YEAR OF PURCHASE IF PRODUCT HAS NO NUMBER)
OWNER’S MANUAL AND SAFETY INSTRUCTIONS
Robotic Pool Cleaner
FOR QUESTIONS PLEASE CALL OUR CUSTOMER SUPPORT: 909.628.0880 MON-FRI 9AM TO 3PM PST
ITEM: 75067

2
Index
1. Product Introduction
2. Warning and Cautions
3.Features and Operation Instructions
4.Routine Maintenance
5.Trouble Shooting
6.Specifications
7.Parts Breakdown and Replaceable Parts List

3
1
Product Introduction
Swimming is good to you health.The cleaning robot is a kind of the underwater cleaner , it
is fully automatically. It is mainly used to clean the dirt and debris such as hair, leaves and
sand from the pool floor; pool wall and waterline. As long as you put it into the pool after
initial program seing, the cleaning robot can automatically measure the size of the pool,
automatically design the working route, and clean the pool by itself.
Warningand Cauons
Warning: Your cleaner should not be used while people are swimming in the pool.
Do not allow swimmers in the pool while pool cleaner is operating.
Warning: Keep the cleaner away from Child, or use under adult's strict and close supervision.
Warning: DO NOT switch on the pool cleaner if it is not immersed in the water. Operating
the cleaner out of the water may cause severe damage and will result in loss of
warranty.
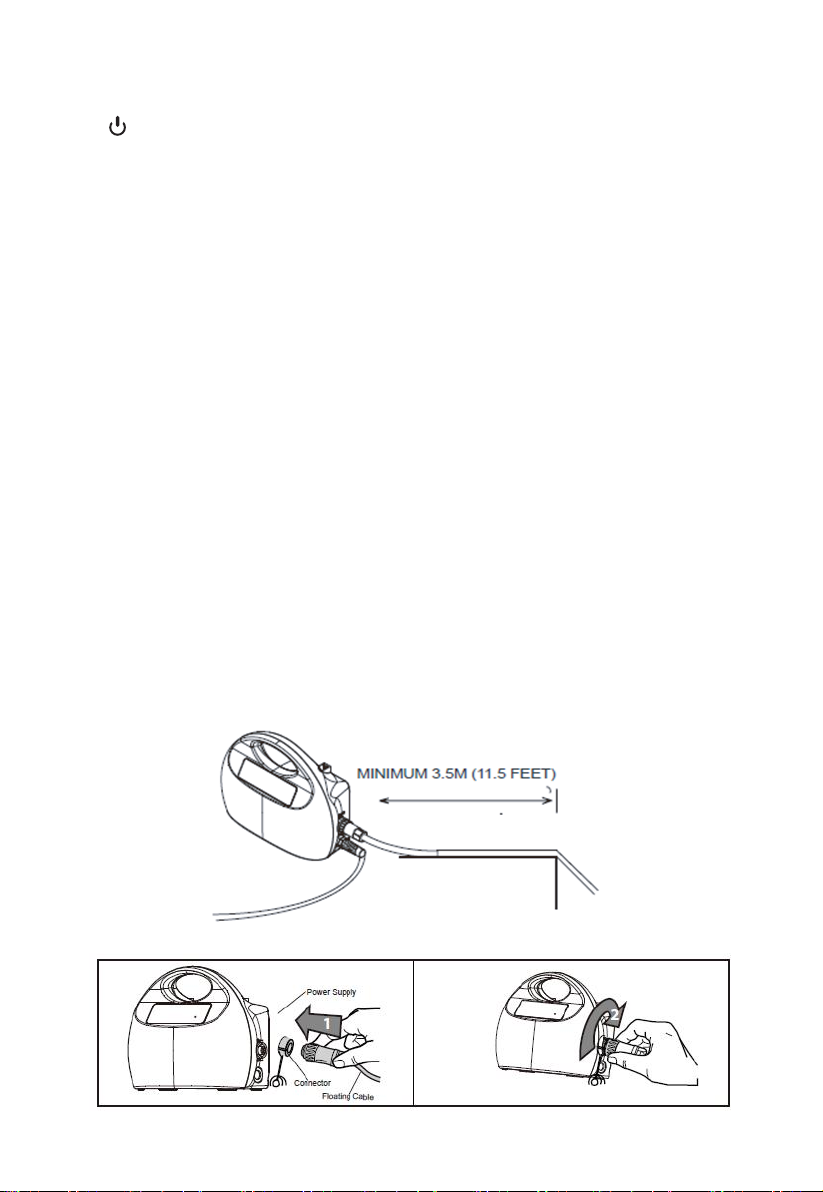
Warning: Always remember to turn the power supply offand unplug it from the power
outlet before removing the cleaner from the pool.
Warning: DO NOT PULL THE POOL CLEANER FROM THE POOL USING THE CABLE,USE THE
HANDLE.
Warning: To use this cleaner only when water temperature is 10-35 and the depth of the
pool is 0.5m-3m. The cleaner is designed to work for the pool with 100m surface
area.
Warning: Keep the controller box in a dry place which is out of direct sunlight and is 3.5m
away from your pool.
C

4
2
BriefIntroduction
1.
start/stop button, error alarm
2.Floor clean only
To clean the pool floor only.It will increase the clean efficiency
3.All purpose clean
All-around cleaning, including pool floor; pool wall and waterline.
4 Timed Stop!running time"
Choose the preferred running hours(2/3/5 hours,press the button to choose the time you
want,red light means the cleaner will work for 2 hours,greenlight for 3 hours,blue for 5
hours),before start the cleaner.The cleaner will stop automatically after working
5.Mobilephone Bluetooth APP Control (Not applicable in some models)
To control the cleaner by Bluetooth and clean the pool.
Operation Instructions:
Position the power supply so that it is approximately in the middle of the long side of the
pool at a distance of 3.5m /11.5ft.
2.Connect floating power cord.
Fixation in the middle of longer side is recommended,
if you have a rectangle or oval shape pool.

5
3.Put the Pool Cleaner into the po
ol. Release the Pool Cleaner and let it sink to the floor of
the pool. Make sure that the flo
ating cable is free of any obstructions.
4.Start:Turn the power supply
ON
modes light will be on. Press th
e button for the mode and time you want to run, then
press buon, the Pool Cl
eaner will now operate
5.Mode switching: Press bu
on, choose the mode, press
cleaner.
Put the Pool Cleaner into the poo
l. Release the Pool Cleaner and let it sink to the fl
oor of
the pool. Make sure that the flo
ating cable is free of any obstructions.
ply ON
( 115V AC 60HZ )in the position of I. One of th
e three
modes light will be on. Press the
button for the mode and time you want to run, t
hen
buon, the Pool Cle
aner will now operate
bu
on, choose the mode, press buon to star
t the
Put the Pool Cleaner into the pool. Release the Pool Cleaner and let it sink to the flo
or of
. One of the
three
modes light will be on. Press the button for the mode and time you want to run, th
en
buon to start
the

6
4
6.Indicator lights#
Running Time Indication:
Red light twinkling means the cleaner has been set for 2 hours
Greenlighttwinkling means the cleaner has been set for 3 hours
Blue light twinkling means the cleaner has been set for 5 hours
On Off Buon
Floor Clean Only
All Purpose Clean
Running Time
Bluetooth Light

7
Daily Maintenance
1.Clean theFilter Basket
Cut off the power supply ( light go out)Turn offthe Pool cleaner. Open the filter cover.
Clean the filter basket with a hose. Insert the clean filter basket and close the filter cover.
Make sure the power supply is switched off and unplugged.It is highly recommended to
clean the filter basket after each cleaning cycle.

8
2.Floatingcable daily maintenance
The floating cable may get intertwined after 6 hours of working which need to be sorted out
manually.It highly recommend to sort the cable out after each cleaning.
Trouble Shooting
Symptom Possible Reason CorrectiveAction
The pool cleaner moves
but does not clean the
pool
Clogged filter basket Clean the filter basket
The pool cleaner does
not move
The impeller get blocked Check and clean the obstacle
The drive belt get blocked Check and clean the obstacle
Debris out from the
outlet
Filter basket is broken Replace the filter basket
Filter basket is full Clean the filter basket
Intertwined floating
cable
Working for too long time,
over 8 hours.
Untwist the floating cable
before re-start.
Twinkling Overload or
protection
Let the cleaner sink to the floor of
the pool, and press to start
again.
no-load

9
7
Specification
Specifications
Product dimension 18.5x16 x10 i nch
Package dimension 21 x18.5x15.4
Product weight Around 23 Ibs
Package weight Around 40 Ibs
Cleaning area
All-around
Filtration accuracy 5um
Length of floating cable 55 feet
Filter speed
60-80 GPM
Warranty 1 Year
Output voltage 24V DC
Output current
4.5A
Input voltage 115V
Frequency 60Hz
Horsepower 150W
IP Class for controller box IP54
IP Class for motor IP68
inch

10
8
Parts Breakdown and Replaceable Parts List
No. Parts NameQty
1 Cover 1
2 Main Frame 1
3 Side Panel 1
4 Motor Box 1
5 Controller Box 1
6 Floating Cable 1
7 Drive Belt 1
8 Wheel Brush 1
9 Handle 1
10 Filter Basket 2
NO. Parts NameQty
1 Cover and wiring assembly 1
2 Filter Basket 2
3 Motor box 1
4 Wheel Brush 2
5 Buoyancy block 1
6 Driven wheel 4
7 Bearing 20
8 Side panel 2
9 Controller Box 1
10 Drive wheel 2
11 Drive belt 2

DISCLAIMER
THE MANUFACTURER AND/OR DISTRIBUTOR HAS PROVIDED THE PARTS LIST AND ASSEMBLY
DIAGRAM IN THIS MANUAL AS A REFERENCE TOOL ONLY. NEITHER THE MANUFACTURER OR
DISTRIBUTOR MAKES ANY REPRESENTATION OR WARRANTY OF ANY KIND TO THE BUYER THAT
HE OR SHE IS QUALIFIED TO MAKE ANY REPAIRS TO THE PRODUCT, OR THAT HE OR SHE IS
QUALIFIED TO REPLACE ANY PARTS OF THE PRODUCT. IN FACT, THE MANUFACTURER AND/OR
DISTRIBUTOR EXPRESSLY STATES THAT ALL REPAIRS AND PARTS REPLACEMENTS SHOULD BE
UNDERTAKEN BY CERTIFIED AND LICENSED TECHNICIANS, AND NOT BY THE BUYER. THE BUYER
ASSUMES ALL RISK AND LIABILITY ARISING OUT OF HIS OR HER REPAIRS TO THE ORIGINAL
PRODUCT OR REPLACEMENT PARTS THERETO, OR ARISING OUT OF HIS OR HER INSTALLATION
OF REPLACEMENT PARTS THERETO.
Record Product’s Serial Number Here:
Note: If product has no serial number, record month and year of purchase instead.
Note: Some parts are listed and shown for illustration purposes only and are not available individually
as replacement parts.
PLEASE READ THE FOLLOWING CAREFULLY
PRODUCT MADE IN CHINA
Table of contents