manuals.online logo
Brands
  1. Home
  2. •
  3. Brands
  4. •
  5. Xuelin Electronics
  6. •
  7. Receiver
  8. •
  9. Xuelin Electronics XL400 User manual

Xuelin Electronics XL400 User manual

This manual suits for next models

2

Popular Receiver manuals by other brands

Televes ZAS HD SAT user manual

Televes

Televes ZAS HD SAT user manual

Realistic DX-75 Operating and service instructions

Realistic

Realistic DX-75 Operating and service instructions

Saris 4620 Assembly instructions

Saris

Saris 4620 Assembly instructions

Mini DTR 206C PVR user manual

Mini

Mini DTR 206C PVR user manual

RF Elements TwistPort manual

RF Elements

RF Elements TwistPort manual

Denon DN-200WS user guide

Denon

Denon DN-200WS user guide

Yamaha RX-V467 owner's manual

Yamaha

Yamaha RX-V467 owner's manual

Russound SaphIR 858 instruction manual

Russound

Russound SaphIR 858 instruction manual

Quasonix RDMS Firmware update procedure

Quasonix

Quasonix RDMS Firmware update procedure

Pioneer XV-HTD1 Service manual

Pioneer

Pioneer XV-HTD1 Service manual

ATZ HDMI-V2-44HE150 manual

ATZ

ATZ HDMI-V2-44HE150 manual

Sony XNV-770BT MyTomTom Specifications

Sony

Sony XNV-770BT MyTomTom Specifications

Grundig STR 7122 TWIN Service manual

Grundig

Grundig STR 7122 TWIN Service manual

Creative Blaster Modem user guide

Creative

Creative Blaster Modem user guide

Panduit ATLONA AT-OME-RX11 installation guide

Panduit

Panduit ATLONA AT-OME-RX11 installation guide

VOLTCRAFT UTPS-40 operating instructions

VOLTCRAFT

VOLTCRAFT UTPS-40 operating instructions

JVC KW-ADV794 instructions

JVC

JVC KW-ADV794 instructions

Litelink VT-1001 operating instructions

Litelink

Litelink VT-1001 operating instructions

manuals.online logo
manuals.online logoBrands
  • About & Mission
  • Contact us
  • Privacy Policy
  • Terms and Conditions

Copyright 2025 Manuals.Online. All Rights Reserved.

Shenzhen, China XuelinElectronicsCo., Ltd. www.51c51.com www.8951.com
XL400/XL600/XL2000 Quick Start
PureEnglishversion of the windowsmaylead tosoftwarecompatibilityissues,Irecommend that you
use a multi-language version of the windows.
1: Connectthe USB socket of the machine andthe
USB ofthe computer,press the power button, thenthe
indication lightwillbe on implying it hasfound the new
hardwareguidance. Click install fromthe listor
indicativeposition(advanced)”option,and enternext;
cd Insert theCD-ROM drive.
2:Click include thisposition insearching”,thenclick
browse”to locate the driving program filesuitsthe
driving disk, forexample:
E:\DRIVERS\USBDRIVER2.0\, thenenter next;
3:You couldenter the system :controlling
board\system\hardware\devicemanagerto see the
following port information CP210* USB TO
UARTbridgecontroller(com3)
. which meanstheysystemhasbeen correctly
installed with USB driving program.
4:Insertthe driving diskaffiliated with the computer,
opendrivingprogram\ DRIVERS\Setup_en.EXE,click
nextaccording to the indication until installment
finishes.
Run XLISP Click: Option\COM Port
Shenzhen, China XuelinElectronicsCo., Ltd. www.51c51.com www.8951.com
5:Click:Auto DetectShow: com3 ok!
Confirm programming/button (JP17)isin Up
(programming) state.
Confirmthe CPU on thesocket isAT89S52and
spannerhasbeen pressed and installed.
Confirm USB driving program hasbeen installed.
(If youusexL2000, corfirm Jp13 Jp14
(usb-choose232)of xl2000 which isnext tousb)
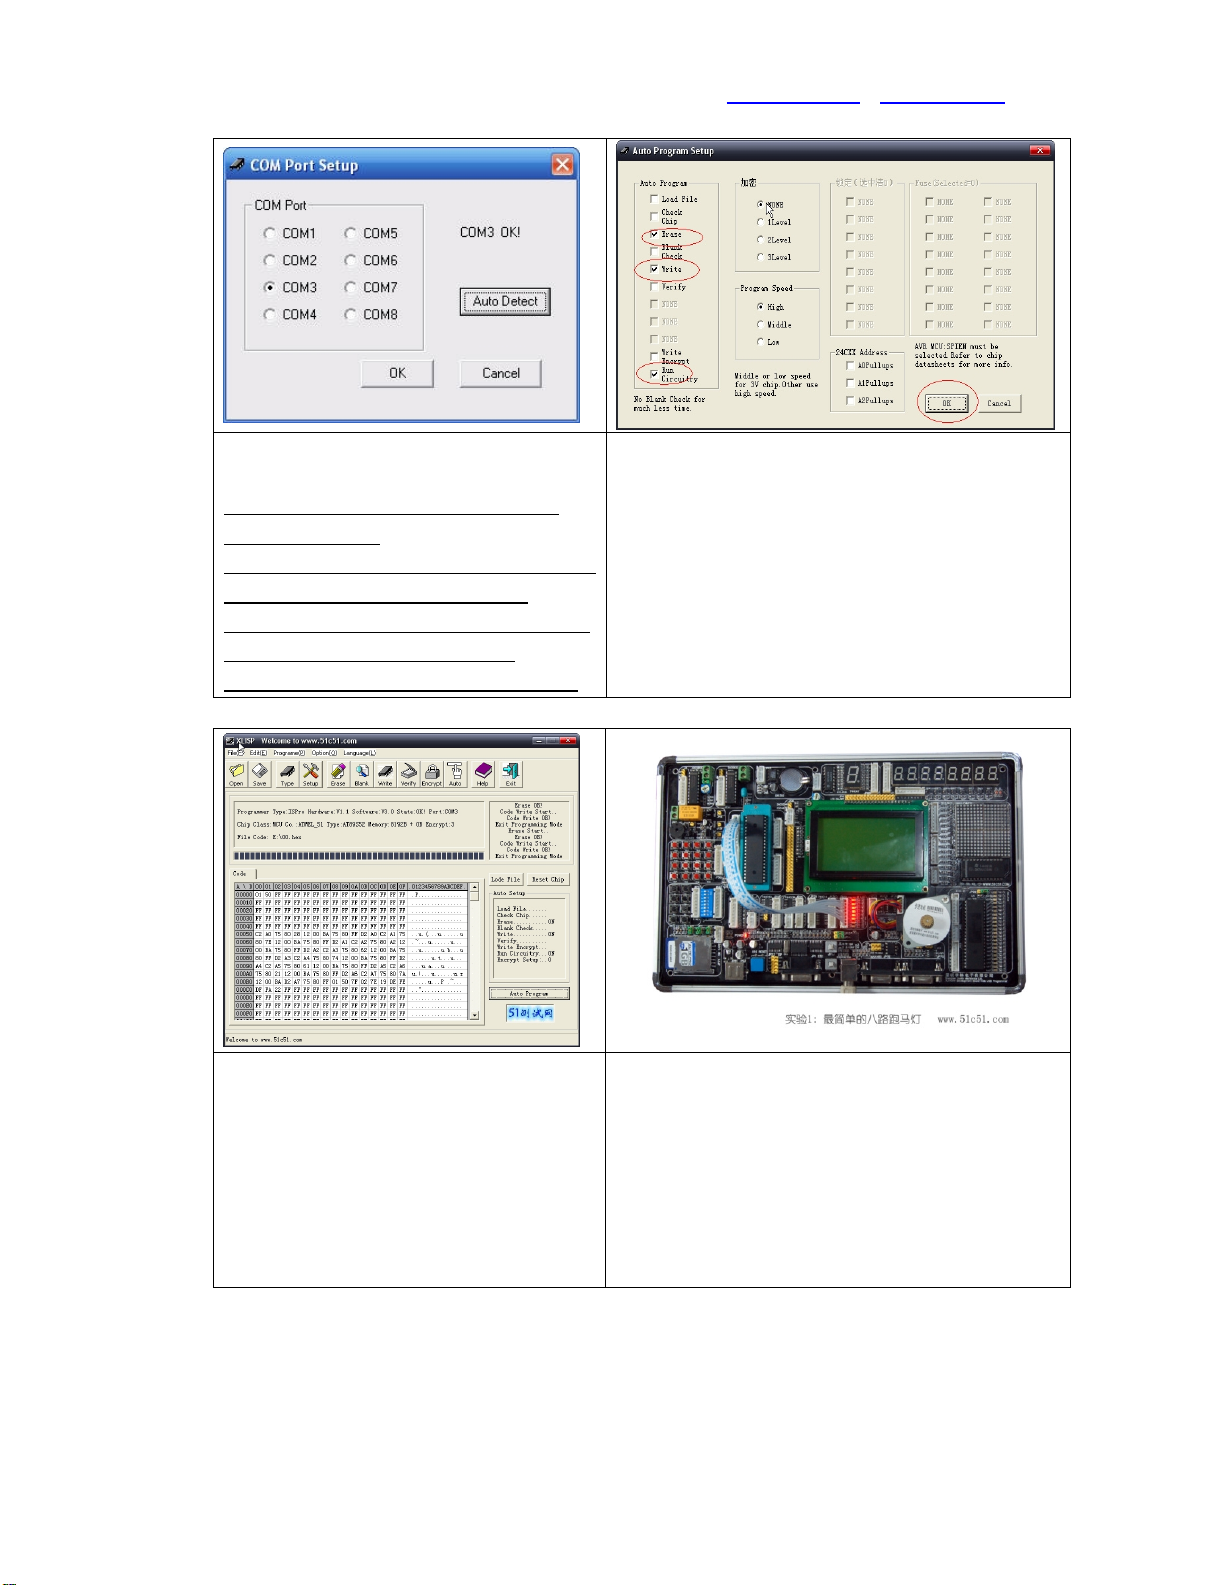
6:In ordertosimplyoperation steps,you need toconfirm
withthe settingsof the software forthe firsttimeto use.
First, clickthe setup”dialogue frame inthe following
picture. Choose erase”write in”run target board”(the
placeswith checkmarksinthefollowing picture)inthe lists
of auto programming options.
In addition, pleasedo not clicktesting chips.dialogue frame
showsthe chipstyles,clickMCU\ATMEL_51\AT89S52,
then clickYES.
7:Click open”in themaininterface to find :
program examples\running light
programs\18LED.HEX, then click YES.
Click intelligent click”,dialogue frame willshow:
erasebegins…erase finishes.
Programming operation begins…..programming
operation OK. Withdraw programming, target
board running!
8:8PIN system connect cable to connect the CPUpart
of theJP44 and8 LEDJP32
8 lampsto light up the cycle of running a successful
Amore detailed explanation see Web site update, Thanks!
Shenzhen, China XuelinElectronicsCo., Ltd.2008-11-15