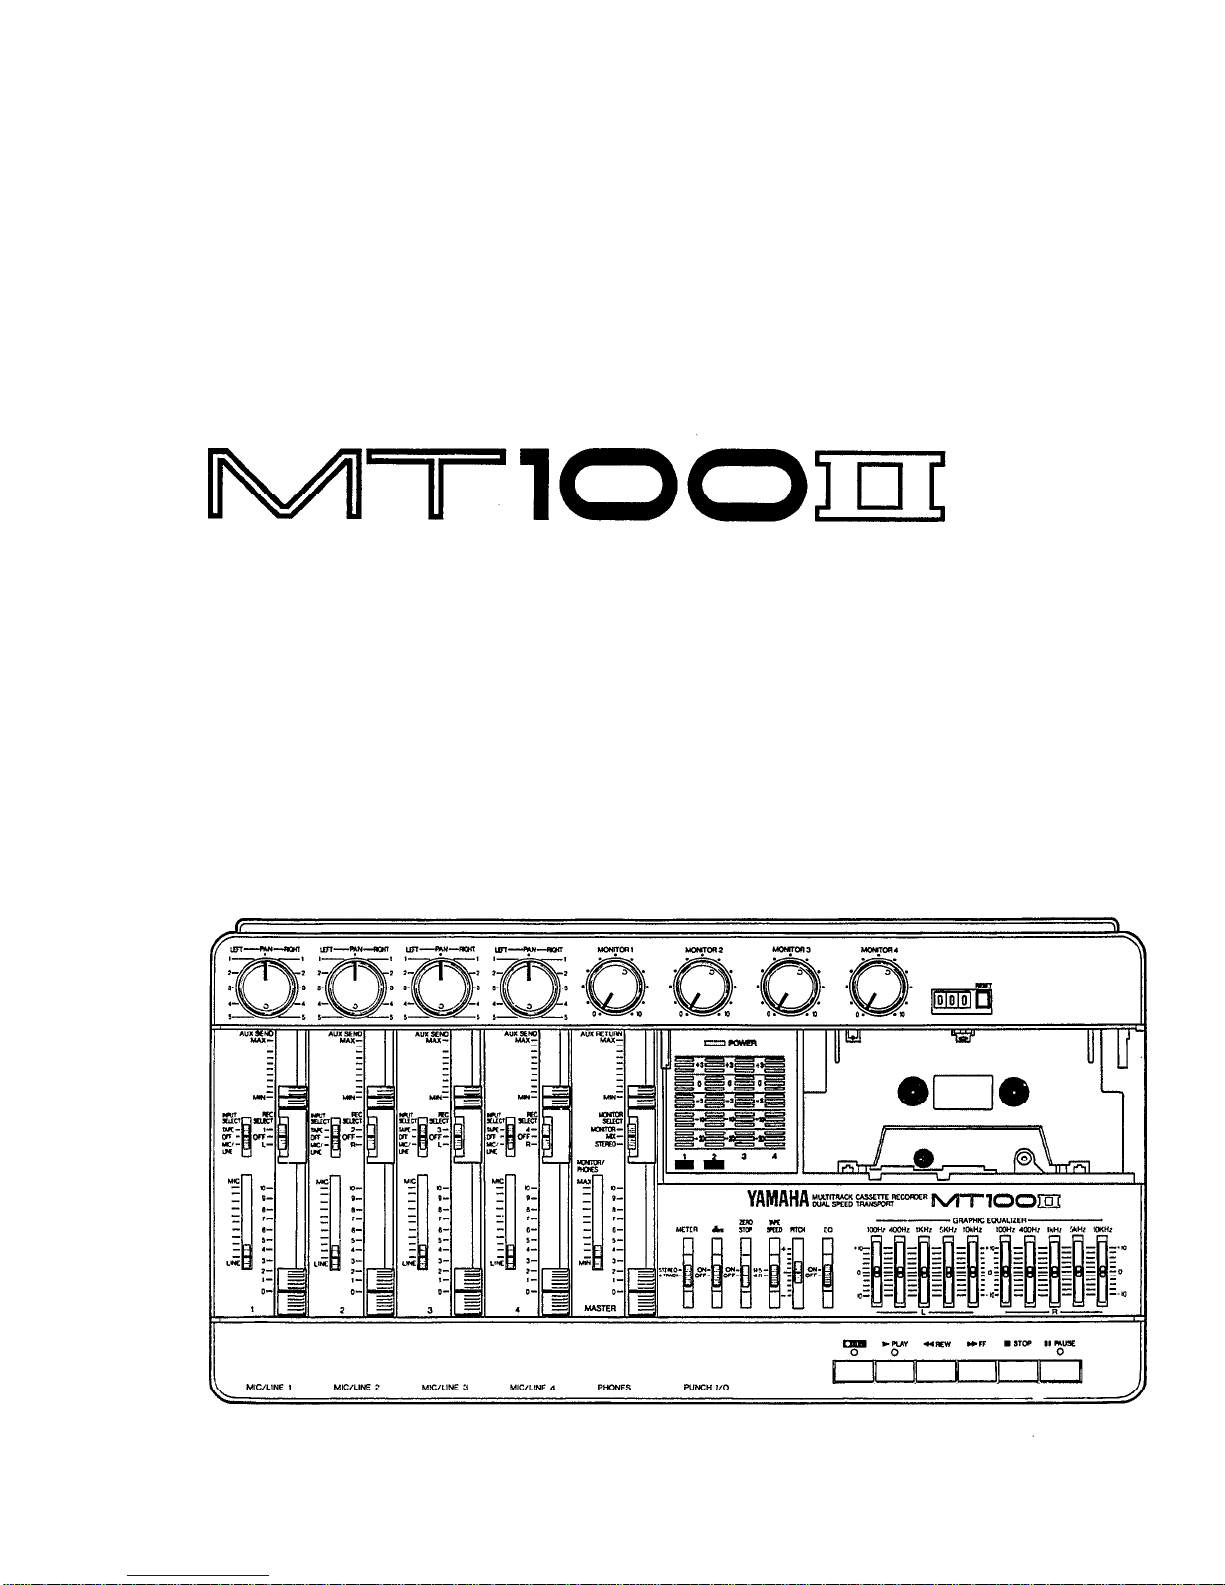
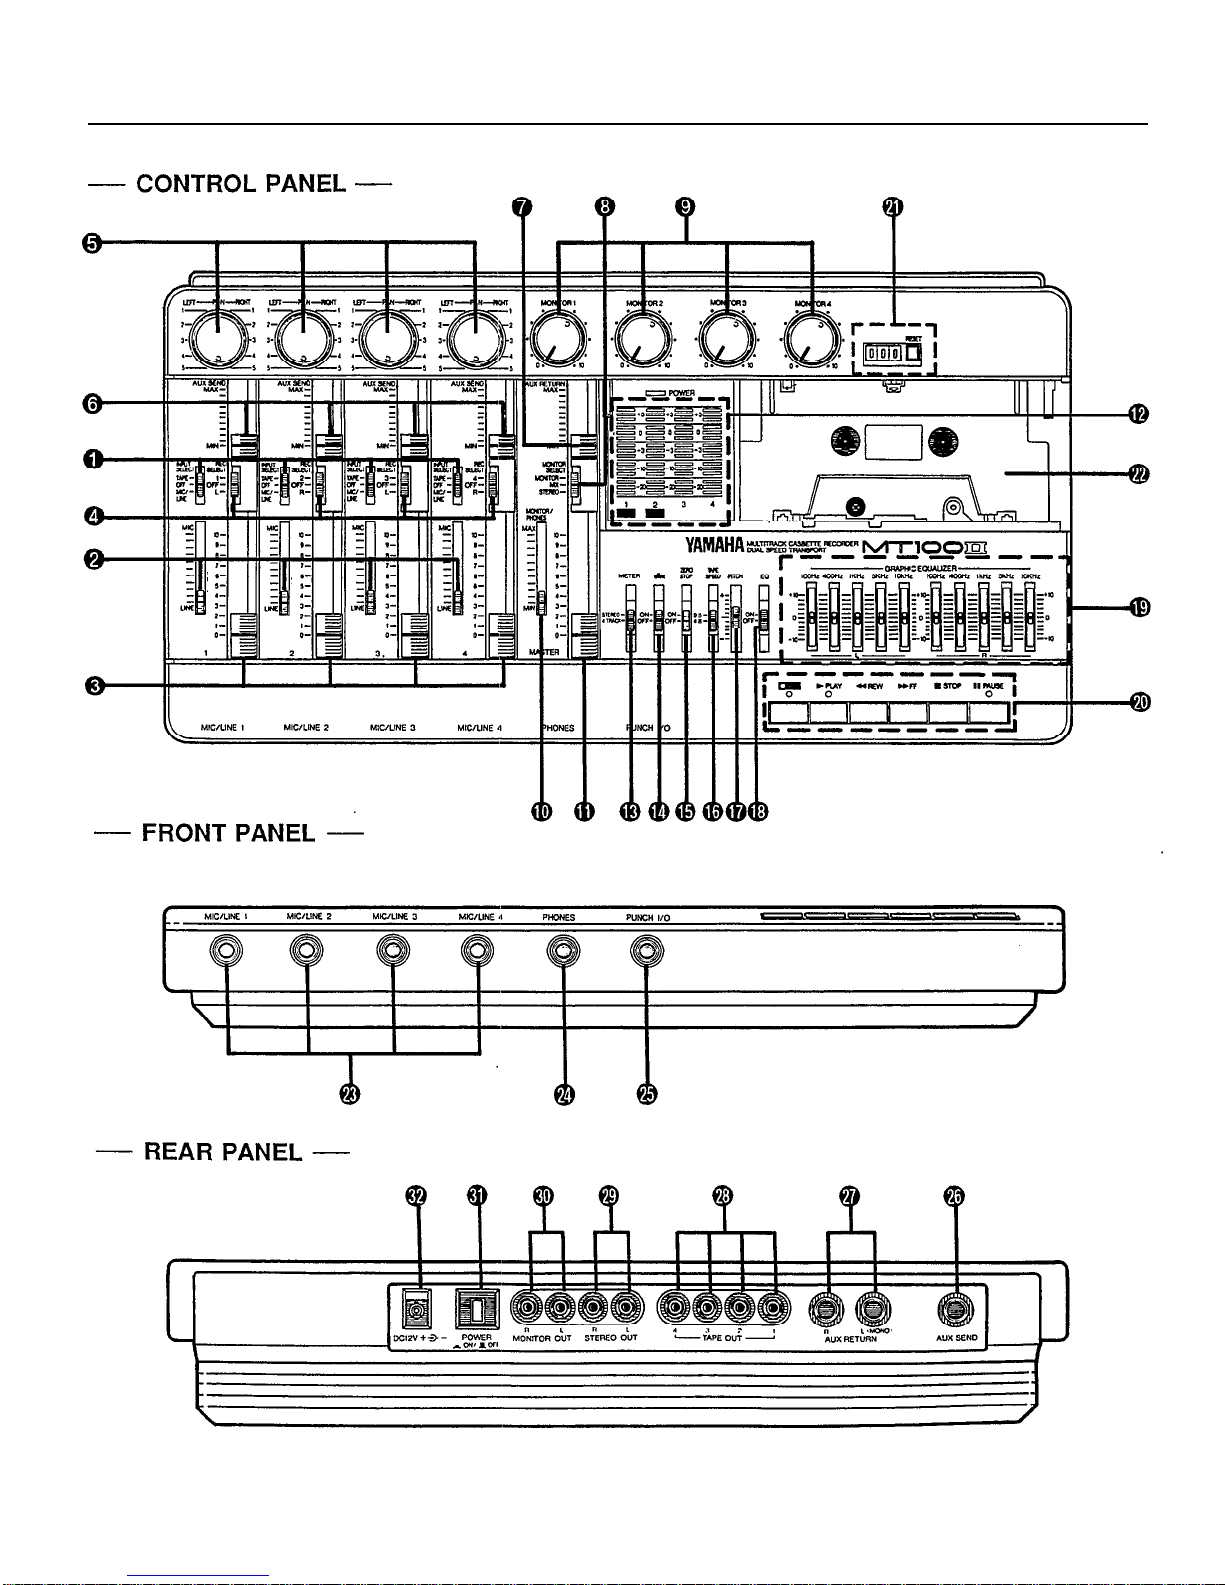
Yamaha MT100II User manual

YAMAHA
®
AUTHORIZED
PRODUCT MANUAL
MULTITRACK CASSETTE RECORDER

YAMAHA
MULTITRACK CASSETTE RECORDER
OPERATION MANUAL

CONGRATULATIONS!
Your MT100II Multitrack Cassette Recorder is a powerful recording tool that will enable you to
work with sound in many ways. No other multitrack cassette recorder offers the straightforward
simplicity and ease-of-use
of
the MT100II. Whether you need to record acoustic instruments or
voice using microphones, electronic instruments and line-level sources, or a creative blend
of the
two, the MT100II makes the process
of
building tracks extraordinarily smooth and simple. You can
simply record and remix four tracks, or use the multitrack “ping-pong” recording technique to in-
dividually record up to ten independent parts – adding sound layer by layer until you create
exactly the arrangement and texture your imagination demands with its ability to record on all four
tracks at once, or in any conbination, MT100II is the ideal choice
for
recording bands or layering
tracks at home. And, because it’s a YAMAHA, you know that the MT100II will give you the very
finest sound quality and overall performance available.
In order to make use
of
the MT100II's many features and obtain maximum performance, we urge
you to read this operation manual thoroughly –and keep it in a safe place
for
later reference.
CONTENTS
PRECAUTIONS.........................................1
THE CONTROLS AND CONNECTORS .....................2
MT100II CONTROLS AND THEIR FUNCTIONS
.................2
CONNECTION EXAMPLES...........................
8
ABOUT CASSETTE TAPES...............................
9
THE RECORDING PROCESS...........................
10
RECORDING THE FIRST TRACK........................
11
STEP 1: CHANNEL-TO-TRACK ASSIGNMENT
................
11
STEP 2: MONITOR SETUP
..................................
12
STEP 3: SETTING RECORDING LEVELS
.....................13
STEP 4: RECORD
.........................................
13
OVERDUBBING .......................................
14
PING-PONG RECORDING...............................
15
A PING-PONG RECORDING EXAMPLE
......................
16
MIXDOWN............................................
17
USING THE GRAPHIC EQUALIZER......................
18
USING THE TAPE OUT JACKS.........................
19
USING THE AUX SEND/RETURN LOOP..................
20
PUNCH-IN/OUT RECORDING...........................
21
MAINTENANCE .......................................
22
SPECIFICATIONS......................................
23
BLOCK DIAGRAM.....................................25

PRECAUTIONS
1. AVOID EXCESSIVE HEAT, HUMIDITY, DUST AND
VIBRATION
Keep the unit away from locations where it is likely to be
exposed to high temperatures or humidity – such as near
radiators, stoves, etc. Also avoid locations which are subject
to excessive dust accumulation or vibration which could
cause mechanical damage.
2. AVOID PHYSICAL SHOCKS
Strong physical shocks to the unit can cause damage.
Handle it with care.
3. DO NOT OPEN THE CASE OR ATTEMPT
REPAIRS OR MODIFICATION YOURSELF
This product contains no user-serviceable parts. For other
than routine cleaning, refer maintenance to qualified
YAMAHA personnel. Opening the case and/or tampering
with the internal circuitry will void the warranty.
4. MAKE SURE POWER IS OFF BEFORE MAKING
OR REMOVING CONNECTIONS
6. CLEAN WITH A SOFT DRY CLOTH
Never use solvents such as benzine or thinner to clean the
unit. Wipe clean with a soft, dry cloth.
7. ALWAYS USE THE CORRECT POWER SUPPLY
The MT100II should only be powered using the supplied
YAMAHA PA100 AC Adaptor. The use of other adaptors
can cause serious damage to the MT100II.
8. KEEP THE HEADS AND TAPE PATH CLEAN
To ensure consistent high performance and sound quality
from your MT100lI, it is important to clean the head and
tape path regularly (ideally before each recording session).
To do this, use a cleaning kit specifically designed for use
with cassette tape equipment.
9. USE ONLY HIGH-QUALITY CHROME CASSETTE
TAPE
The MT100II is designed for use with CrO
2
(chrome) formu-
lation tape, and will not provide proper performance with
any other type of tape. Always choose cassette tapes from
Always turn the power OFF prior to connecting or discon-
necting cables. This is important to prevent damage to the
unit itself as well as other connected equipment.
a reliable manufacturer.
5. HANDLE CABLES CAREFULLY
Always plug and unplug cables — including the AC cord –-
by gripping the connector, not the cord.
IMPORTANT NOTICE FOR THE UNITED KINGDOM
Connecting the Plug and Cord
IMPORTANT. The wires in this
mains
lead are coloured in accordance with the following code:
BLUE :
NEUTRAL
BROWN :
LIVE
As the colours of the wires in the mains lead of this apparatus may not correspond with the coloured
markings identifying the terminals in your plug proceed as follows:
The wire which is coloured BLUE must be connected to the terminal which is marked with the letter
N or coloured BLACK.
The wire which is coloured BROWN must be connected to the terminal which is marked with the
letter L or coloured RED.
1

THE CONTROLS AND CONNECTORS
2
MT100II MULTlTRACK CASSETTE RECORDER

MT100II CONTROLS AND THEIR FUNCTIONS
[Note]
The terms “channel” and “track”: In this owner’s manual, the term “channel” refers to the circuitry and controls
required to process one input source. MT100lI’s mixer section has four “channels.” The term “track” refers to the
magnetic bands on tape used to store signals recorded by MT100II's recorder section. Since MT100II records four
separate bands of audio on tape, it is a four-“track” recorder.
INPUT SELECT Switches
The INPUT SELECT switches are used to select the input
source for each of the four channels.
TAPE:
Select this position to play back already recorded
material. When selected, mixer channel 1 will receive
playback from track 1; channels 2, 3, & 4 will receive
tracks 2, 3, & 4 respectively.
OFF:
In this position, the channel receives no input signal.
MIC/LINE: In this position, the channel can receive a
microphone, keyboard, or other line-level signal
which is connected to the input jack.
[Note]
All channels which are not in use should be set to
“OFF” position.
MIC/LINE Gain Controls
The gain controls adjust the sensitivity of the channel in-
puts to accept a wide range of signal levels – from line to
microphone. The gain controls are used in conjunction for
the input faders to set the optimum recording level with a
wide range of sources (see “SETTING RECORDING LEV-
ELS” on page 13).
[Note]
A gain control only affects the level of the signal
connected to the input jack.
Input Faders
The input faders are used to adjust the level (volume) of
the corresponding mixer channel’s signal, whether it
comes from a source plugged into an input jack or from
the MT100II's recorder section. (The INPUT SELECT
switches are used to choose between the two.) The faders
are used to set up the optimum levels when recording, and
to balance (mix) the sound from the recorder’s tracks
when playing back a recording.
Noise and distortion are at their lowest at input fader level
"7".
REC SELECT Switches
The REC SELECT switches are used when recording to
assign (send) the signal from each mixer channel either
directly to the corresponding track of the recorder or to a
different track via the PAN controls (see “CHANNEL-TO-
TRACK ASSIGNMENT” on page 11).
[Note]
When any of the REC SELECT switches are set to
a position other than OFF, the red indicator LED
above the transport REC button will flash, indicating
that the MT100II is set up to record. Recording will
commence when the transport REC and PLAY but-
tons are pressed simultaneously. If all REC SELECT
switches are set to OFF, the unit will not record even
if the transport REC and PLAY buttons are pressed.
PAN Controls
The PAN controls assign the signal from the correspond-
ing mixer channel to any desired position in the “stereo
sound field”. If a PAN control is set to the maximum
“LEFT” position, the signal from that channel will appear
only at the left-channel MT100II output (STEREO OUT L).
If the PAN control is set fully RIGHT, the signal will appear
only at the STEREO OUT R output jack. If a PAN control
is set to its center position, then the signal from that chan-
nel will appear equally at both the left- and right-channel
outputs, and the sound will appear to come from the cen-
ter of the stereo sound field, a point midway between the
two stereo speakers. By varying the level of the signal
sent to the left-and right-channel outputs, the PAN control
can be used to position the sound at any point in the
stereo spectrum. The PAN controls can also be used dur-
ing recording to assign the signal from several channels to
a single track of the recorder section, or to assign a chan-
nel to a differently-numbered recorder track (see “CHAN-
NEL-TO-TRACK ASSIGNMENT” on page 11).
3

AUX SEND Controls
The AUX SEND controls are used primarily when adding
effects such as reverberation or echo to the sound of a
channel or track. The AUX SEND control on each mixer
channel determines the amount of signal from ‘that chan-
nel sent to the AUX SEND jack. The AUX SEND jack must
be connected to the input of an external signal processor
such as the YAMAHA FX500 Simul-effect Processor (see
“USING THE AUX SEND/RETURN LOOP” on page 20).
AUX RETURN Control
The AUX RETURN control determines the level at which
the signal from an external signal processor is returned
and mixed in with the MT100lI’s main stereo output signal.
The output from an external signal processor fed by the
AUX SEND jack must be connected to the AUX RETURN
jack(s) (see “USING THE AUX SEND/RETURN LOOP” on
page 20).
MONITOR SELECT
Switch
MONITOR:
This position is selected to listen to the four
tape tracks. In this position a mix from the four
MONITOR controls is sent to the PHONES jack and
the MONITOR OUT jack.
MIX:
This position is selected to hear a combination of the
four tape tracks and input sources connected to the
input jacks. The mix from the MONITOR controls is
combined with the stereo output from the mixer sec-
tion and sent to the PHONES jack and MONITOR
OUT jack.
STEREO:
This position is selected to monitor the stereo
output from the mixer section. In this position, the
mix sent to the MONITOR OUT jack and PHONES
jack is the same mix that is sent to the STEREO
OUT jacks.
MONITOR CONTROLS 1 — 4
The four MONITOR controls determine the level of the
signal from the corresponding recorder tracks which is
sent to the PHONES jack and MONITOR OUT jacks when
the MONITOR SELECT switch is set to either “MONITOR
or “MIX.” The MONITOR controls are primarily used to set
up the optimum levels for monitoring recorded tracks while
recording new material (overdubbing).
MONITOR/PHONES Control
This control is used to set headphone and control room lis-
tening level. It adjusts the level of signal sent to the
PHONES jack and MONITOR OUT jacks with out affecting
the signal level appearing at the STEREO OUT jacks.
4
MT100ll MULTlTRACK CASSETTE RECORDER
MASTER Fader
The MASTER fader sets the overall output level of the
MT100II mixer section, and thus the level of the output
signal appearing at the STEREO OUT jacks. The MAS-
TER fader also affects recording level when any of the
mixer section’s channels are assigned to the recorder’s
tracks via the PAN controls (see “SETTING RECORDING
LEVELS” on page 13).
LED Peak Meters
The four LED peak meters accurately display output levels
from the MT100lI’s four recorder tracks when the METER
switch is set to "4 TRACK", or meters 1 and 2 display the
level of signals appearing at the mixer section’s stereo
outputs (the STEREO OUT jacks) when the METER
switch is set to “STEREO.”
The LED peak meters are a guide for setting up the opti-
mum recording levels. (see “SETTING RECORDING LEV-
ELS” on page 13).
METER
Switch
When the METER switch is set to “STEREO,” meters 1
and 2 display the level of signals appearing at the mixer
section’s stereo outputs (the STEREO OUT jacks). When
set to “4 TRACK,” the four LED peak meters display the
level of the corresponding recorder track signals.
dbx ON/OFF Switch
The dbx switch determines whether the MT100II‘s internal
dbx noise reduction system is ON or OFF. For normal
recording and playback using the MT1000II, the dbx switch
should be turned ON. This provides a significantly im-
proved signal-to-noise ratio (as much as 85 dB) so your
recordings will sound cleaner and have much less tape
hiss.
For dbx noise reduction to be effective, it must be turned
ON both during recording and playback.
The dbx switch may be turned OFF when playing back
tapes that were recorded on other equipment and which
are not dbx-encoded.
ZERO STOP Switch
When the transport is in rewind, the ZERO STOP function
automatically stops the tape at a specified location.
To set the ZERO STOP point, play the tape to the desired
location and reset the tape counter to ZERO by pressing
the counter reset button. In rewind, with the ZERO STOP
switch “ON”, the transport will stop when the tape counter
reaches 999. This is particularly handy in the multitrack
“overdub” process when it is necessary to repeatedly re-
wind the tape and play from the same point.

TAPE SPEED Switch
The TAPE SPEED switch selects either the standard 4.8-
cm/sec cassette tape speed, or the MT100II's special 9.5-
cm/sec high tape speed. Use the standard (4.8) speed
when replaying tapes recorded on standard cassette re-
corders, or to obtain maximum tape economy. When you
want maximum sound quality, use the high (9.5) tape
speed. The improvement in sound quality provided by the
high tape speed is significant, and we recommend that
you use the high speed for all important recordings.
[Note]
Never change the TAPE SPEED setting while the
tape is running.
PITCH Control
The PITCH control varies tape speed by ±10%, making it
possible to “tune” material recorded on the MT100II to
match the pitch of musical instruments, or to slightly
lengthen or shorten the running time of a recording to
meet specific timing requirements. Tape speed is normal
when the PITCH control is set to its center click-stop posi-
tion. Tape speed is increased by sliding the control to-
wards the "+" end of the scale, and decreased by sliding
the control towards the "-" end of the scale.
EQ Switch
This switch turns the graphic equalizer on and off.
Graphic Equalizer
An equalizer is used to tailor the signal to help it stand out
or integrate into a mix. MT100lI’s graphic equalizer is a
powerful signal shaping tool which allows you to augment
or attenuate signal components up to 10 dB in five fre-
quency bands. The graphic equalizer can be switched ON
to enhance signals as they are recorded on tape, and
again in playback.
[Note]
When switched ON, the graphic equalizer can affect
signals being routed to tape via the PAN controls
when the REC SELECT switches which are set to “L”
or “R”. The graphic equalizer will not affect signals
being routed to tape via REC SELECT switches
which are set to “1 — 4”.
Transport Controls
These light touch electronic transport controls provide
smooth, sure control of the tape transport functions.
REC: In conjunction with the PLAY button, activates
MT100II record circuitry. Recording is only possible
when one or more of the REC SELECT switches are
set to a position other than OFF. If all the REC SE-
LECT switches are set to OFF, the red REC indicator
LED will flash when the REC button is pressed, and
the orange PAUSE indicator will light. If any REC SE-
LECT switche is set to a position other than OFF, the
red REC indicator and the orange PAUSE indicator
will light continuously. From the REC/PAUSE
mode
it
is necessary to press the PLAY button to start the
transport running. Actual recording will begin if at
least one track REC SELECT button is set to a posi-
tion other than OFF. If not, the transport will run in a
record/ready mode until a REC SELECT switch is set
to a position other than OFF.
[Note]
Only tracks for which the REC SELECT switch is
set to a recording position will be recorded when the
RECORD mode is activated.
[Note]
The RECORD mode
cannot
be activated if a cas-
sette is loaded from which the record-prevention tab
has been removed.
PLAY:
Starts the transport running in the PLAY mode. The
green PLAY indicator LED will light to indicate PLAY
status.
REW (REWIND):
Press this button the rewind the tape. If
the ZERO STOP switch is ON, the tape will stop
rewinding when the counter reaches “999.”
FF (FAST FORWARD):
Press this button the wind the tape
ahead at high speed. When this button is pressed
while in the PLAY mode, the audio will be heard as
the tape winds ahead at high speed.
STOP:
Immediately stops the transport and/or defeats the
RECORD mode.
PAUSE:
Temporarily stops playback or recording. The or-
ange PAUSE indicator LED will light when the
PAUSE mode is active. Press the PLAY button to
disengage the PAUSE mode and continue playback
or recording.
Tape Counter and RESET Button
This three-digit tape counter provides a handy index of
tape position. It’s a good idea to write down the counter
readings for important points of a recording, so you can
locate them easily afterwards. The RESET button resets
the counter to “000” at the current tape position. This is a
useful function when used in conjunction with the ZERO
STOP switch to identify specific positions on the tape.
5

Cassette Compartment
Your cassette tape is loaded here. Use only high-quality
chrome (CrO
2
) formula cassette tape. Other tape formula-
tions will not provide optimum frequency response and sig-
nal-to-noise performance.
A “lifter-tab” is provided at the right side of the cassette
compartment cover. Lift the cover using this tab. Hold the
cassette with the open end (the end at which you can see
tape) facing the transport controls. First, press the rear
edge of the cassette DOWN and UNDER the central retain-
ing finger at the rear of the cassette compartment. Then
gently press the front of the cassette DOWN to seat the
cassette in place. (SEE DIAGRAM)
[Note]
Since the MT100II uses the entire width of the cas-
sette tape to record four tracks, the cassette can only
be recorded on one side. Never change the TAPE
SPEED setting while the tape is running.
MIC
/
LINE
Input Jacks 1 — 4
These four input jacks accept signals from microphones, or
from line-level sources including, electronic keyboards,
electric guitars and basses and tape players. The four
channel inputs are standard monaural 1/4” phone jacks.
When a source is plugged into one of these jacks, its signal
is sent to the corresponding channel of the MT100lI’s
mixer.
6
MT100II MULTITRACK CASSETTE RECORDER
PHONES Jack
Any pair of stereo monitor headphones with an impedance
of between approximately 8 and 40 ohms can be plugged
into this jack. Headphone monitoring is the most conven-
ient way to listen to the MT100lI’s various signals. High-
quality headphones such as the YAMAHA RH5M or
MH100 are ideal for this purpose.
PUNCH
I/O Footswitch Jack
An optional YAMAHA FS-1 Footswitch can be connected to
this jack to permit foot-controlled punch-in and punch-out
recording (see “PUNCH-IN/OUT RECORDING” on page
21).
AUX SEND Jack
AUX RETURN R and L(MONO) Jacks
The AUX SEND and RETURN jacks make it simple to use
an external signal processor (such as the YAMAHA FX500
Simul-effect Processor) to add effects to MT100II signals.
The AUX SEND jack should be connected to the input of
your signal processor, and the output from your signal
processor should be connected to the AUX RETURN jack.
If your signal processor produces only monaural output, it
should be connected to the L (MONO) AUX RETURN jack
(see “USING THE AUX SEND/RETURN LOOP” on page
20).
TAPE OUT Jacks 1 — 4
The four TAPE OUT jacks are direct outputs from the cor-
responding tracks of the MT100lI recorder. These RCA pin
type jacks make it possible to feed the output from the four
recorder tracks to an external mixing console. The TAPE
OUT jacks can also be used to feed each of the recorder’s
tracks to external signal processors, the output of which
can then be returned to the MT100lI’s mixer inputs.
STEREO OUT R and L Jacks
These are the main outputs from the MT100II, delivering
the stereo output signal from the MT100lI mixer section.
The RCA pin-type STEREO OUT jacks can be connected
to a stereo sound system for monitoring and listening. You
can record a mixdown of your tape tracks when these jacks
are connected to the inputs of a stereo recorder.
MONITOR R and L Jacks
These jacks output the same signal fed to the PHONES
jack (at line level). Control the level (volume) of the output
using the MONITOR/PHONES control. The MONITOR
OUT jacks can be connected to a stereo sound system for
monitoring and listening. They are RCA pin type jacks.

POWER Switch
Press the POWER switch once to turn power ON, a second
time to turn power OFF. When the power is ON, the
POWER LED above the LED peak meters on the MT100II
top panel will light. Make sure that the input faders are set
to “0” and the AUX RETURN level control is set to “MIN”
before turning power on.
[Note]
A muting function operates for five seconds after
power is initially turned on, after which the recorder
can be operated.
DC IN Jack (DC1PV)
The DC output cord from the YAMAHA PA100 AC Adaptor
supplied with the MT100II should be plugged in here. The
AC Adaptor should be plugged into a convenient AC wall
outlet.
Caution:
Use only a YAMAHA PA100 AC Power Adaptor
to power your MT100II. Other AC adaptors can cause
faulty operation, and may even permanently damage your
MT100II.
7

CONNECTION EXAMPLES
—- BASIC CONNECTIONS —-
*
Make sure the power to all equipment is OFF when making connections.
Monitor Power Amp/Speaker
8 MT100Il
MULTITRACK CASSETTE RECORDER

ABOUT CASSETTE TAPES
This unit is designed to be used only with Chromeposition tape, and will not work properly with Ferrichrome tape formulations.
CrO
2
tape (Bias: HIGH; EQ: 70µs) should be used. Also, the use of C-120 tapes is not recommended because they exhibit poorer
performance, and can be the cause of equipment failure.
• Preventing accidental erasure of recordings
To keep from inadvertently erasing a prized recording, all
cassette tapes have record protection tabs along the rear
edge of the cassette shell. If this tab is broken out using a
screwdriver or any other appropriate implement, it will not be
possible to record on the corresponding side of the tape. This
will protect your recordings from accidental erasure. To protect
a 4-track recording, it’s necessary to break out the tabs for
both the A and B sides of the tape.
When you’d like to record over a tape with the tabs broken
out, just cover the holes (where the tabs were) with a small
piece of adhesive tape.
•
PREVENTING ACCIDENTAL TAPE ERASURE:
• Taking up tape slack
If the tape in the cassette is slack, or some portion of the tape
is out of the cassette shell, there is a risk it may become
tangled around the capstan or pinchroller. In order to correct
this, insert a pencil or ballpoint pen into the center of one reel,
and rotate to take up loose tape slack.
Cassette shell
• Storing cassette tapes
To prevent tape slack during storage, keep tapes in their
cases. Do not store tapes in direct sunlight, or in places with
high heat or humidity, as this may damage the tapes. Also,
keep the tapes away from magnetic fields, emitted from de-
vices such as televisions or speakers, because the recordings
can be erased or sonically alterd to some degree.
•
RECORDING OVER A TAPE WITH THE TABS BROKEN
OUT:
9

THE RECORDING PROCESS
For details pertaining to the operation of MT100lI controls, please refer to page 3, “MT100II CONTROLS AND THEIR FUNCTIONS”.
Recording with the MT100II is a very simple process. All you need is the MT100II, a pair of monitor headphones, and an instrument,
microphone, or other signal source.
The multitrack recording process can be basically broken down into the following steps:
1. Record the First Track.
a) Select channel-to-track assignment for input source.
b) Set Record Level.
c) Record.
2. Overdub on the Remaining Tracks.
a) Select channel-to-track assignment for each overdub.
b) Set records level for each overdub.
c) Record the overdub.
3. Track Combining.
a) If necessary, use “ping pong” technique to combine tracks and clear them for additional overdubs.
4. Mixdown.
a) Set up for monitoring the mix.
b) Set up a rough mix and add effects.
c) Finalize and rehearse the mix.
d) Connect the MT100II STEREO OUT jacks to a stereo casette recorder.
e) Record (from the MT100II to the stereo cassette recorder).
These steps (and what the recording terms mean) will be described in detail below, so its a good idea to read through the following
sections in sequence in order to get a clear picture of the overall recording process.
10
MT100lI MULTlTRACK CASSETTE RECORDER

RECORDING THE FIRST TRACK
STEP 1: CHANNEL-TO-TRACK ASSIGNMENT
The first step in making any recording is to assign the channel to which your instrument or other source is connected to one of the
recorder’s tracks.
Depending on what you are recording, you might want to record a single instrument or other source on a single track of the tape, or
you might want to combine several instruments or other sources and record them on a single track. The MT100II offers two
“channel-to-track assignment” methods.
Direct Channel-to-Track Assignment
Panned Channel-to-Track Assignment
With this method, an instrument or source connected to one of
the mixer’s channels is fed directly to the correspondingly
numbered track of the recorder. You can record a single track
like this, or up to all four tracks simultaneously. Using this
method, only one input source can be recorded on a single
track.
For direct channel-to-track assignment, the REC SELECT
switchs are set to the “number” position (1, 2, 3 or 4). For ex-
ample, if the channel 1 REC SELECT switch is set to “1,” the
channel 1 signal will be sent directly to track 1 of the recorder.
This applies in the same way to all other channels and tracks.
RECORDER SECTION
MIXER SECTION
DIRECT CHANNEL - TO - TRACK ASSIGNMENT
The panned channel-to-track assignment method makes it
possible to assign several of the mixer’s channels to a single
recorder track, or single mixer channels can be assigned to a
track of a different numbers.
Each of the REC SELECT switches has either an "L” or “R”
position. These correspond to the left (L) and right (R) chan-
nels of the mixer’s stereo output. If track 1’s REC SELECT
switch is set to “L” for example, track 1 will receive any signals
which are “panned” LEFT. Therefore, it is possible to send the
signal from channel 1 to track 4 by selecting “R” on track 4’s
REC SELECT switch and panning channel 1 RIGHT. In addi-
tion, any other channels which are panned RIGHT will also be
recorded on track 4 if the faders for those channels are at
raised. The assignment illustrated below is achieved by set-
ting track 4’s REC SELECT switch to “R” and setting the PAN
controls on channels 1, 2 and 3 fully right.
[Note]
When a REC SELECT switch is set to "L" or “R” the
track will also record signal from the “LEFT or RIGHT
side” of the AUX return. Therefore, effects can be
recorded along with input sources.
MIXER SECTION RECORDER SECTION
PANNED CHANNEL - TO - TRACK ASSIGNMENT
11

STEP 2: MONITOR SETUP
Once your source is connected to an input channel and that channel is assigned to one of the recorder’s tracks, you should set up your
monitor system so that you can listen to the track as it is recorded.
The
MT100II allows you to monitor the material being recorded either via a pair of headphones connected to the PHONES jack or
via a sound system with speakers connected to the MONITOR OUT jacks. The level appearing at the PHONES jack and MONITOR
OUT jacks is controlled by the MONITOR/PHONES control. The MONITOR SELECT switch has three positions which allow you to
listen to tape tracks only (MONITOR position), input sources (STEREO position), or a combination (MIX position).
MONITOR:
In this position only the output from the recorder’s
four tracks is sent directly to the PHONES jack and the
MONITOR OUT jacks via the four MONlTOR controls.
The MONITOR controls are used to create the desired
monitor “mix”. This setup is ideal for general monitoring
while recording because it allows you to listen to the
four tape tracks while leaving input faders available to
route signal sources to tape. Material already recorded
on any of the recorder’s tracks is delivered to the
PHONES jack and MONITOR OUT jacks via the corre-
sponding MONITOR controls. In this case, an input
source can only be heard when it is assigned to a track
via the appropriate REC SELECT switch, and the
TRANSPORT controls are in the RECORD or REC-
ORD/PAUSE mode.
MIX:
Both the output from the recorder’s four tracks (via the
MONITOR controls) and the stereo output from the
mixer section are sent to the PHONES jack and MONI-
TOR OUT jacks.
12
MT100II MULTlTRACK CASSETTE RECORDER
STEREO:
Only the stereo output from the mixer section is
sent to the PHONES jack and MONITOR OUT jacks.
This setting is most useful for mixdown of a completed
multitrack recording, since you want to hear the mix
produced by the mixer section’s input faders and any
effects applied using the AUX SEND and RETURN
controls while mixing.
[Note]
Speakers should not be used for monitoring if you
will be recording via microphones, since the monitor
sound will leak into the microphone(s) and spoil the
recording.

STEP 3: SETTING RECORDING LEVELS
Setting optimum recording levels is vitally important to achieve the best possible recording quality.
1. Make sure that a cassette has been loaded into the cas-
sette compartment, and that it is wound to the point at
which you intend to start your recording. It’s a good idea to
press the counter RESET button to set the counter to “000”
at this point so that you can automatically locate the begin-
ning of the recording later using the ZERO STOP function.
2. Start by setting the channel input fader to be used set to its
minimum (“0”) position, and the MIC/LINE gain control all
the way to LINE.
3. Press transport RECORD button, this activates MT100II’s
record circuit, and puts the transport in RECORD/PAUSE
mode. Tape will not be moving. Play the source at the
highest (loudest) level that it will be played during record-
ing.
4. Set the MASTER fader to about “7” or “8” on the scale and
gradually raise the input fader until you begin to hear the
source sound and see the LED peak meter come to life. If
your source is an electric instrument (guitar or bass) or a
microphone, you may also have to slide the MIC/LINE gain
control towards the MIC end of its scale to get a sufficiently
high meter reading. Adjust the input fader and MIC/LINE
gain control so that the meter reading averages between
about “0” and “+3” on the scale. Ideally, the input fader
should be set at about “7” or “8” on its scale to achieve the
above-mentioned meter reading. This is to ensure the best
possible signal-to-noise ratio and allow plenty of plus and
minus leeway for later adjustment. If the fader setting is
way off, try adjusting the volume control on the instrument
or other source until you can get the optimum reading with
a fader setting between “7” and “8.” After levels are set,
press STOP button to disengage RECORD/PAUSE trans-
port status.
STEP 4: RECORD
When you have inserted a cassette, assigned the input channel to a recorder track, checked the monitor settings and set the
optimum record level for the new track, you’re ready to record.
[Note]
Make sure the PITCH control is OFF (slider in the center position) while recording your first track.
1. Press the REC button and then the PLAY button to start
recording, wait a few seconds, and start playing.
2. When you’ve finished recording the track, press the trans-
port STOP button, turn the REC SELECT switch for the
track just recorded to the OFF position, rewind the tape
(the tape will stop automatically at counter “999” if the
ZERO STOP switch is ON).
[Note]
If you plan to record using microphones and you will
be monitoring in the same room as where the micro-
phones are set up, we recommend the use of head-
phones while actual recording is taking place. If
speakers are used for monitoring during recording,
their sound can “leak” back into the microphones
compromising the quality of your recording.
3. Play back the recording (press the PLAY button) and listen
to the track to make sure that everything went as planned.
13

OVERDUBBING
Overdubbing is the process of recording a new track (or new tracks) while monitoring previously recorded tracks. If you’re only
planning to record a maximum of four tracks, you can go ahead and overdub the second, third and fourth tracks. If you’re planning
to use the "ping-pong” recording technique to record more than four parts, however, record only three tracks and then move on to
the ping-pong step (see “PING-PONG RECORDING” on page 15).
1. Plug the instrument or other source to be recorded into an
available channel input.
2. Make sure that the REC SELECT switches of previously-
recorded tracks are set to OFF so that previously recorded
tracks aren’t erased when the new track is recorded.
3. Set up the channel-to-track assignment for the new track.
4. Check your monitor settings to ensure that you can monitor
the previously recorded track(s) as well as the new track to
be recorded (the MONITOR SELECT switch should nor-
mally be set to MONITOR.)
5. Set the recording level for the new track.
6. You can now “rehearse” the overdub without actually re-
cording by simply playing back the already-recorded
track(s) and playing the new part. When MONITOR select
is in the MONITOR position, it is not possible to hear input
source unless MT100Il’s transport is in RECORD or REC-
ORD/PAUSE. If you are not ready to actually record your
overdub, and would like to hear the new input source along
with previously recorded tracks, set the MONITOR select
switch to the MIX position.
7. Make sure the tape is rewound to the beginning of the
piece and start recording.
These steps are simply repeated to overdub tracks 3 and 4.
14
MT100II MULTITRACK CASSETTE RECORDER

PING-PONG RECORDlNG
Ping-pong recording is a technique you can use to squeeze more than just 4 parts onto your 4-track machine.
This is accomplished by re-recording a mix of existing tracks onto an open track. Once tracks have been combined in this way on a
new track, the original tracks can be erased, clearing them for additional overdubs.
In ping-pong recording, you can record parts on tracks 1, 2,
and 3, for example, and then re-record these tracks onto track
4, using the mixer controls to set up the right balance between
the 3 original tracks. You now have a “mix” of the first 3 tracks
on track 4, and tracks 1, 2, and 3 are available for more
recording. That’s already the equivalent of 6 “tracks” on your
4-track recorder. While mixing the first 3 tracks down onto
track 4 you can also mix in a live instrument via the MT100II
mixer section. That would give you 4 parts recorded on track 4
of the tape. With the 3 tracks you still have available for re-
cording, that’s a total of 7 tracks. Now, if you record only 2 of
the remaining tracks and ping-pong these to track 3 while
mixing in another live instrument, you’ll have 4 parts on tracks
4, 3 parts on track 3, and 2 tracks available. That’s a total of 9.
Following this procedure it is actually possible to record up to
10 individual tracks without re-recording any single track more
than once (refer to the illustration).
EXAMPLE: Recording tracks “1” through “10” using the Ping-pong process.
[Note]
Ping-ponging is a critical step because the tracks to
be ping-ponged must be mixed perfectly before you
can go on to recording the subsequent tracks. This is
because once they’re ping-ponged and new material
has been recorded on the original tracks, their bal-
ance and individual sound cannot be changed un-
less you go back and record the original tracks all
over again.
[Note]
It is recommended that you record using the 9.5 cm/
set tape speed with dbx ON if you plan to combine
tracks using the ping-pong technique. Under some
conditions, use of the 4.8 cm/sec tape speed with
noise reduction OFF will cause feedback when a
previously recorded track is re-recorded onto an ad-
jacent track.
[Note]
Ping-Pong recording technique requires that mul-
tiple tracks are directed to tape via PAN controls.
Remember that a signal appearing at the stereo AUX
RETURN will also be added along with the tracks
being recorded or ping-ponged. To prevent an effect
from being recorded, set the AUX RETURN fader to
“0” (all the way off).
15

A PING-PONG RECORDING EXAMPLE
The following is an example of how you would ping-pong material recorded on tracks 1, 2 and 3 onto track 4.
Here’s how the controls should be set:
•INPUT SELECT switches
Make sure that the channel 1,2 and 3 INPUT SELECT
switches are set to TAPE and the channel-4 INPUT SE-
LECT switch is set to OFF.
•Input Faders
To begin with, set the input 1 through 3 faders to about “7”
on their scales, and set the MASTER fader to
“0.”
•REC SELECT Switches
The channel 1 through 3 REC SELECT switches must be
set to OFF, and the channel-4 REC SELECT switch should
be set to “R.”
•AUX SEND Controls
Set all four AUX SEND controls to MIN for the time being.
•GRAPHIC EQUALIZER Switch
Switch this OFF for the time being.
•PAN Controls
Since the channel-4 REC SELECT switch is set to “R,” the
channel 1 through 3 PAN controls must be rotated full
clockwise (right) to assign the track 1, 2 and 3 signals to
track 4 of the tape. The channel-4 PAN control can be set
to center.
•AUX RETURN Control
Set to MIN for the time being.
•MONITOR SELECT Switch
Set to MONITOR so you’ll only hear signals from the
MT100II recorder.
•MONITOR Controls
Set the channel 1 through 3 MONITOR controls fully
counter-clockwise, and the channel-4 MONITOR control to
about center or a position that will provide the best monitor-
ing level.
16 MT100II MULTITRACK CASSETTE RECORDER
1. Play back the tape. Gradually increase the MASTER fader
setting until you can hear the tracks you’ve recorded and
the channel-4 meter reads around “0” on the meter scale.
Adjust the MONITOR 4 control for the most comfortable
monitoring level.
2. Adjust the input 1, 2 and 3 faders — carefully — until you
get the desired balance between the first three tracks.
You’ll notice that as you adjust the balance between tracks
the channel-4 meter reading might change considerably.
You’ll have to compensate for this as you set up the ping-
pong mix by adjusting the MASTER fader.
3. At this time the GRAPHIC EQUALIZER may be switched
“on” and used to enhance the sound-quality of tracks as
they are combined.
4. AUX SEND controls on the channels may be used to add
an effect to the balance. The amount of effect added is
controlled by the AUX RETURN fader.
5. When everything is set up perfectly, rewind the tape to the
beginning and start recording. Sit back and waft until the
ping-pong is complete, then stop the recorder. Now play
back the tape and listen to the ping-ponged track carefully.
If something sounds odd, go back and repeat the ping-
pong process. You can do this as many times as neces-
sary until you get it right— then go on to the next step.
6. Complete your recording by overdubbing and using the
Ping-Pong technique as necessary.
[Note]
Only one output (left or right) of the effect will be
recorded. If the RECORD SELECT switch is set to
“L”, the output of the effect processor connected to
the LEFT AUX RETURN jack will be recorded. If the
RECORD SELECT switch is set to “R”, the output of
the effect processor connected to the RIGHT AUX
RETURN jack will be recorded.

MIXDOWN
Mixdown is the last stage in the recording process at which time you can blend and polish the sounds to create the final product.
A ‘MIX” is created by finely balancing the four tracks to achieve just the right sound. This final balance is achieved using MT100II’s
mixer section and is re-recorded onto a conventional stereo tape deck. Tracks can be faded in or out as required, and refinements
such as overall reverberation or equalization can be added using external signal processing equipment and MT100II’s 5-band on-
board GRAPHIC EQUALIZER. The mixer’s PAN controls can be used to position each track at their appropriate location in the
stereo image, and you may even want to move or PAN a sound from one channel to the other to create a dramatic effect.
Here’s how your system should be set up:
•INPUT SELECT Switches
Make sure that all four INPUT SELECT switches are set to
TAPE.
•Input Faders
Set all channels to “0” (minimum).
•REC SELECT Switches
Set all REC SELECT Switches to OFF.
•AUX SEND Controls
Set all four AUX SEND controls to MIN for the time being.
•GRAPHIC EQUALIZER Switch
Switch this OFF for the time being.
•PAN Controls
Start with all PAN controls set to center.
•MASTER Fader
Set to about “7” or “8” on the scale.
•AUX RETURN Control
Set to MIN for the time being.
•MONITOR SELECT Switch
You will want to monitor the same signal which appears at
the STEREO OUT jacks, so set this switch to STEREO.
We recommend using an external sound system or a pair
of powered monitor speakers (such as the YAMAHA
MS101 Monitor Speaker) for mixdown.
•MONITOR Controls
Set all MONITOR controls fully counter-clockwise.
•METER Switch
STEREO.
•dbx Switch
If you started recording with the dbx switch set to ON,
leave it there. If OFF, it should stay OFF.
1. Sit in a comfortable, central position in front of your monitor
speakers.
2. Listen to, evaluate, and adjust the sound of each track indi-
vidually. This simply means raising the fader of a single
track, adding effects or other signal processing as required,
then repeating the process on the next track until all tracks
have been carefully checked. MT100II’s 5-band GRAPHIC
EQUALIZER can be used to add or subtract high, mid, and
low frequency components from the overall mix, creating a
more exciting and coherent marriage of the tracks. If you
have an external signal processing device such as the
YAMAHA FX500 Simul-effect Processor connected into the
MT100lI’s AUX SEND/RETURN loop as described in the
following section (“USING THE AUX SEND/RETURN
LOOP), it’s a simple matter to select the desired effect on
your signal processor and add the required amount of ef-
fect to each track using the AUX SEND controls. The AUX
RETURN control must also be set to an appropriate level.
3. When all tracks have been individually checked, bring all
input faders up to about “7” or “8” on the scale and play
back the tape. Adjust the faders for the best overall bal-
ance. Now adjust the PAN controls to place each track at
the desired location in the stereo sound field. Now listen
carefully —
too much or too little reverb on any track?
Readjust the AUX SEND controls to achieve the desired
effect. Balance not quite right? Keep readjusting until you
are satisfied. You should also rehearse any fades or pans
you plan to do while actually recording the mix.
4. When you’re sure everything is ready, prepare to actually
record the mix. Connect the MT100II STEREO OUT jacks
to the inputs of a stereo cassette recorder. Plug your moni-
tor headphones into the stereo cassette deck phones jack
if you want to listen as you record the mix, or simply leave
them connected to the MT100lI PHONES jack and listen
with the MONITOR SELECT switch set to STEREO. Use
the stereo cassette deck record level control(s) and, if nec-
essary, the MT100II MASTER fader to set the optimum
record level, then go ahead and record. The MT100II
MASTER fader can also be used to add a slow fade at the
end of the piece.
17
Other manuals for MT100II
5
Table of contents
Other Yamaha Cassette Player manuals

Yamaha
Yamaha K-720 User manual

Yamaha
Yamaha KX-330 User manual

Yamaha
Yamaha KX-W262 User manual

Yamaha
Yamaha MT44 User manual

Yamaha
Yamaha MT120S User manual

Yamaha
Yamaha MT4X User manual

Yamaha
Yamaha K-1020 User manual

Yamaha
Yamaha K-220 User manual

Yamaha
Yamaha MT100II User manual

Yamaha
Yamaha KX-E300 User manual