89
10
YPAO MIC
1 2
3
9
54
VOLUME CROSSOVER/
HIGH CUT
MIN MAX MIN MAX
9 0
ENT
MEMORY
+10
56 87
MUTE
CODE SET
INPUT
TV VOL
1 2 3 4
MOVIE
ENHANCER
TUNING PRESET
BAND
DISPLAYRETURN
ENTER
ON
SCREEN OPTION
TOP MENU
MUTE
PROGRAM VOLUME
POP-UP/MENU
PURE DIRECT
STRAIGHT
INFO SLEEP
MUSIC
PARTY HDMI OUT
TUNER
PHONO MULTI
ZONE
MAIN 2 3 4
MODE
SCENE
4321
TV
BD/DVD
NET
RADIO
TV
TV CH
AV
AUDIO
5 6 7
V-AUX
1 2 3 4
1 2 3 4
SUR. DECODE
USB
NET
SOURCE RECEIVER
z
ENTER
VOLUME
STRAIGHT
ON SCREEN
AV 1
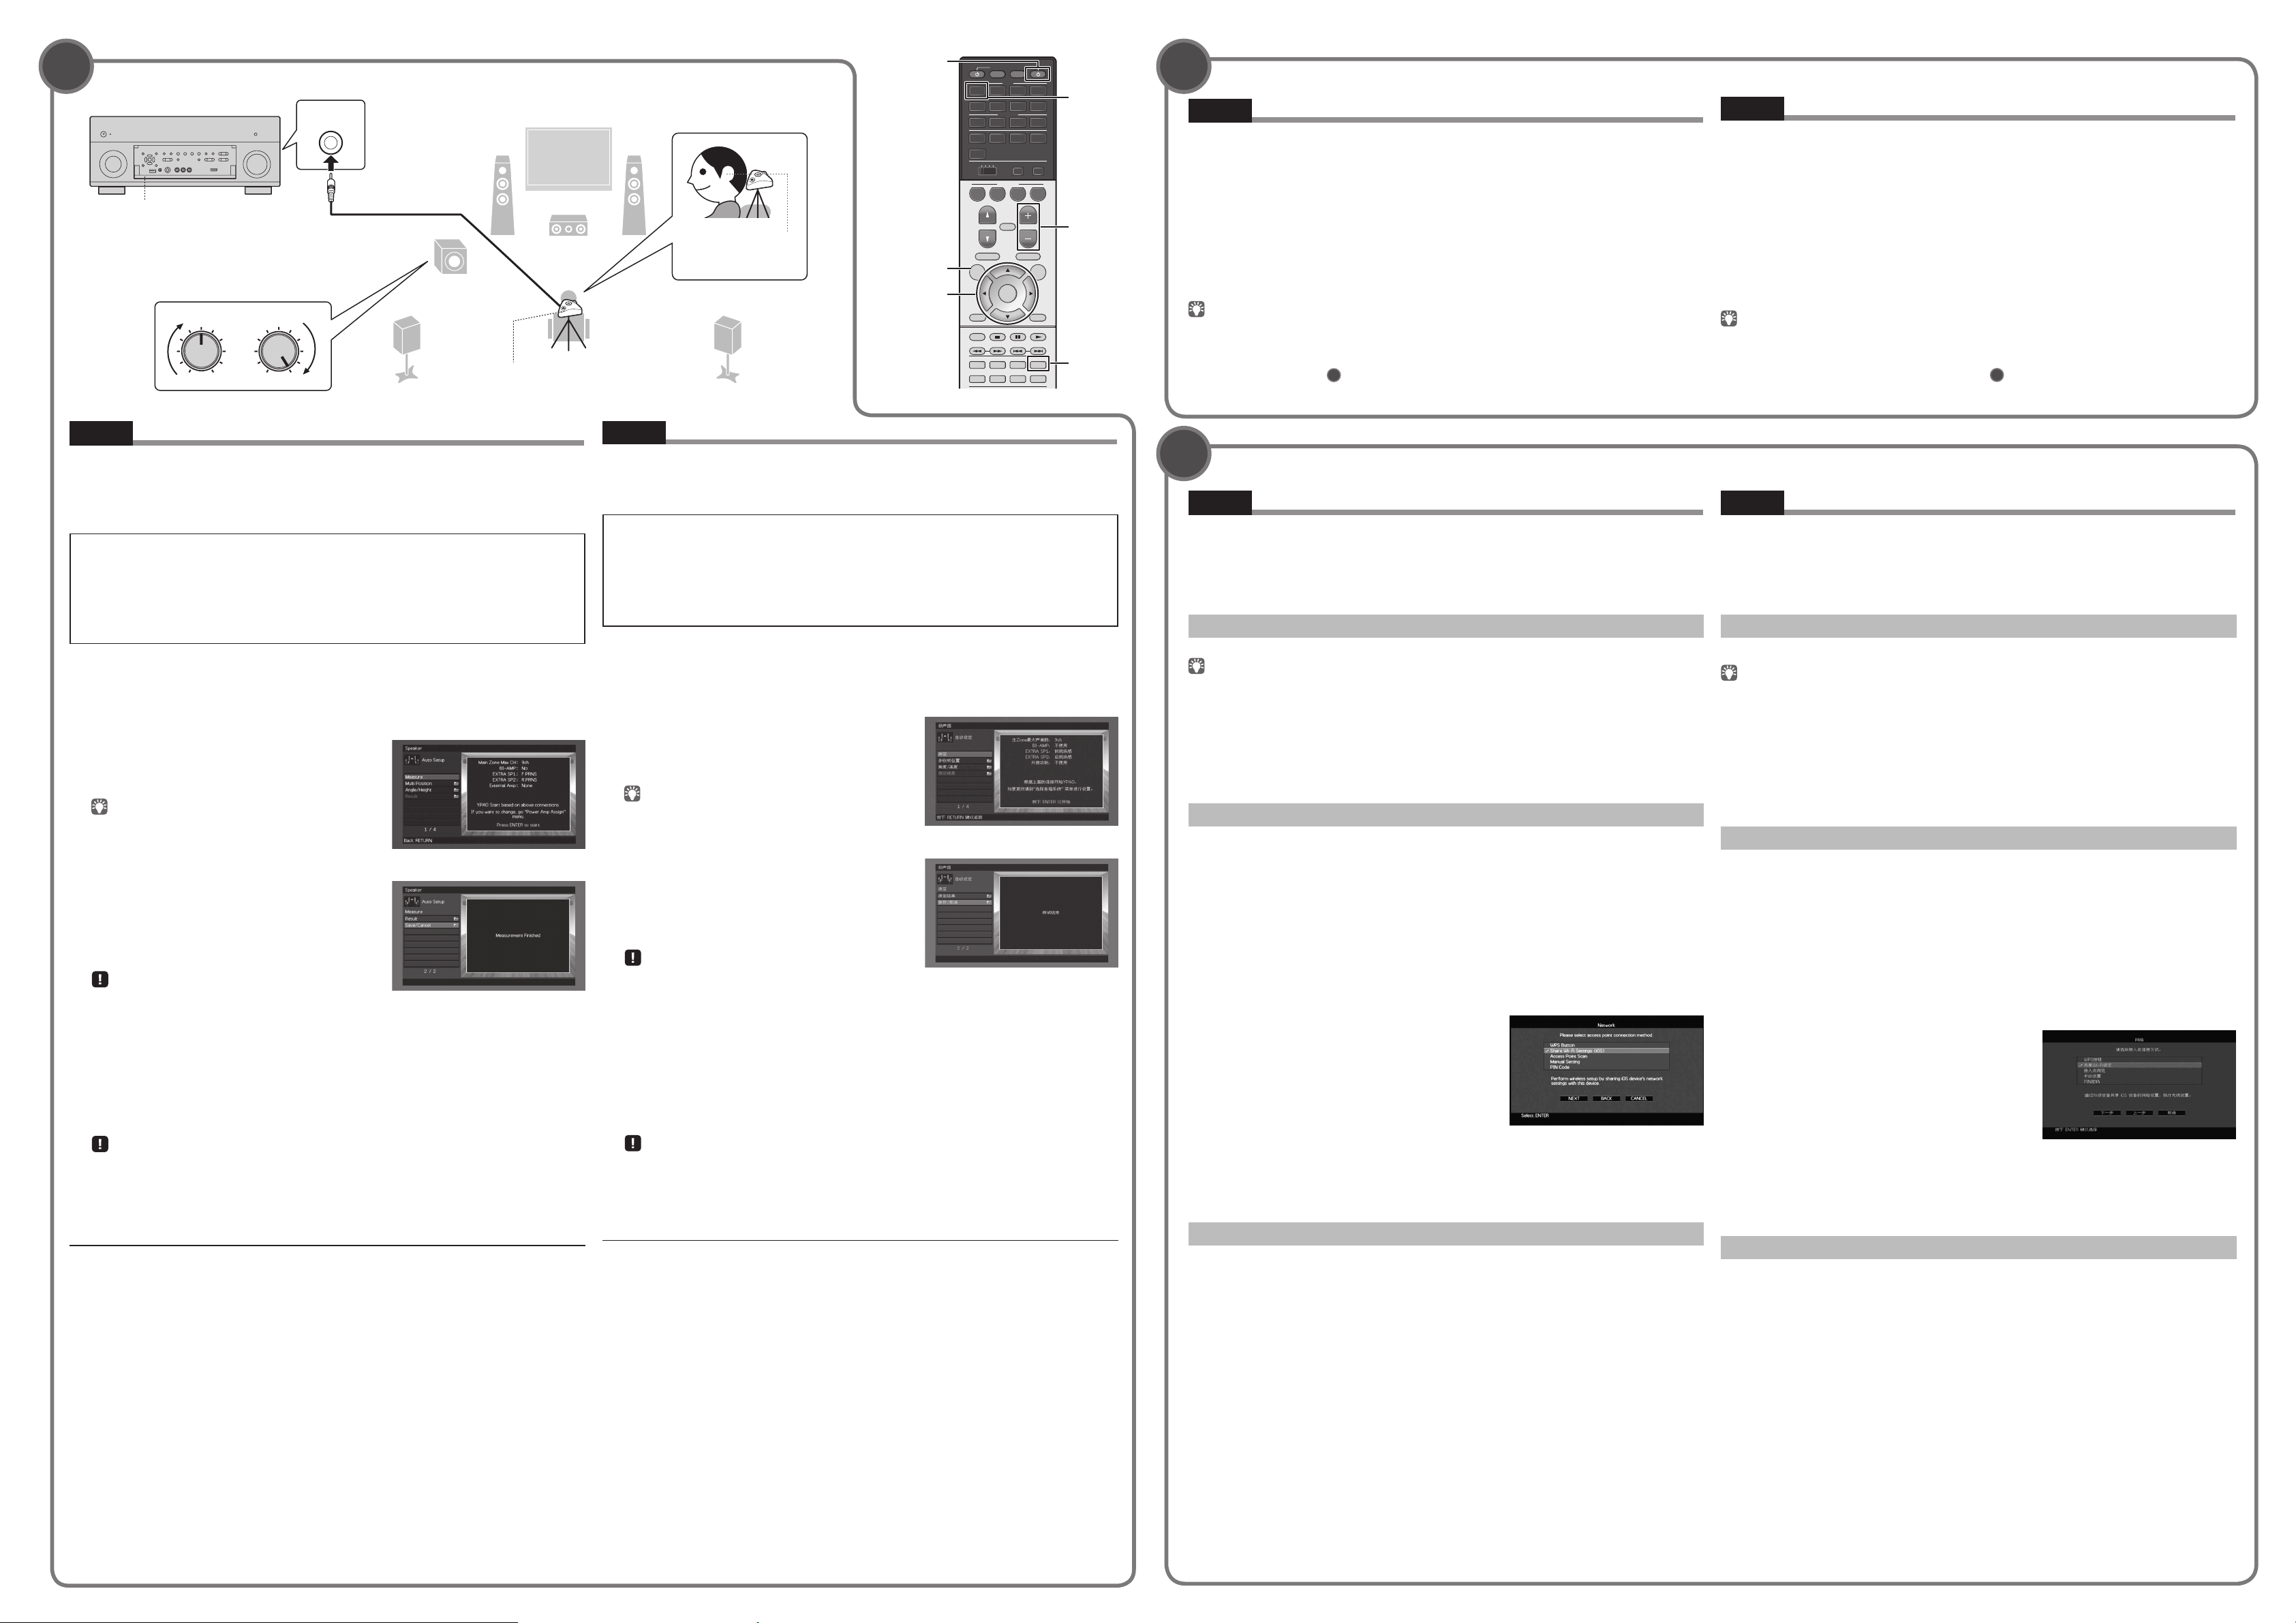
Optimizing the speaker settings automatically (YPAO)
The Yamaha Parametric room Acoustic Optimizer (YPAO) function detects speaker
connections, measures the distances from them to your listening position(s), and then
automatically optimizes the speaker settings, such as volume balance and acoustic
parameters, to suit your room.
Note the following regarding YPAO measurement
• Test tones are output at high volume and may surprise or frighten small children.
• Test tone volume cannot be adjusted.
• Keep the room as quiet as possible.
• Stay in a corner of the room behind the listening position so that you do not become an obstacle
between speakers and the YPAO microphone.
• Do not connect headphones.
1. Press z(receiver power) to turn on the unit.
2. Turn on the TV and switch the TV input to display video from the unit (HDMI
OUT jack).
3. Turn on the subwoofer and set the volume to half. If the crossover frequency
is adjustable, set it to maximum.
4. Place the YPAO microphone at your
listening position and connect it to the
YPAO MIC jack on the front panel.
Place the YPAO microphone at your listening position
(same height as your ears). We recommend the use of a
tripod as a microphone stand. You can use the tripod
screws to stabilize the microphone.
5. To start the measurement, use the cursor
keys to select “Measure” and press ENTER.
The measurement will start in 10 seconds.
It takes about 3 minutes to measure.
The right screen appears on the TV when the
measurement finishes.
• If any error message (such as E-1) or warning message
(such as W-2) appears, see “Error messages” or “Warning messages” in the Owner’s Manual.
• If the warning message “W-1:Out of Phase” appears, see “If “W-1:Out of Phase” appears”.
6. Use the cursor keys to select “Save/Cancel” and press ENTER.
7. Use the cursor keys to select “SAVE” and press ENTER.
8. Use the cursor keys to select “YES” to enable YPAO Volume and press ENTER.
For details on YPAO Volume, refer to the Owner’s Manual.
9. Disconnect the YPAO microphone from the unit.
Do not leave the YPAO microphone in a place where it will be exposed to direct sunlight or high
temperature for an extended period of time.
This completes optimization of the speaker settings.
If “W-1:Out of Phase” appears
Follow the procedure below to check the speaker connections.
1
Use the cursor keys to select “Result” and press ENTER.
2
Check cable connections (+/–) for the problem speaker.
3
Check the cable connections (+/–) of the speaker that was identified as being “Reverse” in
the warning message.
If the speaker is connected incorrectly:
Turn off the unit, reconnect the speaker cable, and then try YPAO measurement again.
If the speaker is connected correctly:
Depending on the type of speakers or room environment, this message may appear even if
the speakers are connected correctly.
In this case, ignore the message and proceed to step 6.
Playing back a BD/DVD
Now let’s play back a BD/DVD.
We recommend playing back multichannel audio (5.1-channel or more) to feel surround sound
produced by the unit.
1. Turn on the BD/DVD player.
2. Press AV 1 to select “AV 1” as the input source.
3. Start playback on the BD/DVD player.
4. Press STRAIGHT repeatedly to select “STRAIGHT”.
5. Press VOLUME to adjust the volume.
When surround sound is not heard, or no sound is output from a specific speaker, see “Troubleshooting”
in the Owner’s Manual.
This completes the basic setup procedure.
Continue with procedure
10
if the unit will be used with a wireless network connection.
Connecting a router for wireless network connection
Connect the unit to a wireless router (access point).
There are several methods to connect the unit to a wireless network. This section describes
the following three methods.
For details on other connection methods, refer to the Owner’s Manual.
A: Using the WPS button conguration
Set up a wireless connection with the WPS button on the wireless router (access point).
This configuration does not work if the security method of your wireless router (access point) is WEP. In
this case, use other connection method.
1. Hold down INFO (WPS) on the front panel for 3 seconds.
“Press WPS button on Access Point” appears on the front display.
2. Push the WPS button on the wireless router (access point).
When the connection process finishes, “Completed” appears on the front display.
If “Not connected” appears, repeat from step 1or try another connection method.
B: Sharing the iOS device setting
Set up a wireless connection by applying the connection settings on iOS devices (iPhone/
iPad/iPod touch*).
* You need iOS devices with iOS 5.0 or later.
Before proceeding, confirm that your iOS device is connected to a wireless router.
1. Press ON SCREEN to display the on-screen menu on the TV.
2. Use the cursor keys to select “Setup” and press ENTER.
3. Use the cursor keys (v/w) to select “Network” and use the cursor keys
(r/s) to select “Network Connection”, and then press ENTER.
4. Use the cursor keys (r/s) and ENTER to check “Wireless (Wi-Fi)” and
select “OK”.
5. Use the cursor keys (r/s) and ENTER
to check “Share Wi-Fi Settings (iOS)” and
select “NEXT”.
6. Connect the iOS device to the USB jack,
and disable the screen lock on the iOS
device.
7. Use the cursor keys (r/s) to select
“NEXT” and press ENTER.
8. Tap “Allow” in the message appeared on the iOS device.
When the connection process finishes, “Completed” appears on the TV screen.
9. To exit from the menu, press ON SCREEN.
C: Searching for an access point
Set up a wireless connection by searching available access points.
1. Perform steps 1to 4of “B: Sharing the iOS device setting”.
2. Use the cursor keys (r/s) to select “Access Point Scan” and press ENTER.
3. Use the cursor keys and ENTER to check the desired access point and
select “NEXT”.
4. Use the cursor keys and ENTER to enter the security key and select “NEXT”.
5. Use the cursor keys (v/w) to select “CONNECT” and press ENTER to start
the connection process.
When the connection process finishes, “Completed” appears on the TV screen.
If “Not connected” appears, repeat from step 1or try another connection method.
6. To exit from the menu, press ON SCREEN.
English
English
English
* The screens may differ depending on
the model of the unit.
The unit
Press the bottom of the front panel
door gently to open the door.
YPAO MIC jack
YPAO microphone
Ear height
(receiver
power) key
Cursor keys
播放 BD/DVD
现在让我们播放 BD/DVD 光盘。
我们建议播放多声道音频(5.1 声道或以上)来感受本机所产生的环绕立体声。
1. 打开 BD/DVD 播放机。
2. 按AV 1 选择“AV 1”作为输入源。
3. 开始在 BD/DVD 播放机上播放。
4. 反复按 STRAIGHT 选择“STRAIGHT”。
5. 按VOLUME 调节音量。
听不到环绕声时,或者特定音箱未输出任何声音时,请参阅使用说明书中的“故障排除”。
这将完成基本的设置过程。
如果配合无线网络连接使用本机,则执行步骤
10
。
连接路由器执行无线网络连接
将本机连接至无线路由器(接入点)。
有多种方式将本机连接至无线网络。本节说明了以下三种方法。
有关其他连接方式的详情,请参阅使用说明书。
A:使用 WPS 按钮配置
使用无线路由器(接入点)上的 WPS 按钮设置无线连接。
如果您的无线路由器(接入点)的加密方式是 WEP,则该配置不起作用。在这种情况下,请使用
其他连接方式。
1. 按住前面板上的 INFO(WPS)3 秒钟。
“Press WPS button on Access Point”将显示在前显示屏上。
2. 在无线路由器(接入点)上按下 WPS 按钮。
连接进度完成后,“Completed”将显示在前方显示屏上。
如果显示“Not connected”,从步骤 1开始重复,或者尝试其他连接方式。
B:共享 iOS 设备设置
在iOS 设备(iPhone/iPad/iPod touch*)上应用连接设置设定无线连接。
* 您需要安装有 iOS 5.0 或更高版本系统的 iOS 设备。
进行前,请确认您的 iOS 设备已连接至无线路由器。
1. 按ON SCREEN 在电视上显示屏幕菜单。
2. 使用光标键选择“设定”,然后按 ENTER。
3. 使用光标键(
v/w
)选择“网络”并使用光标键(r/s)选择“网络连接”,然
后按 ENTER。
4. 使用光标键(r/s)和 ENTER 选择“无线”并选择“确定”。
5. 使用光标键(r/s)和 ENTER 选择“共享
Wi-Fi 设定”并选择“下一步”。
6. 将iOS 设备连接至 USB 插孔,在 iOS 设
备上禁用屏幕锁定。
7. 使用光标键(r/s)选择“下一步”,然后
按ENTER。
8. 轻触 iOS 设备上所出现消息内的“Allow”。
连接进度完成后,“设定完成”将显示在电视屏幕上。
9. 若要从菜单中退出,请按 ON SCREEN。
C:搜索接入点
您可以通过搜索可用接入点设定无线连接。
1. 执行步骤 1到4,如“B: 共享 iOS 设备设置”中所述。
2. 使用光标键(r/s)选择“接入点浏览”,然后按 ENTER。
3. 使用光标键和 ENTER 检查所需的接入点,选择“下一步”。
4. 使用光标键和 ENTER 输入安全密钥,选择“下一步”。
5. 使用光标键(
v/w)选择“连接”,然后按 ENTER 开始连接进度。
连接进度完成后,“设定完成”将显示在电视屏幕上。
如果显示“未连接”,从步骤 1开始重复,或者尝试其他连接方式。
6. 若要从菜单中退出,请按 ON SCREEN。
中文
中文
自动优化音箱设置(YPAO)
Yamaha Parametric room Acoustic Optimizer(YPAO)功能将检测音箱的连接,测试从音
箱到您聆听位置的距离,并且自动优化音箱设置(如音量平衡和音响参数)以适应房间。
请注意以下有关 YPAO 测量信息的说明。
•测试曲调输出音量较高,可能会惊吓到孩童。
•测试曲调的音量无法调节。
•应尽可能保持房间内安静。
•站立于聆听位置后方的房间墙角内,这样您不会阻挡音箱和 YPAO 麦克风。
•不要连接耳机。
1. 按z
(接收器电源)打开本机。
2. 打开电视,然后切换电视输入以显示来自本机的视频(HDMI OUT 插孔)。
3. 打开低音炮,然后将其音量设为原始音量的一半。如果穿越频率可调节,则
将其设为最大。
4. 将YPAO 麦克风放置在收听位置(与您耳朵
的高度相同),然后将它连接至前面板上的
YPAO MIC 插孔。
将YPAO 麦克风放置在收听位置(与您耳朵的高度相
同)。我们建议使用三脚架作为麦克风支架。您可以用
三角架螺钉稳定麦克风。
5. 若要开始测量,请使用光标键选择“测定”,
然后按 ENTER。
10 秒钟后将开始测量。
测量大约需要 3 分钟时间。
完成测量时,电视上将出现右侧屏幕。
•如果出现了任何错误消息(如 E-1)或警告消息(如
W-2),请参见使用说明书中的“错误消息”或“警告消息”。
•如果出现警告消息“W-1: 极性接反”,请参阅“如果出现‘W-1: 极性接反’”。
6. 使用光标键选择“保存 /取消”,然后按 ENTER。
7. 使用光标键选择“保存”,然后按 ENTER。
8. 使用光标键选择“是”启用 YPAO 音量,然后按 ENTER。
有关 YPAO 音量的详情,请参阅使用说明书。
9. 断开 YPAO 麦克风与本机的连接。
请勿使 YPAO 麦克风长时间暴露在阳光直晒或高温的位置。
这将完成对音箱设置的优化。
如果出现“W-1: 极性接反”
请按以下过程检查音箱连接。
1
使用光标键选择“测定结果”,然后按 ENTER。
2
检查问题音箱的缆线连接(+/–)。
3
检查在警告消息中标识为“反相”的音箱的缆线连接(+/–)。
如果音箱连接不正确 :
关闭本机并再次连接音箱缆线,然后再次尝试 YPAO 测量。
如果音箱连接正确 :
根据音箱类型或房间环境,即使音箱连接正确,此消息也可能会出现。
在这种情况下,忽略消息并前进至步骤 6。
中文
* 根据设备型号的不同屏幕有所不同。
本机
YPAO MIC 插孔
YPAO 麦克风
耳朵高度
(接收器
电源)键
光标键
轻按前面板舱门的底部以打开舱门。


