BCDAAABDBCBACDアウトドアスピーカーABCDTo wall / ceiling mount the speakers, use the included bracket.
AUsing the bracket as a template mark the locations (four points) of the key hole
slots on the mounting area.
BUsing appropriate hardware (not included) securely fasten the bracket to the wall /
ceiling.
CPosition the speaker in the bracket and secure the speaker by using the two knobs
included.
DRotate the YAMAHA emblem according to the position of the speaker.
When using the brackets to mount the speakers on a wall / ceiling, please use safety
wire (not included) between the speaker and the bracket to prevent the speaker from
falling.
Fix the safety wire with M5 screw (inch screw: No. 10-32) by using the screw
hole [diameter: 5 mm (1/4″), depth: 15 mm (5/8″)] at the rear of the speakers. For
security, please confirm that installed screw is in the screw hole more than 10 mm
(3/8″).
When placing the speakers on a flat surface, to enjoy the high sound quality, stabilize
the
speaker
s using the included non-skid pads. Affix the non-skid pads to prevent the
speaker
s from moving as a result of vibration, etc.
AWhen placing the speakers vertically, attach the bracket and the knobs to the
speakers, and affix the non-skid pads on the bracket. When placing the speakers
horizontally, attach the knobs to the speakers, and affix the non-skid pads on the
side of the speakers.
BRotate the YAMAHA emblem according to the position of the speaker.
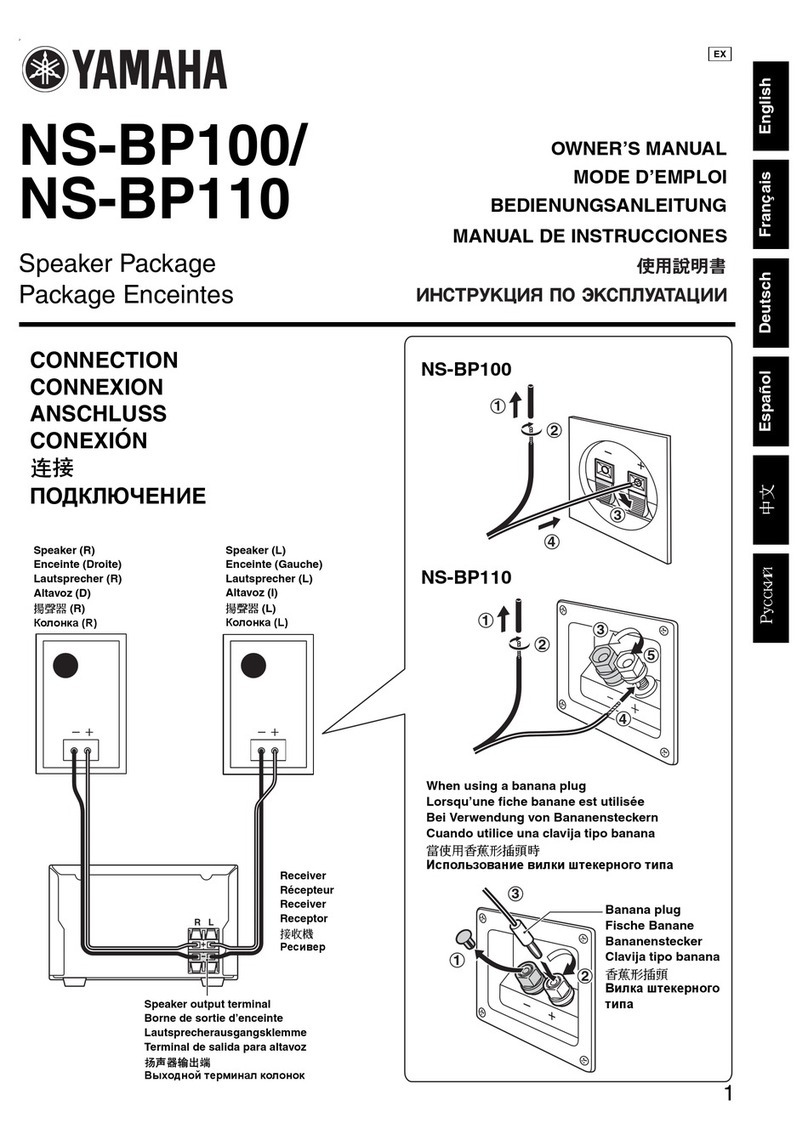
Before making connections, make sure that the amplifier / receiver is switched off.
CONNECTIONS
• Connect the input terminals at the rear of the speakers to the speaker output
terminals of the amplifier / receiver with the speaker cables (not included).
• Connect each speaker making sure not to reverse the polarity “+” (red), “–” (black).
If the speaker is connected with reversed polarity, the sound will be unnatural and
lack bass.
HOW TO CONNECT
ARemove approximately 10 mm (3/8″) of insulation from the end of each speaker
cable and twist the exposed wires of the cable together to prevent short circuits.
BUnscrew the terminal knob.
CInsert one bare wire into the hole in the side of each terminal.
DTighten the terminal knob to secure the wire.
2A MOUNTING THE SPEAKERS
If speaker cable (not included) is being fed from a hole in the wall / ceiling behind the
bracket, pull this speaker cable through the hole in the bracket before mounting the
bracket [figure - ].
2B PLACING THE SPEAKERS
3CONNECTING YOUR AMPLIFIER / RECEIVER
Note: Do not let the bare speaker wires touch each other as this could damage the
speaker or amplifier / receiver, or both.
″ ″
″ ″
″ ″ ″ ″ ″ ″
2A aABCDABCDABABCDABCDABCDABABCDABCDABCDABABCD

