manuals.online logo
Brands
  1. Home
  2. •
  3. Brands
  4. •
  5. Yamaha
  6. •
  7. Stereo Receiver
  8. •
  9. Yamaha RX-V373 User manual

Yamaha RX-V373 User manual

AV Receiver
Owner’s Manual
English
Read the supplied booklet “Safety Brochure” before using the unit.
En 2
CONTENTS
Accessories . . . . . . . . . . . . . . . . . . . . . . . . . . . . . . . . . . . . . . . . . . . . . . . . . . . . . . 4
FEATURES 5
What you can do with the unit . . . . . . . . . . . . . . . . . . . . . . . . . . . . . . . . . . . . 5
Part names and functions . . . . . . . . . . . . . . . . . . . . . . . . . . . . . . . . . . . . . . . . 7
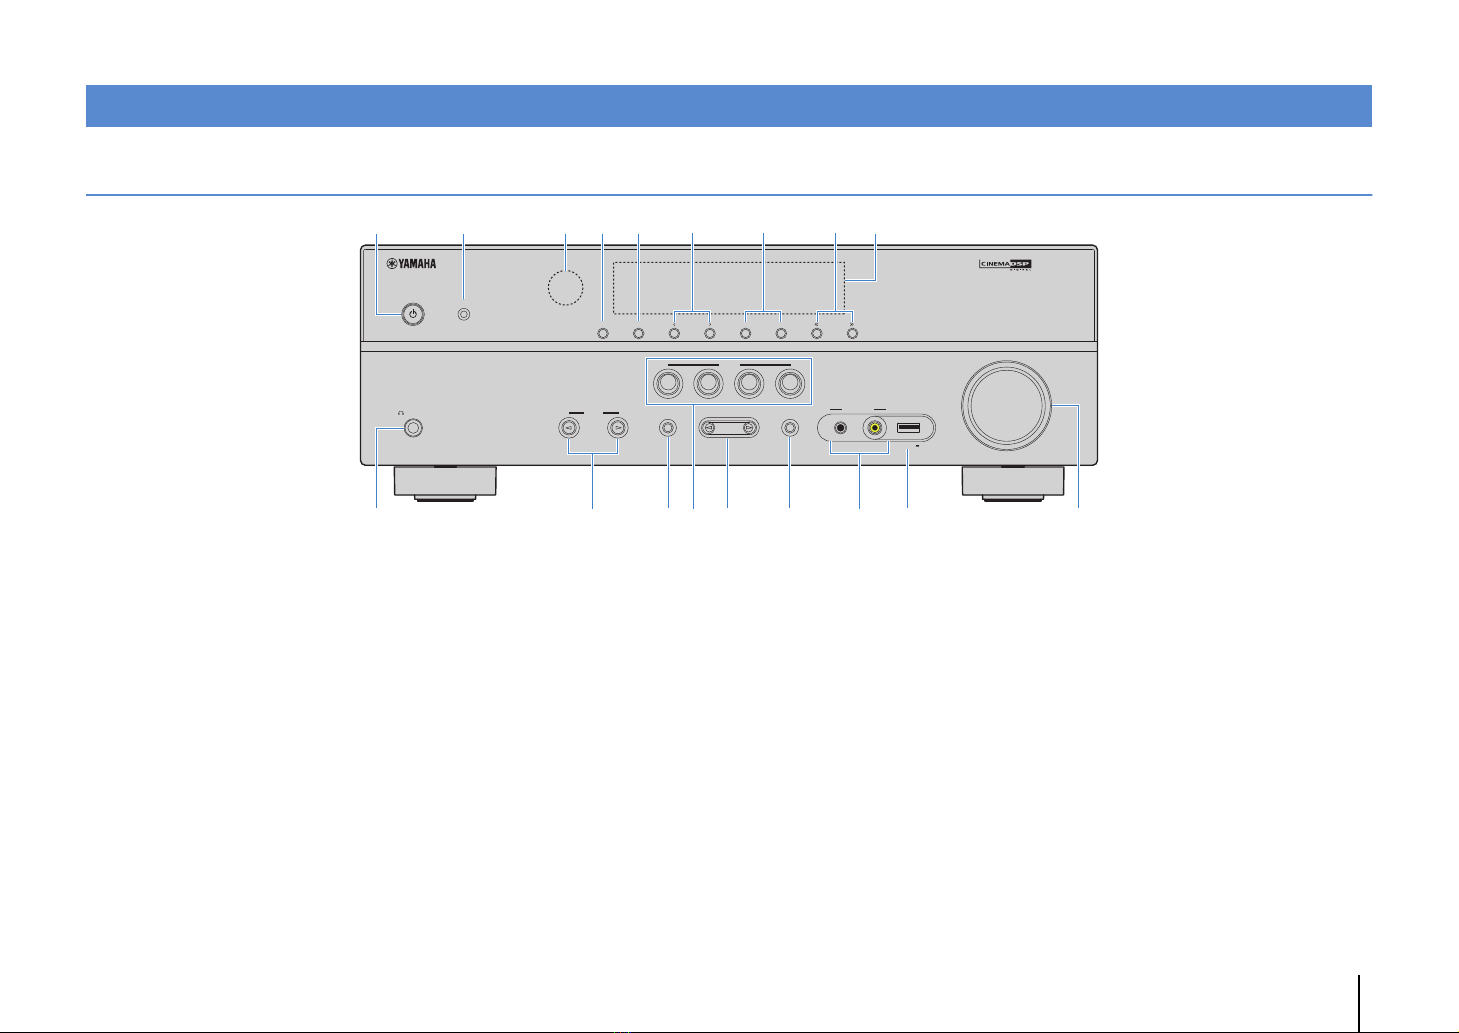
Front panel . . . . . . . . . . . . . . . . . . . . . . . . . . . . . . . . . . . . . . . . . . . . . . . . . . . . . . . . . . . . . . . . . . . . . . . . . . . . . . . . . . . . . . . . 7
Front display (indicators) . . . . . . . . . . . . . . . . . . . . . . . . . . . . . . . . . . . . . . . . . . . . . . . . . . . . . . . . . . . . . . . . . . . . . . . . . . . 8
Rear panel . . . . . . . . . . . . . . . . . . . . . . . . . . . . . . . . . . . . . . . . . . . . . . . . . . . . . . . . . . . . . . . . . . . . . . . . . . . . . . . . . . . . . . . . . 9
Remote control . . . . . . . . . . . . . . . . . . . . . . . . . . . . . . . . . . . . . . . . . . . . . . . . . . . . . . . . . . . . . . . . . . . . . . . . . . . . . . . . . . . 10
PREPARATIONS 11
General setup procedure . . . . . . . . . . . . . . . . . . . . . . . . . . . . . . . . . . . . . . . . 11
1 Placing speakers . . . . . . . . . . . . . . . . . . . . . . . . . . . . . . . . . . . . . . . . . . . . . . 12
2 Connecting speakers . . . . . . . . . . . . . . . . . . . . . . . . . . . . . . . . . . . . . . . . . . 15
Input/output jacks and cables . . . . . . . . . . . . . . . . . . . . . . . . . . . . . . . . . . . 17
3 Connecting a TV . . . . . . . . . . . . . . . . . . . . . . . . . . . . . . . . . . . . . . . . . . . . . . . 18
4 Connecting playback devices . . . . . . . . . . . . . . . . . . . . . . . . . . . . . . . . . . 23
Connecting video devices (such as BD/DVD players) . . . . . . . . . . . . . . . . . . . . . . . . . . . . . . . . . . . . . . . . . . . . . . . 23
Connecting audio devices (such as CD players) . . . . . . . . . . . . . . . . . . . . . . . . . . . . . . . . . . . . . . . . . . . . . . . . . . . . . 25
Connecting to the jacks on the front panel . . . . . . . . . . . . . . . . . . . . . . . . . . . . . . . . . . . . . . . . . . . . . . . . . . . . . . . . . 26
5 Connecting the FM/AM antennas . . . . . . . . . . . . . . . . . . . . . . . . . . . . . . . 26
6 Connecting recording devices . . . . . . . . . . . . . . . . . . . . . . . . . . . . . . . . . . 27
7 Connecting the power cable . . . . . . . . . . . . . . . . . . . . . . . . . . . . . . . . . . . 27
8 Selecting an on-screen menu language . . . . . . . . . . . . . . . . . . . . . . . . . 28
9 Optimizing the speaker settings automatically (YPAO) . . . . . . . . . . 29
Error messages . . . . . . . . . . . . . . . . . . . . . . . . . . . . . . . . . . . . . . . . . . . . . . . . . . . . . . . . . . . . . . . . . . . . . . . . . . . . . . . . . . . .31
Warning messages . . . . . . . . . . . . . . . . . . . . . . . . . . . . . . . . . . . . . . . . . . . . . . . . . . . . . . . . . . . . . . . . . . . . . . . . . . . . . . . .32
PLAYBACK 33
Basic playback procedure . . . . . . . . . . . . . . . . . . . . . . . . . . . . . . . . . . . . . . . 33
Switching information on the front display . . . . . . . . . . . . . . . . . . . . . . . . . . . . . . . . . . . . . . . . . . . . . . . . . . . . . . . . . 33
Selecting the input source and favorite settings with one touch
(SCENE) . . . . . . . . . . . . . . . . . . . . . . . . . . . . . . . . . . . . . . . . . . . . . . . . . . . . . . . . 34
Configuring scene assignments . . . . . . . . . . . . . . . . . . . . . . . . . . . . . . . . . . . . . . . . . . . . . . . . . . . . . . . . . . . . . . . . . . . . 34
Selecting the sound mode . . . . . . . . . . . . . . . . . . . . . . . . . . . . . . . . . . . . . . . 35
Enjoying sound field effects (CINEMA DSP) . . . . . . . . . . . . . . . . . . . . . . . . . . . . . . . . . . . . . . . . . . . . . . . . . . . . . . . . . 36
Enjoying unprocessed playback . . . . . . . . . . . . . . . . . . . . . . . . . . . . . . . . . . . . . . . . . . . . . . . . . . . . . . . . . . . . . . . . . . .38
Enjoying compressed music with enhanced sound (Compressed Music Enhancer) . . . . . . . . . . . . . . . . . . . 39
Enjoying surround sound with headphones (SILENT CINEMA) . . . . . . . . . . . . . . . . . . . . . . . . . . . . . . . . . . . . . . . 39
Listening to FM/AM radio . . . . . . . . . . . . . . . . . . . . . . . . . . . . . . . . . . . . . . . 40
Setting the frequency steps . . . . . . . . . . . . . . . . . . . . . . . . . . . . . . . . . . . . . . . . . . . . . . . . . . . . . . . . . . . . . . . . . . . . . . . . 40
Selecting a frequency for reception . . . . . . . . . . . . . . . . . . . . . . . . . . . . . . . . . . . . . . . . . . . . . . . . . . . . . . . . . . . . . . . . 40
Registering favorite radio stations (presets) . . . . . . . . . . . . . . . . . . . . . . . . . . . . . . . . . . . . . . . . . . . . . . . . . . . . . . . . 41
Radio Data System tuning . . . . . . . . . . . . . . . . . . . . . . . . . . . . . . . . . . . . . . . . . . . . . . . . . . . . . . . . . . . . . . . . . . . . . . . . . 43
Playing back iPod music . . . . . . . . . . . . . . . . . . . . . . . . . . . . . . . . . . . . . . . . . 44
Connecting an iPod . . . . . . . . . . . . . . . . . . . . . . . . . . . . . . . . . . . . . . . . . . . . . . . . . . . . . . . . . . . . . . . . . . . . . . . . . . . . . . .44
Playback of iPod content . . . . . . . . . . . . . . . . . . . . . . . . . . . . . . . . . . . . . . . . . . . . . . . . . . . . . . . . . . . . . . . . . . . . . . . . . . 45
Playing back music stored on a USB storage device . . . . . . . . . . . . . . . 48
Connecting a USB storage device . . . . . . . . . . . . . . . . . . . . . . . . . . . . . . . . . . . . . . . . . . . . . . . . . . . . . . . . . . . . . . . . . . 48
Playback of USB storage device contents . . . . . . . . . . . . . . . . . . . . . . . . . . . . . . . . . . . . . . . . . . . . . . . . . . . . . . . . . . . 48
Configuring playback settings for different playback sources
(Option menu) . . . . . . . . . . . . . . . . . . . . . . . . . . . . . . . . . . . . . . . . . . . . . . . . . . 51
Option menu items . . . . . . . . . . . . . . . . . . . . . . . . . . . . . . . . . . . . . . . . . . . . . . . . . . . . . . . . . . . . . . . . . . . . . . . . . . . . . . . . 51
En 3
CONFIGURATIONS 54
Configuring various functions (Setup menu) . . . . . . . . . . . . . . . . . . . . . . 54
Setupmenu items . . . . . . . . . . . . . . . . . . . . . . . . . . . . . . . . . . . . . . . . . . . . . . . . . . . . . . . . . . . . . . . . . . . . . . . . . . . . . . . . . 55
Speaker . . . . . . . . . . . . . . . . . . . . . . . . . . . . . . . . . . . . . . . . . . . . . . . . . . . . . . . . . . . . . . . . . . . . . . . . . . . . . . . . . . . . . . . . . . . 57
HDMI . . . . . . . . . . . . . . . . . . . . . . . . . . . . . . . . . . . . . . . . . . . . . . . . . . . . . . . . . . . . . . . . . . . . . . . . . . . . . . . . . . . . . . . . . . . . . 59
Sound . . . . . . . . . . . . . . . . . . . . . . . . . . . . . . . . . . . . . . . . . . . . . . . . . . . . . . . . . . . . . . . . . . . . . . . . . . . . . . . . . . . . . . . . . . . . 61
ECO . . . . . . . . . . . . . . . . . . . . . . . . . . . . . . . . . . . . . . . . . . . . . . . . . . . . . . . . . . . . . . . . . . . . . . . . . . . . . . . . . . . . . . . . . . . . . . 62
Function . . . . . . . . . . . . . . . . . . . . . . . . . . . . . . . . . . . . . . . . . . . . . . . . . . . . . . . . . . . . . . . . . . . . . . . . . . . . . . . . . . . . . . . . . . 63
Language . . . . . . . . . . . . . . . . . . . . . . . . . . . . . . . . . . . . . . . . . . . . . . . . . . . . . . . . . . . . . . . . . . . . . . . . . . . . . . . . . . . . . . . . . 64
Configuring the system settings (ADVANCED SETUP menu) . . . . . . . . 65
ADVANCED SETUP menu items . . . . . . . . . . . . . . . . . . . . . . . . . . . . . . . . . . . . . . . . . . . . . . . . . . . . . . . . . . . . . . . . . . . . 65
Changing the speaker impedance setting (SP IMP.) . . . . . . . . . . . . . . . . . . . . . . . . . . . . . . . . . . . . . . . . . . . . . . . . . 65
Selecting the remote control ID (REMOTE ID) . . . . . . . . . . . . . . . . . . . . . . . . . . . . . . . . . . . . . . . . . . . . . . . . . . . . . . . 65
Changing the FM/AM tuning frequency setting (TU) . . . . . . . . . . . . . . . . . . . . . . . . . . . . . . . . . . . . . . . . . . . . . . . . 66
Switching the video signal type (TV FORMAT) . . . . . . . . . . . . . . . . . . . . . . . . . . . . . . . . . . . . . . . . . . . . . . . . . . . . . . 66
Restoring the default settings (INIT) . . . . . . . . . . . . . . . . . . . . . . . . . . . . . . . . . . . . . . . . . . . . . . . . . . . . . . . . . . . . . . . . 66
Updating the firmware (UPDATE) . . . . . . . . . . . . . . . . . . . . . . . . . . . . . . . . . . . . . . . . . . . . . . . . . . . . . . . . . . . . . . . . . . 66
Checking the firmware version (VERSION) . . . . . . . . . . . . . . . . . . . . . . . . . . . . . . . . . . . . . . . . . . . . . . . . . . . . . . . . . . 66
APPENDIX 67
Frequently asked questions . . . . . . . . . . . . . . . . . . . . . . . . . . . . . . . . . . . . . 67
Troubleshooting . . . . . . . . . . . . . . . . . . . . . . . . . . . . . . . . . . . . . . . . . . . . . . . . 68
Power and system . . . . . . . . . . . . . . . . . . . . . . . . . . . . . . . . . . . . . . . . . . . . . . . . . . . . . . . . . . . . . . . . . . . . . . . . . . . . . . . . 68
Audio . . . . . . . . . . . . . . . . . . . . . . . . . . . . . . . . . . . . . . . . . . . . . . . . . . . . . . . . . . . . . . . . . . . . . . . . . . . . . . . . . . . . . . . . . . . . . 69
Video . . . . . . . . . . . . . . . . . . . . . . . . . . . . . . . . . . . . . . . . . . . . . . . . . . . . . . . . . . . . . . . . . . . . . . . . . . . . . . . . . . . . . . . . . . . . . 70
FM/AM radio . . . . . . . . . . . . . . . . . . . . . . . . . . . . . . . . . . . . . . . . . . . . . . . . . . . . . . . . . . . . . . . . . . . . . . . . . . . . . . . . . . . . . . 70
USB . . . . . . . . . . . . . . . . . . . . . . . . . . . . . . . . . . . . . . . . . . . . . . . . . . . . . . . . . . . . . . . . . . . . . . . . . . . . . . . . . . . . . . . . . . . . . . . 71
Remote control . . . . . . . . . . . . . . . . . . . . . . . . . . . . . . . . . . . . . . . . . . . . . . . . . . . . . . . . . . . . . . . . . . . . . . . . . . . . . . . . . . . 71
Error indications on the front display . . . . . . . . . . . . . . . . . . . . . . . . . . . . . 72
Glossary . . . . . . . . . . . . . . . . . . . . . . . . . . . . . . . . . . . . . . . . . . . . . . . . . . . . . . . . 73
Audio information . . . . . . . . . . . . . . . . . . . . . . . . . . . . . . . . . . . . . . . . . . . . . . . . . . . . . . . . . . . . . . . . . . . . . . . . . . . . . . . . 73
HDMI and video information . . . . . . . . . . . . . . . . . . . . . . . . . . . . . . . . . . . . . . . . . . . . . . . . . . . . . . . . . . . . . . . . . . . . . . .74
Yamaha technologies . . . . . . . . . . . . . . . . . . . . . . . . . . . . . . . . . . . . . . . . . . . . . . . . . . . . . . . . . . . . . . . . . . . . . . . . . . . . .74
Video signal flow . . . . . . . . . . . . . . . . . . . . . . . . . . . . . . . . . . . . . . . . . . . . . . . . . . . . . . . . . . . . . . . . . . . . . . . . . . . . . . . . . .75
Information on HDMI . . . . . . . . . . . . . . . . . . . . . . . . . . . . . . . . . . . . . . . . . . . 75
HDMI Control . . . . . . . . . . . . . . . . . . . . . . . . . . . . . . . . . . . . . . . . . . . . . . . . . . . . . . . . . . . . . . . . . . . . . . . . . . . . . . . . . . . . .75
HDMI signal compatibility . . . . . . . . . . . . . . . . . . . . . . . . . . . . . . . . . . . . . . . . . . . . . . . . . . . . . . . . . . . . . . . . . . . . . . . . . 76
Reference diagram (rear panel) . . . . . . . . . . . . . . . . . . . . . . . . . . . . . . . . . . 77
Trademarks . . . . . . . . . . . . . . . . . . . . . . . . . . . . . . . . . . . . . . . . . . . . . . . . . . . . 78
Specifications . . . . . . . . . . . . . . . . . . . . . . . . . . . . . . . . . . . . . . . . . . . . . . . . . . 79
Index . . . . . . . . . . . . . . . . . . . . . . . . . . . . . . . . . . . . . . . . . . . . . . . . . . . . . . . . . . 81
Accessories En 4
Accessories
Check that the following accessories are supplied with the product.
Remote control Batteries (AAA, R03, UM-4) (x2)
Insert the batteries the right
way round.
AM antenna FM antenna
*One of the above is supplied depending on the region of
purchase.
YPAO microphone CD-ROM (Owner’s Manual)
Easy Setup Guide Safety Brochure
Operating range of the remote control
• Point the remote control at the remote control sensor on the unit and remain within the operating range
shown below.
• The illustrations of the remote control used in this manual are of the U.S.A. model.
• (Australia model only)
For information on how to control external devices with the remote control, refer to “Supplement for
Remote Control” on the supplied CD-ROM.
• Some features are not available in certain regions.
• Due to product improvements, specifications and appearance are subject to change without notice.
• This manual explains operations using the supplied remote control.
• This manual describes both the “iPod” and “iPhone” as the “iPod”. “iPod” refers to both “iPod” and
“iPhone”, unless otherwise specified.
• indicates precautions for use of the unit and its feature limitations.
• indicates supplementary explanations for better use.
30° 30°
Within 6 m (20 ft)
FEATURES ➤What you can do with the unit En 5
FEATURES
What you can do with the unit
• High-quality sound from iPod via
digital connection
.p.44
• Playback of music stored on USB
devices
.p.48
AV receiver (the unit)
Speakers
USB deviceiPod
BD/DVD player
HDMI Control
Audio/Video
The unit’s
remote control TV remote control
Audio
Audio
HDMI Control
Audio
Video
TV
Sequential operation of a TV,
AV receiver, and BD/DVD
player (HDMI Control)
.p.75
Supports 2- to 5.1-channel speaker system.
Allows you to enjoy your favorite acoustic
spaces in various styles.
• Automatically optimizing the
speaker settings to suit your room
(YPAO)
.p.29
• Reproducing stereo or multichannel
sounds with the sound fields like
actual movie theaters and concert
halls (CINEMA DSP)
.p.36
• Enjoying compressed music with
enhanced sound (Compressed
Music Enhancer)
.p.39
Change the input source
and favorite settings with
one touch (SCENE)
.p.34
The ECO mode
(power saving function)
allows you to create an
eco-friendly home
theater system
.p.63
FEATURES ➤What you can do with the unit En 6
Full of useful functions!
❑Connecting various devices (p.23)
A number of HDMI jacks and various input/output jacks
on the unit allow you to connect video devices (such as
BD/DVD players), audio devices (such as CD players),
game consoles, camcorders, and other devices.
The HDMI jacks supports 3D and 4K video transmission
(through output).
❑Playing back TV audio in surround sound
with a single HDMI cable connection
(Audio Return Channel: ARC) (p.18)
When using an ARC -compatible TV, you only need one
HDMI cable to enable video output to the TV, audio input
from the TV, and the transmission of HDMI Control signals.
❑Creating high-realistic sound fields (p.36)
CINEMA DSP allows you to create a natural and realistic
sound field in your own room.
❑Listening to FM/AM radio (p.40)
The unit is equipped with a built-in FM/AM tuner. You
can register up to 40 favorite radio stations as presets.
❑Easy operation with a TV screen
You can operate the iPod or USB storage device, view
information, or easily configure the settings using the
on-screen menu.
BD/DVD
player
Game
console
Camcorder
Set-top box
TV
CD player
HDMI Control
TV audio
Video from
external device
Useful tips
The combination of video/audio input jacks does not
match an external device...
Use “Audio In” in the “Option” menu to change the
combination of video/audio input jacks so that it matches
the output jack(s) of your external device (p.24).
Video and audio are not synchronized...
Use “Lipsync” in the “Setup” menu to adjust the delay
between video and audio output (p.61).
I want to hear audio from the TV speakers...
Use “Audio Output” in the “Setup” menu to select the
output destination of signals input into the unit (p.59).
Your TV speakers may be selected as an output
destination.
I want to change the on-screen menu language...
Use “Language” in the “Setup” menu to select a
language from English, French, German, Spanish,
Russian and Chinese (p.28).
I want to update the firmware...
Use “UPDATE” in the “ADVANCED SETUP” menu to
update the unit’s firmware (p.66).
Many other settings are available that let you to
customize the unit. For details, see the following pages.
• Scene settings (p.34)
• Sound/video settings and signal information for each
source (p.51)
• Various function settings (p.55)
• System settings (p.65)
FEATURES ➤Part names and functions En 7
Front panel
1z(power) key
Turns on/off (standby) the unit.
2YPAO MIC jack
For connecting the supplied YPAO microphone (p.29).
3Remote control sensor
Receives remote control signals (p.4).
4INFO key
Selects the information displayed on the front display (p.33).
5MEMORY key
Registers FM/AM radio stations as preset stations (p.41).
6PRESET keys
Select a preset FM/AM radio station (p.42).
7FM and AM keys
Switch between FM and AM (p.40).
8TUNING keys
Select the radio frequency (p.40).
9Front display
Displays information (p.8).
0PHONES jack
For connecting headphones.
AINPUT keys
Select an input source.
BTONE CONTROL key
Adjusts the high-frequency range and low-frequency range
of output sounds (p.52).
CSCENE keys
Select the registered input source and sound program with
one touch. Also, turns on the unit when it is in standby mode
(p.34).
DPROGRAM keys
Select a sound program or a surround decoder (p.35).
ESTRAIGHT key
Enables/disables the straight decode mode (p.38).
FVIDEO AUX jacks
For connecting devices, such as camcorders and game
consoles (p.26).
GUSB jack
For connecting a USB storage device (p.48) or an iPod
(p.44).
HVOLUME knob
Adjusts the volume.
Part names and functions
YPAO MIC
INFO
MEMORY
PRESET
FM AM
TUNING
PHONES
SILENT
CINEMA
VIDEO
VOLU ME
AUX USB
TONE
CONTROL
STRAIGHT
TV
BD
DVD
CD
RADIO
INPUT PROGRAM
SCENE
VIDEO
iPod/iPhone 5V 1A
AUDI O
394521 678
:HBDE GFAC
FEATURES ➤Part names and functions En 8
Front display (indicators)
1HDMI
Lights up when HDMI signals are being input or output.
OUT
Lights up when HDMI signals are being output.
2CINEMA DSP
Lights up when CINEMA DSP (p.36) is working.
3ENHANCER
Lights up when Compressed Music Enhancer (p.39) is
working.
4ADAPTIVE DRC
Lights up when Adaptive DRC (p.52) is working.
5STEREO
Lights up when the unit is receiving a stereo FM radio signal.
TUNED
Lights up when the unit is receiving an FM/AM radio station
signal.
6iPod CHARGE
Lights up when the iPod is being charged while the unit is in
standby mode (p.44).
7SLEEP
Lights up when the sleep timer is on.
8MUTE
Blinks when audio is muted.
9Volume indicator
Indicates the current volume.
0Cursor indicators
Indicate the remote control cursor keys currently operational.
AInformation display
Displays the current status (such as input name and sound
mode name). You can switch the information by pressing
INFO (p.33).
BSpeaker indicators
Indicate speaker terminals from which signals are output.
AFront speaker (L)
SFront speaker (R)
DCenter speaker
FSurround speaker (L)
GSurround speaker (R)
LSubwoofer
SW
C
LR
SLSR
VOL.
MUTE
iPod
ENHANCER
ADAPTIVE DRC
STEREO
TUNED
CHARGE
SLEEP
SBL SBR
OUT
123467895
: >A B
FEATURES ➤Part names and functions En 9
Rear panel
1HDMI OUT jack
For connecting to an HDMI-compatible TV and outputting
video/audio signals (p.18). When using ARC, TV audio signal
can also be input through the HDMI OUT jack.
2HDMI 1–4 jacks
For connecting to HDMI-compatible playback devices and
inputting video/audio signals (p.23).
3ANTENNA jacks
For connecting to FM and AM antennas (p.26).
4MONITOR OUT (component video) jacks
For connecting to a TV that supports component video and
outputting video signals (p.22).
5AV 1–5 jacks
For connecting to video/audio playback devices and
inputting video/audio signals (p.23).
6AV OUT jacks
For outputting video/audio to a recording device (such as a
VCR) (p.27).
7AUDIO 1–2 jacks
For connecting to audio playback devices and inputting
audio signals (p.25).
8AUDIO OUT jacks
For outputting audio to a recording device (such as tape
deck) (p.27).
9MONITOR OUT (composite video) jack
For connecting to a TV that supports composite video and
outputting video signals (p.22).
0SUBWOOFER jack
For connecting to a subwoofer (with built-in amplifier) (p.15).
ASPEAKERS terminals
For connecting to speakers (p.15).
BVOLTAGE SELECTOR
(General model only)
Selects the switch position according to your local voltage
(p.27).
CPower cable
For connecting to an AC wall outlet (p.27).
FRONT
AV 1 AV 2 AV 3AV 5
OPTICAL COAXIAL COAXIAL OPTICAL
(TV )
(CD)
COMPONENT
VIDEO
P
B
Y
VIDEO
AUDIO 1 AUDIO 2
AV
MONITOR OUT
OUT OUT
AUDIO
AV 4
COMPONENT
VIDEO
MONITOR OUT
P
R
P
B
Y
P
R
HDMI 1
(BD/DVD)
HDMI 2 HDMI 3
HDMI 4
HDMI
OUT
ARC
FM
ANTENNA
AM
SURROUND
SUBWOOFER
CENTER
SPEAKERS
78 0 A B49 C6
213
5
* The area around the video/audio output jacks is
marked in white on the actual product to prevent
improper connections.
FEATURES ➤Part names and functions En 10
Remote control
1Remote control signal transmitter
Transmits infrared signals.
2TRANSMIT indicator
Lights up when remote control signals are transmitted.
3SLEEP key
Switches the unit to standby mode automatically after a
specified period of time has elapsed (sleep timer). Press
repeatedly to set the time (120 min, 90 min, 60 min, 30 min,
off).
4Input selection keys
Select an input source for playback.
HDMI 1–4 HDMI 1–4 jacks
AV 1–5 AV 1–5 jacks
AUDIO 1–2 AUDIO 1–2 jacks
USB USB jack (on the front panel)
V-AUX VIDEO AUX jacks (on the front panel)
5MODE key
Switches between “Stereo” and “Mono” for FM radio
reception (p.40).
Switches the iPod operation modes (p.46).
6Radio keys
Operate the FM/AM radio (p.40).
FM Switches to FM radio.
AM Switches to AM radio.
MEMORY Registers FM/AM radio stations as presets.
PRESET Select a preset station.
TUNING Select the radio frequency.
7INFO key
Selects the information displayed on the front display (p.33).
8Sound mode keys
Select a sound mode (p.35).
9SCENE keys
Select the registered input source and sound program with
one touch. Also, turns on the unit when it is in standby mode
(p.34).
0SETUP key
Displays the setup menu (p.54).
AMenu operation keys
Cursor keys Select a menu or a parameter.
ENTER Confirms a selected item.
RETURN Returns to the previous screen.
BExternal device operation keys
Control playback of the iPod (p.45) or USB storage device
(p.48).
CRECEIVER zkey
Turns on/off (standby) the unit.
DOPTION key
Displays the option menu (p.51).
EVOLUME keys
Adjust the volume.
FMUTE key
Mutes the audio output.
• (Australia model only)
For information on the keys other than those above, refer to
“Supplement for Remote Control” on the supplied CD-ROM.
1234
1234
512
FM
INFO MEMORY
AM
PRESET
TUNING
SCENE
OPTION
SETUP
RETURN
VOLUME
BD
DVD TV
CD
RADIO
MUTE
ENTER
TRANSMIT
RECEIVER
HDMI
AV
AUDIO
TUNER
SLEEP
USB
MODE
V-AUX
MOVIE MUSIC
SUR. DECODE STRAIGHT
ENHANCER
C
D
E
F
1
2
3
5
4
6
7
8
9
:
A
B
PREPARATIONS ➤General setup procedure En 11
PREPARATIONS
This completes all the preparations. Enjoy playing movies, music, radio and other content with the unit!
General setup procedure
1Placing speakers (p.12) Select the speaker layout for the number of speakers that you are using and place them in your room.
2Connecting speakers (p.15) Connect the speakers to the unit.
3Connecting a TV (p.18) Connect a TV to the unit.
4Connecting playback devices (p.23) Connect video devices (such as BD/DVD players) and audio devices (such as CD players) to the unit.
5Connecting the FM/AM antennas (p.26) Connect the supplied FM/AM antennas to the unit.
6Connecting recording devices (p.27) Connect recording devices to the unit.
7Connecting the power cable (p.27) After all the connections are complete, plug in the power cable.
8Selecting an on-screen menu language
(p.28) Select the desired on-screen menu language (default: English).
9Optimizing the speaker settings
automatically (YPAO) (p.29)
Optimize the speaker settings, such as volume balance and acoustic parameters, to suit your room
(YPAO).
PREPARATIONS ➤Placing speakers En 12
Select the speaker layout for the number of speakers that you are using and place the speakers and subwoofer (with built-in amplifier) in your room. This section describes the
representative speaker layout examples.
1Placing speakers
Caution
• (U.S.A. and Canada models only)
Under its default settings, the unit is configured for 8-ohm speakers. When connecting 6-ohm speakers, set the unit’s speaker impedance to “6 MIN”. In this case, you can also use 4-ohm speakers as the front speakers.
For details, see “Setting the speaker impedance” (p.14).
• (Except for U.S.A. and Canada models)
Use speakers with an impedance of at least 6 .
Speaker type Abbr. Function
Speaker system (the
number of channels)
5.1 4.1 3.1 2.1
Front (L) 1
Produce front right/left channel sounds (stereo sounds).
●●●●
Front (R) 2●●●●
Center 3Produces center channel sounds (such as movie dialogue and vocals). ●●
Surround (L) 4
Produce surround right/left channel sounds.
●●
Surround (R) 5●●
Subwoofer 9Produces LFE (low-frequency effect) channel sounds and reinforces the bass parts of other channels.
This channel is counted as “0.1”. ●●●●
1Speaker placement 2 3 4 5 6 7 8 9
PREPARATIONS ➤Placing speakers En 13
1Speaker placement 2 3 4 5 6 7 8 9
5.1-channel system
4.1-channel system
3.1-channel system
2.1-channel system
45
12
39
10° to 30°10° to 30°
45
12
9
10° to 30°10° to 30°
12
39
12
9
PREPARATIONS ➤Placing speakers En 14
■Setting the speaker impedance
(U.S.A. and Canada models only)
Under its default settings, the unit is configured for 8-ohm speakers. When connecting
6-ohm speakers, set the speaker impedance to “6 MIN”. In this case, you can also
use 4-ohm speakers as the front speakers.
1Before connecting speakers, connect the power cable to an AC wall
outlet.
2While holding down STRAIGHT on the front panel, press z(power).
3Check that “SP IMP.” is displayed on the front display.
4Press STRAIGHT to select “6 MIN”.
5Press z(power) to set the unit to standby mode and remove the
power cable from the AC wall outlet.
You are now ready to connect the speakers.
z(power)
STRAIGHT
SPIMP.8MIN
1Speaker placement 2 3 4 5 6 7 8 9
PREPARATIONS ➤Connecting speakers En 15
Connect the speakers placed in your room to the unit.
The following diagrams provide connections for a
5.1-channel system as an example. For other systems,
connect speakers while referring to the connection
diagram for the 5.1-channel system.
Cables required for connection
(commercially available)
Speaker cables (x the number of speakers)
Audio pin cable (x1: for connecting a subwoofer)
5.1-channel system
■Connecting speaker cables
Speaker cables have two wires. One is for connecting
the negative (-) terminal of the unit and the speaker, and
the other is for the positive (+) terminal. If the wires are
colored to prevent confusion, connect the black wire to
the negative and the other wire to the positive terminal.
(Connecting front speakers)
aRemove approximately 10 mm (3/8”) of insulation from
the ends of the speaker cable and twist the bare wires of
the cable firmly together.
bLoosen the speaker terminal.
cInsert the bare wires of the cable into the gap on the side
(upper right or bottom left) of the terminal.
dTighten the terminal.
Using a banana plug
(U.S.A., Canada, Australia and General models only)
aTighten the speaker terminal.
bInsert a banana plug into the end of the terminal.
2Connecting speakers
Caution
• Remove the unit’s power cable from an AC wall outlet and turn
off the subwoofer before connecting the speakers.
• Ensure that the core wires of the speaker cable do not touch
one another or come into contact with the unit’s metal parts.
Doing so may damage the unit or the speakers. If the speaker
cables short circuit, “Check SP Wires” will appear on the front
display when the unit is turned on.
–
+
–
+
FRONT
SURROUND
SUBWOOFER
CENTER
SPEAKERS
12
3
45
9
The unit (rear)
FRONT
aa
b
d
c
+ (red)
- (black)
FRONT
a
b
Banana plug
1 2 Speaker connections 3 4 5 6 7 8 9
PREPARATIONS ➤Connecting speakers En 16
(Connecting center/surround speakers)
aRemove approximately 10 mm (3/8”) of insulation from
the ends of the speaker cable, and twist the bare wires of
the cable firmly together.
bPress down the tab.
cInsert the bare wires of the cable into the hole in the
terminal.
dRelease the tab.
■Connecting the subwoofer
Use an audio pin cable to connect the subwoofer.
ROU
ND CENTER
aa b
c
d
+ (red)
- (black)
Audio pin cable
1 2 Speaker connections 3 4 5 6 7 8 9
PREPARATIONS ➤Input/output jacks and cables En 17
■Video/audio jacks
❑HDMI jacks
Transmit digital video and digital sound through a single
jack. Use an HDMI cable.
• Use a 19-pin HDMI cable with the HDMI logo. We recommend using
a cable less than 5.0 m (16.4 ft) long to prevent signal quality
degradation.
• To connect a device that has a DVI jack, an HDMI/DVI-D cable is
required.
• The unit’s HDMI jacks support the HDMI Control, Audio Return
Channel (ARC), and 3D and 4K video transmission (through output)
features.
• Use high speed HDMI cables to enjoy 3D or 4K videos.
■Video jacks
❑COMPONENT VIDEO jacks
Transmit video signals separated into three
components: luminance (Y), chrominance blue (PB),
and chrominance red (PR). Use a component video
cable with three plugs.
❑VIDEO jacks
Transmit analog video signals. Use a video pin cable.
■Audio jacks
❑OPTICAL jacks
Transmit digital audio signals. Use a digital optical
cable. Remove the tip protector (if available) before
using the cable.
❑COAXIAL jacks
Transmit digital audio signals. Use a digital coaxial
cable.
❑AUDIO jacks
(Stereo L/R jacks)
Transmit analog stereo audio signals. Use a stereo pin
cable.
(Stereo mini jack)
Transmits analog stereo audio signals. Use a stereo
mini-plug cable.
Input/output jacks and cables
HDMI cable
Component video cable
Video pin cable
AV 4
OPTICAL
(TV )
Digital Optical cable
Digital coaxial cable
Stereo pin cable
Stereo mini-plug cable
PREPARATIONS ➤Connecting a TV En 18
Connect a TV to the unit so that video input to the unit can be output to the TV.
You can also enjoy playback of TV audio on the unit.
The connection method varies depending on the functions and video input jacks
available on your TV.
Refer to the instruction manual of the TV and choose a connection method.
■
Connection Method 1 (HDMI Control/ARC-compatible TV)
Connect the TV to the unit with an HDMI cable.
• The following explanation is based on the assumption that you have not changed the “HDMI” parameters
(p.59) in the “Setup” menu.
• By connecting a TV to the unit with an HDMI cable, you can control your iPod or USB storage device, or
configure the settings of the unit with the menu displayed on the TV.
3Connecting a TV
When connecting a video device with an analog video output
• If you will connect any video device to the AV 1–2 (COMPONENT VIDEO) jacks of the unit, you also
need to connect the TV to the MONITOR OUT (COMPONENT VIDEO) jacks.
• If you will connect any video device to the AV 3–5 (VIDEO) jacks or the VIDEO AUX (VIDEO) of the
unit, you also need to connect the TV to the MONITOR OUT (VIDEO) jack.
Does your TV support
Audio Return Channel (ARC)?
Does your TV support
HDMI Control?
Does your TV have an
HDMI input jack? ■Connection Method 3 (p.21)
■Connection Method 2 (p.20)
■Connection Method 1 (p.18)
■Connection Method 4 (p.22)
Yes
Yes
Yes
No
No
No
About HDMI Control
HDMI Control allows you to operate external devices via HDMI. If you connect a TV
that supports HDMI Control to the unit with an HDMI cable, you can control the unit’s
power and volume with the TV’s remote control. You can also control playback
devices (such as an HDMI Control-compatible BD/DVD player) connected to the
unit with an HDMI cable. For details, see “HDMI Control” (p.75).
About Audio Return Channel (ARC)
ARC allows audio signals to travel both ways under HDMI Control. If you connect a
TV that supports HDMI Control and ARC to the unit with a single HDMI cable, you
can output video/audio to the TV or input TV audio to the unit.
AV 1 AV 2 AV 3
OPTICAL COAXIAL COAXIAL OPTIC
A
(TV
(CD)
COMPONENT
VIDEO
P
B
Y
VIDEO
A
V
COMPONENT
VIDEO
MONITOR OUT
P
R
P
B
Y
P
R
HDMI 1
(BD/DVD)
HD
M
HDMI
OUT
ARC
HDMI
OUT
ARC
HDMI
ARC
HDMI
HDMI
HDMI OUT jack HDMI input
(ARC-compatible)
The unit (rear)
TV
1 2 3 TV connection 4 5 6 7 8 9
PREPARATIONS ➤Connecting a TV En 19
❑Necessary settings
To use HDMI Control and ARC, you need to configure the following settings.
For details on settings and operating your TV, refer to the instruction manual for the TV.
1
After connecting external devices (such as a TV and playback devices)
and the power cable to the unit, turn on the unit, TV, and playback devices.
2Configure the settings of the unit.
aCheck that ARC is enabled on the TV.
bSwitch the TV input to display video from the unit.
cPress SETUP.
dUse the cursor keys to select “HDMI” and press ENTER.
ePress ENTER again.
fUse the cursor keys (q/w) to select “HDMI Control” and the cursor keys (e/r) to
select “On” as shown below.
gPress SETUP.
3Configure the settings for HDMI Control.
aEnable HDMI Control on the TV and playback devices (such as HDMI Control-
compatible BD/DVD player).
bTurn off the TV’s main power and then turn off the unit and playback devices.
cTurn on the unit and playback devices and then turn on the TV’s main power.
dSwitch the TV input to display video from the unit.
eCheck the following.
On the unit: The input to which the playback device is connected is selected. If not,
select the input source manually.
On the TV: The video from the playback device is displayed.
fCheck that the unit is properly synchronized with the TV by turning off the TV or
adjusting the TV volume with the TV remote control.
This completes the necessary settings.
If you select a TV program with the TV remote control, the input source of the unit will be
automatically switched to “AV 4” and the TV audio will be played back on the unit.
If you cannot hear the TV’s audio, check that “ARC” (p.60) in the “Setup” menu is set to
“On”.
• If HDMI Control does not work properly, try turning off and on (or unplugging and then plugging in again)
the devices. It may solve the problem.
• If the unit is not synchronized to the TV’s power operations, check the priority of the audio output setting on
the TV
• If the audio is interrupted while using ARC, set “ARC” (p.60) in the “Setup” menu to “Off” and use a digital
optical cable to input TV audio to the unit (p.20).
• “AV 4” is set as TV audio input at the factory. If you have connected any external device to the AV 4 jacks,
use “TV Audio Input” (p.60) in the “Setup” menu to change the TV audio input assignment. To use the
SCENE function (p.34), you also need to change the input assignment for SCENE(TV).
OPTION
SETUP
RETURN
VOLUME
ENTER
O
PTIO
N
R
ET
U
R
N
V
O
LU
M
E
SETUP
Cursor keys
ENTER
Setup
Speaker
HDMI
Sound
ECO
Function
Language
Configuration
Configuration
HDMI Control
Audio Output
TV Audio Input
Standby Sync
ARC
SCENE
On
AV4
Auto
On
Back: RETURN
1 2 3 TV connection 4 5 6 7 8 9
PREPARATIONS ➤Connecting a TV En 20
■Connection Method 2 (HDMI Control-compatible TV)
Connect the TV to the unit with an HDMI cable and a digital optical cable.
• The following explanation is based on the assumption that you have not changed the “HDMI” parameters
(p.59) in the “Setup” menu.
• By connecting a TV to the unit with an HDMI cable, you can control your iPod or USB storage device, or
configure the settings of the unit with the menu displayed on the TV.
❑Necessary settings
To use HDMI Control, you need to configure the following settings.
For details on settings and operating your TV, refer to the instruction manual for the TV.
1After connecting external devices (such as a TV and playback
devices) and power cable of the unit, turn on the unit, TV, and
playback devices.
2Configure the settings of the unit.
aSwitch the TV input to display video from the unit.
bPress SETUP.
cUse the cursor keys to select “HDMI” and press ENTER.
dPress ENTER again.
eUse the cursor keys (q/w) to select “HDMI Control” and the cursor keys (e/r) to
select “On” as shown below.
fPress SETUP.
AV 1 AV 2 AV 3
OPTICAL COAXIAL COAXIAL OPTICAL
(TV )
(CD)
COMPONENT
VIDEO
P
B
Y
VIDEO
AV 4
COMPONENT
VIDEO
MONITOR OUT
P
R
P
B
Y
P
R
HDMI 1
(BD/DVD)
HDMI 2
HDMI
OUT
ARC
HDMI
OUT
ARC
HDMI
HDMI
HDMI
AV 4
(TV)
OPTICAL
OPTICAL
OO
The unit (rear) HDMI OUT jack
AV 4 (OPTICAL) jack Audio output
(digital optical)
TV
HDMI input
OPTION
SETUP
RETURN
VOLUME
ENTER
O
PTIO
N
R
ET
U
R
N
V
O
LU
M
E
SETUP
Cursor keys
ENTER
Setup
Speaker
HDMI
Sound
ECO
Function
Language
Configuration
Configuration
HDMI Control
Audio Output
TV Audio Input
Standby Sync
ARC
SCENE
On
AV4
Auto
On
Back: RETURN
1 2 3 TV connection 4 5 6 7 8 9

Other manuals for RX-V373

2

Other Yamaha Stereo Receiver manuals

Yamaha R-900 User manual

Yamaha

Yamaha R-900 User manual

Yamaha RX-V990 User manual

Yamaha

Yamaha RX-V990 User manual

Yamaha RX-V383BL User manual

Yamaha

Yamaha RX-V383BL User manual

Yamaha R-500 User manual

Yamaha

Yamaha R-500 User manual

Yamaha R-10 User manual

Yamaha

Yamaha R-10 User manual

Yamaha RX-V465 Use and care manual

Yamaha

Yamaha RX-V465 Use and care manual

Yamaha RX-V577 Use and care manual

Yamaha

Yamaha RX-V577 Use and care manual

Yamaha RX-750 User manual

Yamaha

Yamaha RX-750 User manual

Yamaha RX-S602 User manual

Yamaha

Yamaha RX-S602 User manual

Yamaha RX-V3200 User manual

Yamaha

Yamaha RX-V3200 User manual

Yamaha RX-V1070 User manual

Yamaha

Yamaha RX-V1070 User manual

Yamaha RX-V390RDS User manual

Yamaha

Yamaha RX-V390RDS User manual

Yamaha RX-V1900 User manual

Yamaha

Yamaha RX-V1900 User manual

Yamaha MusicCast TSR-400 User manual

Yamaha

Yamaha MusicCast TSR-400 User manual

Yamaha R-70 User manual

Yamaha

Yamaha R-70 User manual

Yamaha RX-930 User manual

Yamaha

Yamaha RX-930 User manual

Yamaha HTR-4071 User manual

Yamaha

Yamaha HTR-4071 User manual

Yamaha R-50 User manual

Yamaha

Yamaha R-50 User manual

Yamaha HTR5540OM User manual

Yamaha

Yamaha HTR5540OM User manual

Yamaha CR-2040 User manual

Yamaha

Yamaha CR-2040 User manual

Yamaha RX-V3900 User manual

Yamaha

Yamaha RX-V3900 User manual

Yamaha AVANTAGE RX-A2A User manual

Yamaha

Yamaha AVANTAGE RX-A2A User manual

Yamaha CR-420 User manual

Yamaha

Yamaha CR-420 User manual

Yamaha RX-830 User manual

Yamaha

Yamaha RX-830 User manual

Popular Stereo Receiver manuals by other brands

JVC R-S7 Service manual

JVC

JVC R-S7 Service manual

Pioneer Elite VSX-49TXi Service manual

Pioneer

Pioneer Elite VSX-49TXi Service manual

Philips LX710/01 user manual

Philips

Philips LX710/01 user manual

Denon AVR-1508 Specifications

Denon

Denon AVR-1508 Specifications

Marantz 2215B Service manual

Marantz

Marantz 2215B Service manual

Denon AVR-1907 Service manual

Denon

Denon AVR-1907 Service manual

Marantz SR8400 user guide

Marantz

Marantz SR8400 user guide

Kenwood KR-65 instruction manual

Kenwood

Kenwood KR-65 instruction manual

Harman Kardon HK 3370 owner's manual

Harman Kardon

Harman Kardon HK 3370 owner's manual

Denon AVR-587 Dimensions

Denon

Denon AVR-587 Dimensions

Aiwa NSX-VC18 Service manual

Aiwa

Aiwa NSX-VC18 Service manual

Pioneer SPH-EVO950DAB Operation manual

Pioneer

Pioneer SPH-EVO950DAB Operation manual

Pioneer AVH-X390BT Operation manual

Pioneer

Pioneer AVH-X390BT Operation manual

Sony STR-DB925 Service manual

Sony

Sony STR-DB925 Service manual

Sony STR-V 25 Service manual

Sony

Sony STR-V 25 Service manual

Naxa NPB-429 quick start guide

Naxa

Naxa NPB-429 quick start guide

Denon AVR-1612 Specifications

Denon

Denon AVR-1612 Specifications

Marantz SR6012 owner's manual

Marantz

Marantz SR6012 owner's manual

manuals.online logo
manuals.online logoBrands
  • About & Mission
  • Contact us
  • Privacy Policy
  • Terms and Conditions

Copyright 2025 Manuals.Online. All Rights Reserved.