Yamaha TD-88 User manual

このたびは、ヤマハ・クロマチッ
ク・チューナーTD-88 をお買い上
げいただき、誠にありがとうござ
います。
本製品を末永くご愛用いただくた
めにも、取扱説明書をよくお読み
になって正しい方法でご使用下さ
い。また、取扱説明書は大切に保
管してください。
安全上のご注意
● 本製品を使用する前に、以下の指示をよく読んでください。
● 次のような場合には直ちに電池を抜き、ヤマハミュージックトレーディング株式会社またはお買い上げ
になった販売店に修理を依頼してください。
•
異物が内部に入ったり、液体がこぼれたとき
•
製品が(雨などで)濡れたとき
•
製品に異常や故障が生じたとき
● 次のような場所での使用や保存はしないでください。
•
温度が極端に高い場所(直射日光のあたる場所、暖房機器の近く、発熱する機器の上など)
•
水気の近く(風呂場、洗面台、濡れた床など)や湿度の高い場所
•
ホコリの多い場所
● 修理/部品の交換などで、取扱説明書に書かれている以外のことは、絶対にしないでください。
●本製品に、異物(燃えやすいもの、硬貨、針金など)や液体(水やジュースなど)を絶対にいれないでくだ
さい。
● 本製品を分解したり、改造したりしないでください。
注意
● 本製品はマイクロコンピュータを使用した機器です。このため他の電気機器を接近して同時にご使用に
なりますと、それらに雑音が入ることがあります。逆に他の電気機器から本製品が雑音を受けて誤動作
する場合があります。
●
長期間使用しない場合は、電池の液漏れを防ぐために電池を抜いておいてください。
●
スイッチに必要以上の力を加えますと故障の原因となりますので注意してください。
●外装のお手入れは、必ず乾いた柔らかい布で軽く拭いてください。ベンジンやシンナー系の液体は絶対
にご使用にならないでください。(コンパウンド質、強燃性のポリッシャーも不可)。
● 今後の参照のために、この取扱説明書はお読みになった後も大切に保管してください。
サービスについて
1.保証期間
本機の保証期間は、ご購入(保証書による)より満1ヶ年(現金・クレジット・月賦等による区別はご
ざいません)と致します。
2.保証期間中のサービス
保証期間中に万一故障が発生した場合、お買い上げ店にご連絡頂きますと、技術者が修理、調整致
します。この際必ず保証書をご提示ください。保証書なき場合にはサービス料金を頂く場合もあり
ます。また、お買い上げ店より遠方に移転される場合は、事前にお買い上げ店あるいは下記のヤマ
ハミュージックトレーディング株式会社にご連絡ください。移転先におけるサービス担当店をご紹
介申し上げますと同時に、引続き保証期間中のサービスを責任をもって行うよう手続き致します。
3.アフターサービス
満1ヶ年の保証期間を過ぎますとサービスは有料となりますが、引き続き責任をもってサービスをさせ
ていただきます。ご不明の点などございましたら、お買い上げ店あるいは下記のヤマハミュージックト
レーディング株式会社までお問い合わせください。
各部の名称
チューニング・ガイド
液晶ディスプレイ
[STANDBY/ON]スイッチ
[BACKLIGHT]スイッチ
[EQUAL/PROG]スイッチ
[CALIB]スイッチ
[SOUND]スイッチ
[FOCUSTUNE]スイッチ
[VOLUMEMETER]スイッチ
[SOUNDBACK]スイッチ
[▲]UP/[▼]DOWNスイッチ
(1秒以上押し続けると値が連続
的に変化します)
PHONE端子
ボリューム
DCIN端子
(ACアダプター接続)
インプット端子
内蔵マイク
スピーカー
電源の入れ方
電源をオンにする
TD-88を開いて[STANDBY/ON]スイッチを押し、電源をオンにします。
電源をオフにする
[STANDBY/ON]スイッ チを押し、電源をオフにします。
TD-88を閉じると自動的に電源がオフになります。また、電池使用時に電源オンのまま入力音がない
状態で約20分間経過すると、自動的に電源がオフになります。
電源オフ時は、以下の設定が記憶されます。
電源オフ時に記憶される設定選択範囲工場出荷時の設定
キャリブレーション 410...480H z 440Hz
フォーカスチューン・モードON/OFFOFF
サウンドバック・モード ON/OFFOFF
LAUQEGORP/LAUQE律音 (平均律)
音律プログラムのセント値 −50...0...+50 すべて0
4A8C...0A音振発準基
音量計測表示 ON/OFF ON
チューニングの方法
TD-88では、メーター・モード、フォーカスチューン・モード、サウンドアウト・モード、サウンドバック・
モードの4 つのチューニング・モードがあります。
インプット端子に接続してチューニングする場合
市販ケーブルのプラグを楽器などに接続し、もう一方のプラグをTD-8 8 のインプット端子に接続し
ます。また、別売りのヤマハ・チューナー専用マイクロフォンTM-10Lを使用して楽器をチューニング
するときは、TD-8 8 のインプット端子にTM-10 Lのプラグを接続します。
インプット端子にプラグが接続されているときは、内蔵マイクは使用できません。
インプット端子はモノラル専用です。ステレオ・プラグは使用できません。
内蔵マイクを使ってチューニングする場合
インプット端子にプラグを接続せずに、楽器に内蔵マイクをできるだけ近づけます。
内蔵マイクを使ってチューニングする場合は、余計な音がマイクに入らないようにしてください。
イヤホンを使う場合(サウンドアウト・モード、サウンドバック・モード)
市販のミニプラグ(φ3.5m m)のイヤホンを、PHON E端子に接続します。このとき、スピーカーから
は音が出ません。イヤホンの音量はボリュームで調整します。
■メーター・モード
メーターを見ながらチューニングするモードです。
1. 楽器を単音で鳴らします。
入力音に一番近い音名が液晶ディスプレイの左に表示されます。合わせたい音名が表示されるよ
うに楽器をおおまかにチューニングします。
2. メーターが0位置(中央)を指し、チューニング・ガイドの中央のランプが点灯するようにチューニ
ングします。
チューニング・ガイドは音が低いときは左、高いときは右のランプが点灯します。
ある音に対して、純正の長3度上にチューニングするときはメーターを“ ”(−13. 7セント)に合わ
せます。純正の短3度上にチューニングするときはメーターを“ ”(+15.6セント)に合わせます。
【例1】A(0
セント
)の音に対して、純正の長3度上の音にする場合
音名表示をC#にして、メーターを“ ”(−13.7
セント
)に合わせます。
【例2】A(0
セント
)の音に対して、純正の短3度上の音にする場合
音名表示をCにして、メーターを“ ”(+15.6
セント
)に合わせます。
■フォーカスチューン・モード
メーターを10
セント
の範囲で表示し、より精度の高いチューニングをするモードです。
1. [FOCUSTUNE]スイッチを押してフォーカスチューン・ モードに入ります。
2. 楽器を単音で鳴らします。
入力音に一番近い音名が液晶ディスプレイに表示されます。入力した音が0位置(中央)より10
セント
以内になったとき表示が切り替わり、10
セント
の範囲が表示されます。また、10
セン
ト
を外れると元の表示(50
セント
の範囲)に戻ります。
3. 楽器を単音で鳴らして、メーターが0位置(中央)を指し、チューニング・ガイドの中央のランプが
点灯するようにチューニングします。
チューニング・ガイドは音が低いときは左、高いときは右のランプが点灯します。
4. フォーカスチューン・モードを終了するときは、[FOCUSTUNE]スイッチを押します。
■サウンドアウト・モード
TD-88のスピーカーから出力される基準発振音に合わせてチューニングするモードです。
1. [SOUND]スイッチを 押してサウンドアウト・モードに入ります。
2. [▲]または[▼]スイッチを押して、合わせたい音名を選びます。
音名[平均律:C2...C6、音律プログラム:A0...C8]
3. TD-88が出力する基準発振音に合わせて、楽器をチューニングします。
C2〜C6 以外の音名を選んだ場合、その音名に近い出力可能範囲の基準発振音が出力されます。
4.
サウンドアウト・モードを終了するときは、[SOUND]スイッチを押します。
■サウンドバック・モード
TD-88が出力する基準発振音とメーターの表示でチューニングするモードです。
インプット端子から入力した音に一番近い基準発振音をスピーカーから出力し、入力音との誤差をメー
ターで表示します。
本機の内蔵マイクからの入力音については、サウンドバック・モードは機能しません。
1. [SOUNDBACK]スイッチを押してサウンドバック ・モードに入ります。
2. 楽器を単音で鳴らします。
入力した音に一番近い基準発振音を出力し、その音名を液晶ディスプレイに表示します。メーター
は、基準音と入力音との誤差が−50CENT〜+50CENTの範囲を指示します。あわせたい音名
と基準発振音が出力されるように、楽器音のピッチをおおまかにチューニングしてください。
C2〜C6以外の音を入力した場合、その入力音に近い出力可能範囲の基準発振音が出力されます。
3. 基準発振音とメーターをもとに楽器をチューニングします。
4. サウンドバック・モードを終了するときは、[SOUNDBACK]スイッチを押します。
■キャリブレーション(基準ピッチ)を変更する
[CALIB]スイッチを押してから、[▲]または[▼]スイッチを押します。キャリブレーションの値が1Hz
単位で増減します。
キャリブレーション[410...480Hz]
■音律プログラム機能
TD-88では平均律のほかに、好みの音律を記憶させチューニングすることができます。民族楽器や古
典楽器などのチューニングに便利です。A0〜C8までの88音の1音ごとに設定が可能です。設定した
セント値はすべてのチューニング・モードで有効になります。
1. [EQUAL/PROG]スイッチを長押しして、音律を「プログラム」に切り替えます。
液晶ディスプレイに“ PROG” と表示され、音名が点滅します。
2. [▲]または[▼]スイッチを押して、変更する音名を選択します。
3. [EQUAL/PROG]スイッ チを押すと、セント値が点滅します。
[▲]または[▼]スイッチを押して、平均律を基準としたセント値を設定します。
4.
音名とセント値の設定を続けるには、[EQUAL/PROG]スイッチを押して、手順2と3を繰り返します。
5. [CALIB]スイッチを押すと、設定した音律でチューニングできる状態になります。
6. [EQUAL/PROG]スイッ チを再度長押しすると、音律が「平均律」に戻ります。
“PRO G” 表示が消え、“ EQUAL”表示に切り替わります。
■音量計測表示
内蔵マイク、またはインプット端子から入力された楽器音の音量を、メーターと数値で液晶ディスプレ
イに表示します。音量を一定に保って演奏したり、音量を徐々に上げたり下げたりする練習等に便利で
す。また、音量計測モードはチューナーと同時に使用することができます。
入力レベルによっては測定表示が不安定になることがあります。
内蔵マイク入力時は、マイクからの距離により表示されるレベルが変わることがあります。
本モードにて表示される音量や数値は、特別な精度を保証するものではありません。目安として
お使いください。
1.
[VOLUMEMETER]スイッチを押して、音量計測モードに入ります。
2.
楽器を鳴らして持続音を入力し、液晶ディスプレイに表示されている音量の変化を確認します。
■バックライト
[BACKLIGHT]スイッチを押すと、液晶ディスプレイのバックライトが点灯します。
入力音が約2分間なかったときは、自動的にバックライトは消灯します。
バックライトの自動点灯
[BACKLIGHT]スイッチを1秒以上押し続けると、メーター・モード、フォーカスチューン・モード時
に入力音によってメーターが動作した場合、バックライトが自動で点灯します。
自動点灯の設定時に入力音が約2分間ない場合も、
バックライトは自動的に消灯します。
バックライトの自動点灯を終了するときは、もう一度[BACKLIGHT]スイッチを1秒以上押し続けます。
バックライトの自動点灯の設定は、電源オフ時に記憶されません。
電池の交換
電池の交換は電源スイッチをオフにして行ってください。
付属の電池は動作確認用ですので、寿命の短い場合があります。
1. 裏面の電池ケースのふたを矢印方向にずらしてから、引き上げて開けます。
2. 単4 電池を2本入れます。電池の極性(+、−)を間違えないように注意してください。
電池ケースのふた
3. 電池ケースのふたを閉めます。
電池の残量が少なくなると、液晶ディスプレイ左上に電池マークが点灯します。お早めに新しい電池と
交換してください。
工場出荷時の状態に戻す方法
TD-88のすべての設定を工場出荷時の状態に戻すことができます。
1. [▲]スイッチを押しながら[STANDBY/ON ]スイッチを押します。
記憶している設定がすべて工場出荷時の設定に戻ります。
仕様
音律: 12 平均律、プログラム(88 音)
測定範囲: A0(27.50H z)〜C8(4186.01H z)サイン波入力時
基準発振音: C2(65.41H z)〜C6(1046.50H z)
チューニング・モード: メーター・モード(オート)
フォーカスチューン・モード(オート)
サウンドアウト・モード(マニュアル)
サウンドバック・モード(オート)
キャリブレーション範囲: A4=41 0 〜480H z(1Hz単位)
測定精度: 1.0 セント以内
サウンド精度: 1.5 セント以内
接続端子: インプット端子(φ6. 3 モノラル標準ジャック)
PHON E端子(φ3.5 ミニジャック)
DCIN(9V)
スピーカー: ダイナミック・スピーカー(16mm35m m)
電源: 単4
アルカリ
電池(LR0 3 ) 2 本(3 V)、AC アダプター(9 V)
電池寿命: 約60時間(アルカリ電池、メーター・モード、A4連続入力、バックラ
イト・オフ時)
外形寸法(W)(D )(H): 101mm 84mm 22m m(折りたたみ状態)
重量: 148 g(電池含む)
付属品: 取扱説明書、動作確認用単4 電池 2 本、ソフトケース
オプション(別売): ACアダプター(PA-D0 9: )
※仕様および外観は改良のため予告なく変更する場合があります。
※液晶ディスプレイに強い圧力や衝撃を加えたりしないでください。また、ひねったり、曲げたり、ボー
ルペンなど尖ったもので突いたりしないでください。不適当な取扱い方をした場合、液晶ディスプ
レイが破損することがあります。

Thank you for purchasing the
Yamaha TD-88 chromatic
tuner. Before you use the TD-
88 please read this owner’s
manual carefully, and use the
TD-88 as directed.
Keep this manual for future
reference.
Precautions
Location
Using the unit in the following locations can result in a malfunction.
• In direct sunlight
• Locations of extreme temperature or humidity
• Excessively dusty or dirty locations
• Locations of excessive vibration
• Close to magnetic fields
Power supply
Please connect the designated AC adapter to an AC outlet of the correct voltage. Do not
connect it to an AC outlet of voltage other than that for which your unit is intended.
Interference with other electrical devices
Radios and televisions placed nearby may experience reception interference. Operate this unit
at a suitable distance from radios and televisions.
Handling
To avoid breakage, do not apply excessive force to the switches or controls.
Care
If the exterior becomes dirty, wipe it with a clean, dry cloth. Do not use liquid cleaners such as
benzene or thinner, or cleaning compounds or flammable polishes.
Keep this manual
After reading this manual, please keep it for later reference.
Keeping foreign matter out of your equipment
Never set any container with liquid in it near this equipment. If liquid gets into the equipment,
it could cause a breakdown, fire, or electrical shock.
Be careful not to let metal objects get into the equipment. If something does slip into the
equipment, unplug the AC adapter from the wall outlet. Then contact your nearest Korg dealer
or the store where the equipment was purchased.
THE FCC REGULATION WARNING (for U.S.A.)
This equipment has been tested and found to comply with the limits for a Class B digital
device, pursuant to Part 15 of the FCC Rules. These limits are designed to provide
reasonable protection against harmful interference in a residential installation. This
equipment generates, uses, and can radiate radio frequency energy and, if not installed and
used in accordance with the instructions, may cause harmful interference to radio
communications. However, there is no guarantee that interference will not occur in a
particular installation. If this equipment does cause harmful interference to radio or
television reception, which can be determined by turning the equipment off and on, the user
is encouraged to try to correct the interference by one or more of the following measures:
• Reorient or relocate the receiving antenna.
• Increase the separation between the equipment and receiver.
• Connect the equipment into an outlet on a circuit different from that to which the receiver
is connected.
• Consult the dealer or an experienced radio/TV technician for help.
Unauthorized changes or modification to this system can void the user’s authority to
operate this equipment.
CE mark for European Harmonized Standards
CE mark which is attached to our company’s products of AC mains operated apparatus
until December 31, 1996 means it conforms to EMC Directive (89/336/EEC) and CE mark
Directive (93/68/EEC).
And, CE mark which is attached after January 1, 1997 means it conforms to EMC Directive
(89/336/EEC), CE mark Directive (93/68/EEC) and Low Voltage Directive (73/23/EEC).
Also, CE mark which is attached to our company’s products of Battery operated apparatus
means it conforms to EMC Directive (89/336/EEC) and CE mark Directive (93/68/EEC).
IMPORTANT NOTICE TO CONSUMERS
This product has been manufactured according to strict specifications and voltage
requirements that are applicable in the country in which it is intended that this product
should be used. If you have purchased this product via the internet, through mail order,
and/or via a telephone sale, you must verify that this product is intended to be used in the
country in which you reside.
WARNING: Use of this product in any country other than that for which it is intended
could be dangerous and could invalidate the manufacturer’s or distributor’s warranty.
Please also retain your receipt as proof of purchase otherwise your product may be
disqualified from the manufacturer’s or distributor’s warranty.
Features of the TD-88
Tuning Guide
LCD display
[STANDBY/ON] switch
[BACK LIGHT] switch
[EQUAL/PROG] switch [CALIB] switch
[SOUND] switch
[FOCUS TUNE] switch
[VOLUME METER] switch
[SOUND BACK] switch
[ ]UP/[ ]DOWN switch
(Hold down to change
the value continuously)
PHONE jack
Volume
DC IN jack
(connect to AC adapter)
INPUT jack
Built in mic Speaker
Turning the power on
Open the TD-88 and press the [STANDBY/ON] switch to turn on the power.
Turning the power off
Press the [STANDBY/ON] switch again to turn off the power or simply close the cover.
If you’re operating the TD-88 on batteries, the power will automatically turn off if
there is no audio input for approximately 20 minutes. The following settings are re-
membered when you turn off the power.
Settings remembered when the power is offAvailable range Factory setting
Calibration 410...480 Hz 440 Hz
Focus Tune mode ON/OFF OFF
Sound Back mode ON/OFF OFF
Temperament EQUAL/PROG EQUAL
Cent value of programmable temperament -50...0...+50 All zero
Reference tone A0...C8 A4
Volume measurement displayON/OFF ON
Tuning procedure
The TD-88 has four tuning modes; Meter mode, Focus Tune mode, Sound Out mode,
and Sound Back mode.
Tune using the INPUT jack
Connect an instrument cable between your instrument and the TD-88’s INPUT jack. If
you’re tuning your instrument via a separately sold TM-10L microphone designed
specifically for Yamaha tuners, plug the TM-10L into the input jack of the TD-88.
If a cable is connected to the INPUT jack, the built-in mic cannot be used.
The INPUT jack is mono so stereo plugs cannot be used.
Tune using the internal mic
Position your instrument as close as possible to the internal mic without connecting
anything to the INPUT jack.
While tuning with the built-in mic a quiet environment is recommended for precise tuning.
Connecting Earphones (Sound Out mode or Sound Back mode)
You can connect 1/8” mini-plug earphones to the PHONE jack. When plugged in, no
sound will be heard from the speaker.
Use the volume control to adjust the volume of the earphones.
■Meter mode
This mode lets you tune using the meter in the display.
1. Play a single note on your instrument.
The name of the note closest to the note you played will appear in the left of the
display. Tune your instrument to the correct pitch, so that the desired note name
appears.
2. While playing a single note on your instrument, tune your instrument so that the
tip of the meter indicates “0” and the center indicator of the tuning guide is lit.
The left tuning guide indicator will light if the pitch of your instrument is flat, and
the right indicator if the pitch is sharp. If you want to tune to a just major third
above or a minor third above a certain note, use the “ ” (-13.7 cent) or “ ” (+15.6
cent) marks on the meter.
Tuning to a just major third above or a minor third above
If you want to tune to a just major third above A(0 cent), tune your instrument so
that the note name indicator shows C# and the meter is at “ ”.
If you want to tune to a minor third above A (0 cent), tune your instrument so that
the note name indicator shows C and the meter is at “ ”.
■Focus Tune mode
In this mode the meter indicates a range of ±10 cents, allowing you to tune with greater
precision.
1. Press the [FOCUS TUNE] switch to enter Focus Tune mode.
2. Play a single note on your instrument. The LCD will show the name of the note that is
closest to the pitch you played. When the input pitch comes within ±10 cents of the
“0” (center) position, the display will change to a range of ±10 cents. If the input pitch
is not within ±10 cents, the display will return to its previous state of ±50 cents.
3. Play a single note on your instrument and tune it so that the meter indicates the
“0” (center) position and the center indicator of the tuning guide is lit.
The tuning guide indicator to the left will light if the pitch is flat, and the indicator
to the right will light if the pitch is sharp.
4. Press the [FOCUS TUNE] switch to exit Focus Tune mode.
■Sound Out mode
This mode lets you tune using a reference pitch that is sounded from the TD-88’s
speaker.
1. Press the [SOUND] switch to select Sound Out mode.
2. Press the [▲] or [▼] switch to select the name of the note you want to tune.
The name of the note [C2...C6: Equal Temperament, A0...C8: Programmable Temperament]
3. Tune your instrument to match the reference tone from the TD-88.
The TD-88 detects pitches between A0 and C8 and reproduces them between C2 and C6.
In Sound Out Mode, the TD-88 will provide a reference tone within the C2 to C6 pitch range.
4. Press the [SOUND] switch to exit Sound Out mode.
■Sound Back mode
This lets you tune your instrument using the reference tone and the meter display. The
speaker will sound a reference tone for the note closest to the pitch being received
from the input jack, and the meter will indicate the difference between the input pitch
and the correct pitch.
Sound Back mode won’t work for sound that’s input via the TD-88’s internal mic.
1. Press the [SOUND BACK] switch to enter Sound Back mode.
2. Play a single note on your instrument. The TD-88 will sound the reference tone
that is closest to the pitch of the audio input, and the LCD will indicate the name
of that note. The meter will indicate the difference between the reference note and
the input pitch in a range of -50 cents – +50 cents. Tune your instrument so the TD-
88 sounds and displays the desired reference note.
The TD-88 detects pitches between A0 and C8 and plays back pitches between C2
and C6. In Sound Back Mode, if the note you play is below C2 or above C6, the TD-
88 will transpose the octave of the note being played back and reproduce the corre-
sponding pitch within the C2 to C6 pitch range.
3. Tune your instrument to match the reference tone and meter indication.
4. Press the [SOUND BACK] switch again to exit Sound Back mode.
■Adjusting the calibration (standard pitch)
1. Press the [CALIB] switch.
2. Use the [▲] or [▼] switches to adjust the calibration. You can adjust the calibration
in steps of 1 Hz.
Calibration range [410...480Hz]
■Programmable Temperament
In addition to equal temperament, the TD-88 lets you program and store any desired
temperament. This is convenient for tuning ethnic or historical instruments. You can
specify the pitch of each note in the 88-note range from A0 to C8. The cent values you
specify are available in all tuning modes.
1. Hold down the [EQUAL/PROG] switch to change the temperament to “Program.”
The LCD will indicate
“
PROG,
”
and the note name will blink.
2.
Press the [▲] or [▼] switch to select the name of the note whose pitch you want to adjust.
3. Press the [EQUAL/PROG] switch to make the cent value blink.
Press the [▲] or [▼] switch to specify the cent value relative to equal temperament.
4. To continue specifying the cent value for other note names, press the [EQUAL/
PROG] switch and repeat steps 2 and 3.
5. Press the [CALIB] switch, and you’ll be able to tune using the temperament you
specified.
6.
Once again hold down the [EQUAL/PROG] switch to change the temperament to “Equal.”
■Volume Meter display
The volume of your instrument via the internal mic or INPUT jack is shown in the
LCD as a meter indication and a numerical value.
This is convenient when you want to practice playing at a steady volume or when you
want to practice increasing or decreasing the volume gradually. You can use Volume
Meter mode at the same time as the tuner.
The meter display may become unstable depending on the input level.
If you’re using the internal mic, the displayed level may change according to the distance
from the mic.
We do not guarantee any special accuracy for the volume or numerical value displayed in
this mode. Use this feature as a general guide.
1. Press the [VOLUME METER] switch to enter Volume Meter mode.
2.
Play a continuous note on your instrument, and watch the volume indication in the LCD.
■Backlight
Press the [BACK LIGHT] switch to turn on the backlight of the LCD display. The backlight
will turn off automatically when there has been no audio for approximately two minutes.
Auto Backlight
While in Meter mode or Focus Tune mode, hold down the [BACK LIGHT] switch for
more than 1 second. The LCD backlight will now turn on and remain lit as long as a
note is played into the TD-88. If no note is played for approximately 2 minutes, the
backlight will turn off automatically but will turn back on when you play a note again.
To turn this function off, once again hold down the [BACK LIGHT] switch for more than 1 second.
This setting will not be remembered when the TD-88 is turned off.
Installing the batteries
Turn off the power switch before replacing the batteries.
The included batteries are for the purpose of verifying operation so they may have a shorter
lifespan than normal.
1. Slide the back panel battery cover in the direction of the arrow, and lift the cover.
2. Insert two AAA batteries, making sure to observe the correct polarity (+, -).
The battery cover
3. Close the battery cover.
When the batteries run down, a battery symbol will appear in the left of the display.
When this occurs, replace the batteries.
Restoring the factory settings
You can restore the TD-88 to its factory settings. Doing this will overwrite all previ-
ously stored settings.
1. While holding down the [▲] switch, press the [STANDBY/ON] switch.
Specifications
Scale: 12 note equal temperament, program (88 notes)
Detection range: A0 (27.50 Hz) – C8 (4186.01 Hz) for a sinewave
Reference tone: C2 (65.41 Hz) – C6 (1046.50 Hz)
Tuning modes:
Meter mode (AUTO), Focus Tune mode (AUTO), Sound Out
mode (MANUAL), Sound Back mode (AUTO)
Calibration range: A4 = 410 Hz – 480 Hz (1 Hz step)
Detection accuracy: Better than ±1.0 cent
Sound accuracy:
Better than ±1.5 cent
Connectors: INPUT jack (1/4”mono), PHONE jack (1/8” mini), DC IN
(9V)
Speaker: Dynamic speaker (16 mm x 35 mm)
Power supply: Two AAA alkaline batteries (3V) or AC adapter ( )
Battery life: Tuner ... Approximately 60 hours (Alkaline batteries, Meter
mode, A4 continuous input and Backlight off)
Dimensions: 101 (W) x 84 (D) x 22 (H) mm (folded)
3.98 (W) x 3.31 (D) x 0.81 (H) inches (folded)
Weight: 148 g / 5.22 oz. (including batteries)
Included items: Owner’s manual, two AAA batteries for checking operation,
soft case
Option(sold separately): AC adapter ( )
✍The specifications and external appearance of this product are subject to change
without notice for improvement.
✍Do not subject the LCD display to extreme pressure, impact or sharp objects. Also,
don't twist or bend the tuner to avoid damage to the LCD display.

Merci pour avoir fait l'acquisition de
I'accordeur chromatique
YamahaTD-88. Afin d'assurer un
fonctionnement durable et sans
problème de votre nouvel
accordeur, veuillez lire ce manuel
attentivement.Après l'avoir lu,
conservez-le en lieu sûr pour
pouvoir vous y référer par la suite.
Précautions
Emplacement
L’utilisation de cet instrument dans les endroits suivants peut en entraîner le mauvais
fonctionnement.
• En plein soleil
• Endroits très chauds ou très humides
• Endroits sales ou fort poussiéreux
• Endroits soumis à de fortes vibrations
• A proximité de champs magnétiques
Alimentation
Branchez l’adaptateur secteur fourni à une prise secteur de tension appropriée. Evitez de
brancher l’adaptateur à une prise de courant dont la tension ne correspond pas à celle pour
laquelle l’appareil est conçu.
Interférences avec d’autres appareils électriques
Les postes de radio et de télévision situés à proximité peuvent par conséquent souffrir
d’interférences à la réception. Veuillez dès lors faire fonctionner cet appareil à une distance
raisonnable de postes de radio et de télévision.
Maniement
Pour éviter de les endommager, manipulez les commandes et les boutons de cet instrument avec soin.
Entretien
Lorsque l’instrument se salit, nettoyez-le avec un chiffon propre et sec. Ne vous servez pas d’agents
de nettoyage liquides tels que du benzène ou du diluant, voire des produits inflammables.
Conservez ce manuel
Après avoir lu ce manuel, veuillez le conserver soigneusement pour toute référence ultérieure.
Evitez toute intrusion d’objets ou de liquide
Ne placez jamais de récipient contenant du liquide près de l’instrument. Si le liquide se
renverse ou coule, il risque de provoquer des dommages, un court-circuit ou une électrocution.
Veillez à ne pas laisser tomber des objets métalliques dans le boîtier (trombones, par ex.). Si cela
se produit, débranchez l’alimentation de la prise de courant et contactez votre revendeur korg
le plus proche ou la surface où vous avez acheté l’instrument.
Marque CE pour les normes européennes harmonisées
La marque CE apposée sur tous les produits de notre firme fonctionnant sur secteur
jusqu’au 31 décembre 1996 signifie que ces appareils répondent à la Directive EMC (89/
336/CEE) et à la Directive concernant la marque CE (93/68/CEE).
La marque CE apposée après le 1 janvier 1997 signifie que ces appareils sont conformes à la
Directive EMC (89/336/CEE), à la Directive concernant la marque CE (93/68/CEE) ainsi
qu’à la Directive Basse Tension (73/23/CEE).
La marque CE apposée sur tous les produits de notre firme fonctionnant sur piles signifie
que ces appareils répondent à la Directive EMC (89/336/CEE) et à la Directive concernant
la marque CE (93/68/CEE).
REMARQUE IMPORTANTE POUR LES CLIENTS
Ce produit a été fabriqué suivant des spécifications sévères et des besoins en tension
applicables dans le pays où ce produit doit être utilisé. Si vous avez acheté ce produit via
l’internet, par vente par correspondance ou/et vente par téléphone, vous devez vérifier que
ce produit est bien utilisable dans le pays où vous résidez.
ATTENTION: L’utilisation de ce produit dans un pays autre que celui pour lequel il a été
conçu peut être dangereuse et annulera la garantie du fabricant ou du distributeur.
Conservez bien votre récépissé qui est la preuve de votre achat, faute de quoi votre produit
ne risque de ne plus être couvert par la garantie du fabricant ou du distributeur.
Caractéristiques du TD-88
Volume
Guide d'accord
Microphone interne
Commutateur [EQUAL/PROG]
Prise de casque PHONE
Touches [ ](haut)/[ ](bas)
(maintenir enfoncée pour changer
continuellement la valeur)
Commutateur [SOUND BACK]
Afficheur LCD
Haut-parleur
Commutateur [BACK LIGHT]
Commutateur [CALIB]
Commutateur [STANDBY/ON]
Commutateur [SOUND]
Prise DC IN
(raccorder à l'adaptateur secteur)
Commutateur [FOCUS TUNE]
Commutateur [VOLUME METER]
Prise INPUT
Mise sous tension
Mise sous tension
Ouvrez le TD-88 et appuyez sur le commutateur [STANDBY/ON] pour mettre
l’appareil sous tension.
Mise hors tension
Appuyez de nouveau sur le commutateur [STANDBY/ON] pour mettre l’appareil
hors tension ou refermez simplement le couvercle. Quand vous faites fonctionner le
TD-88 sur piles, l’appareil se mettra automatiquement hors tension si aucun signal
audio n’est reçu au bout d’environ 20 minutes. Les réglages suivants resteront en
mémoire même si vous mettez l’appareil hors tension.
Réglages mémorisés après la mise hors tension Gamme disponible
Réglage d’usine
Calibrage 410...480 Hz 440 Hz
Mode Focus Tune ON/OFF OFF
Mode Sound Back ON/OFF OFF
Tempérament EQUAL/PROG EQUAL
Valeur en centièmes du tempérament programmable
-50...0...+50 Tout zéro
Note de référence A0...C8 A4
Affichage de mesure du volume ON/OFF ON
Méthode d’accordage
Le TD-88 possède quatre modes d’accord : mode Compteur, mode Focus Tune, mode
Sound Out et mode Sound Back.
Accord avec la prise INPUT
Raccordez un câble à votre instrument et branchez le câble sur la prise INPUT du TD-88.
Si vous souhaitez accorder votre instrument via un microphoneTM-10L vendu
séparément et conçu spécifiquement pour une utilisation avec les accordeurs Yamaha,
branchez le TM-10L sur la prise d'entrée du TD-88.
Si un câble est branché sur la prise INPUT, le microphone interne ne pourra pas être utilisé.
La prise INPUT étant monophonique, une fiche stéréo ne peut pas être utilisée.
Accord avec le microphone interne
Rapprochez le plus possible votre instrument du microphone interne sans rien brancher
sur la prise INPUT.
Il est conseillé d’effectuer l’accord avec le microphone interne dans un environnement
calme pour obtenir des résultats précis.
Raccordement du casque (mode Sound Out ou Sound Back)
Vous pouvez raccorder un casque avec minijack 1/8” à la prise PHONE. Lorsque le
casque est branché, le son du haut-parleur est coupé.
Utilisez la commande de volume pour régler le volume du casque.
■Mode Compteur
Ce mode vous permet d’accorder en observant le compteur affiché à l’écran.
1. Jouez une note unique sur votre instrument.
Le nom de la note la plus proche de celle jouée apparaîtra sur la gauche de
l’afficheur. Accordez correctement votre instrument de telle manière que la note
souhaitée apparaisse.
2. Tout en jouant une note unique sur votre instrument, accordez celui-ci de telle
façon que l’aiguille du compteur pointe sur “0” et que la diode au centre du guide
d’accord s’allume.
La diode à gauche s’allumera si la hauteur de la note produite par votre instru-
ment est trop basse et celle à droite si elle est trop élevée. Si vous souhaitez accorder
sur une tierce majeure pure ou sur une tierce mineure au-dessus d’une certaine
note, utilisez les repères “ ” (-13.7 cents) ou “ ” (+15.6 cents) du compteur.
Accord sur une tierce majeure pure ou une tierce mineure au-dessus
Si vous souhaitez effectuer l’accord sur une tierce majeure pure au-dessus de A (0
cent), accordez votre instrument de telle façon que l’indicateur de note affiche C#
et le compteur indique “ ”.
Si vous souhaitez effectuer l’accord sur une tierce mineure au-dessus de A(0 cent),
accordez votre instrument de telle façon que l’indicateur de note affiche C et le
compteur indique “ ”.
■Mode Focus Tune
Dans ce mode, le compteur indique une gamme de ±10 cents, vous permettant
d’accorder avec une précision plus grande.
1. Appuyez sur le commutateur [FOCUS TUNE] pour passer en mode Focus Tune.
2. Jouez une note unique sur votre instrument.
Le nom de la note la plus proche de celle jouée apparaîtra sur l’afficheur.
Si la hauteur de la note perçue se trouve à ±10 cents de la position (centrale) “0”,
l’afficheur changera pour indiquer une plage de ±10 cents. Si la hauteur perçue est
en dehors de cette plage, l’afficheur reviendra à son état précédent de ±50 cents.
3. Jouez une note unique sur votre instrument et accordez de telle façon que l’aiguille
du compteur pointe sur “0” et que la diode au centre du guide d’accord s’allume.
La diode à gauche s’allumera si la hauteur de la note produite par votre instru-
ment est trop basse et celle à droite si elle est trop élevée.
4. Appuyez sur le commutateur [FOCUS TUNE] pour quitter le mode Focus Tune.
■Mode Sound Out
Ce mode vous permet d’accorder en utilisant une hauteur de référence produite par le
haut-parleur du TD-88.
1. Appuyez sur le commutateur [SOUND] pour sélectionner le mode Sound Out.
2. Appuyez sur la touche [▲] ou [▼] pour sélectionner le nom de la note de référence.
Nom de la note [C2...C6 : Tempérament égal, A0...C8 : Tempérament programmable]
3. Accordez votre instrument sur la note de référence produite.
Le TD-88 détecte des hauteurs comprises entre A0 et C8 et les reproduit entre C2 et
C6. En mode Sound Out, le TD-88 produit une note de référence à l’intérieur d’une
plage de hauteur comprise entre C2 et C6.
4. Appuyez sur le commutateur [SOUND] pour quitter le mode Sound Out.
■Mode Sound Back
Ce mode vous permet d’accorder votre instrument en utilisant la note de référence et
l’afficheur LCD. Dans ce mode, le TD-88 produit la note de référence la plus proche en
hauteur du son reçu par la prise INPUT. Le haut-parleur produira un son de référence
pour la note la plus proche de la hauteur du son reçu par la prise d’entrée, et le compteur
indiquera la différence entre la hauteur du son entré et la hauteur correcte.
Le mode Sound Back ne fonctionne pas pour les sons captés par le microphone interne du TD-88.
1. Appuyez sur le commutateur [SOUND BACK] pour passer en mode Sound Back.
2. Jouez une note unique sur votre instrument. Le TD-88 produira la note de référence
la plus proche en hauteur du son reçu par la prise INPUT et le nom de la note
correspondante apparaîtra sur l’afficheur LCD. Le compteur indiquera la différence
entre la note de référence et la hauteur du son reçu dans une plage de -50 cents à
+50 cents. Accordez votre instrument de telle façon que le TD-88 produise et affiche
la note de référence souhaitée.
Le TD-88 détecte des hauteurs comprises entre A0 et C8 et les reproduit entre C2 et
C6. En mode Sound Back, si la note jouée est sous C2 ou au-dessus de C6, le TD-88
transposera l’octave de la note jouée et reproduira la hauteur correspondante à
l’intérieur d’une plage comprise entre C2 et C6.
3. Accordez votre instrument sur la hauteur de la note de référence entendue et
conformément à l’indication du compteur.
4. Appuyez sur le commutateur [SOUND BACK] pour quitter le mode Sound Back.
■Réglage du calibrage (hauteur standard)
1. Appuyez sur la touche [CALIB].
2. Appuyez sur la touche [▲] ou [▼]. Le réglage de calibrage augmentera ou
diminuera par incréments de 1 Hz.
Plage de calibrage [410...480Hz]
■Tempérament programmable
En plus du tempérament égal, le TD-88 vous permet de programmer et d’enregistrer
tout tempérament souhaité. Une fonction pratique pour accorder des instruments
ethniques ou historiques. Vous pouvez spécifier la hauteur de chaque note sur une
plage de 88 notes allant de A0 à C8. Les valeurs spécifiées en centièmes sont disponibles
dans tous les modes d’accord.
1.
Maintenez le commutateur [EQUAL/PROG] enfoncé pour passer en mode de tempérament
“Program”. L’afficheur LCD indiquera “PROG”, et le nom de la note clignotera.
2.
Appuyez sur la touche [▲] ou [▼] pour sélectionner le nom de la note dont vous souhaitez
régler la hauteur.
3. Appuyez sur la touche [
▲
] ou [
▼
] pour spécifier la valeur en centièmes relative au
tempérament égal.
4. Pour continuer à spécifier la valeur en centièmes des autres noms de notes, appuyez
sur le commutateur [EQUAL/PROG] et reprenez les étapes 2 et 3.
5. Appuyez sur le commutateur [CALIB] et vous pourrez accorder en utilisant le
tempérament spécifié.
6. Maintenez une fois de plus le commutateur [EQUAL/PROG] enfoncé pour passer
en mode de tempérament “Equal”.
■Affichage du volume sur le compteur
Le volume de votre instrument tel qu’il est reçu par le microphone interne ou la prise
INPUT est indiqué sur l’afficheur LCD sous la forme d’une indication du compteur et
une valeur numérique. C’est pratique quand vous souhaitez vous entraîner à jouer à
un volume constant ou quand vous souhaitez vous entraîner à augmenter ou diminuer
progressivement le volume. Vous pouvez utiliser le mode d’affichage du volume sur
le compteur en même temps que l’accordeur.
L’affichage sur le compteur peut devenir instable en fonction du volume sonore.
Si vous utilisez le microphone interne, le niveau affiché pourra changer en fonction de la
distance au microphone.
Nous ne pouvons garantir le niveau de précision pour le volume ou la valeur numérique
affichée dans ce mode. Utilisez cette fonction à titre indicatif seulement.
1. Appuyez sur le commutateur [VOLUME METER] pour passer en mode d’affichage
du volume sur le compteur.
2. Jouez une note continue sur votre instrument et regardez l’indication du volume
sur l’écran LCD.
■Rétroéclairage
Appuyez sur le commutateur [BACK LIGHT] pour allumer le rétroéclairage de
l’afficheur LCD. Le rétroéclairage s’éteindra automatiquement si aucun son n’est reçu
pendant environ deux minutes.
Rétroéclairage automatique
En mode Compteur ou Focus Tune, maintenez le commutateur [BACK LIGHT] enfoncé
pendant plus d’une seconde. Le retroéclairage s’allumera et restera allumé aussi
longtemps qu’un son sera reçu par le TD-88.
Si aucune note n’est jouée pendant environ 2 minutes, le rétroéclairage s’éteindra
automatiquement mais se rallumera dès qu’une note sera de nouveau jouée.
Pour désactiver cette fonction, maintenez de nouveau le commutateur [BACK LIGHT]
enfoncé pendant plus d’une seconde.
Ce réglage ne sera pas conservé après la mise hors tension de l’appareil.
Mise en place des piles
Mettez l’appareil hors tension avant de remplacer les piles.
Les piles fournies sont destinées à vérifier le bon fonctionnement de votre appareil. Il est
possible que leur durée de vie soit plus courte que la normale.
1. Faites glisser le couvercle du logement des piles du panneau arrière dans le sens
de la flèche et soulevez-le.
2. Insérez deux piles de format AAA, en respectant leur polarité (+, -).
The battery cover
3. Refermez le logement des piles.
Quand les piles sont usées, un symbole de pile apparaît sur l’afficheur à gauche.
Remplacez alors les piles.
Restoration des programmes d’usine
Vous pouvez restaurer les réglages d’usine du TD-88. Tous les réglages précédemment
enregistrés seront alors effacés.
1. Tout en maintenant la touche [▲] enfoncée, appuyez sur le commutateur
[STANDBY/ON].
Spécifications
Gamme: 12 notes tempérament égal, programme (88 notes)
Plage de détection: A0 (27,50 Hz) – C8 (4186,01 Hz) : onde sinusoïde
Note de référence: C2 (65.41 Hz) – C6 (1046.50 Hz)
Modes d’accord: Mode Compteur (AUTO), Mode Focus Tune (AUTO), Mode
Sound Out (MANUAL), Mode Sound Back (AUTO)
Plage de calibrage: A4 = 410 Hz – 480 Hz (par pas de 1 Hz)
Précision de la détection: Supérieure à ± 1 centième
Précision du son: Supérieure à ± 1.5 centième
Prises: Prise INPUT (jack mono 1/4”), Prise PHONE (minijack 1/
8”), Prise DC IN (9 V)
Haut-parleur: Haut-parleur dynamique (16 mm x 35 mm)
Alimentation:
Deux piles de format AAA(3V) ou adaptateur secteur ( )
Durée de vie des piles:
Accordeur ... environ 60 heures (piles alcalines, mode Compteur,
note A4 en fonctionnement continu, pas de Rétroéclairage)
Dimensions: 101 (L) x 84 (P) x 22 (H) mm (replié)
Poids: 148 g (piles comprises)
Accessoires fournis: Mode d’emploi de l’utilisateur, deux piles AAA pour
vérification du fonctionnement, Etui souple
Option (vendu séparément): Adaptateur secteur ( )
✍Les spécifications et l’aspect extérieur sont sujets à modifications sans préavis à des fins
d’amélioration du produit.
✍
Ne soumettez pas l’afficheur LCD à des pressions importantes ou à des chocs. Évitez aussi de
le tordre, de le plier ou de le toucher avec un objet pointu. Une telle mauvaise manipulation
peut endommager l'affichage à cristaux liquides.

Vielen Dank, daß Sie sich für das
chromatische Stimmgerät TD-88
vonYamaha entschieden haben.
Bitte lesen Sie sich diese
Bedienungsanleitung vor Gebrauch
desTD-88 vollständig durch, um
bei der Bedienung alles richtig zu
machen.Bewahren Sie die
Bedienungsanleitung an einem
sicheren Ort auf.
Vorsichtsmaßnahmen
Aufstellungsort
Vermeiden Sie das Aufstellen des Geräts an Orten, an denen
• es direkter Sonneneinstrahlung ausgesetzt ist;
• hohe Feuchtigkeit oder Extremtemperaturen auftreten können;
• Staub oder Schmutz in großen Mengen vorhanden sind;
• das Gerät Erschütterungen ausgesetzt sein kann.
• in der Nähe eines Magnetfeldes.
Stromversorgung
Schließen Sie das beiliegende Netzteil nur an eine geeignete Steckdose an. Verbinden Sie es
niemals mit einer Steckdose einer anderen Spannung.
Störeinflüsse auf andere Elektrogeräte
Dieser kann bei in der Nähe aufgestellten Rund-funkempfängern oder Fernsehgeräten
Empfangsstörungen hervorrufen. Betreiben Sie solche Geräte nur in einem geeigneten Abstand
von diesem Erzeugnis.
Bedienung
Vermeiden Sie bei der Bedienung von Schaltern und Reglern unangemessenen Kraftaufwand.
Reinigung
Bei auftretender Verschmutzung können Sie das Gehäuse mit einem trockenen, sauberen Tuch
abwischen. Verwenden Sie keinerlei Flüssigreiniger wie beispielsweise Reinigungsbenzin,
Verdünnungs- oder Spülmittel. Verwenden Sie niemals brennbare Reiniger.
Bedienungsanleitung
Bewahren Sie diese Bedienungsanleitung gut auf, falls Sie sie später noch einmal benötigen.
Flüssigkeiten und Fremdkörper
Stellen Sie niemals Behältnisse mit Flüssigkeiten in der Nähe des Geräts auf. Wenn Flüssigkeit
in das Gerät gelangt, können Beschädigung des Geräts, Feuer oder ein elek-trischer Schlag die
Folge sein.
Beachten Sie, daß keinerlei Fremdkörper in das Gerät gelangen. Sollte ein Fremdkörper in das
Gerät gelangt sein, so trennen Sie es sofort vom Netz. Wenden Sie sich dann an Ihren KORG-
Fachhändler.
Das CE-Zeichen für die Europäische Gemeinschaft
Vor dem 31.12.1996 vergebene CE-Zeichen auf unseren netzgespeisten Geräten zeigen an,
daß diese Geräte gemäß der EMC-Richtlinie (89/336/EWG) und der CE-Richtlinie (93/68/
EWG) der EU arbeiten.
Nach dem 01.01.1997 vergebene CE-Zeichen auf unseren netzgespeisten Geräten zeigen an,
daß diese Geräte gemäß der EMC-Richtlinie (89/336/EWG), der CE-Richtlinie (93/68/
EWG) und der Niederspannungsstromrichtlinie (73/23/EWG) der EU arbeiten.
Die CE-Zeichen auf unseren batteriegespeisten Geräten zeigen an, daß diese Geräte gemäß
der EMC-Richtlinie (89/336/EWG) und der CE-Richtlinie (93/68/EWG) der EU arbeiten.
WICHTIGER HINWEIS FÜR KUNDEN
Dieses Produkt wurde unter strenger Beachtung von Spezifikationen und
Spannungsanforderungen hergestellt, die im Bestimmungsland gelten. Wenn Sie dieses
Produkt über das Internet, per Postversand und/oder mit telefonischer Bestellung gekauft
haben, müssen Sie bestätigen, dass dieses Produkt für Ihr Wohngebiet ausgelegt ist.
WARNUNG: Verwendung dieses Produkts in einem anderen Land als dem, für das es
bestimmt ist, verwendet wird, kann gefährlich sein und die Garantie des Herstellers oder
Importeurs hinfällig lassen werden. Bitte bewahren Sie diese Quittung als Kaufbeleg auf,
da andernfalls das Produkt von der Garantie des Herstellers oder Importeurs
ausgeschlossen werden kann.
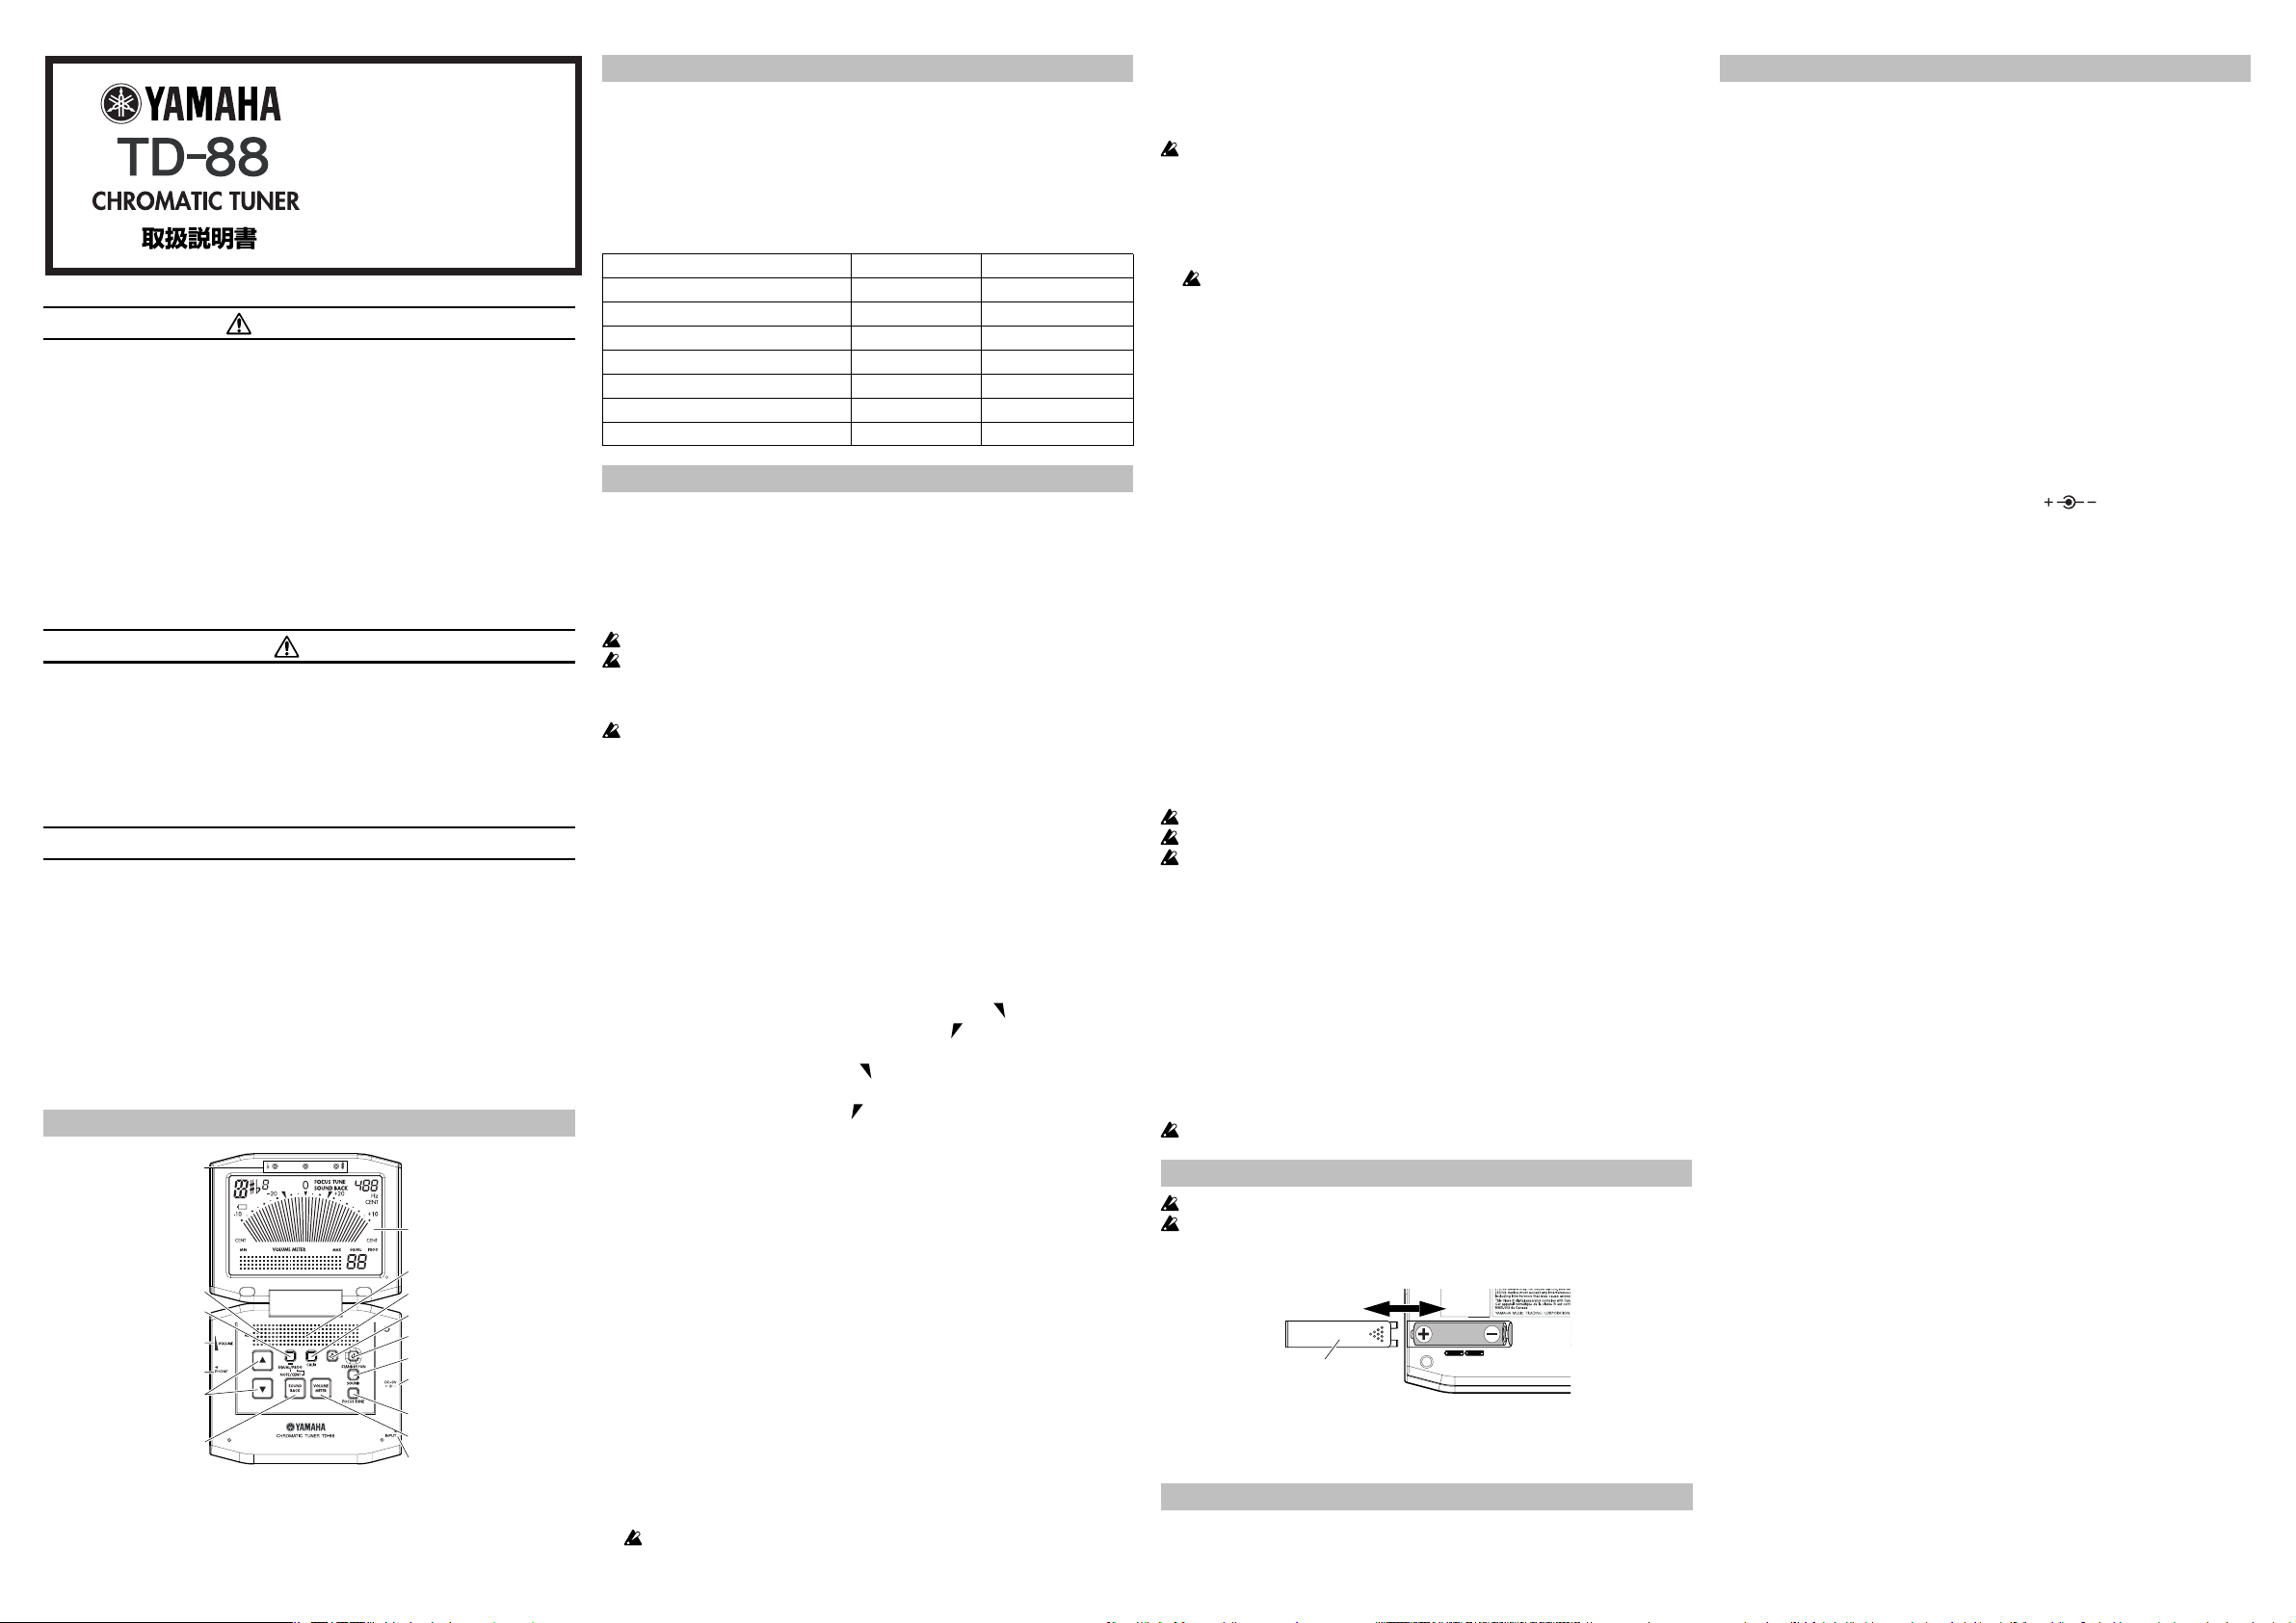
Merkmale des TD-88
Stimm-Anleitung
Equalizer/Program-Taste
[EQUAL/PROG]
[SOUND BACK]-Taste
[ ](Auf)/[ ](Ab)-Taste
(Wenn gedrückt gehalten, wird der
Wert kontinuierlich geändert)
Kopfhörerbuchse (PHONE)
Lautstärke
Eingebautes Mikrofon
LCD
Ein/Standby-Taste [STANDBY/ON]
Rückbeleuchtung-Taste
[BACKLIGHT]
Kalibrieren-Taste [CALIB]
Klang-Taste [SOUND]
[FOCUS TUNE]-Taste
Lautstärkemesser-Taste
[VOLUME METER]
Betriebsstrom-Buchse (DC IN)
(an Netzteil anschließen)
Eingangsbuchse (INPUT)
Lautsprecher
Einschalten des Geräts
Öffnen Sie das TD-88 und drücken Sie die [STANDBY/ON]-Taste, um das Gerät
einzuschalten.
Ausschalten des Geräts
Drücken Sie die [STANDBY/ON]-Taste erneut, um das Gerät auszuschalten, oder
schließen Sie einfach den Deckel. Wenn Sie das TD-88 mit Batteriestrom betreiben, schaltet
es automatisch aus, wenn ca. 20 Minuten lang kein Ton am Eingang angelegt ist. Die
folgenden Einstellungen werden auch bewahrt, wenn das Gerät ausgeschaltet wird.
Beim Ausschalten bewahrte Einstellungen
Verfügbarer Bereich
Werkseitige Einstellung
Kalibrierung 410...480 Hz 440 Hz
Focus-Tune-Modus EIN/AUS AUS
Sound-Back-Modus EIN/AUS AUS
Stimmung EQUAL/PROG EQUAL
Cent-Wert programmierbarer Stimmung -50...0...+50 Alle Null
Referenzton A0...C8 A4
Lautstärkemessanzeige EIN/AUS EIN
Arbeitsweise für das Stimmen
Das TD-88 hat vier Stimm-Modi; Messmodus, Focus-Tune-Modus, Ton-Ausgabe-
Modus, und Sound-Back-Modus.
Stimmen mit der INPUT-Buchse
Schließen Sie ein Instrumentenkabel zwischen Ihrem Instrument und der INPUT-
Buchse des TD-88 an. Wenn Sie Ihr Instrument über ein getrennt erhältliches, speziell
für Yamaha-Stimmgeräte ausgelegtes Mikrofon TM-10Lstimmen, stecken Sie das TM-
10L in die Eingangsbuchse des TD-88.
Wenn ein Kabel an die INPUT-Buchse angeschlossen ist, kann das eingebaute Mikrofon
nicht verwendet werden.
Die INPUT-Buchse ist Mono, so dass Stereo-Stecker nicht verwendet werden können.
Stimmen mit der internen Mikrofon
Positionieren Sie Ihr Instrument so nahe wie möglich am internen Mikrofon, ohne
einen Anschluss an der INPUT-Buchse vorzunehmen.
Für das Stimmen mit dem eingebauten Mikrofon wird eine ruhige Umgebung für präzises
Stimmen empfohlen.
Anschließen von Kopfhörern (Ton-Ausgabe-Modus oder Sound-Back-Modus)
Sie können 1/8-Zoll-Ministecker-Kopfhörer an die PHONE-Buchse anschließen. Wenn
eingesteckt, kommt kein Ton vom Lautsprecher.
Verwenden Sie den Lautstärkeregler zum Einstellen der Lautstärke der Kopfhörer.
■Messmodus
Dieser Modus erlaubt es Ihnen, mit der Messanzeige im Display zu stimmen.
1. Spielen Sie eine einzelne Note auf Ihrem Instrument.
Die Note, deren Name der gespielten Note am nächsten ist, erscheint links in der
Notenanzeige. Stimmen Sie das Instrument auf die korrekte Tonhöhe, so dass der
gewünschte Notenname erscheint.
2. Während Sie eine einzelne Note auf Ihrem Instrument spielen, stimmen Sie Ihr
Instrument so, dass die Spitze der Messanzeige “0” anzeigt, und die Mittenanzeige
an der Stimmführung leuchtet.
Die linke Stimmanzeige leuchtet auf, wenn die Tonlage des Instruments Moll ist, und
die rechteAnzeige leuchtet auf, wenn die Tonlage Dur ist. Wenn Sie eine genaue große
Terz oder eine kleine Terz über einer bestimmten Note stimmen wollen, verwenden
Sie die Markierungen “ ” (-13,7 Cent) oder “ ” (+15,6 Cent) in der Messanzeige.
Stimmen zu einer genauen großen Terz oder einer kleinen Terz nach oben
Wenn Sie eine reine große Terz über A(0 Cent) abstimmen wollen, stimmen Sie Ihr Instru-
ment so, dass die Notennamen-Anzeige C# anzeigt und die Messanzeige bei “ ” ist.
Wenn Sie eine kleine Terz über A (0 Cent) abstimmen wollen, stimmen Sie Ihr Instru-
ment so, dass die Notennamen-Anzeige C anzeigt und die Messanzeige bei “ ” ist.
■Focus-Tune-Modus
In diesem Modus zeigt die Messanzeige einen Bereich von ±10 Cent an, wodurch Sie
mit größerer Präzision stimmen können.
1. Drücken Sie die [FOCUS TUNE]-Taste, um auf Focus-Tune-Modus zu schalten.
2. Spielen Sie eine einzelne Note auf Ihrem Instrument.
Das LCD zeigt den Namen der Note, die der gespielten Tonlage am nächsten liegt.
Wenn die eingegebene Tonhöhe innerhalb von ±10 Cent von der “0” (Mitten)-
Position kommt, wechselt das Display auf einen Bereich von ±10 Cent um. Wenn
die eingegebene Tonhöhe nicht innerhalb von ±10 Cent liegt, schaltet das Display
auf den vorherigen Zustand von ±50 Cent um.
3. Spielen Sie eine einzelne Note auf Ihrem Instrument und stimmen es so, dass die
Messanzeige “0” (Mitten)-Position anzeigt, und die Mittenanzeige an der
Stimmführung leuchtet. Die linke Stimmanzeige leuchtet auf, wenn die Tonlage
Moll ist, und die rechte Anzeige leuchtet auf, wenn die Tonlage Dur ist.
4. Press the [FOCUS TUNE] switch to exit Focus Tune mode.
■Ton-Ausgabe-Modus
Dieser Modus erlaubt es Ihnen, eine Bezugstonhöhe zu verwenden, die vom
Lautsprecher des TD-88 ausgegeben wird.
1. Drücken Sie die [SOUND]-Taste, um den Ton-Ausgabe-Modus zu wählen.
2. Drücken Sie die Taste [▲] oder [▼], um den Namen der zu stimmen gewünschten
Note zu wählen.
Der Name der Note [C2...C6: Gleichschwebende Stimmung, A0...C8: Programmierbare Stimmung]
3. Stimmen Sie Ihr Instrument auf die Referenztonlage vom TD-88.
Das TD-88 erkennt Tonlagen zwischen A0 und C8 und reproduziert sie zwischen
C2 und C6. Im Ton-Ausgabe-Modus liefter das TD-88 einen Referenzton innerhalb
der Tonlage C2 bis C6.
4. Drücken Sie die [SOUND]-Taste, um den Ton-Ausgabe-Modus zu verlassen.
■Sound-Back-Modus
Dies erlaubt es Ihnen, Ihr Instrument mit dem Referenzton und Messanzeige zu
stimmen. Der Lautsprecher gibt einen Referenzton aus, der der Note der von der
Eingangsbuchse empfangnen Tonlage am nächsten ist, und die Messanzeige zeigt den
Unterschied zwischen der Eingangstonlage und der richtigen Tonlage an.
Sound-Back-Modus arbeitet nicht für Ton, der über das interne Mikrofon des TD-88
angelegt wird.
1. Drücken Sie die [SOUND BACK]-Taste, um den Sound-Back-Modus einzuschalten.
2. Spielen Sie eine einzelne Note auf Ihrem Instrument.
Das TD-88 gibt den Referenzton aus, der der Tonlage des Audioeingangs am
nächsten liegt, und im LCD wird der Name der Note angezeigt. Die Messanzeige
zeigt den Unterschied zwischen der Bezugsnote und der Eingangstonlage in einem
Bereich von -50 Cent bis +50 Cent an. Stimmen Sie Ihr Instrument so, dass das TD-
88 die gewünschte Bezugsnote ausgibt und anzeigt.
Das TD-88 erkennt Tonlagen zwischen A0 und C8 und spielt Tonhöhen zwischen
C2 und C6 ab. Wenn die gespielte Note im Sound-Back-Modus unter C2 oder
über C6 ist, transponiert das TD-88 die Oktave der gespielten Note und reproduziert
die entsprechende Tonlage innerhalb des Bereichs C2 bis C6.
3.
Stimmen Sie Ihr Instrument so, dass es dem Referenzton und der Messanzeige entspricht.
4.
Drücken Sie die [SOUND BACK]-Taste erneut, um den Sound-Back-Modus zu verlassen.
■Einstellen der Kalibrierung (Standard-Tonlage)
1.
Drücken Sie die [CALIB]-Taste.
2. Drücken Sie die Taste [▲] oder [▼]. Die Kalibrierungseinstellung nimmt in Schritten
von 1 Hz zu oder ab.
Kalibrierungsbereich [410...480Hz]
■Programmierbare Stimmung
Neben der gleichschwebenden Stimmung erlaubt das TD-88 es Ihnen auch, jede
gewünschte Stimmung zu programmieren und zu speichern. Dies ist praktisch zum
Stimmen von ethnischen oder historischen Instrumenten. Sie können die Tonlage jeder
Note im 88-Noten-Bereich von A0 bis C8 festlegen. Die von Ihnen festgelegten Cent-
Werte sind in allen Stimm-Modi verfügbar.
1. Halten Sie die [EQUAL/PROG]-Taste gedrückt und schalten Sie die Stimmung
auf “Programm” um. Im LCD erscheint “PROG”, und der Name der Note blinkt.
2. Drücken Sie die Taste [
▲
] oder [
▼
], um den Namen der zu stimmen gewünschten
Note zu wählen, deren Tonlage eingestellt werden soll.
3. Drücken Sie die [EQUAL/PROG]-Taste, so dass der Cent-Wert blinkt.
Drücken Sie die Taste [
▲
] oder [
▼
], um den Cent-Wert relativ zur
gleichschwebenden Stimmung festzulegen.
4. Zum Fortsetzen der Festlegung des Cent-Wertes für andere Notennamen drücken
Sie den [EQUAL/PROG]-Schalter und wiederholen Schritt 2 und 3.
5.
Drücken Sie die [CALIB]-Taste, und Sie können mit der festgelegten Stimmung stimmen.
6.
Halten Sie die [EQUAL/PROG]-Taste erneut gedrückt und schalten Sie die Stimmung
auf
“
Equal
”
um.
■Lautstärkemessanzeige
Die Lautstärke Ihres Instruments über das interne Mikrofon oder die INPUT-Buchse
wird im LCD als Messanzeige und numerischer Wert angezeigt.
Das ist praktisch, wenn Sie bei gleichmäßiger Lautstärke üben wollen, oder wenn Sie
allmähliches Steigern oder Senken der Lautstärke üben wollen. Sie können den
Lautstärkemesser-Modus gleichzeitig mit dem Stimmgerät verwenden.
Die Messanzeige kann je nach Eingangspegel instabil werden.
Wenn Sie das interne Mikrofon verwenden, kann der angezeigte Pegel je nach Abstand
zum Mikrofon wechseln.
Wir garantieren keine besondere Genauigkeit für die Anzeige von Lautstärke oder
Zahlenwert in diesem Modus. Verwenden Sie dieses Merkmal als allgemeine Richtlinie.
1.
Drücken Sie die [VOLUME METER]-Taste zum Umschalten auf Lautstärke-Messmodus.
2.
Spielen Sie eine kontinuierliche Note auf Ihrem Instrument, und beobachten Sie die
Lautstärkeanzeige im LCD.
■Rückbeleuchtung
Drücken Sie die [BACK LIGHT]-Taste, um die Rückbeleuchtung des LCDs einzuschalten.
Die Rückbeleuchtung schaltet automatisch aus, wenn ca. zwei Minuten lang kein Ton angelegt ist.
Auto-Rückbeleuchtung
Während der Messungsmodus oder Focus-Tune-Modus eingeschaltet ist, halten Sie
die [BACK LIGHT]-Taste länger als 1 Sekunde gedrückt. Die LCD-Rückbeleuchtung
schaltet jetzt ein und bleibt beleuchtet, solange die Note im TD-88 gespielt wird.
Wenn etwa 2 Minuten lang keine Note gespielt wird, schaltet die Rückbeleuchtug
automatisch aus und schaltet erneut ein, wenn wieder eine Note gespielt wird.
ZumAusschalten dieser Funktion drücken Sie die [BACK LIGHT]-Taste erneut länger als 1 Sekunde.
Diese Einstellung wird beim Ausschalten des TD-88 nicht bewahrt.
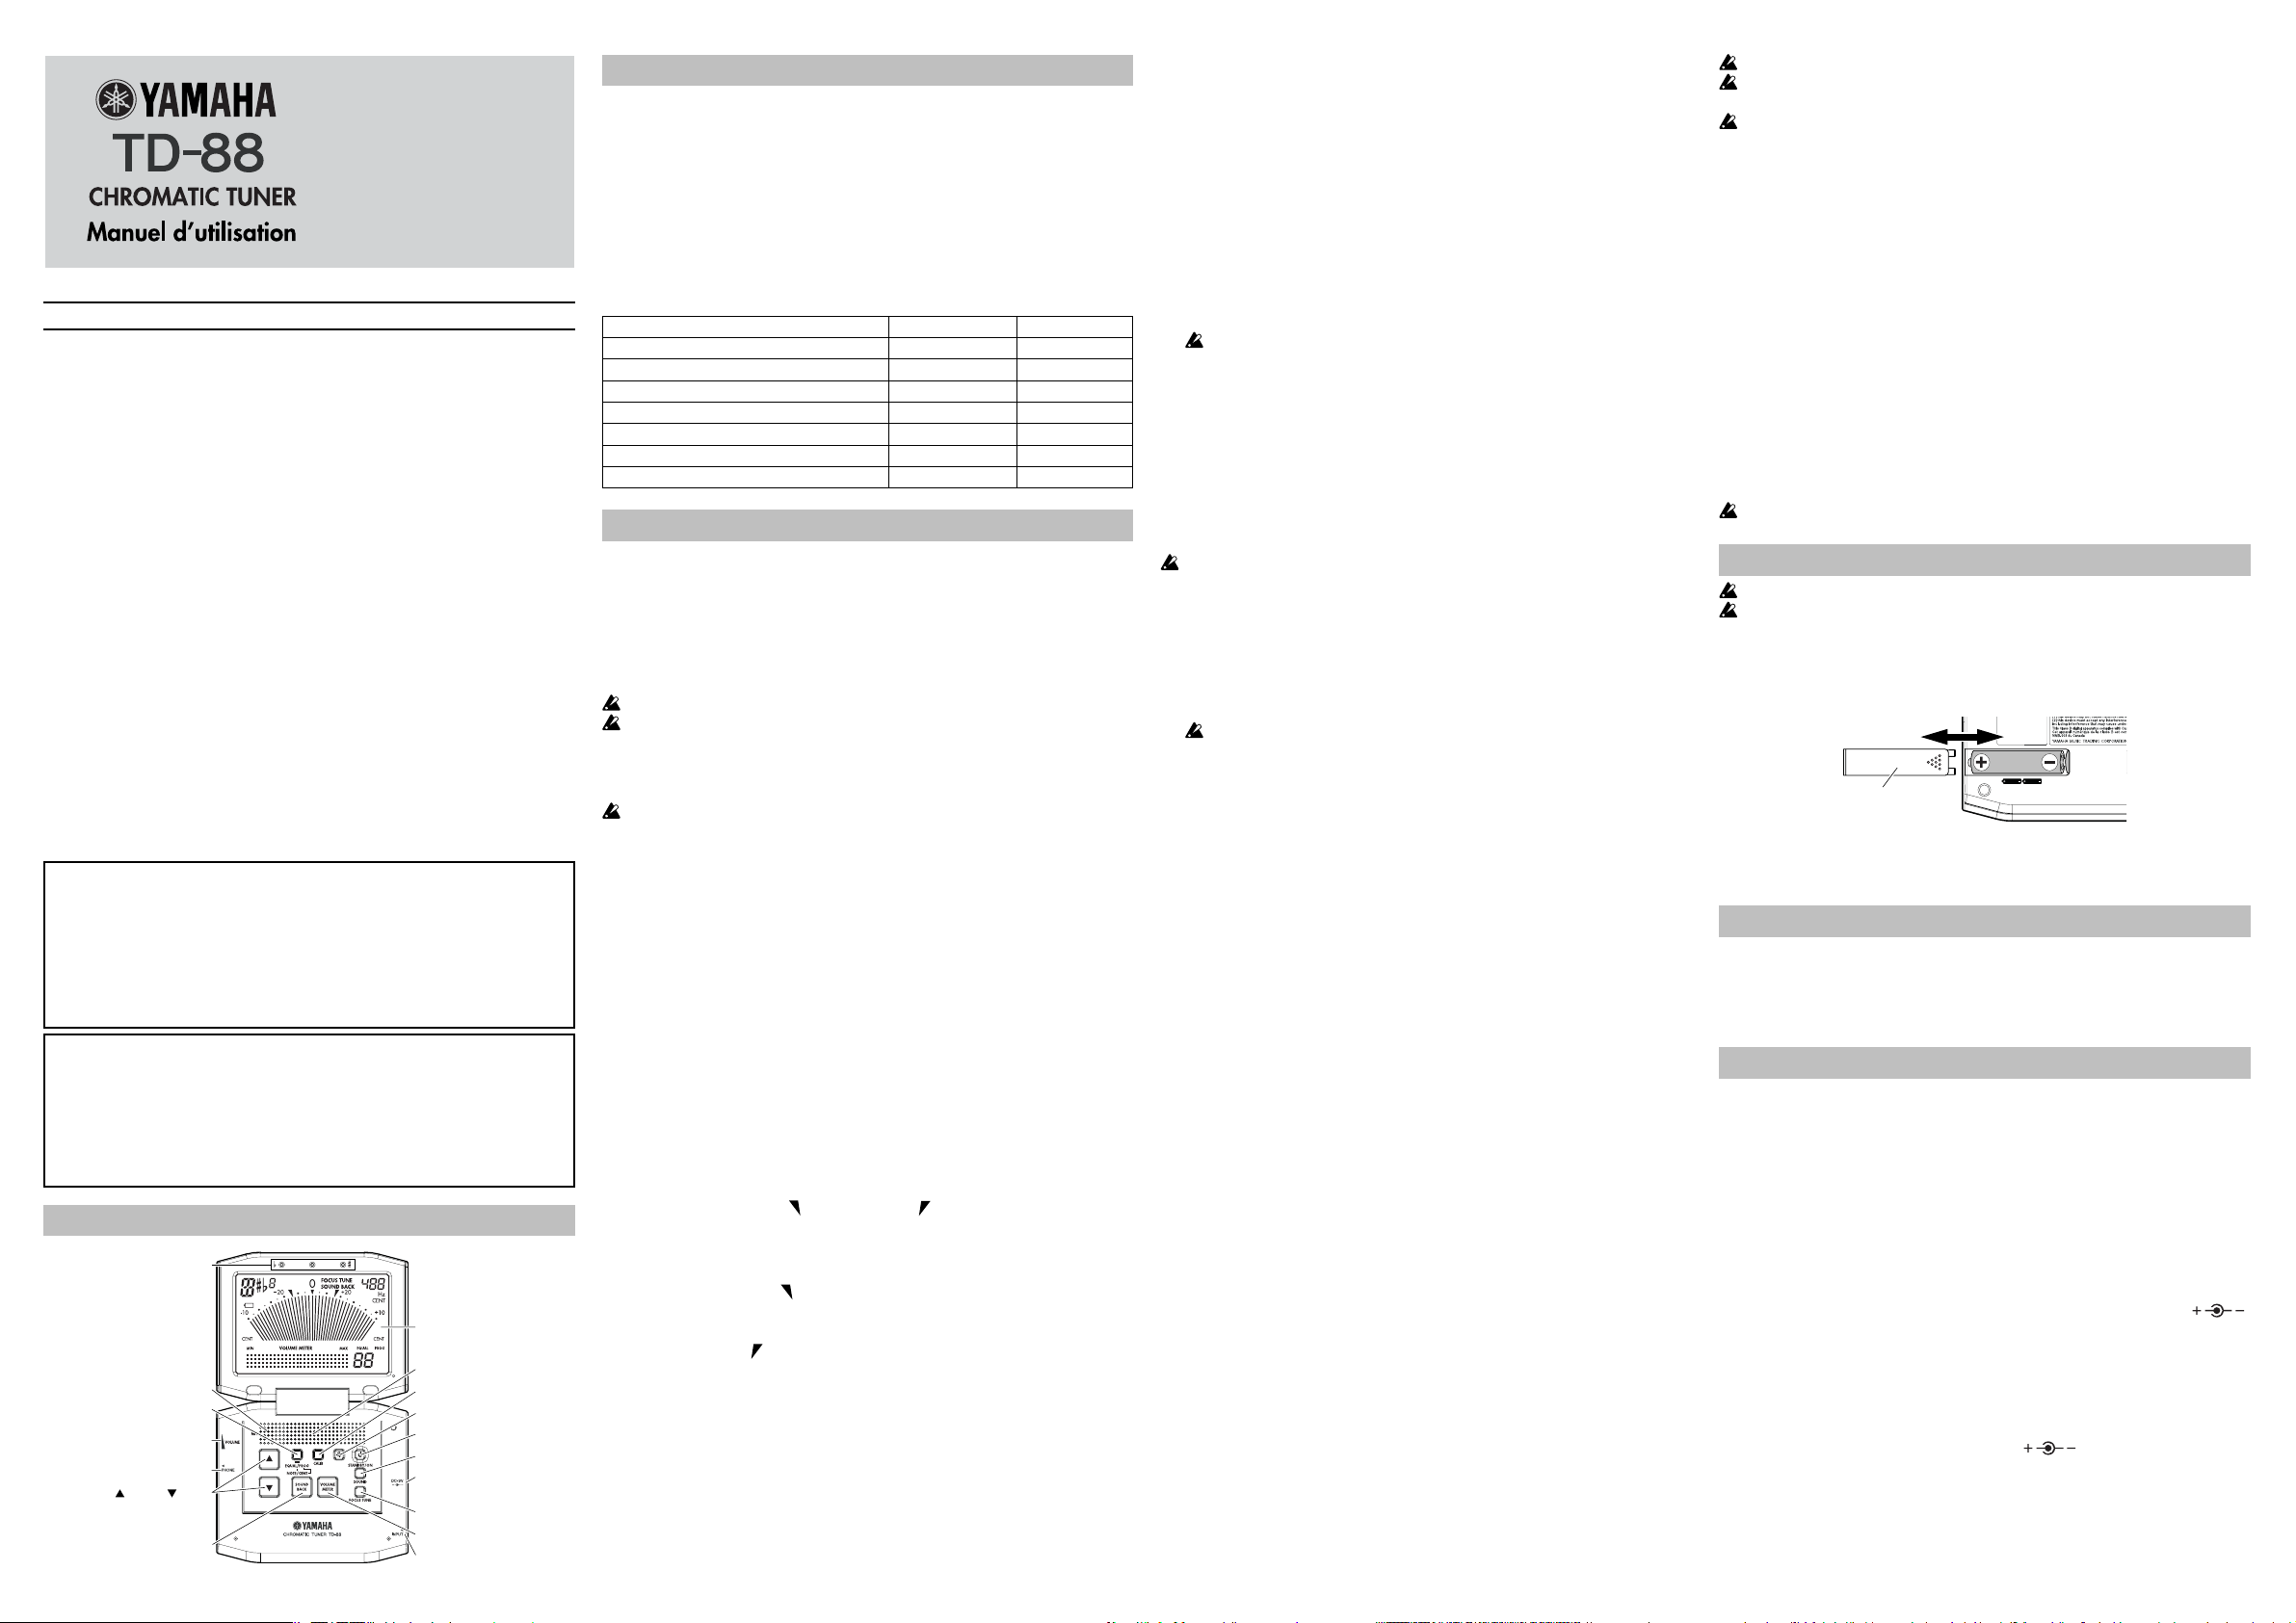
Einsetzen der Batterien
Schalten Sie den Netzschalter aus, bevor Sie die Batterien ersetzen.
Die mitgelieferten Batterien dienen zur Bestätigung des Betriebs und können eine kürzere
Lebensdauer als normale Batterien haben.
1. Schieben Sie den Batteriefachdeckel an der Rückseite in die Richtung des Pfeils,
und nehmen Sie ihn ab.
2.
Setzen Sie zwei AAA-Batterien (R03, Micro) unter Beachtung der richtigen Polung (+, -) ein.
The battery cover
3. Den Batteriefachdeckel schließen.
Wenn die Batterien schwach werden, erscheint ein Batteriesymbol links im Display. In
diesem Fall ersetzen Sie die Batterien.
Wiederherstellen der Werksvorgaben
Sie können das TD-88 auf werkseitige Voreinstellungen zurücksetzen. Damit werden
alle vorher gespeicherten Einstellungen überschrieben.
1. Während Sie die [▲]-Taste gedrückt halten, drücken Sie die [STANDBY/ON]-Taste.
Technische Daten
Skala: 12 Noten gleichschwebende Stimmung, Programm (88 Noten)
Erkennungsbereich: A0 (27.50 Hz) – C8 (4186.01 Hz) für eine Sinuswelle
Referenzton: C2 (65.41 Hz) – C6 (1046.50 Hz)
Stimm-Modi: Messmodus (AUTO)
Focus-Tune-Modus (AUTO)
Ton-Ausgabe-Modus (MANUAL)
Sound-Back-Modus (AUTO)
Kalibrierungsbereich: A4 = 410 Hz – 480 Hz (1 Hz Schritt)
Messgenauigkeit: Besser als ±1,0 Cent
Klanggenauigkeit: Besser als ±1,5 Cent
Anschlüsse: INPUT-Buchse (1/4 Zoll Mono)
PHONE-Buchse (1/8 Zoll Mini)
DC IN (9V)
Lautsprecher: Dynamischer Lautsprecher (16 mm x 35 mm)
Stromversorgung: Zwei AAA-Alkalibatterien (R03, Micro) (3 V) oder Netzteil
()
Batterielebensdauer:
Stimmgerät ... Etwa 60 Stunden (Alkalibatterien, Messungsmodus,
A4 kontinierlicher Eingang und Rückbeleuchtung aus)
Abmessungen: 101 (B) x 984 (T) x 22 (H) mm (zusammengeklappt)
Gewicht: 148 g (mit Batterien)
Lieferumfang: Bedienungshandbuch, zwei AAA-Batterien (R03, Micro) zur
Funktionsprüfung, Etui
Option (getrennt erhältlich):
Netzteil ( )
✍Änderungen der technischen Daten und des Designs ohne Vorankündigung bleiben
im Sinne ständiger Produktverbesserungen vorbehalten.
✍Setzen Sie das LCD nicht extermem Druck oder Stößen aus. Vermeiden Sie Verdrehen,
Verbiegen oder Anstoßen mit spitzen Gegenständen. Eine derartige Handhabung
kann das LCD beschädigen.
Table of contents
Languages:
Other Yamaha Tuner manuals

Yamaha
Yamaha YT-2000 User manual

Yamaha
Yamaha TX-550 User manual

Yamaha
Yamaha CT-410 User manual

Yamaha
Yamaha YT-1200 User manual

Yamaha
Yamaha T-80 User manual

Yamaha
Yamaha TX-670RDS User manual

Yamaha
Yamaha T-1000 User manual

Yamaha
Yamaha T-1000 User manual

Yamaha
Yamaha CT-7000 User manual

Yamaha
Yamaha T-60 User manual

Yamaha
Yamaha CT-610 User manual

Yamaha
Yamaha T-2 User manual

Yamaha
Yamaha T-1020 User manual

Yamaha
Yamaha T-09 User manual

Yamaha
Yamaha T-S500 User manual

Yamaha
Yamaha T-60 User manual

Yamaha
Yamaha T-1020 User manual

Yamaha
Yamaha T-230 User manual

Yamaha
Yamaha YT-1000 User manual

Yamaha
Yamaha T-S1000 User manual