CAUT ION:
This is a FISH ER precision high-fidelity in-
strument.It should be serviced only by qualified personnel -
trained
in the
repair of transistor
equipment
and printed
circuitry.
EQUIPMENT AND TOOLS NEEDED
The following are needed to completely test and align modern high-fidelity instruments
such as amplifiers, tuners and receivers.
Miscellaneous
Adjustable-line-Voltage Transformer or
line-voltage regulator
Load Resistors (2) -8-ohm, 50-watt (or higher)
Stereo source (Turntable with stereo cartridge
or Tape Deck)
Speakers (2) Full-range, for listening tests
Soldering iron (with small-diameter tip).
Fully insulated from power line.
Test Instruments
Vacuum-Tube Voltohmmeter DC VTVM
Audio (AC) Vacuum-Tube Voltmeter (AC VTVM)
Oscilloscope (Flat to lOOkc minimum)
Audio (Sine-wave) Generator
Intermodu lat ion AnaIyzer
Sweep (FM) Generator (88 to 108 mc)
Marker Generator
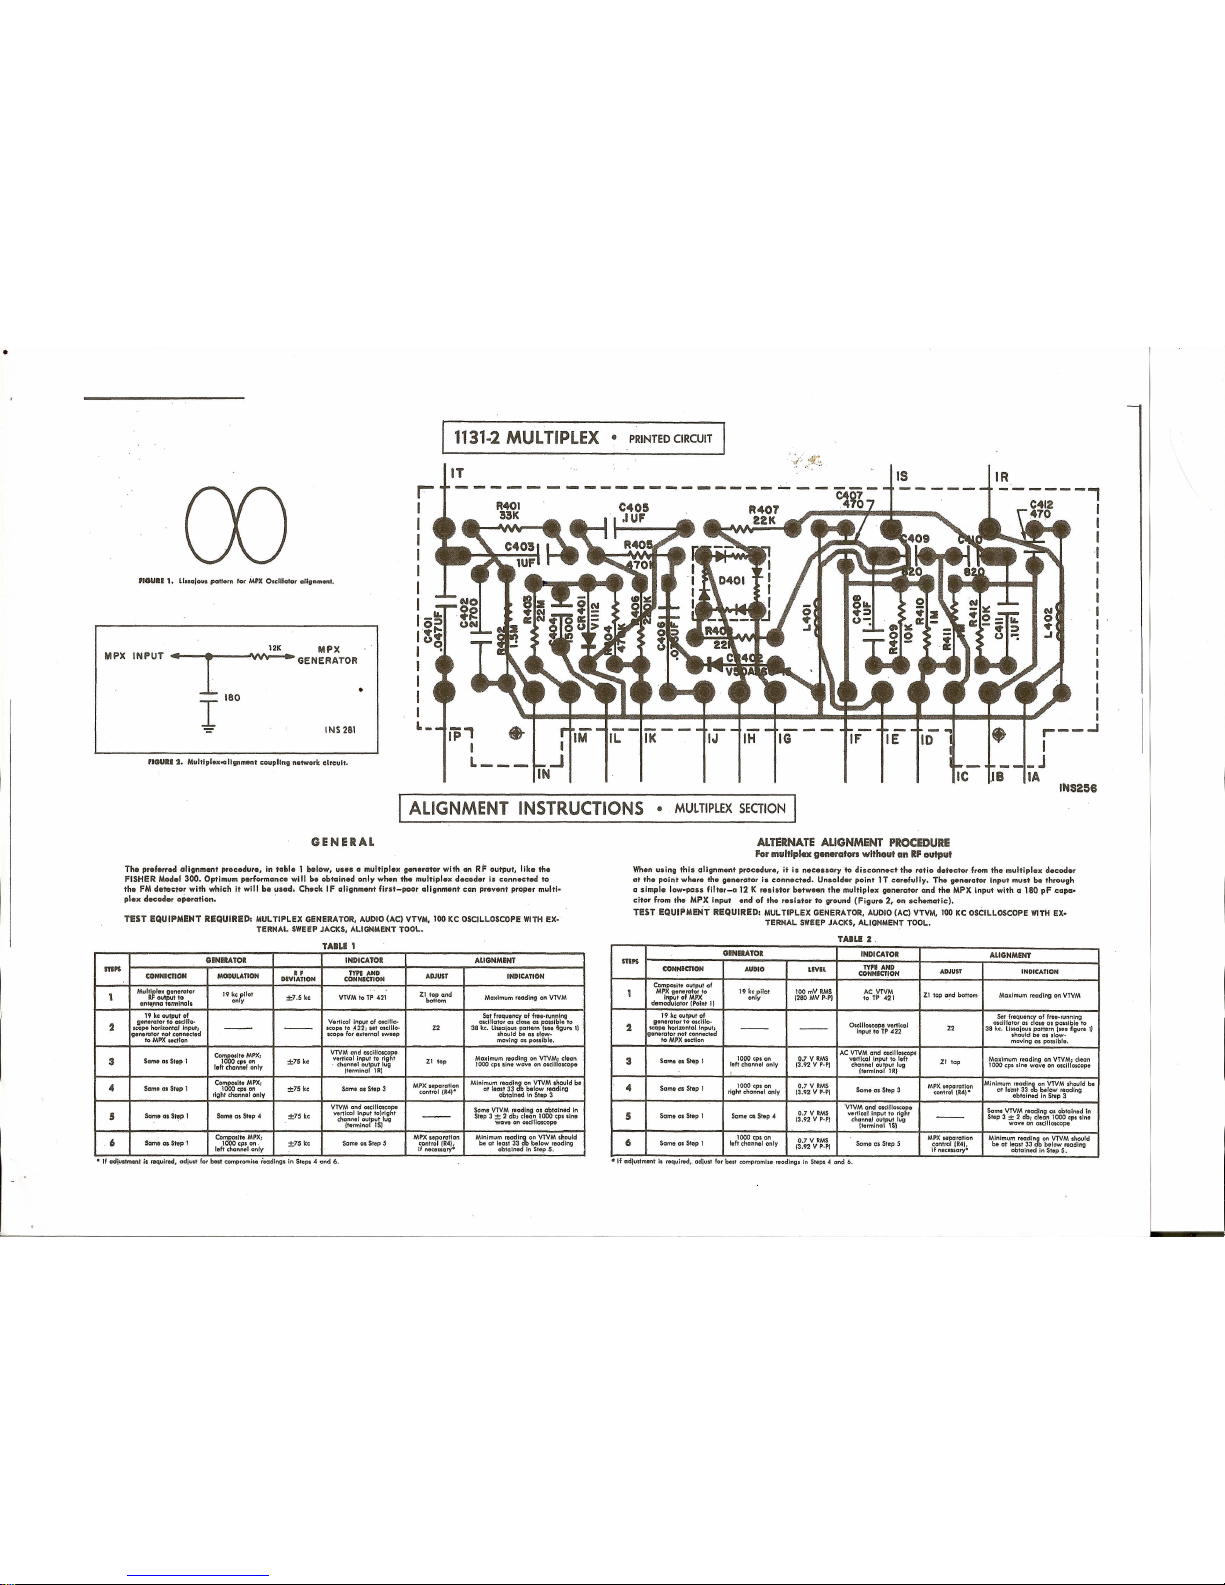
Multiplex Generator(preferably with RF output-
FISHER Model 300 or equal).
Many of the items below are included just as a re-
minder-they are normal procedures,for experienced
technicians. Shortcuts can be taken but often they
cause additional damage - to transistors, circuit com-
ponents or the printed-circuit board.
Soldering-A well-tinned, hot, clean soldering iron tip
will make it easier to solder without damage to the
printed-circuit board or the many many circuit com-
ponents mounted on it.It is not the wattage of the
iron that counts - it is the heat available at the tip.
Low-wattage soldering irpns will often take too long to
heat a connection - pigtail leads willget too hot and
damage the part.Too much heat, applied too long, will
damage the printed-circuit board. Some 50-watt irons
reach temperatures of 1,000°F- others will hardly
melt solder. Small·diameter tips should be used for
single solder connections -larger pyramid and chisel
tips are needed forlarger areas.' '
• When removing defective resistors, capacitors, etc.,
the leads should be cut as close to the body of the
circuit component as possible.(If the part is not being
returned for in-warranty factory replacement it maybe
cut in half - with diagonal-cutting pliers -to make
removaleasier.)
• Special de-soldering tiplets are made for unsolder-
ing multiple-terminal units like IF transformers and
electrolytic capacitors. By unsoldering all terminals at
the same time the part can be, removed with little
chance of breaking the printed-circuit board.
• Always disconnect the chassis from the power line
when soldering. Turning the power switch OFF is not
enough. Power-line leakage paths, through the heating
element, can destroy transistors.
Transistors-Never attempt to do any work on the
transistor amplifiers without first disconnecting the
-~AC-power linecord - wait until the power supply filter-
capacitors have discharged.
• Guard against shorts - it takes only an instant for
a base-to-collector short to destroy that transistor and
possibly others direct-coupled to it.[In the time it
takes for a dropped machine screw, washer or even
the screwdriverrto glance off a pair of socket terminals
(or betweena terminal and the chassis)a transistor
can be rllined.]
• DO NOT bias the base of any transistor to, or near,
the samevoltage appl ied to itscollector.
• DO NOT use an ohmmeter for testi ng transistors.
The voltage applied through the test probes may be
higher than the base-emitter breakdown voltage of the
transistor.
Output Stage and Driver-Replacements for output
and driver transistors, if necessary,must be made from
the same beta group as the original type.The beta
group is indicated by a colored dot on the mounting
flange of the transistor. Be sure toinclude this in-
formation, when ordering replacement transistors.
• If one output transistor burns out (open or shorts),
always remove all output transistors in that channel
and check the bias adjustment, the control and other
parts in the network with an ohmmeter before insert-
ing a new transistor. All output transistors in one
channel will be destroyed if the base-biasing circuit
is open on the emitter end.
• When mounting a' replacement power transistor be
sure the bottom of the flange, the mica insulator and
the surface of the heat sink are free of foreign matter.
Dust and grit can prelent perfect contact. This re-
duces heat transfer to the heat sink. Metallic particles
can puncture the insulator and cause shorts - ruining
the transistor.
• Silicone grease must be used between the transist-
or and the mica insulator and between the mica and
the heat sink for best heat conduction. Heat is the
grea,test enemy of electronic equipment.It can shorten
the life of transistors, capacitors and resistors. (Use
Dow-Corning DC-3 or C20194 or equivalent compounds
made for power transistor heat conduction.)
• Use care when making connections to speakers and
output terminals. Any frayed wire ends can cause
shorts that may burn out the output transistors - they
are direct-coupled to the speakers.There is no output
transformer - nothing to limit current through the tran-
sistors except the fuses. To reduce the possibility of
shorts at the speakers, lugs should be used on the
exposed ends -at lea,st the ends of the stranded wires
should be tinned to prevent frayed wire ends. The
current in the speakers and output circuitry:is quite
high. Any poor contact or small-size wire,:,~~n cause
power losses in the speaker system. Use 14 ojl16 AWG
for long runs of speaker-connecting wiring.
DC-Voltage Measurements-These basic tests of the
transistor circuitry are made without the signal gener-
ator. Without any signal input measure the circuit volt-
ages -as indicated on the schematic. The voltage
difference between the base and the emitter should
be in the millivolt range -a sensitive DC meter is
needed for these readings. A low-voltage range of 1volt,
full scale - or lower - is needed.
Audio-Voltage (gain) Measurements-The schematic
and printed-circuit board layout diagrams are used.
Input signals are injected at the proper points - found
most quickly by using layout of the printed-circuit
board instead of the schematic. An AUDIO (AC) VTVM
connected to the test points should indicate voltages
close tothose values shown in the boxes on the sche-
matic.Many ot the signallevels in the input stages
are only a few millivolts-they can not be read on the
AC ranges supplied on most Vacuum-Tube AC/DC Volt·
ohml'eters
VTVMs).
Even with a l-volt range a signal
level of 100 millivolts (.1 volt) will be the first 1/10
of themeter scale. A reading of 1 millivolt (.001 volt)
willhardly even move the meter needle. '