Yardbird FTRE10221 User manual

WARNING
WARNING indicates an imminently hazardous
situation which, if not avoided, will result in
death or serious injury.
For models: FTRE10221, FTSQ10221, FTRO10221
Warning: For Outdoor Use Only!
This appliance is intended for decorative purposes
Read all instructions prior to installation and use!
INSTALLER: Leave this manual with the appliance
CONSUMER: Retain this manual for future reference
FTUM-1
Fire Table User Manual

Warning: If the Information in this manual is not followed exactly, a fire or
explosion may result, causing property damage, personal injury or loss of life.
WARNING
Do not store or use gasoline, or other
flammable vapors and liquids in the vicinity of
this or any other appliance.
A propane cylinder not connected for use shall
not be stored in the vicinity of this or any other
appliance.
WARNING
We cannot foresee every use which may be
made of our fire tables.
Check with your local fire safety authority if
you have questions about fire table use.
Other standards govern the use of fuel gases
and heat producing products for specific uses.
Your local authorities can advise you about
these.
If no local codes exist, follow National Fuel
Gas Code,ANSI Z223.1. In Canada, installation
must conform to local codes. If no local codes
exist, follow the current National standards of
CANADA CAN/CGA-B 149.2.
WARNING
Yardbird and Two Peaks LLC disclaims any
responsibility for, and the warranty will be
voided by, the following actions:
-Installation and use of any damaged
components
-Modification of the burner assembly
-Installation other than as instructed by
Yardbird
IF YOU SMELL GAS:
-Shut off gas to the appliance.
-Extinguish any open flame.
-If odor continues, leave the area immediately.
-After leaving the area, call your local gas
supplier or fire department.
Failure to follow these instructions could result
in fire or explosion, which could cause property
damage, personal injury or death
DANGER
CARBON MONOXIDE HAZARD
This fire table is a combustion appliance. All
combustion appliances produce carbon
monoxide (CO) during the combustion process.
This product is designed to produce extremely
minute, non-hazardous amounts of CO if used
and maintained in accordance with all
warnings and instructions. Do not block air flow
into or out of the fire pit.
Carbon Monoxide (CO) poisoning produces
flu-like symptoms, watery eyes, headaches,
dizziness, fatigue and possibly death. You can't
see it and you can't smell it. It's an invisible
killer. If these symptoms are present during
operation of this product get fresh air
immediately!
This appliance is for outdoor use only. Never
use the appliance inside a house, or other
unventilated or enclosed areas.
This fire table consumes air (oxygen). Do not
use in unventilated or enclosed areas to avoid
endangering your life.
DANGER
Page | 1
Yardbird Customer Experience Contact: Hello@Yardbird.com or 877.927.2846

WARNING
California Proposition 65
Combustion by-products produced when using this product contain chemicals known
to the State of California to cause cancer, birth defects, and other reproductive harm.
WARNING
This product is fueled by propane gas.
Propane gas is invisible, odorless, and
flammable. An odorant is normally added to
help detect leaks and can be described as a
rotten egg”smell. The odorant can " fade over
time so leaking gas is not always detectable
by smell alone.
Propane gas is heavier than air and leaking
propane will sink to the lowest level possible.
It can ignite by ignition sources including
matches, lighters, sparks or open flames of
any kind many feet away from the original
source of the leak. Use only propane gas set
up for vapor withdrawal.
Store or use propane gas in compliance with
local ordinances and codes or with ANSI/NFPA
58. Turn off propane when not in use.
WARNING
Alert children and adults to the hazards of
high surface temperatures. Stay away from
these surfaces to avoid burning skin or
igniting clothing.
Carefully supervise young children when in the
vicinity of the fire pit.
Do not hang clothing or any other flammable
materials from the fire pit, or place on or near
the fire pit.
Replace any guard or protective device
removed for servicing the appliance prior to
placing back in service.
Installation and repair should be done by a
qualified service person. The fire pit should be
inspected before use and annually by a
qualified service person.
More frequent cleaning may be required as
necessary. It is imperative that the control
compartment, burners, and circulating air
passageway of the appliance be kept clean.
WARNING
Certain materials or items, when stored under
the fire pit, will be subjected to radiant heat
and could be seriously damaged.
CAUTION
SERVICE SAFETY
Keep all connections and fittings clean. Make
sure propane cylinder valve outlet is clean.
During set up, check all connections and
fittings for leaks using soapy water. Never use
a flame.
Use as a decorative appliance only. Never
alter in any way or use with any device.
CAUTION
CAUTION indicates an imminently hazardous
situation which, if not avoided, may result in
minor or moderate personal injury, or
property damage.
Page | 2

DANGER CARBON MONOXIDE HAZARD
This appliance can produce
carbon monoxide which has no
odor. Using it in an enclosed
space can kill you. Never use
this appliance in an enclosed
space such as a camper, tent or
home.
DANGER
EXPLOSION - FIRE HAZARD
Never store propane near high heat, open
flames, pilot lights, direct sunlight, other
ignition sources or where temperatures exceed
120 F (49 C).
Propane vapors are heavier than air and can
accumulate in low places. If you smell gas,
leave the area immediately.
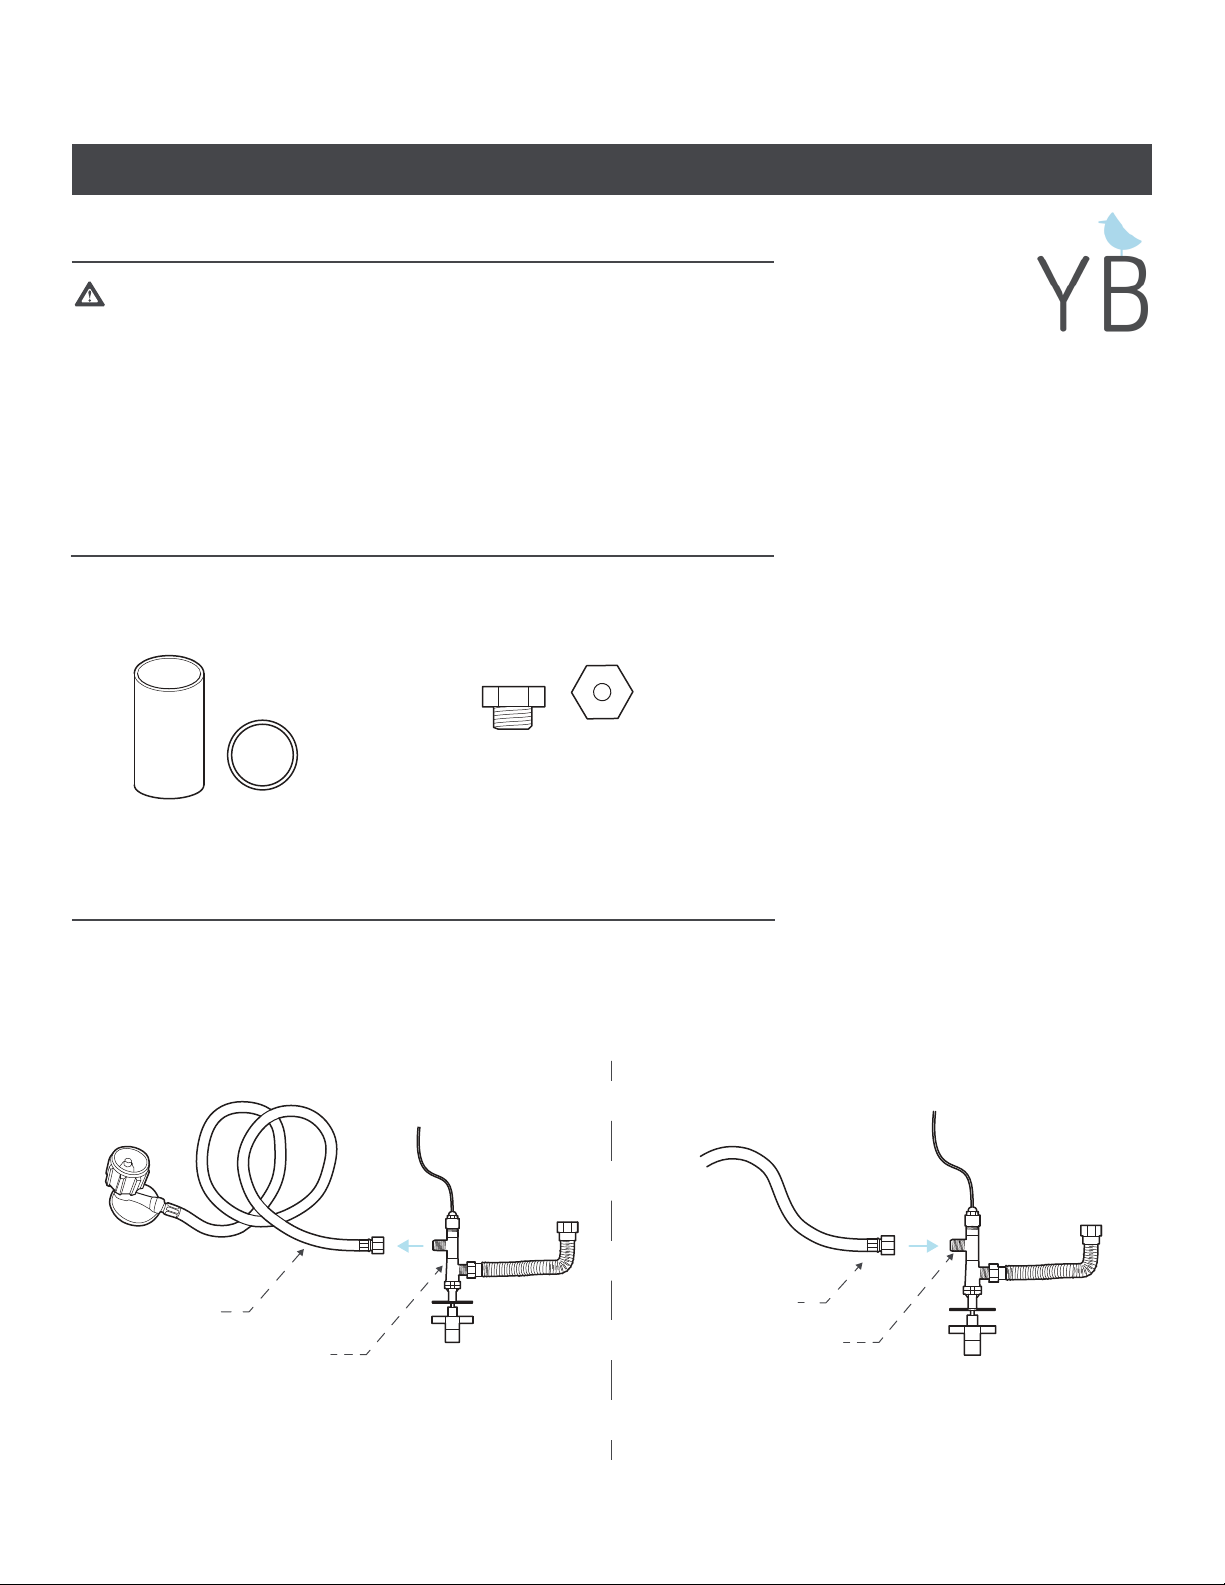
Never install or remove the propane cylinder
while the fire table is lit, near flame, other
ignition sources or while fire table is hot to
touch.
This fire pit is extremely hot during use and
can ignite flammables close to the burner.
Keep flammables at least two feet from all
sides of the burner and 6 feet from the ceiling.
Keep gasoline and flammable liquids and
vapors well away from the fire pit.
Store the propane cylinder outdoors in a well
ventilated space out of reach from children.
Never store the propane cylinder in an
enclosed area (house, garage, ect.)
Always disconnect the propane cylinder when
the fire table is not in use.
WARNING
Improper installation, adjustment, alteration,
service or maintenance can cause property
damage, injury or death. Read the installation,
operation and maintenance instructions
thoroughly before installing or servicing this
appliance.
EXPLOSION - FIRE HAZARD
Keep solid combustibles, such as building
materials, paper or cardboard, a safe distance
away from the fire pit as recommended by the
instructions.
Provide adequate clearances around air
openings into the combustion chamber.
Never use the fire pit in spaces which do or may
contain volatile or airborne combustibles, or
products such as gasoline, solvents, paint
thinner, dust particles or unknown chemicals.
During operation, this product can be a source
of ignition. Keep fire pit area clear and free from
combustible materials, gasoline, paint thinner,
cleaning solvents and other flammable vapors
and liquids. Do not use fire pit in areas with
high dust content.
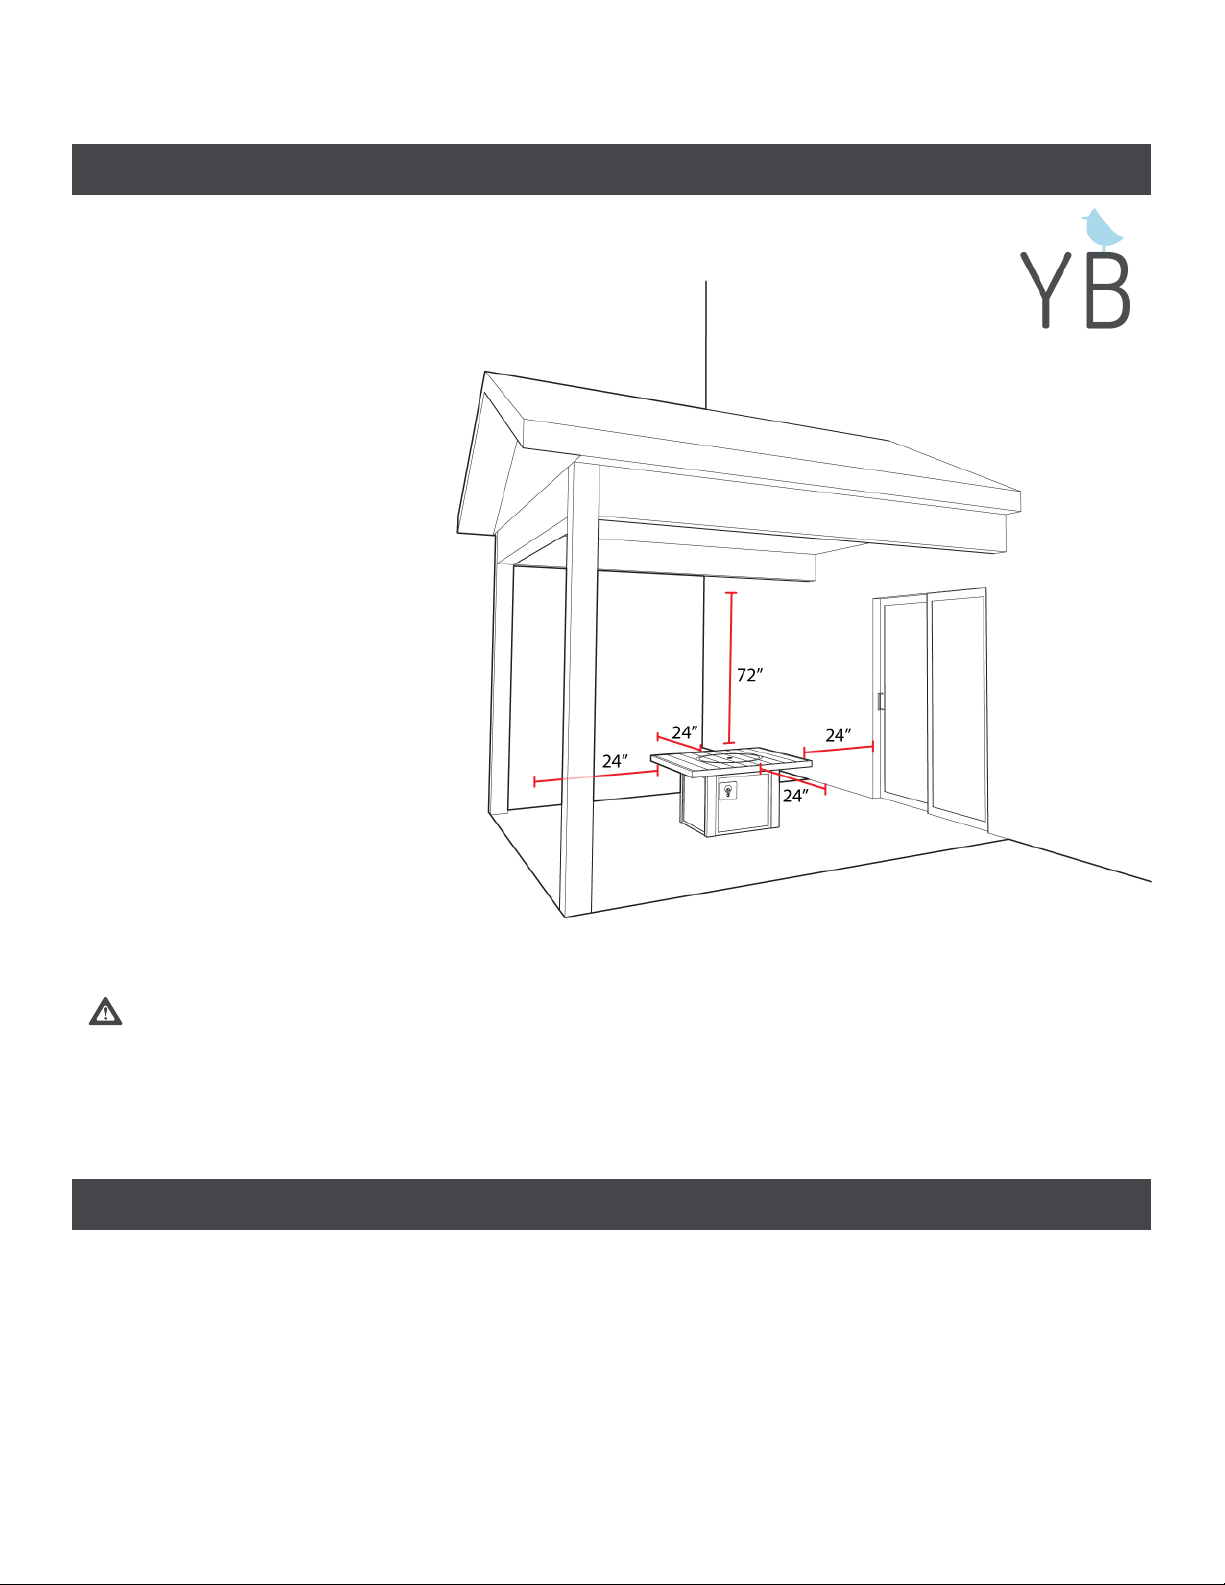
Minimum fire pit clearances from combustible
materials: two (2) feet from the sides & two (2)
feet from the rear, 6 feet from ceiling.
DANGER
Page | 3
BURN HAZARD
Never leave fire pit unattended when hot or in use.
Keep out of reach of children.
WARNING

-This appliance must be installed at least 24” from any combustible wall or material. If the
appliance is installed under a ceiling or covered canopy, there must be at least 72” of space
between the top of the burner and the above covering.
1. Before installing the appliance, check the above MINIMUM CLEARANCE TO COMBUSTIBLES
section to ensure that the surrounding area is appropriately sized for installation and use.
2. This appliance is for outdoor use only DO NOT install or use this appliance inside a building,
garage, or any other enclosed area, including recreational vehicles and/or boats. This unit must be
installed in such a manner that the vent opening at the base of the unit remains clear and free of
all obstructions at all times and during all weather conditions.
Pre-installation and preparation safety guidelines are continued on page 5
The dimensions shown in figure 1 are Minimum
clearances to maintain when you install this outdoor
appliance.
Figure 1
MINIMUM CLEARANCE TO COMBUSTIBLES
PRE-INSTALLATION AND PREPARATION SAFETY GUIDELINES
Page | 4
For Outdoor Use Only!

3. CHECK THE GAS TYPE (natural gas or propane): The gas supply you intend to use
may not be the same as that stated on the unit rating plate as purchased. If the gas
supply is different, convert the unit to the gas type you intend to use. See the natural
gas installation and setup instructions on pages 7 and 8. If you are unsure, contact a
professional for assistance.
4. FOR NATURAL GAS: The minimum inlet gas-supply pressure for purposes of input adjustment is
3.5 "water column (w.c.), and the maximum inlet gas-supply pressure is 10.5 " w.c.
5. FOR PROPANE: The minimum inlet gas-supply pressure for purposes of input adjustment is 8"
w.c., and the maximum inlet gas-supply pressure is 13" w.c.. Do not install this appliance if the inlet
pressure is below the stated minimum or exceeding the stated maximum pressure.
6. For installations at elevations above 2,000 ft., contact your local dealer or gas supplier before
installing. Input ratings should be reduced approximately 4% for each 1,000 ft. above sea level.
Refer to the National Fuel Gas Code for more information.
7. The appliance and it’s control valve must be disconnected from the gas-supply piping system
during any pressure testing of that system at test pressures in excess of 1/2 psi (3.5 kPa). The unit
must be isolated from the gas-supply piping system by closing its manual control valve during any
pressure testing of the gas-supply piping system at test pressures equal to or less than 1/2 psi (3.5
kPa).
8. This appliance should be installed so that it can be removed if service is required.
9. NATURAL GAS PLUMBING REQUIREMENTS: Apply only joint compounds that are resistant to all
gases on all male pipe fittings. Make sure to tighten every joint securely. Do not use pipe joint
compound to connect are fittings. Bring the gas-supply pipe up from beneath the enclosure near its
center (if applicable).
Page | 5
TOOLS AND SUPPLIES REQUIRED FOR LP SET UP AND INSTALLATION
PRIOR TO INSTALLATION
PRE-INSTALLATION AND PREPARATION SAFETY GUIDELINES
- Work Gloves
- Safety Glasses
- Utility Knife (for unboxing)
- Adjustable Wrenches x2
- Phillips Screwdriver
- 4mm Hex Wrench (for Eden fire tables ONLY)
- AAA Battery
-Spray Bottle (filled with soapy water)
1. Carefully inspect the appliance for any damage that occurred during transit. If any parts
are damaged, refer to the replacement part list on page 11 and call the Yardbird Customer
Experience Team at 877-927-2846 or Hello@yardbird.com
2. Before proceeding, carefully read this manual in its entirety to ensure that you are in compliance with
all safety precautions and warnings while installing this appliance.

Page | 6
INSTALLATION AND SET UP
LIQUID PROPANE INSTALLATION AND SET UP
1. Place the fire table in it’s desired location. Make sure that it is placed outdoors in a well
ventilated area away from any flammable structures, awnings, vegetation, etc
2. Open the door on the base of the unit and extend the propane carriage outwards.
3. Place your 20 lb. Propane cylinder onto the carriage. Make sure that the base of the cylinder is nested
into the metal enclosure on the carriage. Secure the cylinder by tightening the wing bolt until it contacts
the base of the cylinder.
4. Connect the gas hose and regulator to the propane cylinder by hand-tightening the black QCC1 nut
clockwise until firmly seated. Do not use a wrench or over-tighten.
5. Open the bag containing the decorative fire media and carefully place them into the burner bowl
making sure not to cover the screen that protects the thermocouple and pilot igniter.
LEAK TEST
Turn on the gas supply, ignite the burner, and test at all connections for leaks using a soapy water
solution. Spray around the entire circumference of each metal fitting. If bubbles appear, a leak is present.
Turn off the gas and tighten at all connections. Repeat until no leaks are present. If a leak persists, turn
off the gas supply and contact the local gas company or the Yardbird Customer Experience Team.
NEVER USE A FLAME TO CHECK FOR LEAKS

Page | 7
NATURAL GAS INSTALLATION AND SETUP
IMPORTANT SAFETY INFORMATION
NATURAL GAS CONVERSION KIT
*Not Provided: Natural gas hose with fitting for connection to manual gas control valve
INSTALLATION AND SETUP
Natural gas Installation and setup safety guidelines are continued on page 8
Natural Gas Supply Hose
Manual Gas Control Valve Fitting
LP Regulator Hose
Manual Gas Control Valve
Air Shutter Natural Gas Brass Insert
Installation and setup of this appliance for the use of natural gas or house
hold propane fuel sources must be done by a NFI certified or other trained professional.
The instructions below are included for the trained installer. Do not set up your appliance for
this fuel source if you are not a trained professional.
Stop!
Installer: Before continuing, please make sure that the LP gas supply to the fire table is turned off, the
gas control knob is in the “OFF” position and any nearby electrical devices or other sources of ignition are
shut off.
Installer: Before continuing, please make sure that the LP gas supply to the fire table is turned off, the
gas control knob is in the “OFF” position and any nearby electrical devices or other sources of ignition are
shut off.
Disconnect the LP regulator hose from the
manual gas control valve
Attach the natural gas supply hose to the
fitting on the manual gas control valve
1. 2.

Page | 8
NATURAL GAS INSTALLATION AND SETUP
Turn on the gas supply, ignite the burner, and
test at all connections for leaks using a spray
bottle and soapy water solution. Spray
around the entire circumference of each metal
fitting. If bubbles appear, a leak is present.
Turn off the gas and tighten at all
connections. Repeat until no leaks are
present. If a leak persists, turn off the gas
supply and contact your local gas company
or the Yardbird Customer Experience Team.
NEVER USE A FLAME TO CHECK FOR LEAKS
Before operating the appliance, conduct
a leak test on all hose and fitting connections
to ensure the appliance is safe to use
Leak Test
Coupler
Brass Insert
Propane Gas
Brass Insert
Natural Gas
Brass Insert
Coupler Fitting
Air Mixer
Stainless Steel Hose
*The gas hose connector shall have a connector that complies with the Standard for Gas Hose
Connectors for Portable Outdoor Gas-Fired Appliances, ANSI Z21.54 CSA 8.4.
3.
Disconnect the stainless steel spiral hose from
the LP coupler fitting attached to the air mixer.
Then, remove the coupler from the air mixer
assembly.
Remove the brass insert from the coupler and
replace it with the provided natural gas brass
insert. Note: the LP brass insert has a smaller
orifice than the natural gas brass insert.
4.
Slide the provided air shutter over the air mixer
tube so that it blocks off the air holes. Reinstall
the coupler with the new natural gas insert.
Then, re-attach the stainless steel spiral hose
to the coupler.
6.
Air Mixer
Stainless Steel Hose
Coupler Fitting
Air Shutter
5.

Page | 9
OPERATIONAL CHECKLIST
BEFORE OPERATING
AFTER OPERATION
1. The gas control valve is in the OFF position.
2. The gas tank vale is in the OFF position.
3. The fuel source has been disconnected from the appliance.
1. I am familiar with the entire owners manual and understand all of the precautions stated within it.
2. All components are properly assembled, intact and operable.
3. No alterations have been made to this appliance.
4. All gas connections are secure and do not leak.
5. I understand that this unit may operate at reduced efficiency in temperatures below 40oF (4.44oC)
6. The appliance is outside and is compliant with the minimum clearances to combustible materials
stated in this manual.
7. There is adequate fresh air ventilation. Do not use this appliance if any part has been underwater.
Immediately call a qualified service technician to inspect the appliance and to replace any part of the
control system and gas control which has been underwater.
8. The appliance is away from any flammable liquids or vapors.
9. The appliance is away from any windows, air intake opening, sprinklers and other water sources.
10. The appliance is placed on a hard, level surface and has been installed in conformance with local
codes and regulations.
11. There are no signs of spider or insect nests.
12. All burner and air circulation passages are clear and free of any obstructions.
13. Children and adults have been alerted to the hazards of high surface temperatures and should stay
away to avoid burns or ignition of clothing.
14. Young children will be carefully supervised when they are in the vicinity of the appliance.
15. The appliance will not be left unsupervised for any period of time while in operation.
16. Clothing or other protective materials are not near, on top of or inside the appliance.
17. Any guard or other protective device removed for servicing the appliance has been replaced prior to
operation.
18. The control components, burner and circulating air passageways are clean and free of foreign
substances and buildup.
*For a safe and pleasurable use of this appliance, preform
this check sequence before each use.

Page | 10
OPERATION
Warning: If the Information in this manual is not followed exactly, a fire or
explosion may result, causing property damage, personal injury or loss of life.
OPERATING YOUR APPLIANCE
TROUBLE SHOOTING YOUR APPLIANCE
1. Push the control knob inwards and turn it counter clockwise
to the low/ignition position.
2. While continuing to depress the knob inwards, hold it at the
low/ignition position for 3-5 seconds while depressing the
igniter button with your open hand.
3. A small flame should be present, you may now manipulate
the knob to your desired flame height.
4. If a flame is not present, wait 1 minute before attempting to
light again.
- Check to see if there is a AAA battery inside of the Igniter button.
- Make sure there is no fire media inside or on top of the perforated pilot igniter protection screen
(located within the burner dish).
- Check electrical wiring connections to the sparker box and burner dish. Make sure all wires are securely
connected.
- Clear any fire media obstructing the small holes located on the burner ring.
- Check fuel line connections. Make sure all hoses are tightly secured and the manual release valve on
the propane cylinder is in it’s open position.
-Make sure the control components, burner and circulating air passageways are clean and free of foreign
substances and buildup.
P
U
S
H
Low/Ignition
position
Control Knob
Igniter Button
*If your appliance fails to produce a flame after multiple ignition attempts, follow the below trouble
shooting instructions.
*If your appliance fails to produce a flame after following the trouble shooting instructions, contact the
Yardbird Customer Experience team at: Hello@Yardbird.com or 877-927-2846
Warning: Do not operate this appliance if there are any signs of damage present on
the control components and burner tray. If any parts are damaged, refer to the replacement
part list on page 11 and call the Yardbird Customer Experience Team at 877-927-2846

Valve and Gas Hoses Thermocouple Tube Control Knob
SKU# SPFT908 SKU# SPFT916 SKU# SPFT918
Igniter Cable
SKU# SPFT909
Glass Beads
SKU# SPFT907
Burner Cover Natural Gas Adapter
SKU# SPFT902
Control Panel
SKU# SPFT913 or SKU# SPFT912
Table to Base Hardware
SKU# SPFT910
Adjustable Feet
SKU# SPFT903
Igniter Box
SKU# SPFT904
Full Burner Kits
SKU# FTA169 SKU#FTA168
SKU# SPFT906 SKU# SPFT905
Page | 11
SPARE PARTS
OFF
HIGH
LOW/
IGNITION
YARDBIRD
*If you believe a component on your appliance is damaged, missing or
faulty identify the part(s) SKU# below and contact the Yardbird
Customer experience team at: Hello@Yardbird.com or 877-927-2846.
P
U
S
H
This manual suits for next models
2
Table of contents
Popular Outdoor Fireplace manuals by other brands

thermo mate
thermo mate OTDFPTTHMAR94 Assembling instructions

Firesense
Firesense FirrSense 02119 Instructions for use

BlueRhino
BlueRhino UniFlame 251828 owner's manual

sunjoe
sunjoe L-FT710PST Assembly instructions

OW Lee
OW Lee CASUAL FIRESIDE 5110-2872O owner's manual

BlueRhino
BlueRhino GAD17300B owner's manual