YATO YT-85460 User manual

GENERATOR PRĄDOTWÓRCZY
POWER GENERATOR
STROMGENERATOR
ГЕНЕРАТОР ТОКА
ГЕНЕРАТОР СТРУМУ
ELEKTROS SROVĖS GENERATORIUS
STRĀVAS ĢENERATORS
GENERÁTOR VYTVÁŘEJÍCÍ PROUD
GENERÁTOR VYTVORUJÚCÍ PROUD
ÁRAMFEJLESZTŐGENERÁTORHOZ
GENERATOR ELECTRIC
GENERADOR DE ELECTRICIDAD
GROUPE ÉLECTROGÈNE
GRUPPO ELETTROGENO
STROOMGENERATOR
ΗΛΕΚΤΡΟΓΕΝΝΗΤΡΙΑ
PL
GB
D
RUS
UA
LT
LV
CZ
SK
H
RO
E
F
I
NL
GR
YT-85460
INSTRUKCJA ORYGINALNA 1

INSTRUKCJA ORYGINALNA
2
PL D RUS UA LT LV CZ SK H RO E F I NL GR
TOYA S.A. ul. Sołtysowicka 13-15, 51-168 Wrocław, Polska
Rok produkcji:
Production year:
Produktionsjahr:
Год выпуска:
Рік випуску:
Pagaminimo metai:
Ražošanas gads:
Rok výroby:
Rok výroby:
2019 Gyártási év:
Anul producţiei utilajului:
Año de fabricación:
Année de fabrication:
Anno di produzione:
Bouwjaar:
Έτος παραγωγής:
I
II III
IV V
I
I I
1
2
5
18 19
20
13
3
7
15
15
6
7
8
5
12
21
11
17
44
9
4
10
14

INSTRUKCJA ORYGINALNA 3
PL D RUS UA LT LV CZ SK H RO E F I NL GR
VIII
XII
IX
XIII
VII
XI
VI
X

INSTRUKCJA ORYGINALNA
4
PL D RUS UA LT LV CZ SK H RO E F I NL GR
0,7 - 0,8 mm
XX
XIXXVIII
XVIIXVI
XVXIV
XXI

INSTRUKCJA ORYGINALNA 5
PL D RUS UA LT LV CZ SK H RO E F I NL GR
1. generator frame
2. fuel tank
3. fuel fi ller
4. power outlet
5. engine ON/OFF switch
6. air fi lter
7. priming accelerator lever
8. starter pull cord
9. ground terminal
10. spark plug
11. exhaust pipe
12. oil fi ller
13. oil drain valve
14. fuel supply valve
15. overload breaker reset button
16. fuel level indicator
17. battery
18. wheel
19. handle
20. base
21. voltmeter
GB
1. Grundrahmen
2. Kraftstoff tank
3. Kraftstoff einfüllstutzen
4. Stromanschluss
5. Motorsteuerschalter
6. Luftfi lter
7. Choke-Hebel
8. Starterseil
9. Erdungsklemme
10. Zündkerze
11. Auspuff rohr
12. Öleinfüllstutzen
13. Ölablassventil
14. Kraftstoff ventil
15. Drucktaste für Überlastungsschutz
16. Kraftstoff standanzeige
17. Akku
18. Laufrad
19. Haltegriff
20. Aufstellplatte
21. Spannungsmesser
D
1. рама генератора
2. топливный бак
3. заливная горловина
4. монтажное гнездо
5. выключатель двигателя
6. воздушный фильтр
7. рычаг всасывания
8. пусковой тросик
9. клемма заземления
10. свеча зажигания
11. выхлопная труба
12. заливная горловина масла
13. сливной клапан масла
14. топливный клапан
15. кнопка защиты от перегрузки
16. указатель уровня топлива
17. аккумулятор
18. колесо
19. держатель
20. подставка
21. вольтметр
RUS
1. elektroģeneratora rāmis
2. degvielas tvertne
3. degvielas ielietne
4. strāvas ligzda
5. dzinēja slēdzis
6. gaisa fi ltrs
7. sūkšanas svira
8. startera trose
9. zemējuma spaile
10. aizdedzes svece
11. izplūdes caurule
12. eļļas ielietne
13. eļļas izlaišanas vārsts
14. degvielas vārsts
15. pārslodzes aizsardzības poga
16. degvielas līmeņa indikators
17. akumulators
18. ritenis
19. rokturis
20. pamatne
21. voltmetrs
LV
1. рама генератора
2. паливний бак
3. заливна горловина палива
4. струмовий роз’єм
5. вимикач двигуна
6. повітряний фільтр
7. всмоктуючий важіль
8. стартовий трос
9. клема заземлення
10. свічка запалення
11 . вихлопна труба
12. заливна горловина масла
13. зливний клапан масла
14. паливний клапан
15. кнопка захисту від перевантаження
16. покажчик рівня палива
17. акумулятор
18. колесо
19. ручка
20. підставка
21. вольтметр
UA
1. generatoriaus rėmas
2. degalų bakas
3. degalų pildymo anga
4. elektros lizdas
5. variklio jungiklis
6. oro fi ltras
7. siurbimo svertas
8. užvedimo virvė
9. įžeminimo gnybtas
10 uždegimo žvakė
11. Išleidimo vamzdis
12. alyvos pildymo anga
13. alyvos atbulinio tekėjimo sklendė
14. kuro sklendė
15. apsaugos nuo perkrovos mygtukas
16. kuro lygio rodiklis
17. akumuliatorius
18. ratas
19. rankena
20. pagrindas
21. voltmetras
LT
1. rama generatora
2. zbiornik paliwa
3. wlew paliwa
4. gniazdo prądowe
5. włącznik silnika
6. fi ltr powietrza
7. dźwignia ssania
8. linka startowa
9. zacisk uziemienia
10. świeca zapłonowa
11. rura wydechowa
12. wlew oleju
13. zawór spustowy oleju
14. zawór paliwa
15. przycisk zabezpieczenia przeciążeniowego
16. wskaźnik poziomu paliwa
17. akumulator
18. koło
19. uchwyt
20. podstawka
21. woltomierz
PL
XXII

INSTRUKCJA ORYGINALNA
6
PL D RUS UA LT LV CZ SK H RO E F I NL GR
1. rám generátoru
2. palivová nádrž
3. plnicí hrdlo paliva
4. elektrická zdířka
5. vypínač motoru
6. vzduchový fi ltr
7. páka sání
8. startovací lanko
9. zemnicí svorka
10.zapalovací svíčka
11. výfuk
12. plnicí hrdlo oleje
13. vypouštěcí ventil oleje
14. palivový ventil
15. tlačítko zajištění proti přetížení
16. ukazatel hladiny paliva
17. akumulátor
18. kolo
19. rukojeť
20. podstavec
21. voltmetr
CZ
1. rám agregátu
2. palivová nádrž
3. hrdlo palivovej nádrže
4. el. zásuvka
5. zapínač motora
6. vzduchový fi lter
7. páka satia
8. štartovacie lanko
9. svorka uzemnenia
10. zapaľovacia sviečka
11. výfuková rúra
12. hrdlo olejovej nádrže
13. výpustný ventil oleja
14. ventil paliva
15. tlačidlo ochrany proti preťaženiu
16. ukazovateľ hladiny paliva
17. akumulátor
18. koleso
19. držiak
20. podstavec
21. voltmeter
SK
1. generátorváz
2. üzemanyagtartály
3. üzemanyag betöltő nyílás
4. elektromos aljzat
5. motor bekapcsológombja
6. légszűrő
7. szivatókar
8. indítókötél
9. földelő bilincs
10. gyújtógyertya
11. kipufogócső
12. olajbetöltő nyílás
13. olajleeresztő szelep
14. üzemanyag szelep
15. túlterhelésvédő kapcsoló
16. üzemanyagszint jelző
17. akkumulátor
18. kerék
19. fogantyú
20. alátét
21. voltmérő
H
1. cadrul generatorului
2. rezervor de carburant
3. fi ltru de carburant
4. priză ieșire
5. comutator on/off (pornit/oprit) motor
6. fi ltru de aer
7. pârghia amorsare accelerator
8. coardă demaror
9. bornă de împământare
10. bujie
11. țeavă eșapament
12. fi ltru de ulei
13. ventil de scurgere a uleiului
14. ventil de alimentare a carburantului
15. buton resetare întrerupător suprasarcină
16. indicatoare pentru nivelul de carburant
17. acumulator
18. roată
19. mâner
20. bază
21. voltmetru
RO
1. armazón del grupo
2. depósito de combustible
3. boca de llenado de combustible
4. toma de corriente
5. interruptor del motor
6. fi ltro de aire
7. palanca de succión
8. cable de arranque
9. terminal de puesta a tierra
10. bujía de encendido
11. tubo de escape
12. boca de llenado de aceite
13. válvula de descarga de aceite
14. válvula de combustible
15. botón de protección contra sobrecarga
16. indicador de nivel de combustible
17. acumulador
18. rueda
19. mango
20. base
21. voltímetro
E
1. cadre
2. réservoir de carburant
3. cheminée de remplissage de carburant
4. prise de courant
5. interrupteur du moteur
6. fi ltre d’air
7. levier d’aspiration
8. cordon de démarrage
9. borne de mise à la terre
10. bougie d’allumage
11. tuyau d’échappement
12. cheminée de remplissage d’huile
13. vanne de vidange d’huile
14. vanne de carburant
15. bouton de protection contre les surcharges
16. indicateur de niveau de carburant
17. batterie
18. roue
19. poignée
20. support
21. voltmètres
F
1. telaio gruppo elettrogeno
2. serbatoio carburante
3. bocchettone di riempimento carburante
4. presa di corrente
5. interruttore del motore
6. fi ltro d’aria
7. leva di aspirazione
8. corda di avviamento
9. morsetto di messa a terra
10. candela di accensione
11. tubo di scarico
12. bocchettone di riempimento olio
13. valvola di scarico dell’olio
14. valvola carburante
15. pulsante di protezione sovraccarico
16. Indicatore del livello del carburante
17. batteria
18 rotella
19. impugnatura
20. base
21. voltmetro
I
1. generatorframe
2. brandstoftank
3. brandstofvulgat
4. stroomaansluiting
5. schakelaar motor
6. luchttoevoer
7. schakelaar aanzuigen
8. de startlijn
9. aardingsklem
10. bougie
11. uitlaatpijp
12. olievulgat
13. olieaftapkraan
14. brandstofkraan
15. overbelastingsbeveiligingsknop
16. indicator brandstofpeil
17. accu
18. wiel
19. handvat
20. basis
21. voltmeter
NL
1. πλαίσιο γεννήτριας
2. δεξαμενή καυσίμου
3. στόμιο καυσίμου
4. υποδοχή ρεύματος
5. διακόπτης κινητήρα
6. φίλτρο αέρα
7. μοχλός αναρρόφησης
8. σκοινί εκκίνησης
9. συνδετήρας γείωσης
10. μπουζί
11. σωλήνας εξάτμισης
12. στόμιο λαδιού
13. βαλβίδα εκκένωσης λαδιού
14. βαλβίδα καυσίμου
15. κουμπί ασφάλειας υπερφόρτωσης
16. δείκτης στάθμης καυσίμου
17. συσσωρευτής
18. τροχός
19. λαβή
20. βάση
21. βολτόμετρο
GR

INSTRUKCJA ORYGINALNA 7
PL D RUS UA LT LV CZ SK H RO E F I NL GR
Przeczytać instrukcję
Read the operating instruction
Bedienungsanleitung durchgelesen
Прочитать инструкцию
Прочитать iнструкцiю
Perskaityti instrukciją
Jālasa instrukciju
Přečtet návod k použití
Prečítať návod k obsluhe
Olvasni utasítást
Citeşti instrucţunile
Lea la instrucción
Lisez la notice d’utilisation
Leggere il manuale d’uso
Lees de instructies
Διαβάστε τις οδηγίες χρήσης
Zagrożenie elektryczne
Electrical hazard
Elektrische Gefährdung
Опасность поражения электрическим током
Небезпека електричного струму
Elektriniai pavojai
Elektriskais risks
Nebezpečí úrazu elektrickým proudem
Ohrozenie el. prúdom
Elektromos veszély
Pericol electric
Riesgo eléctrico
Danger électrique
Pericolo elettrico
Elektrisch risico
Ηλεκτρικό κίνδυνος
Zagrożenie tlenkiem węgla (CO)
Carbon monoxide (CO) hazard
Gefahr von Kohlenmonoxid (CO)
Опасность отравления окисью углерода (CO)
Небезпека окису вуглецю (CO)
Anglies monoksido (CO) pavojus
Oglekļa oksīda (CO) radītais risks
Nebezpečí otravy oxidem uhelnatým (CO)
Ohrozenie oxidom uhoľnatým (CO)
Szén-monoxid (CO) veszély
Pericol de monoxid de carbon (CO)
Riesgo de monóxido de carbono (CO)
Danger dû à l’oxyde de carbone (CO)
Pericoli derivanti dal monossido di carbonio (CO)
Risico op koolmonoxide (CO)
Κίνδυνος σχετικά με το μονοξείδιο του άνθρακα (CO)
Ryzyko oparzeń
Risk of burns
Verbrennungsgefahr
Риск появления ожогов
Ризик опіків
Nudegimo pavojus
Apdegumu risks
Riziko vzniku popálenin
Riziko popálenia
Égésveszély
Risc de arsuri
Riesgo de quemaduras
Risque de brûlures
Pericolo di ustioni
Risico op brandwonden
Κίνδυνος εγκαυμάτων
Ryzyko pożaru
Risk of fi re
Brandgefahr
Риск пожара
Ризик виникнення пожежі
Gaisro pavojus
Ugunsgrēka risks
Riziko vzniku požáru
Riziko požiaru
Tűzveszély
Risc de incendiu
Riesgo de incendio
Risque d’incendie
Pericolo di incendi
Brandgevaar
Κίνδυνος πυρκαγιάς
Ostrzeżenie!
Warning!
Warnung!
Внимание!
Увага!
Įspėjimas!
Brīdinājums!
Upozornění!
Varovanie!
Figyelmeztetés!
Avertizare!
¡Advertencia!
Attention!
Avvertenza!
Waarschuwing!
Προειδοποίηση!
Zamknięta przepustnica
Closed throttle
Geschlossene Drosselklappe
Дроссельная заслонка закрыта
Закрита дросельна заслінка
Uždaras droselis
Aizvērts droseļvārsts
Uzavřená škrticí klapka
Zatvorená klapka
Bezárt fojtószelep
Șocul închis
Estrangulador cerrado
Étrangleur fermé
Valvola a farfalla chiusa
Afgesloten gasklep
Κλειστή βαλβίδα
OFF
Otwarta przepustnica
Open throttle
Geöff nete Drosselklappe
Дроссельная заслонка открыта
Відкрита дросельна заслінка
Atidarytas droselis
Atvērts droseļvārsts
Otevřená škrticí klapka
Otvorená klapka
Nyitott fojtószelep
Șocul deschis
Estrangulador abierto
Étrangleur ouvert
Valvola a farfalla aperta
Open gasklep
Ανοιχτή βαλβίδα
ON

INSTRUKCJA ORYGINALNA
8
PL D RUS UA LT LV CZ SK H RO E F I NL GR
Hałas - moc LwA
Noise - LwA power
Lärm – Leistung LwA
Сила шума LwA
Сила шуму LwA
Triukšmas - galia LwA
Trokšņa līmenis - jauda LwA
Hluk – výkon LwA
Hluk – výkon LwA
Zaj - LwA teljesítmény
Zgomotul - puterea LwA
Ruido - potencia LwA
Bruit - puissance LwA
Rumore - potenza LWA
Lawaai - geluidsvermogen LwA
Θόρυβος - ισχύς LwA
25 l
Pojemność zbiornika paliwa
Fuel tank capacity
Volumen des Kraftstoff behälters
Емкость топливного бака
Обєм топливного бака
Kuro bakelio tūris
Degvielas tvertnes tilpums
Objem palivové nádrže
Objem palivovej nádrže
Üzemanyagtartály térfogata
Capacitatea recipientului pentru conbustibil
Capacidad del tanque de combustible
Capacité du réservoir de carburant
Capacità del serbatoio d’olio
Inhoud brandstoftank
Χωρητικότητα δεξαμενής καυσίμου
IP23M
Stopień ochrony
Protection grade
Schutzart
Уровень защиты
Рівень захисту
Apsaugos laipsnis
Drošības pakāpe
Stupeň ochrany
Stupeň ochrany
Védelmi osztály
Trepta securitaţii
Grado de protección
Indice de protection du corps
Classe di protezione dell’involucro
Beschermingsklasse van de behuizing
Βαθμίδα προστασίας
G1
Klasa wydajności
Performance class
Leistungsklasse
Класс производительности
Клас продуктивності
Našumo klasė
Ražīguma klase
Třída výkonnosti
Trieda výkonnosti
Teljesítményosztály
Clasa de randament
Clase de efi ciencia
Classe de rendement
Classe di effi cienza
Prestatieklasse
Κλάση αποδοτικότητας
Znamionowa prędkość obrotowa
Nominal rotation
Nennumdrehungsgeschwindigkeit
Номинальные обороты
Номінальні оберти
Nominalus apsisukimų greitis
Nomināls griezes ātrums
Jmenovité otáčky
Menovité otáčky
Névleges fordulatszám
Viteza de rotire nominală
Velocidad de la rotación nominal
Vitesse de rotation nominale
Velocità di rotazione nominale
Nominale omwentelingssnelheid
Ονομαστική ταχύτητα περιστροφής
3600 min-1
Moc znamionowa
Nominal power
Nennleistung
Номинальная мощность
Номінальна потужність
Nominali galia
Nomināla spēja
Jmenovitý výkon
Menovitý výkon
Névleges teljesítmény
Consum de putere nominală
Potencia nominal
Puissance nominale
Potenza nominale
Nominaal vermogen
Ονομαστική ισχύ
Moc maksymalna
Maximal power
Maximale Leistung
Максимальная мощность
Максимальна потужність
Didžiausia galia
Maksimālā jauda
Maximální výkon
Maximálny výkon
Maximális teljesítmény
Putere maximă
Potencia máxima
Puissance maximale
Potenza massima
Maximaal vermogen
Μέγιστη ισχύς
230 V~ 50/60 Hz
400 V~ 50/60 Hz
Napięcie i częstotliwość znamionowa
Mains voltage and frequency
Spannung und Nennfrequenz
Номинальное напряжение и частота
Номінальна напруга та частота
Įtampa ir nominalus dažnis
Nomināls spriegums un nomināla frekvence
Jmenovité napětí a frekvence
Menovité napätie a frekvencia
Névleges feszültség és frekvencia
Tensiunea şi frecvenţa nominală
Tensión y frecuencia nominal
Tension et fréquence nominale
Tensione e frequenza nominale
Nominale spanning en frequentie
Ονομαστική τάση και συχνότητα
1,1 l
Pojemność zbiornika oleju
Oil tank capacity
Ölbehälter- Inhalt
Емкость масляного бачка
Обєм масляного бачка
Alyvos bakelio tūris
Eļļas tvertnes tilpums
Objem olejové nádrže
Objem olejovej nádrže
A motorolaj tartályának űrtartalma
Capacitatea recipientului pentru ulei
Capacidad del tanque de aceite
Capacité du réservoir d’huile
Capacità del serbatoio d’olio per la lubrifi cazione
Inhoud smeerolietank
Χωρητικότητα δεξαμενής λαδιού για λίπανση αλυσίδας
4250 W 5500 W (S2 5min)

INSTRUKCJA ORYGINALNA 9
PL
CHARAKTERYSTYKA URZĄDZENIA
Generator prądotwórczy jest urządzeniem elektromecha-
nicznym, w którym energia mechaniczna jest zamieniania w
energię elektryczną. Generator prądotwórczy składa się ze
współpracujących ze sobą: silnika spalinowego i prądnicy. Pra-
widłowa, niezawodna i bezpieczna praca urządzenia zależna
jest od właściwej eksploatacji, dlatego:
Przed przystąpieniem do pracy z urządzeniem należy prze-
czytać całą instrukcję i zachować ją.
Za szkody powstałe w wyniku nie przestrzegania przepisów
bezpieczeństwa i zaleceń niniejszej instrukcji, dostawca nie
ponosi odpowiedzialności.
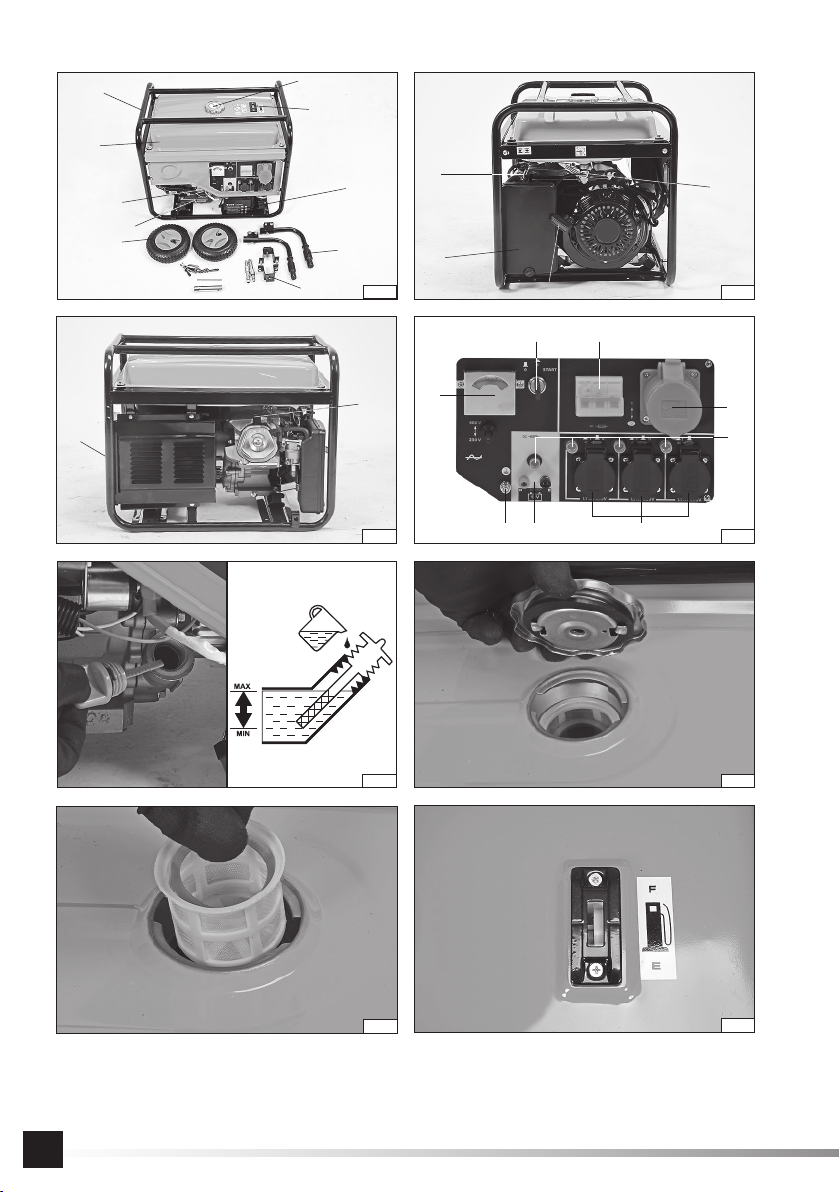
WYPOSAŻENIE
Generator jest sprzedawany w stanie kompletnym i nie wy-
maga montażu. W silniku generatora znajduje się olej w ilości
potrzebnej tylko do konserwacji silnika. UWAGA! Przed pierw-
szym uruchomieniem należy uzupełnić poziom oleju. Wraz z
generatorem jest dostarczany klucz do świecy.
INSTRUKCJE BEZPIECZEŃSTWA
Ogólne instrukcje bezpieczeństwa
Chronić dzieci przez zachowanie bezpiecznej odległości po-
między nimi a generatorem.
Przed rozpoczęciem pracy zapoznać się z oznakowaniem ge-
neratora oraz treścią etykiet ostrzegawczych.
Paliwo jest wybuchowe i łatwo ulega zapłonowi. Nie uzupełniać
paliwa podczas pracy generatora. Nie palić podczas uzupełnia-
nia paliwa. Nie uzupełniać paliwa w pobliżu płomieni.
Nie rozlewać paliwa.
Opary paliwa są niebezpieczne, przygotowywanie oraz uzupeł-
nianie paliwa należy przeprowadzać w dobrze wentylowanych
miejscach.
Niektóre części silnika spalinowego mogą być gorące i być
przyczyną oparzeń. Zwrócić uwagę na ostrzeżenia widoczne
na generatorze.
Generator należy przenosić tylko za pomocą przeznaczonych
do tego uchwytów. Nie wolno dotykać powierzchni generatora,
które nagrzewają się podczas pracy, grozi to poparzeniem.
Spaliny i gazy wylotowe są toksyczne. Nie należy użytkować
generatora w pomieszczeniach pozbawionych wentylacji. Pod-
czas użytkowania w wentylowanych pomieszczeniach, należy
przedsięwziąć dodatkowe środki zapobiegające pożarowi oraz
wybuchowi. W przypadku używania generatora na zewnątrz
zwrócić uwagę, aby nie był ustawiony w pobliżu okien, drzwi
oraz wlotów wentylacji. Spaliny mogą się przedostać do po-
mieszczenia i spowodować zagrożenie.
Zapoznać się z treścią etykiet ostrzegawczych oraz symboli wi-
docznych na generatorze. Sprawdzić ich znaczenie w instrukcji
obsługi.
Bezpieczeństwo elektryczne
Przed rozpoczęciem użytkowania należy sprawdzić generator
oraz wyposażenie elektryczne (włączając w to wtyczki oraz ka-
ble) i upewnić się że nie uległy uszkodzeniu.
Generator nie jest przeznaczony do podłączania do jakiegokol-
wiek innego źródła energii elektrycznej. Bezwzględnie zabrania
się podłączać generatora do gniazdka sieci elektroenergetycz-
nej powszechnego użytku 230 V / 50 Hz.
Ochrona przed porażeniem elektrycznym zależy od działania
bezpiecznika, specjalnie dobranego do generatora. Jeżeli bez-
piecznik wymaga wymiany, należy go wymienić na bezpiecznik
posiadający identyczne dane znamionowe oraz charakterystyki
działania.
Ze względu na duże naprężenia mechaniczne, należy stoso-
wać kable elastyczne w izolacji z twardej gumy (zgodne z nor-
mą IEC 60245-4) lub równoważne.
W przypadku używania przedłużaczy należy pamiętać o tym,
aby były to przedłużacze przystosowane do pracy poza za-
mkniętymi pomieszczeniami. Rezystancja przedłużaczy nie
może przekroczyć 1,5 Ω. Całkowita długość przewodu nie
może przekroczyć 60 m, dla przekroju poprzecznego kabla 1,5
mm2, oraz 100 m, dla przekroju poprzecznego kabla 2,5 mm2.
Generator należy uziemić jeżeli do jego gniazd będzie podłą-
czane urządzenia elektryczne wymagające uziemienia. Takie
urządzenie posiada kabel zasilający wyposażony w przewód
ochronny. Wymagane jest, aby podłączenie do uziemienia
przeprowadził wykwalifi kowany elektryk zgodnie z lokalnymi
przepisami dotyczącymi uziemiania urządzeń elektrycznych.
Ostrzeżenie! Miejsce stosowania generatora może podlegać
lokalnym ograniczeniom. Należy stosować się do lokalnych
przepisów dotyczących bezpieczeństwa elektrycznego pod-
czas użytkowania generatora.
Ostrzeżenie! Użytkownik powinien przestrzegać wymagań i
środków ostrożności w przypadku uzupełnienia generatora o
instalacje, w zależności od istniejących środków ochrony w tej
instalacji i obowiązujących przepisów.
Nie przeciążać generatora. Większość urządzeń elektrycznych
podczas rozruchu pobiera więcej mocy niż ich moc znamionowa.
Moc przekraczająca moc znamionową generatora, ale nie prze-
kraczająca mocy maksymalnej, nie może być wykorzystywana
dłużej niż 5 minut w trybie pracy dorywczej S2. Oznacza to, ze
po 5 minutach pracy w tym trybie należy zatrzymać generator i
pozwolić mu na całkowite wystygnięcie. W przypadku gdy moc
pobierana z generatora nie przekracza jego mocy znamionowej
generator może pracować w trybie pracy ciągłej S1.
Nie zaleca się stosować rozgałęźników podłączonych do
gniazdka generatora. Jeżeli jednak takie urządzenia zostaną
wykorzystane, należy zsumować moc wszystkich odbiorników
podłączonych do generatora. Suma mocy odbiorników nie
może przekroczyć mocy znamionowej generatora.
Bezpieczeństwo eksploatacji
Generator musi stać na płaskim, równym, twardym i stabilnym
podłożu. Trzeba zapewnić przynajmniej 1 metr wolnej prze-
strzeni wokół pracującego generatora.
Generator musi osiągnąć znamionowe obroty przed podłącze-
niem odbiornika elektrycznego. Przed wyłączeniem generatora
należy wyłączyć odbiornik elektryczny, jeżeli odbiornik posiada
części ruchome należy odczekać do całkowitego ich zatrzyma-
nia, a następnie odłączyć wtyczkę kabla zasilającego odbiornik
od gniazdka generatora.
Nie wolno przekraczać maksymalnej prędkości obrotowej sil-
nika. Przekroczenie maksymalnej prędkości obrotowej silnika
może spowodować uszkodzenie generatora oraz obrażenia
osób obsługujących urządzenie.
Generatora prądotwórczego nie wolno przechowywać, ani użyt-

INSTRUKCJA ORYGINALNA
10
PL
kować w wilgotnym lub silnie przewodzącym prąd elektryczny
środowisku (np. stawiać na metalowych powierzchniach).
Nie wystawiać generatora na działanie opadów atmosferycz-
nych. Nie używać generatora wystawionego na działanie opa-
dów atmosferycznych.
Generator nie jest przeznaczony do użytkowania w atmosferze
potencjalnie palnej lub wybuchowej.
Gazy i spaliny wylotowe są wystarczająco gorące, aby zapalić
niektóre materiały. Nie użytkować generatora w pobliżu mate-
riałów palnych.
Generator nie może być używany, jeśli zostaną zauważone ja-
kiekolwiek uszkodzone lub zniszczone części.
Pracującego generatora nie należy zostawiać bez opieki lub
pod opieką osób niepełnoletnich oraz osób które nie zostały
przeszkolone w obsłudze urządzenia.
Trzeba natychmiast wyłączyć generator prądotwórczy, jeśli zo-
staną zauważone:
- zmiany w prędkości obrotowej silnika,
- przegrzanie podłączonych do generatora urządzeń,
- iskrzenie,
- dym lub płomienie wydobywające się z urządzenia,
- niepożądane wibracje.
Trzeba okresowo sprawdzać system doprowadzenia paliwa. W
przypadku zauważania przecieków, należy oddać urządzenie
do naprawy w autoryzowanym punkcie serwisowym.
Przed podłączeniem urządzeń elektrycznych należy poczekać
aż silnik urządzenia osiągnie znamionowe obroty.
Wszystkie naprawy muszą być przeprowadzone w autoryzowa-
nym punkcie serwisowym producenta.
Nie wolno dopuścić do stanu, kiedy podczas pracy silnika,
skończy się paliwo!
Nie wolno zakrywać wlotów i wylotów wentylacyjnych. Nawet,
gdy generator nie pracuje.
Przed transportem generatora, koniecznie trzeba opróżnić
zbiornik paliwa.
PRZYGOTOWANIE DO PRACY
UWAGA! Procedurę sprawdzania generatora, należy przepro-
wadzać przed każdym uruchomieniem.
OSTRZEŻENIE! Generator dostarczany jest tylko z niewielką
ilością oleju w skrzyni przekładniowej. Przed pierwszym uru-
chomieniem generatora należy uzupełnić olej. Poziom oleju
należy sprawdzać regularnie i uzupełniać w razie potrzeby.
Uruchomienie generatora bez oleju lub ze zbyt małą ilością
oleju w skrzyni przekładniowej doprowadzi to nieodwracalnego
uszkodzenia silnika.
Sprawdzanie poziomu oleju
Odkręcić zatyczkę wlewu oleju. Zatyczka posiada bagnet po-
miarowy.
Poziom oleju powinien zawierać się pomiędzy górną i dolną
granicą zaznaczonego obszaru bagnetu. W razie potrzeby uzu-
pełnić olej do poziomu wskazanego na ilustracji (II).
Należy stosować dobrej jakości olej przeznaczony do spalino-
wych silników czterotaktowych (czterosuwowych) o klasie lep-
kości podanej w tabeli z danymi technicznymi.
Zamknąć wlew oleju wkręcając zatyczkę.
Uwaga! Podczas uzupełniania oleju, generator powinien być
ustawiony na płaskiej i równej powierzchni. Jeżeli generator był
przechylony, należy ustawić go na płaskim i równym podłożu,
a następnie odczekać co najmniej 30 minut, aby ustabilizował
się poziom oleju.
Uwaga! Do uzupełniania oleju zaleca stosować się nalewaki i/
lub lejki. Pozwoli to zmniejszyć ryzyko rozchlapania oleju. W
przypadku rozchlapania oleju należy dokładnie powycierać
resztki oleju przed uruchomieniem generatora.
Uwaga! Generator jest wyposażony w czujnik poziomu oleju,
który nie pozwoli uruchomić silnika mechanicznego przy zbyt
niskim stanie oleju w zbiorniku. Jeżeli próba uruchomienia
generatora kończy się niepowodzeniem, należy sprawdzić po-
ziom oleju.
Uzupełnianie paliwa
Zalecane paliwo, benzyna bezołowiowa o liczbie oktanowej
powyżej 93.
Należy używać paliwa i oleju wolnego od wszelkich zanie-
czyszczeń oraz przeznaczonego do silników czterosuwowych.
Zaleca się używać produktów wysokiej jakości. Przedłuży to
żywotność silnika.
Nie wolno napełniać zbiornika paliwa powyżej znacznika peł-
nego zbiornika. Trzeba zostawić wolną przestrzeni, pomiędzy
powierzchnią paliwa, a górną ścianą zbiornika paliwa.
Do uzupełniania paliwa zaleca stosować się nalewaki i/lub lej-
ki. Pozwoli to zmniejszyć ryzyko rozchlapania. Jeżeli podczas
uzupełniania, zostanie rozlane paliwo, przed uruchomieniem
generatora dokładnie powycierać resztki paliwa.
Podczas uzupełniania paliwa zabronione jest palenie.
Obrócić pokrywę wlewu paliwa w kierunku przeciwnym do ru-
chu wskazówek zegara, a następnie zdemontować ją z wlewu.
Pokrywa posiada dwa wypusty, które muszą jednocześnie tra-
fi ć w dwa wycięcia w kołnierzu wlewu paliwa (III). Zamknięcie
odbywa się przez obrót pokrywy do oporu w kierunku zgodnym
z ruchem wskazówek zegara. Tylko w taki sposób pokrywę wle-
wu można zamontować lub zdemontować.
Wewnątrz wlewu paliwa został umiejscowiony fi ltr paliwa (IV),
który służy do zatrzymania części zanieczyszczeń mechanicz-
nych, które mogą się pojawić w paliwie. Zawsze należy napeł-
niać zbiornik z zamontowanym fi ltrem wlewu.
Pojemność zbiornika paliwa jest określona w tabeli. Zbiornik
został wyposażony w mechaniczny wskaźnik poziomu paliwa
(V). Jeżeli wskaźnik znajduje się w pobliżu znacznika opisane-
go literą „E” oznacza to, że zbiornik jest pusty. Jeżeli wskaźnik
znajduje się w pobliżu znacznika opisanego literą „F” zbiornik
jest pełny.
Uziemianie generatora
Przewód łączący instalację uziemiającą z generatorem pod-
łączyć do oznaczonego miejsca na generatorze. Podłączenia
generatora do instalacji uziemiającej musi dokonać osoba z
odpowiednimi kwalifi kacjami elektrycznymi.
Montażkółek i rękojeści
Rama generatora została przystosowana do montażu kółek
oraz uchwytów. Nie są one konieczne do prawidłowego użyt-
kowania generatora, ale ułatwiają transport generatora na nie-
wielkie odległości. Montaż kół należy rozpocząć od zamocowa-
nia osi kół za pomocą nakrętek (VI), Na oś generatora nałożyć
tuleje dystansowe, a następnie koło i zamocować je na osi za
pomocą nakrętki (VII). Na każde koło nałożyć kołpak ozdobny.

INSTRUKCJA ORYGINALNA 11
PL
Po drugiej stronie ramy zamocować podstawki, przykręcając je
za pomocą śrub i nakrętek (VIII). Podstawki poziomują gene-
rator po montażu kół.
Do górnej części ramy, po stronie podstawek zamocować
uchwyty za pomocą śrub i nakrętek (IX). Zwrócić uwagę, aby
rękojeści po zamontowaniu składały się do środka. Pozwala to
zaoszczędzić miejsce podczas gdy generator nie jest transpor-
towany.
UWAGA! Opony kół należy napompować. Nie przekraczać ci-
śnienia znamionowego widocznego na boku opony. Koła nada-
ją się tylko do transportu generatora gdy jest on prowadzony
pieszo. Nie zaczepiać generatora do jakichkolwiek pojazdów.
Po zakończeniu czynności przygotowawczych można przystą-
pić do uruchomienia generatora.
OBSŁUGA GENERATORA
Uruchomienie silnika spalinowego
Przed uruchomieniem generatora, należy odłączyć wszystkie
urządzenia elektryczne od gniazdek w generatorze.
Silnik generatora można uruchomić na dwa sposoby, za po-
mocą elektrycznego rozrusznika zasilanego z akumulatora lub
za pomocą ręcznego rozrusznika uruchamianego za pomocą
linki startowej.
Generator jest dostarczany odłączonym akumulatorem, za-
pobiega to przypadkowemu uruchomieniu generatora, a tak-
że spowalnia proces rozładowania akumulatora. Akumulator
należy wymontować z podstawy odczepiając zaczepy taśmy
elastycznej (X). Z zacisku kabla zsunąć osłonę, a następnie
zacisk zamocować za pomocą śruby i nakrętki do zacisku aku-
mulatora (XI). Nasunąć osłonę za zacisk kabla i akumulatora
(XII). Akumulator zamocować za pomocą taśmy elastycznej do
ramy generatora.
Otworzyć zawór paliwa, przestawiając go w pozycję „ON” (XIII).
Włącznik silnika przestawić w pozycję odpowiadającą napię-
ciu znamionowemu, które będzie użytkowane (XIV). Włącznik
posiada pozycję, pozycja opisana 230 V odpowiada zasilaniu
gniazd prądowych 230 V/50 Hz, pozycja opisana 400 V odpo-
wiada zasilaniu gniazda 400 V/50 Hz. Pozycja środkowa ozna-
cza, że włącznik znajduje się w pozycji wyłączony.
Zamknąć przepustnicę, przestawiając dźwignię ssania do opo-
ru w kierunku napisu „OFF” (XV).
Przekręcić kluczyk rozruchu elektrycznego z pozycji 0 do po-
zycji 1 (XVI). Jeżeli nie będzie słychać działania rozrusznika,
może to oznaczać rozładowany akumulator. Taka sytuacja
może wystąpić przy pierwszym rozruchu lub rozruchu po dłu-
gim okresie przechowywania generatora. Jeżeli nie będzie
możliwe skorzystanie z rozruchu elektrycznego należy skorzy-
stać z rozruchu ręcznego.
Kilkukrotnie, płynnie pociągnąć za linkę startową, aż do wy-
czuwalnego oporu spowodowanego kompresją silnika, wtedy
pociągnąć energicznym, zdecydowanym ruchem (XVII).
Wycofać rączkę linki płynnym ruchem, aż do jej całkowitego
schowania się w obudowie generatora. Nie puszczać uchwytu
linki, aby gwałtownie schowała się w obudowie. Takie działanie
może być przyczyną uszkodzenia startera.
W miarę rozgrzewania się silnika stopniowo otwierać prze-
pustnicę, przestawiając dźwignię ssania stopniowo w kierunku
położenie oznaczonego „ON”. Po każdej zmianie położenia
dźwigni ssania trzeba poczekać, aż silnik będzie pracował
płynnie. Prędkość powrotu dźwigni ssania zależy od warunków
atmosferycznych, w jakich jest uruchamiany silnik. Im niższa
temperatura otoczenia, tym powrót musi być wolniejszy.
Generator posiada woltomierz, który pozwala sprawdzić w
orientacyjny sposób pobierane napięcie z generatora.
Podłączenie urządzeńelektrycznych do generatora
UWAGA! Nie wolno podłączać do generatora urządzeń elek-
trycznych o mocy znamionowej wyższej od mocy znamionowej
generatora. W przypadku podłączania więcej niż jednego urzą-
dzenia, ich sumaryczna moc znamionowa musi być niższa niż
moc znamionowa generatora.
UWAGA! Sprawdzić czy podłączane do generatora urządzenia
elektryczne mają parametry elektryczne zgodne z parametrami
elektrycznymi generatora.
UWAGA! Nie można jednocześnie zasilać urządzeń za pomo-
cą gniazd 230 V i gniazda 400 V. Możliwe jest jednoczesne
korzystanie tylko z gniazd 230 V lub z gniazda 400 V.
Uruchomić silnik według procedury opisanej w punkcie „Uru-
chomienie silnika spalinowego”
Upewnić się, że podłączane urządzenia elektryczne są wyłą-
czone.
Unieść pokrywę gniazda, a następnie podłączyć wtyczkę ka-
bla zasilającego odbiornik do gniazda prądowego generatora
(XVIII).
Uruchomić odbiornik przestawiając jego włącznik w pozycję
włączony.
Uwaga! W przypadku podłączenia więcej niż jednego do od-
biornika, następny należy uruchomić dopiero gdy poprzedni
rozpocznie normalną pracę np. osiągnie znamionowe obroty,
nagrzeje się do znamionowej temperatury itp.
Każde z gniazd posiada osobne zabezpieczenie przeciwprze-
ciążeniowe. W przypadku przeciążenia np. na skutek zbyt
wysokiego poboru mocy, zostanie odłączone zasilanie gniaz-
da prądowego generatora, ale nie zostanie zatrzymana praca
silnika spalinowego. Przeciążenie jest sygnalizowane pracą
bezpiecznika. W przypadku gniazd 230 V oraz 12 V jest to „wy-
bicie” bezpiecznika, a w przypadku gniazda 400 V jest to prze-
łączenie się bezpiecznika w dolną pozycję. W takim przypadku
należy wyłączyć za pomocą włącznika każdy z odbiorników
podłączonych tych gniazd do generatora, przy których zostało
zasygnalizowane przeciążenie, odłączyć odbiornik od gniazd
prądowego generatora, odczekać do schłodzenia układów ge-
neratora, a następnie nacisnąć przycisk bezpiecznika. Jeżeli
zadziałanie bezpiecznika będzie się powtarzała, należy wyłą-
czyć za pomocą włączników wszystkie odbiorniki podłączone
do generatora, a następnie odłączyć ich wtyczki od gniazd prą-
dowych generatora. Zatrzymać generator i odczekać do jego
schłodzenia. Sprawdzić czy suma mocy znamionowej wszyst-
kich odbiorników podłączonych do generatora nie przekracza
mocy znamionowej generatora. W razie potrzeby odłączyć nie-
które odbiorniki. Sprawdzić czy wloty powietrza i/lub szczeliny
wentylacyjne nie zostały zablokowane. Sprawdzić otoczenie
generatora na obecność przedmiotów, które mogą powodować
zatykanie wlotów powietrza i/lub szczelin wentylacyjnych.
Po sprawdzeniu, wcisnąć / przestawić bezpieczniki, a następ-
nie uruchomić ponownie generator wg procedury startowej.

INSTRUKCJA ORYGINALNA
12
PL
UWAGA! Zabezpieczenie może zadziałać podczas uruchamia-
nia obciążenia, ma to związek z tym, że większość odbiorników
elektrycznych wykorzystuje podczas uruchomienia większą
moc niż moc znamionowa odbiornika. Jeżeli odbiornik nie jest
uszkodzony, może to oznaczać, że nie nadaje się do zasilania
z generatora.
UWAGA! Jeżeli jednocześnie z gniazdami zmiennoprądowy-
mi jest używane gniazdo stałoprądowe, podczas sumowania
mocy należy także uwzględnić moc odbiornika podłączonego
do tego gniazda.
Zatrzymywanie silnika
Wyłączyć odbiornik podłączony do generatora za pomocą jego
włącznika.
Odłączyć odbiornik od generatora, wyciągając wtyczkę kabla
zasilającego z gniazda prądowego generatora.
Włącznik silnika przełączyć w pozycję wyłączony - O.
Poczekać do całkowitego zatrzymania obrotów silnika.
Zamknąć zawór paliwa przestawiając go w pozycję: OFF.
UWAGA! W przypadku gdy zajdzie potrzeba awaryjnego, na-
tychmiastowego wyłączenia silnika, należy włącznik silnika
przełączyć w pozycję wyłączony - O.
Praca na dużej wysokości
Gaźnik zamontowany w generatorze został zaprojektowany
do poprawnej pracy na wysokości nie większej niż określona
w tabeli z danymi technicznymi. W przypadku potrzeby pracy
na większej wysokości należy zwrócić się do autoryzowanego
serwisu celem dokonania modyfi kacji gaźnika. Nawet po mo-
dyfi kacji gaźnika należy liczyć się ze spadkiem mocy silnika
spalinowego, a co za tym idzie spadkiem mocy generatora o
3,5% na każde 300 metrów przyrostu wysokości powyżej limitu
podanego w tabeli. Spadek mocy będzie większy w przypadku
użytkowania generatora bez zmodyfi kowanego gaźnika. Spa-
dek mocy jest związany z rozrzedzeniem powietrza wraz ze
wzrostem wysokości nad poziomem morza.
KONSERWACJA I PRZEGLĄDY
W okresie gwarancji użytkownik nie może demontować urzą-
dzenia, ani wymieniać innych podzespołów lub części składo-
wych niż te wymienione poniżej, gdyż powoduje to utratę praw
gwarancyjnych. Wszelkie nieprawidłowości obserwowane przy
przeglądzie lub w czasie pracy są sygnałem do przeprowadze-
nia naprawy w punkcie serwisowym.
Po zakończeniu pracy, obudowę, szczeliny wentylacyjne,
przełączniki, rękojeść dodatkową i osłony należy oczyścić np.
strumieniem powietrza (o ciśnieniu nie większym niż 0,3 MPa),
pędzlem lub suchą szmatką bez użycia środków chemicznych
i płynów czyszczących. Narzędzia i uchwyty oczyścić suchą
czystą szmatą.
Przeglądy okresowe
Należy dokonywać okresowych przeglądów i konserwacji wy-
mienionych niżej podzespołów generatora.
UWAGA! Wszelkie zabiegi konserwacyjne należy dokonywać
przy wyłączonym i niepracującym urządzeniu. Trzeba także
odłączyć wszelkie urządzenia elektryczne od generatora.
UWAGA! Jeśli przebieg jakiejś czynności serwisowej nie jest
opisany poniżej. Oznacza to, że w celu wykonania tej czyn-
ności należy oddać urządzenie do specjalistycznego punktu
serwisowego.
UWAGA! W przypadku gdzie do czyszczenia jest używany roz-
puszczalnik, należy unikać kontaktu rozpuszczalnika ze skórą i
oczami. Używać indywidualnych środków ochrony.
Element Uwagi
Przed
każdym
urucho-
mieniem
Po
pierwszym
miesiącu
pracy albo
pierw-
szych 20
godzinach
pracy
Co każde
3 miesiące
albo po 50
godzinach
pracy
Co każde
12 mie-
sięcy albo
po 100
godzinach
pracy
Poziom
oleju w
przekładni
silnika
Sprawdzić X
Wymienić X X
Filtr po-
wietrza
Sprawdzić X
Wyczyścić X X(*)
Świeca
zapło-
nowa
Czysz-
czenie.
Jeśli to
konieczne,
wymienić
X
Filtr
wlewu
paliwa
Sprawdzić.
Jeśli to
konieczne
wymienić.
X
Instalacja
paliwowa
Spraw-
dzenie
szczelno-
ści i uszko-
dzeń.
X
Wymienić Co każde dwa lata
Usuwanie
nalotu wę-
glowego
Sprawdzać
częściej,
jeśli to
konieczne
X
Silnik
Czysz-
czenie i
regulacja
zaworów i
cylindrów
Co każde
125 godzin
(*) W przypadku użytkowania generatora w zapylonym środowisku zalecana jest
większa częstotliwość.
Zalecana jest wymiana zbiornika paliwa, co trzy lata. Jeżeli
zostaną wykryte jakiekolwiek nieszczelności w instalacji pali-
wowej zabronione jest użytkowanie generatora.
Konserwacja filtru powietrza (XIX)
UWAGA! Nie użytkować generatora bez poprawnie zamonto-
wanego fi ltru powietrza lub z uszkodzonym fi ltrem powietrza.
W przeciwnym wypadku silnik spalinowy może zassać nieczy-
stości, które w normalnych warunkach zostałby zatrzymane
przez fi ltr. Nieczystości mogą doprowadzić do zakłócenia pracy
generatora, a nawet do jego uszkodzenia.
Odkręcić pokrętło i zdemontować pokrywę fi ltru. Wyciągnąć fi ltr
i oczyścić go w niepalnym rozpuszczalniku, po czym dokładnie
wycisnąć rozpuszczalnik.

INSTRUKCJA ORYGINALNA 13
PL
OCHRONA ŚRODOWISKA
Symbol wskazujący na selektywne zbieranie zużytego
sprzętu elektrycznego i elektronicznego. Zużyte urządze-
nia elektryczne są surowcami wtórnymi - nie wolno wyrzucać
ich do pojemników na odpady domowe, ponieważ zawierają
substancje niebezpieczne dla zdrowia ludzkiego i środowiska!
Prosimy o aktywną pomoc w oszczędnym gospodarowaniu za-
sobami naturalnymi i ochronie środowiska naturalnego przez
przekazanie zużytego urządzenia do punktu składowania zuży-
tych urządzeń elektrycznych. Aby ograniczyć ilość usuwanych
odpadów konieczne jest ich ponowne użycie, recykling lub od-
zysk w innej formie.
Nasączyć fi ltr czystym olejem silnikowym i wycisnąć go jednak
tak, aby fi ltr pozostał wilgotny.
Zamontować fi ltr na miejsce i zamocować pokrywę za pomocą
pokrętła.
Konserwacja świecy zapłonowej
Odłączyć przewód od świecy.
Wykręcić świecę zapłonową kluczem do świec (XX).
Szczotką drucianą oczyścić elektrody z nalotu węglowego (tzw.
nagaru).
Sprawdzić odległość miedzy elektrodami, powinna wynosić od
0,7 mm do 0,8 mm. (XXI)
W przypadku stwierdzenia przepalonych elektrod lub pękniętej
osłony ceramicznej, wymienić świecę na nową.
Wkręcić świecę. Podłączyć przewód do świecy.
Wymiana oleju silnikowego
UWAGA! Wymianę oleju silnikowego najlepiej przeprowadzać
zaraz po zatrzymaniu silnika. Wtedy olej jest najbardziej rzadki
i najszybciej spłynie z komory przekładni silnika.
Podczas wymiany oleju należy zachować ostrożność. Olej za-
raz po zatrzymaniu silnika jest rozgrzany i może być przyczyną
oparzeń.
Zbiornik oleju jest wyposażony w otwór spustowy. Pod otwór
spustowy podstawić naczynie o pojemności większej niż po-
jemność zbiornika oleju.
Za pomocą klucza wykręcić całkowicie zawór spustowy (XXII).
Pozwolić spłynąć olejowi do zbiornika, a następnie kluczem
wkręcić zawór spustowy. Powycierać do sucha resztki oleju.
Uzupełnić olej zgodnie z procedurą opisaną w punkcie: „Spraw-
dzanie poziomu oleju”.
UWAGA! Zużyty olej silnikowy należy poddać utylizacji zgodnie
z lokalnymi przepisami. Zabronione jest wylewanie oleju silni-
kowego do kanalizacji.
Konserwacja filtru wlewu paliwa
Zdemontować pokrywę wlewu paliwa. Wyciągnąć fi ltr wlewu
paliw. Wyczyścić fi ltr wlewu paliwa za pomocą benzyny eks-
trakcyjnej. Osuszyć za pomocą miękkiej, czystej szmatki. Za-
montować fi ltr w otworze wlewowym. Zamontować pokrywę
wlewu paliwa.
UWAGA! Ścianki fi ltru wykonano z delikatnej siatki. Należy
zachować ostrożność podczas konserwacji, aby ich nie uszko-
dzić. W przypadku uszkodzenia fi ltru, należy go wymienić na
nowy pozbawiony uszkodzeń przed wznowieniem pracy.
Przechowywanie generatora
Jeżeli generator będzie przechowywany przez krótki czas (nie
więcej niż 10 dni) należy zatrzymać silnik spalinowy, odłączyć od
niego wszystkie odbiorniki, a następnie zamknąć zawór paliwa.
Jeżeli generator będzie przechowywany przez czas dłuższy niż
10 dni należy postępować wg poniższej procedury.
Przestawić włącznik silnika w pozycję wyłączony - O.
Zdemontować pokrywę wlewu paliwa, usunąć paliwo ze zbior-
nika, na przykład za pomocą odpowiedniej pompki. Zamonto-
wać pokrywę wlewu paliwa.
Uruchomić silnik wg procedury opisanej w punkcie „Uruchomie-
nie silnika spalinowego”.
Nie podłączać żadnych odbiorników, pozwolić silnikowi praco-
wać do momentu samoczynnego zatrzymania z powodu braku
paliwa. Czas pracy będzie zależał od ilości paliwa, która pozo-
stała w zbiorniku oraz instalacji paliwowej.
Przestawić włącznik silnika w pozycję wyłączony - O.
Przestawić zawór paliwa w pozycję OFF.
Wykręcić świecę zapłonową, do cylindra, przez otwór montażo-
wy wlać łyżkę stołową oleju silnikowego o lepkości podanej w
tabeli z danymi technicznymi.
Wkręcić świecę zapłonową. Pociągnąć za linkę startową tak,
aby silnik wykonał kilka obrotów, pozwoli to nasmarować wnę-
trze tłoka. Przestać pociągać za linkę startową w momencie
wyczucia kompresji (oporu).
Niezależnie od czasu przechowywania, zawsze należy:
Wyczyścić zewnętrzne części generatora za pomocą miękkiej
szmatki, miękkiej szczotki lub strumienia sprężonego powietrza
o ciśnieniu nie większym niż 0,3 MPa. Szczególną uwagę zwró-
cić na drożność otworów wentylacyjnych.
Generator przechowywać w pozycji poziomej.
Generator, przechowywać w suchym, dobrze wentylowanym i
zadaszonym pomieszczeniu.
Transport generatora
OSTRZEŻENIE! Generator zawsze należy transportować z
zatrzymanym silnikiem spalinowym oraz odłączonymi odbior-
nikami.
Na niewielkie odległości, np. podczas przenoszenia generatora
w miejscu użytkowania, generator transportować przenosząc
go trzymając za ramę.
Zachować ostrożność, unikać kołysania i przechylania genera-
tora, aby nie rozchlapać paliwa. Generator może być gorący,
zachować ostrożność, aby uniknąć poparzeń.
W przypadku transportu na większe odległości należy genera-
tor przygotować do transportu wg procedury opisanej w punk-
cie „Przechowywanie generatora”. Generator transportować w
pozycji poziomej. Zabezpieczyć za pomocą pasów przed prze-
wróceniem się w trakcie transportu.
Części zamienne
Szczegółowy wykaz części zamiennych produktu znajduje się
w dziale „Do pobrania”, w karcie produktu, na stronach interne-
towych TOYA SA: www.toya.pl.

INSTRUKCJA ORYGINALNA
14
PL
PARAMETRY TECHNICZNE
Typ generatora YT-85460
Parametr Jednostka miary Wartość
PRĄDNICA
Napięcie znamionowe
[V] A.C. 230
[V] A. C. 400 (3P/N/PE)
[V] D.C. 12
Częstotliwość znamionowa [Hz] 50
Moc znamionowa generatora COP [W] 4250
Moc maksymalna (S2 5 min) [W] 5500
Współczynnik mocy 1,0
Prąd znamionowy (A.C.) [A] 5,2
Prąd znamionowy (D.C.) [A] 8,3
Klasa izolacji elektrycznej I
Stopień ochrony obudowy (IP) IP23M
Klasa wydajności G1
Klasa jakości A
SILNIK MECHANICZNY
Typ CP188F
Ilość cylindrów 1
Ilość taktów 4
Rodzaj paliwa Benzyna bezołowiowa
Rodzaj oleju [SAE] 10W-40
Zużycie paliwa (przy 75% obciążeniu) [l/h] 4,27
Pojemność silnika [cm3] 389
Moc znamionowa [kW] 7,5
Obroty znamionowe [min-1] 3600
Obroty biegu jałowego [min-1] 1800 ± 100
Chłodzenie Powietrzem
Stopień sprężania 8,5:1
Pojemność zbiornika paliwa [l] 25
Pojemność zbiornika oleju [l] 1,1
Typ świecy zapłonowej F7RTC
URZĄDZENIE
Wymiary gabarytowe [mm] 680 x 510 x 540
Waga [kg] 85
Zakres temperatur pracy [OC] 0 +40
Maksymalna wysokość pracy [m n.p.m.] 1000
Poziom hałasu
ciśnienie akustyczne LpA±K [dB(A)] 75,0±2,62
moc akustyczna LwA±K [dB(A)] 93,7±2,62

15
ORIGINAL INSTRUCTIONS
GB
insulation (according to IEC 60245-4) or equivalent must be used.
When using extension cords, make sure that they are suitable
for outdoor use. The resistance of the extension cables shall
not exceed 1,5 Ω. The total length of the cable must not exceed
60 m for a cable cross-section of 1.5 mm2, and 100 m for a
cable cross-section of 2.5 mm2.
The generator should be grounded if an electrical device which
requires grounding will be connected to its socket. Such a
device has a power supply cable equipped with a protective
conductor. The grounding connection must be carried out by a
qualifi ed electrician in accordance with local regulations for the
grounding of electrical equipment.
Warning! The location of use of the generator may be subject to
local restrictions. Observe the local electrical safety regulations
when using the generator.
Warning! The operator must observe the requirements and pre-
cautions when retrofi tting the generator, depending on the existing
protective measures in the plant and the applicable regulations.
Do not overload the generator. Most electrical equipment con-
sumes more power than its rated power during start-up. The
power exceeding the rated power of the generator, but not ex-
ceeding the maximum power, may not be used for more than 5
minutes in the S2 short-time operation mode. This means that
after 5 minutes of operation in this mode, the generator must
be stopped and allowed to cool down completely. If the power
drawn from the generator does not exceed its rated output, the
generator may operate in S1 continuous operation mode.
It is not recommended to use splitters connected to the gen-
erator socket. However, if such devices are used, the power
demand of all consumers connected to the generator must be
summed up. The sum of the power demand of the consumers
must not exceed the rated power of the generator.
Operational safety
The generator must stand on a fl at, level, hard and stable sur-
face. Provide at least 1 meter of free space around the gener-
ator when it is running.
The generator must reach its rated engine revolutions before con-
necting the electrical consumer. Before switching off the genera-
tor, turn off the electrical consumer, if the consumer has moving
parts, wait until they have come to a complete standstill and then
unplug the consumer’s power cord from the generator socket.
The maximum engine’s speed of revolution must not be exceed-
ed. If the maximum engine’s speed of revolution is exceeded, the
generator can be damaged and operators can be injured.
The generator must not be stored or used in a damp or electri-
cally conductive environment (e.g. on metal surfaces).
Do not expose the generator to precipitation. Do not use a gen-
erator that is exposed to precipitation.
The generator is not intended for use in potentially fl ammable
or explosive atmospheres.
The gases and exhaust fumes are hot enough to ignite certain
materials. Do not use the generator near combustible materials.
The generator must not be used if any damaged or destroyed
parts are noticed.
Do not leave the generator in operation unattended or under
the care of minors or persons who have not been trained in the
operation of the device.
The generator must be switched off immediately if the following
symptoms are noticed:
- changes of the engine’s speed of revolution,
DEVICE CHARACTERISTICS
A power generator is an electromechanical device, in which
mechanical energy is converted into electrical energy. A gener-
ator consists of an internal combustion engine and an electric
generator that cooperate. The correct, reliable, and safe opera-
tion of the device depends on its proper use, so:
Read and keep the entire manual before the fi rst use of
the device.
The supplier shall not be held liable for any damage resulting
from failure to observe the safety regulations and recommen-
dations specifi ed in this manual.
ACCESSORIES
The generator is supplied complete and does not require as-
sembly. The generator engine contains oil in the quantity re-
quired only for engine maintenance. CAUTION! The oil level
must be topped up before fi rst operation. A spark plug wrench
is supplied with the generator.
SAFETY INSTRUCTIONS
General safety instructions
Protect children by keeping a safe distance from the generator.
Before starting work, read the generator’s markings and the
warning labels.
The fuel is explosive and ignites easily. Do not refi ll fuel while
the generator is running. Do not smoke while refi lling. Do not
refi ll fuel nearby fl ames.
Do not spill fuel.
Fuel vapours are hazardous, and fuel preparation and refi lling
must be carried out in well-ventilated areas.
Some parts of the internal combustion engine can be hot and
cause burns. Pay attention to the warnings placed on the generator.
The generator must only be carried using the appropriate han-
dles. Do not touch the generator surface if it becomes hot dur-
ing operation, this may cause burns.
Fumes and exhaust gases are toxic. Do not use the generator
in rooms without ventilation. When used in ventilated rooms,
additional measures must be taken to prevent fi re and explo-
sion. When using the generator outdoors, ensure that it is not
positioned near windows, doors or ventilation inlets. Exhaust
fumes can enter the room and cause a hazard.
Read the warning labels and symbols placed on the generator.
Check their meaning with the operating manual.
Electrical Safety
Check the generator and the electrical accessories (including
plugs and cables) before use and make sure that they are not
damaged.
The generator is not intended to be connected to any other
source of electrical energy. It is absolutely forbidden to connect
the generator to a 230 V / 50 Hz mains socket.
Protection against electric shock depends on functioning of the
fuse specially selected for the generator. If the fuse needs to be
replaced, it shall be replaced with a fuse having the same rating
and performance characteristics.
Due to high mechanical stresses, fl exible cables with hard rubber

16
GB
ORIGINAL INSTRUCTIONS
engage the two locating grooves in the fuel fi ller’s neck (III).
Close the fuel fi ller by twisting on the cap clockwise. This is the
only way to open and close the fuel fi ller cap.
A fuel fi lter (IV) is inside the fuel fi ller to retain some of the solid
impurities that may be present in the fuel. Always refuel the fuel
tank with the fi lter installed in the fuel fi ller.
See the product specifi cations table for the fuel tank capacity.
The tank is equipped with a mechanical fuel level indicator (V).
If the indicator is close to the “E” marker, the tank is empty. If the
indicator is close to the “F” marker, the tank is full.
Generator grounding
Connect the cable between the grounding system and the pow-
er generator to the ground terminal marked on the generator.
The power generator must be connected to a grounding system
by a person with appropriate electrical qualifi cations.
Installation of wheels and handles
The generator frame has been adapted for mounting wheels
and handles. They are not necessary for proper operation of
the generator, but they facilitate the transport of the generator
over short distances. Start by fi xing the wheel axles with the
nuts (VI). Place the spacer sleeves on the generator axle and
then the wheel and fi x it on the axle with the nut (VII). Place
a decorative cap on each wheel. Fix the bases on the other
side of the frame by screwing them in place using bolts and
nuts (VIII). The bases level the generator after the wheels have
been mounted.
Attach the handles to the upper part of the frame, on the base
side, using bolts and nuts (IX). Make sure that the handles fold
inwards after installation. This saves space when the generator
is not being transported.
CAUTION! Infl ate the wheel tyres. Do not exceed the rated
pressure indicated on the tyre side. The wheels are only suit-
able for transporting the generator on foot. Do not attach the
generator to any vehicles.
With the preparations for operation complete, you may now
start the power generator.
GENERATOR OPERATION
Start-up of the combustion engine
Before starting the power generator, unplug all electrical loads
from the power outlets of the power generator.
The generator motor can be started in two ways: by an electric
starter powered by a battery or by a manual starter operated by
a starter pull cord.
The generator is supplied with a disconnected battery, which
prevents accidental starting of the generator, and also slows
down the process of battery discharge. The battery should be
removed from the base by removing the hooks of the elastic
band (X). Slide the cover off the cable clamp, and then fi x the
clamp to the battery clamp (XI) using a screw and a nut. Push
the cover over the cable and battery clamp (XII). Secure the
battery to the generator frame using the elastic band.
Open the fuel supply valve by rotating it to the “ON” position (XIII).
Move the engine switch to the position corresponding to the
rated voltage to be used (XIV). The switch has the following
- overheating of the devices connected to the generator,
- sparking,
- smoke or fl ames coming out of the device,
- unwanted vibration.
The fuel feed system must be checked periodically. If you notice
leaks, have the unit repaired by an authorised servicing centre.
Wait until the engine of the unit has reached its rated engine
revolutions before connecting electrical equipment.
All repairs should only be carried out by an authorised servicing
centre.
Do not allow fuel to run out while the engine is running!
Do not cover the ventilation inlets and outlets. Even when the
generator is not running.
Before transporting the generator, it is necessary to empty the
fuel tank.
PREPARING THE MACHINE FOR OPERATION
CAUTION! The checking procedure must be carried out on the
generator before each start-up.
WARNING! The generator is supplied with only a small amount
of oil in the gearbox. The oil must be topped up before the gen-
erator’s fi rst operation. Check the oil level regularly and top up
if necessary. Starting the generator without oil or with too little
oil in the gearbox will cause irreparable damage to the engine.
Checking the oil level
Twist off the oil fi ller cap. The oil fi ller cap has a dipstick attached.
The oil level should be between the lower and upper limit marks
on the dipstick. If necessary, add oil to the level indicated in
Figure (II).
Use four-stroke premium engine oil with the viscosity class
shown in the product specifi cations table.
Close the oil fi ller by twisting on the cap.
Caution! Put the power generator on a fl at and level surface
before adding oil. If the power generator is off level, move it to
a fl at and level surface and wait at least 30 minutes for the oil
level to stabilize.
Caution! Add oil through a fi lling pistol or a funnel. This will
reduce the risk of a spill. If spilled, thoroughly wipe off all oil
before starting the power generator.
Caution! The power generator features an oil level sensor
which will prevent ignition when the oil level is too low. If the
power generator fails to start, check the oil level.
Refuelling
93-octane unleaded petrol or better is recommended.
Use four-stroke engine fuel and oil which are free from solid
impurities. Premium quality products are recommended. They
will extend the service life of the engine.
Do not refuel above the maximum level marked on the fuel
tank. Leave a headroom of air between the fuel level and the
top of the fuel tank.
Refuel with a fuel pump and/or a funnel. This will reduce the risk
of a spill. If spilled, thoroughly wipe off all fuel before starting the
power generator.
Never smoke when refuelling.
Open the fuel fi ller cap counter-clockwise to open. Remove the
cap from the fuel fi ller. The cap has two bosses which need to

17
ORIGINAL INSTRUCTIONS
GB
positions: the position marked “230 V” corresponds to the sup-
ply of 230 V/50 Hz power sockets, the position marked “400 V”
corresponds to the supply of 400 V/50 Hz power sockets. The
middle position indicates that the switch is in the off position.
Close the throttle by moving the priming accelerator lever to
stop at the “OFF” marker (XV).
Turn the electric start key from the “0” position to the “1” posi-
tion (XVI). If you cannot hear the starter sound, the battery may
be discharged. This can happen at the fi rst start-up or start-up
after a long period of storage of the generator. If it is not possi-
ble to use the electric start, use manual start.
Pull the starter pull cord smoothly several times until you feel
the resistance caused by the engine compression, which is
when you should pull it vigorously and fi rmly (XVII).
While holding the handle, let the starter pull cord retract itself in
a controlled manner until it is fully inside the power generator
housing. Do not release the starter pull cord handle so that it is
suddenly retracted into the housing. This can damage the starter.
As the engine is heating up, open the throttle gradually by mov-
ing the priming accelerator lever gradually towards “ON”. Allow
the engine to start running smoothly every time you reposition
the priming accelerator lever. The rate at which the priming
accelerator lever should be reversed depends on the ambient
temperature in which you start the engine. The lower the ambi-
ent temperature, the slower the lever should be reversed.
The generator is equipped with a voltmeter, which allows to ap-
proximately check the voltage taken from the generator.
Connecting electrical loads to the power generator
CAUTION! Do not connect electrical loads with a power rating
higher than the rated power output of the power generator. If
more than one electrical load is connected, the total rated pow-
er of all connected loads must be lower than the rated power
output of the power generator.
CAUTION! Verify that the ratings of the electrical loads to be
connected match the ratings of the power generator.
CAUTION! The devices cannot be powered by the 230 V sock-
ets and the 400 V socket at the same time. Only the 230 V
sockets or the 400 V socket can be used at the same time.
Start the engine according to the procedure in “Start-up of the
combustion engine”.
Make sure that the electrical loads to be connected are switched off .
Lift the socket cover and plug in the receiver power cable to the
generator socket.
Switch on the connected electrical load.
Caution! If more than one electrical load is connected, switch
on each next load when the previous load starts running stead-
ily (i.e. at the rated speed, temperature, etc.).
Each of the sockets has its own overload breaker. If the power
output is overloaded by an excessive power output consump-
tion, the socket of the generator is isolated from power but the
engine will keep running. Overload is indicated by the operation
of the fuse. In the case of 230 V and 12 V sockets, it happens
when the fuse is “blown”, and in the case of 400 V sockets, it
happens when the fuse switches to the lower position. In such a
case, switch off all the receivers. which were indicated as over-
loaded, connected to the generator using the switch, unplug
the receiver from the generator socket, wait until the generator
circuits cool down, and press the overload breaker reset button.
If the activation of the fuse repeats, switch off all the receivers
connected to the generator using switches and then disconnect
their cables from the generator sockets. Stop the generator and
wait for it to cool down. Make sure that the total rated power of
all connected electrical loads does not exceed the rated power
output of the power generator. Disconnect the electrical loads
as required. Check if the air intake and/or the air vents are
obstructed. Check the power generator’s vicinity for anything
which might obstruct the air intake / air vents.
After checking, press / adjust the fuses and then restart the
generator according to the start procedure.
CAUTION! The overload breaker may trip when switching on a
connected electrical load; most electrical power loads start with
a power consumption exceeding their ratings. If the electrical
power load is not defective, it might not be compatible with the
power generator’s output.
CAUTION! If a DC socket is used with AC sockets at the same
time, the power of the receiver connected to this socket should
also be taken into account when adding up the power.
Stopping the engine
Switch off the electrical load connected to the power generator.
Unplug the electrical load power cables from the power generator.
Turn the engine switch to the O - off position.
Wait until the engine stops.
Close the fuel supply valve by rotating it to “OFF”.
CAUTION! Should it be necessary to shut down the engine
immediately in the event of an emergency, move the engine
switch to the O - off position.
Operation at high altitude
The carburettor installed in the generator has been designed
for correct operation at an altitude not higher than specifi ed in
the technical data table. If you need to work at a higher altitude,
contact an authorized servicing centre to modify the carburet-
tor. Even after modifi cation of the carburettor, it is expected that
the power of the combustion engine will decrease, and conse-
quently the generator’s power will decrease by 3.5 % for every
300 meters of altitude increase above the limit given in the ta-
ble. The power drop will be greater when using a generator
without a modifi ed carburettor. The decrease in power is due to
the dilution of air as sea level altitude rises.
MAINTENANCE AND OVERHAUL
During the warranty period, the user cannot disassemble the
device or replace other assemblies or components than those
listed below, as this will invalidate the warranty. Any irregulari-
ties found during the check or the operation signal the need for
repair to be done at the servicing centre.
After work has been fi nished, clean the housing, ventilation
slots, switches, additional handle grip and guards using e.g. a
jet of air (pressure not more than 0.3 MPa), or a brush or dry
cloth without the use of chemicals or cleaning liquids. Clean the
tools and holders with a clean, dry cloth.
Scheduled Inspections
Periodic inspection and maintenance of the following generator
assemblies must be carried out.

18
GB
ORIGINAL INSTRUCTIONS
CAUTION! All maintenance must be carried out with the ma-
chine switched off and not running. It is also necessary to dis-
connect all electrical equipment from the generator.
CAUTION! If a service operation is not described below. This
means that the device must be serviced by a specialist servic-
ing point for this purpose.
CAUTION! Where solvent is used for cleaning, avoid contact of
the solvent with skin and eyes. Use personal protective equipment.
Compo-
nent Notes Before
each
start-up
After the
fi rst month
of opera-
tion or the
fi rst 20
hours of
operation
Every 3
months or
after 50
hours of
operation
Every 12
months or
after 100
hours of
operation
Engine
gearbox
oil level
Check X
Replace X X
Air fi lter Check X
Clean X X(*)
Spark plug
Cleaning.
Replace, if
neces-
sary.
X
Fuel fi ller
fi lter
Check.
Replace, if
neces-
sary.
X
Fuel
system
Check for
tightness
and
damage.
X
Replace Every two years
Removal
of carbon
deposits
Check
more fre-
quently if
necessary
X
Engine
Cleaning
and ad-
justment of
valves and
cylinders
Every 125
hours
(*) A higher frequency is recommended in case of use in dusty environments.
It is recommended to replace the fuel tank every three years.
If any leaks are detected in the fuel system, it is forbidden to
use the generator.
Maintenance of the air filter (III)
CAUTION! Do not operate the power generator without a cor-
rectly installed air fi lter or with a defective air fi lter. Otherwise
the combustion engine may aspirate impurities that would nor-
mally settle on the air fi lter. Impurities can lead to malfunctions
or, ultimately, cause a failure of the power generator.
Release the knob and remove the air fi lter cover. Remove the
fi lter and clean it in a non-fl ammable solvent, then thoroughly
squeeze out the solvent.
Soak the air fi lter with clean engine oil and squeeze it out so
that the fi lter remains slightly moist only.
Install the air fi lter in place and close the air fi lter cover with the knob.
Maintenance of the spark plug
Disconnect the cable from the spark plug.
Remove the spark plug with the spark plug wrench (XX).
Use a wire brush to clean carbon deposits off the electrodes
(so-called combustion deposits).
Check the distance between the electrodes from 0.7 mm to 0.8
mm. (XXI)
If burned electrodes or the ceramic casing is broken, replace
the spark plug with a new one.
Screw in the spark plug. Connect the cable to the spark plug.
Changing the engine oil
CAUTION! It is best to change the engine oil as soon as the
engine has come to a standstill. Then the oil is the thinnest and
will fl ow out of the engine gearbox the fastest.
Care must be taken when changing the oil. As soon as the en-
gine stops, the oil is hot and can cause burns.
Each oil tank has a drain opening. Place a container with a capac-
ity greater than that of the oil tank underneath the drain opening.
Unscrew the drain valve (XXIII) completely using a wrench. Al-
low the oil to fl ow into the tank and then screw in the drain valve
using a wrench. Wipe any oil residue dry.
Top up the oil according to the procedure described under
“Checking the oil level”.
CAUTION! Dispose of used motor oil in accordance with the
local regulations. It is forbidden to spill engine oil into the sewer
system.
Maintenance of the fuel filler filter
Remove the fuel fi ller cap. Take out the fuel fi ller fi lter. Clean the
fuel fi ller fi lter using extraction petrol. Dry with a soft, clean cloth.
Install the fi lter in the fi ller opening. Close the fuel fi ller cap.
CAUTION! The fi lter walls are made of fi ne mesh. Care must
be taken during maintenance to ensure that they are not dam-
aged. If the fi lter is damaged, replace it with a new one that is
free of damage before resuming operation.
Storage of the power generator
If you need to store the power generator for a short time (less
than 10 days), stop the engine, unplug all electrical loads, and
close the fuel supply valve.
If the power generator will be stored for more than 10 days,
follow the procedure below.
Move the engine switch to the O - off position.
Remove the fuel fi ller cap and drain fuel from the tank with a
suitable pump. Close the fuel fi ller cap.
Start the engine according to the procedure in “Start-up of the
combustion engine”.
Do not plug in any electrical loads. Let the engine running until
it stalls to stop without fuel. The running time will depend on
how much fuel remains in the fuel tank and the fuel supply lines.
Move the engine switch to the O - off position.
Close the fuel supply valve by rotating it to “OFF”.
Remove the spark plug from the cylinder. Add a table spoon of
engine oil through the empty spark plug port on the cylinder.
Use the engine oil with the viscosity listed in the product spec-
ifi cations table.
Screw in the spark plug. Pull the starter pull cord so that the
engine cranks through a few revolutions and the cylinder piston
is lubricated. Stop pulling the starter pull cord when you feel
the compression.
Regardless of the storage time, you should always:
Clean the outside of the generator with a soft cloth, brush or

19
ORIGINAL INSTRUCTIONS
GB
Spare parts
For a detailed list of spare parts for the appliance go to the
“Download” section in the Product tab on the TOYA SA website:
www.toya.pl.
compressed air jet at a pressure of 0.3 MPa or less. Pay par-
ticular attention to the permeability of the ventilation slots.
Store the generator in a horizontal position.
Store the generator in a dry, well-ventilated and covered room.
Transporting the generator
WARNING! The generator must always be transported with the
combustion engine stopped and the consumers disconnected.
For short distances, e.g. when moving the generator at the point
of use, the generator must be transported holding it by the frame.
Be careful not to swing or tilt the generator to spill fuel. The
generator may be hot, stay cautious to avoid burns.
For longer transport distances, the generator must be prepared
for transport according to the procedure described under “Stor-
age of the generator”. The generator must be transported in a
horizontal position. Secure the machine with belts to prevent it
from tipping over during transport.
ENVIRONMENTAL PROTECTION
Correct disposal of this product: This marking shown on
the product and its literature indicates this kind of product
mustn’t be disposed with household wastes at the end of its wor-
king life in order to prevent possible harm to the environment or
human health. Therefore the customers is invited to supply to the
correct disposal, diff erentiating this product from other types of
refusals and recycle it in responsible way, in order to re - use this
components. The customer therefore is invited to contact the lo-
cal supplier offi ce for the relative information to the diff erentiated
collection and the recycling of this type of product.
TECHNICAL PARAMETERS
Generator type YT-85460
Parameter Measure Unit Value
ELECTRIC GENERATOR
Rated voltage
[V] A.C. 230
[V] A. C. 400 (3P/N/PE)
[V] D.C. 12
Rated frequency [Hz] 50
Generator rated power COP [W] 4250
Maximum power (S2 5 min) [W] 5500
Power factor 1.0
Rated current (A.C.) [A] 5.2
Rated current (D.C.) [A] 8.3
Electric insulation class I
Degree of protection of the housing (IP) IP23M
Performance class G1
Quality class A
MECHANICAL ENGINE
Type CP188F
Number of cylinders 1
Number of strokes 4
Fuel type Unleaded petrol
Type of oil [SAE] 10W-40
Fuel consumption (at 75% load) [l/h] 4.27
Engine capacity [cm3] 389
Rated power [kW] 7.5
Rated speed [min-1] 3600
Idling speed revolutions [min-1] 1800 ± 100
Cooling Air cooling
Compression stage 8.5:1
Fuel tank capacity [l] 25
Oil tank capacity [l] 1.1
Spark plug type F7RTC
DEVICE
Overall dimensions [mm] 680 x 510 x 540
Weight [kg] 85
Operating temperature range [OC] 0 ÷ +40
Maximum operating altitude [metres above the sea level] 1000
Noise level
Sound pressure LpA±K [dB(A)] 75,0±2,62
Sound power LwA±K [dB(A)] 93.7±2.62

20 ORIGINALANLEITUNG
D
ne andere Stromquelle bestimmt. Es ist streng verboten, den
Stromgenerator am allgemeinen Elektronetz 230 V / 50 Hz an-
zuschließen.
Der Stromschlagschutz hängt von der Funktion der speziell für
den Stromgenerator bestimmten Sicherung ab. Muss die Si-
cherung gewechselt werden, darf nur eine Sicherung mit iden-
tischen Nennparametern und der Funktionskennlinie installiert
werden.
Aufgrund hoher mechanischer Spannungen sind nur fl exible
Kabel mit beständiger Gummiisolierung nach IEC 60245-4 oder
gleichwertige zu verwenden.
Müssen Verlängerungskabel verwendet werden, ist es darauf
zu achten, dass sie für den Einsatz außerhalb geschlossener
Räume geeignet sind. Der Wirkwiderstand der Verlängerungs-
kabel darf 1,5 Ω nicht überschreiten. Die Gesamtlänge des
Verlängerungskabels darf 60 m beim Kabelquerschnitt von 1,5
mm2 und 100 m beim Kabelquerschnitt von 2,5 mm2 nicht über-
schreiten.
Für den Stromgenerator ist eine Erdung erforderlich, wenn zu
erdende Elektrogeräte am Gerät angeschlossen werden. Der-
artige Elektrogeräte sind mit einer Schutzleitung ausgerüstet.
Die Erdung ist von einem Fachelektriker gemäß den Erdungs-
vorschriften für Elektrogeräte vor Ort anzuschließen.
Warnung! Der Einsatzort des Stromgenerators kann den Be-
schränkungen je nach den Gegebenheiten vor Ort unterliegen.
Die Vorschriften für die elektrische Sicherheit vor Ort sind beim
Stromgeneratoreinsatz zu beachten.
Warnung! Vom Betreiben sind Sicherheitsanforderungen und
-maßnahmen zu beachten, wenn der Stromgenerator mit Ins-
tallationen erweitert wird, die von ihren Schutzmaßnahmen und
den geltenden Vorschriften abhängig sind.
Stromgenerator nicht überlasten. Die Stromaufnahme über-
schreitet bei der Inbetriebnahme der meisten Elektrogeräte ihre
Nennleistung. Der Stromgenerator ist nicht für die Stromver-
sorgung von Schweißmaschinen bestimmt.
Die Leistung, die die Nennleistung des Stromgenerators, nicht
aber seine Maximalleistung überschreitet, darf maximal 5 Mi-
nuten im Kurzzeitbetrieb S2 verwendet werden. D.h. nach dem
Kurzzeitbetrieb von 5 Minuten ist der Stromgenerator still zu
setzen und vollständig abkühlen zu lassen. Überschreitet die
vom Stromgenerator gelieferte Leistung seine Nennleistung
nicht, kann er im Dauerbetrieb S1 betrieben werden.
Am Stromanschluss des Stromgenerators angeschlossene
Gabelschaltungen sollten nicht verwendet werden. Ist es trotz-
dem erforderlich, ist die Leistung aller am Stromgenerator an-
geschlossenen Stromverbrauchern zu summieren und diese
Leistungssumme darf die Nennleistung des Stromgenerators
nicht überschreiten.
Betriebssicherheit
Der Stromgenerator ist auf einem ebenen, tragfähigen und
stabilen Untergrund aufzustellen. Es ist für einen Freiraum von
mindestens 1 m um den laufenden Stromgenerator herum zu
sorgen.
Der Stromgenerator muss seine Nenndrehzahl vor Anschluss
eines Stromverbrauchers erreichen. Vor Außerbetriebnahme
des Stromgenerators ist der angeschlossene Stromverbrau-
cher abzuschalten. Weist dieser bewegliche Teile auf, ist auf
ihren vollständigen Stillstand zu warten. Anschließend Stecker
des Stromkabels dieses Stromverbrauchers ziehen.
Maximale Motordrehzahl auf keinen Fall überschreiten. Sonst
GERÄTEBESCHREIBUNG
Der Stromgenerator ist ein elektromechanisches Gerät, um
die mechanische Energie in die elektrische umzuwandeln. Der
Stromgenerator besteht aus zwei zusammenwirkenden Haupt-
komponenten: dem Kraftmotor und dem Generator. Der fehler-
freie, sichere und zuverlässige Betrieb des Gerätes hängt von
seinem korrekten Gebrauch ab, deshalb:
Bedienungsanleitung vor Erstgebrauch gründlich lesen
und für künftigen Gebrauch aufbewahren.
Der Lieferant haftet nicht für jegliche Schäden und Verletzun-
gen infolge des bestimmungsfremden Produktgebrauches, die
Nichtbeachtung der Sicherheitsvorschriften und der Bestim-
mungen dieser Bedienungsanleitung.
ZUBEHÖR
Der Stromgenerator wird komplett zusammengebaut überge-
ben und benötigt keine Montageeingriff e. Der Gerätemotor ist
mit einer, für die Motorwartung erforderlichen Ölmenge befüllt.
ACHTUNG! Motorenöl vor Erstinbetriebnahme des Gerätes
nachfüllen. Im Zubehör des Stromgenerators ist der Zündker-
zenschlüssel enthalten.
SICHERHEITSHINWEISE
Allgemeine Sicherheitshinweise
Kinder fern vom Stromgenerator halten.
Symbole auf dem Stromgenerator und Inhalt der Warnaufkle-
ber vor Erstinbetriebnahme zur Kenntnis nehmen.
Der Kraftstoff ist leicht entzündlich und daher explosionsfähig.
Kraftstoff beim Gerätebetrieb sowie in der Nähe off ener Flam-
me nicht nachfüllen. Beim Kraftstoff nachfüllen nicht rauchen.
Kraftstoff nicht verschütten.
Die Kraftstoff dämpfe sind gefährlich, daher Kraftstoff nur an gut
gelüfteten Plätzen vorbereiten und nachfüllen.
Einige Kraftmotorteile werden beim Betrieb heiß und können
Verbrühungen herbeiführen. Warnaufkleber auf dem Stromge-
nerator beachten.
Stromgenerator nur an den dazu bestimmten Haltegriff en ver-
tragen. Geräteoberfl ächen, die beim Betrieb heiß werden, nicht
berühren, sonst sind Verbrühungen nicht auszuschließen.
Die Abgase sind giftig. Stromgenerator nur in entsprechend
gelüfteten Räumen einsetzen. Wird der Stromgenerator in gut
gelüfteten Räumen eingesetzt, sind zusätzliche Vorbeuge-
maßnahmen gegen Brand und Explosion zu ergreifen. Wird
der Stromgenerator im Freien eingesetzt, darf er nicht an den
Türen, Fenstern oder Luftansaugvorrichtungen aufgestellt wer-
den. Sonst können die Angase in die Räumlichkeiten eindrin-
gen und Gefahren herbeiführen.
Symbole auf dem Stromgenerator und Inhalt der Warnaufkle-
ber zur Kenntnis nehmen und ihre Bedeutung in der Bedie-
nungsanleitung nachprüfen.
Elektrische Sicherheit
Stromgenerator und seine Elektroausrüstung (inklusive den
Steckern und Kabeln) vor Erstgebrauch prüfen und sicherstel-
len, dass sie nicht beschädigt sind.
Der Stromgenerator ist nicht für den Anschluss an irgendei-
Table of contents
Languages:
Other YATO Portable Generator manuals
Popular Portable Generator manuals by other brands

B+K precision
B+K precision 4060B Series user manual

AimTTi
AimTTi TG120 instruction manual

Securitytronix
Securitytronix ST-PBX18/24AC-PTC installation manual

Ribimex
Ribimex PRGE3150 User and maintenance manual

Keysight Technologies
Keysight Technologies M8190A Configuration guide

Yanmar
Yanmar Mase I.S. 6.5 installation manual