Yealink UVC86 User manual

Video Conferencing Camera
UVC86
Quick Start Guide (V1.0)
English | 简体中文 | Deutsch | Français | Español
Yealink Documentation
support.yealink.com

1
Package Contents
UVC86 7m
USB Cable
7.5m
Ethernet Cable Power Adapter
48V/0.7A
VCR20
Remote Control
AAA
Battery×2 Cable Tie× 5
Velcro
(on the bracket) Mounting Bracket
and Accessories Quick Start Guide
1. The USB cable in the UVC86 single-product package is 7m, and 2.5m in the UVC86 bundle package.
2. Before you begin, please use Yealink Room Connect software for lens calibration.
2. We recommend that you use the accessories provided or approved by Yealink. The use of unapproved
third-party accessories may result in poor performance.
UVC86 Installation
• Mount on top of a display
Choose the following installation method when the thickness of the TV is between 0mm and 50mm.
Pay attention to the direction
of the bracket.
• Put on a Flat Surface
You can put the UVC86 on the conference table, and make sure that the angle of inclination of the UVC86
is not more than 5 degrees to ensure proper operation.
X 4
X 4
X 5
E
N
G
L
I
S
H

2
66mm
100mm
• Mount on the Wall
Hole depth: 30mm
Hole diameter: 6mm
Screw specication: T4×30
Screw specication:
1/4'' -20 UNC
3M Velcro
Choose the following installation method when the thickness of the TV is between 50mm and 150mm.
The recommended height is 1.55m-1.85m above the ground.
Expansion screw
E
N
G
L
I
S
H
E
N
G
L
I
S
H

3
• Mount on the Ceiling
• Mount onto a TV Mount2
Screw specication: T4×30
You need to purchase a TV Mount2 separately.
180°
Screw specication: M3×8
Screw specication:
1/4'' -20 UNC
Screw specication:
1/4'' -20 UNC
Screw specication:
1/4'' -20 UNC
Screw specication:
1/4'' -20 UNC
E
N
G
L
I
S
H

4
Hardware Interface Instructions
No. Item Description
1 VCH Port
In MVC system, connect to audio device (for example: VCM34).
In video conference system, connect to the endpoint (for example:
MeetingEye 800).
2 DC48V Connect to the power adapter.
3 PC Port Connect to a PC as video output.
4 HDMI out In video conference system, connect for sharing content or camera
image.
5 Line in Connect to an audio input device using an audio cable (3.5mm).
6 Reset Reset the UVC86 to factory defaults.
7Security
slot
Connect a universal security cable to the UVC86 so that you can lock
the UVC86 down.
E
N
G
L
I
S
H

5
VCH3 VCH2 VCH1 Display3Display2Display1Internet
5V
DC 48V
Line in Line out Video in
UVC86 UVC86 UVC86 UVC86
LED Indicator Instructions
LED indicators on the UVC86:
LED Status Description
Off The UVC86 is powered off.
Solid green The UVC86 is active.
Solid red The UVC86 is in sleep mode.
Flashing orange The UVC86 is upgrading rmware.
Flashing red The UVC86 is in recovery mode.
• Connect to the video conference system:
MeetingEye 800
UVC86 Connection
USB
cable
Cat5e
• Connect to PC:
Internet
IEEE 802.3af compliant
PoE Switch
E
N
G
L
I
S
H
E
N
G
L
I
S
H

6
VCR20 Remote Control Instructions
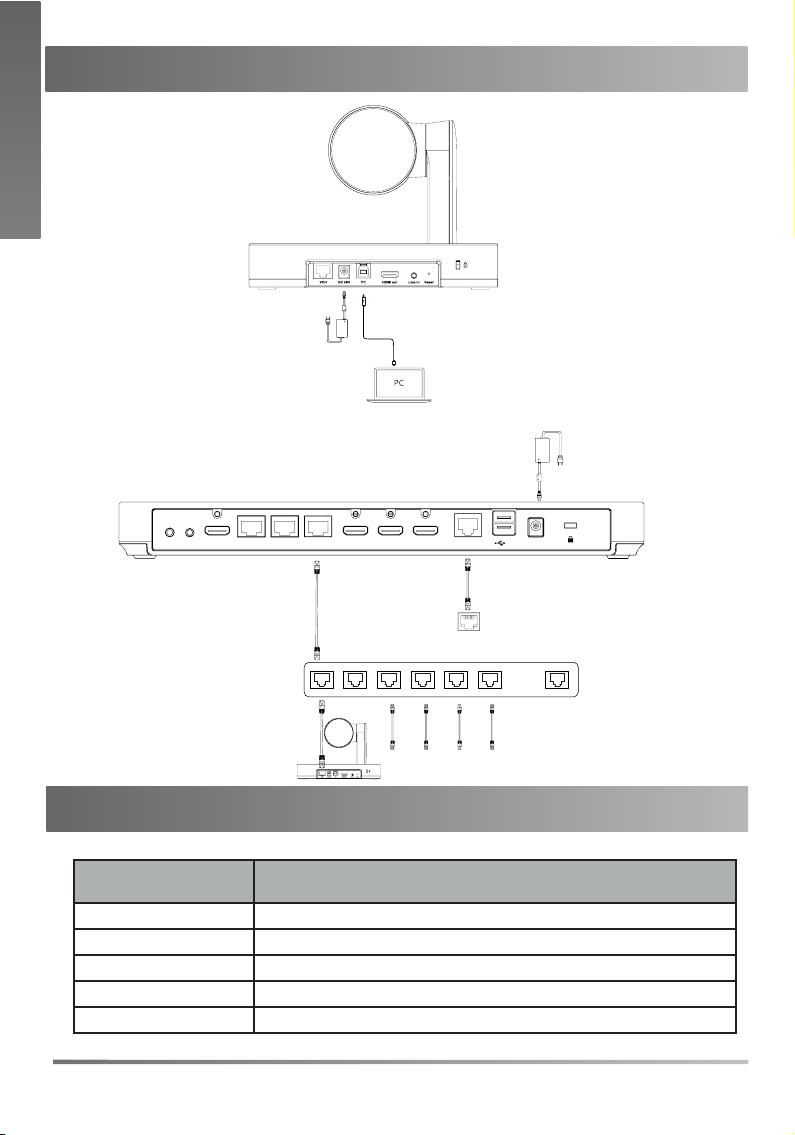
Upgrade the Firmware
No. Item Description
1Tracking
Mode Key
Long press the Tracking Mode key to switch among the auto framing, the
speaker tracking, or off.
2 Mute Key Mute or unmute the microphone.
3Navigation
Key Pan and tilt the camera to adjust the viewing angle.
4Scroll
Wheel
• Scroll up to zoom camera in.
• Scroll down to zoom camera out.
5Preset
Key
• Long press the number key to add/update the preset position.
• Short press the number key to apply the preset position.
6Volume
Key Adjust the volume.
• Use Yealink Room Connect/USB Connect software to upgarde the rmware
after connecting to the PC.
• In MVC system: The UVC86 can be automatically upgraded via windows
update by default. Otherwise, you should enable automatically windows update
or upgrade the devices manually.
• In video conference system: Upgrade it through the web user interface of
endpoint after UVC86 is connected to the endpoint.
For more information about how to upgrade the firmware, please refer to the
upgrading document.
E
N
G
L
I
S
H

7
包装清单
UVC86 7米
USB 线
7.5 米
以太网线 电源适配器
48V/0.7A
VCR20
遥控器
7 号电池 ×2 束线带 ×5
魔术贴
(已粘在挂架上) 支架配件 快速入门指南
1. UVC86 单品包材中标配的 USB 线为 7 米,在组合包中为 2.5 米。
2. 开始使用之前,请使用亿联 Room Connect 进行镜头校准。
3. 我们推荐使用由亿联提供或经亿联认可的配件。使用未经认可的第三方配件可能会导致性能的下降。
安装 UVC86
• 挂装
当电视厚度范围为 0-50mm 时,进行以下步骤:
注意支架方向
• 平放安装
将终端摆放在水平桌面。如果桌面略有倾斜,请保证倾斜角小于 5°,以保证终端的摄像机云台正常运转。
X 4
X 4
X 5
E
N
G
L
I
S
H
简
体
中
文

8
66mm
100mm
• 墙装
打孔深度:30mm
打孔直径:6mm
螺丝规格:T4×30
螺丝规格:1/4''-
20UNC
魔术贴
当电视厚度范围为 50-150mm 时,进行以下步骤:
建议安装高度为距地面 1.55m-1.85m。
膨胀螺丝
简
体
中
文

9
• 吊装
• 安装至电视挂架
螺丝规格:T4×30
用户可以自行选购电视架。
180°
螺丝规格:M3×8
螺丝规格:1/4''-
20UNC
螺丝规格:1/4''-
20UNC
螺丝规格:1/4''-
20UNC
螺丝规格:1/4''-
20UNC
简
体
中
文

10
硬件介绍
编
号项 功能说明
1VCH 口 在 MVC 会议室系统中,连接音频设备(例如:VCM34)。
在视频会议系统中,连接终端(例如:MeetingEye 800)。
2 电源接口 连接电源适配器。
3 PC 口 连接电脑作为视频输出。
4 HDMI 输出 在视频会议系统中,连接显示器进行辅流或投屏摄像机画面。
5音频线性输
入连接 3.5mm 音频接头,将 UVC86 作为音频输出设备。
6 重置 重置设备到出厂设置。
7 安全锁孔 将主机锁在固定位置。
简
体
中
文

11
VCH3 VCH2 VCH1 Display3Display2Display1Internet
5V
DC 48V
Line in Line out Video in
UVC86 UVC86 UVC86 UVC86
指示灯介绍
UVC86 指示灯介绍如下 :
指示灯状态 功能说明
灭 UVC86 没有正确连接到 PC 上或未处于正常工作状态。
绿色常亮 UVC86 处于正常工作状态。
红色常亮 UVC86 处于休眠状态。
橙色闪烁 UVC86 固件更新中。
红色闪烁 UVC86 处于恢复模式。
• 连接会议电视终端
MeetingEye 800
UVC86连接
USB 线
Cat5e
• 连接电脑
网口
支持 IEEE 802.3af/ac 协议
PoE Switch
简
体
中
文

12
VCR20遥控器
固件升级
编
号项 功能说明
1 智能取景键 长按智能取景按键时,可切换智能取景模式(在自动框⼈像,语音追踪与关闭
之间依次切换)。
2 静音键 将麦克风静音或取消静音。
3 导航键 调节摄像机的取景范围。
4 滚轮 向上滑动放⼤摄像机画面。
向下滑动放⼤摄像机画面。
5 预置位 长按数字键,新增 / 更新预设置位。
短按数字键,应用预设置位。
6 音量调节键 调节音量。
1. 将 UVC86 连接至电脑后,使用亿联 Room Connect/USB Connect 软件升级固件。
2. 在 MVC 系统中:UVC86 在默认情况下可以通过 windows 自动更新升级。如果设备
软件没有自动升级,你可以启用自动 windows 自动更新或手动升级设备。
3. 在视频会议系统中 : 将 UVC86 通过 VCH 口与终端连接后,在终端的网页界面中升
级 UVC86 的固件。
更多关于如何升级固件的信息,请参考升级文档。
简
体
中
文

13
Lieferumfang
UVC86 7m
USB-Kabel
7,5m
Ethernet-Kabel Netzgerät
(48V/0,7A)
VCR20
Fernbedienung
AAA
Batterie×2 Kabelbinder×5
Klettband
(an der Halterung) Wandhalterung und
Zubehör Kurzanleitung
1. Das USB-Kabel im UVC86-Einzelproduktpaket ist 7 m lang und 2,5 m im UVC86-Bundlepaket.
2. Bevor Sie beginnen, verwenden Sie bitte Yealink Room Connect für die Objektivkalibrierung.
3. Wir empfehlen die Verwendung von Zubehör, das von Yealink entweder geliefert oder empfohlen wird.
Die Verwendung von nicht zugelassenem Zubehör von Drittanbietern kann zu Leistungseinbußen führen.
UVC86-Installation
• Montage auf einem Display
Wählen Sie die folgende Installationsmethode, wenn der Fernseher zwischen 0 mm und 50 mm dick ist.
Achten Sie auf die Richtung
der Halterung.
• Aufstellung auf einer achen Oberäche
Sie können die UVC86 auf einen Tisch im Konferenzraum stellen. Vergewissern Sie sich, dass die
Neigung nicht mehr als 5 Grad beträgt, damit das System korrekt funktioniert.
X 4
X 4
X 5
D
E
U
T
S
C
H

14
66mm
100mm
• Montieren an der Wand
Lochtiefe: 30mm
Lochdurchmesser: 6mm
Schraube: T4×30
Schraube: 1/4'' -20
UNC
3M Velcro
Wählen Sie die folgende Installationsmethode, wenn der Fernseher zwischen 50mm und 150mm dick ist.
Es wird eine Höhe von 1,55m-1,85m über dem Boden empfohlen.
Dehnschraube
D
E
U
T
S
C
H

15
• Montage an Decke
• Montage auf einem TV Mount2
Schraube: T4×30
Sie müssen einen TV Mount2 separat erwerben.
180°
Schraube: M3×8
Schraube: 1/4'' -20
UNC
Schraube: 1/4'' -20
UNC
Schraube: 1/4'' -20
UNC
Schraube: 1/4'' -20
UNC
D
E
U
T
S
C
H
D
E
U
T
S
C
H

16
Anleitung für die Hardware-Schnittstelle
Nr. Artikel Beschreibung
1 VCH Port
Im MVC-System mit dem Audiogerät verbinden (z. B.: VCM34).
Im Videokonferenzsystem mit dem Endpunkt verbinden (z. B.:
MeetingEye 800).
2 DC48V Anschluss an das Netzteil.
3 PC Port Verbindung mit einem PC als Video-Ausgang.
4 HDMI out Im Videokonferenzsystem, verbunden für Inhaltsfreigabe oder
Kamerabildern.
5 Line in Anschluss eines 3,5 mm-Audiosteckers zur Verwendung des UVC86
als Audio-Ausgabegerät.
6 Reset Rücksetzen des UVC86 auf Werkseinstelllungen.
7Sicherheits-
steckplatz
Schließen Sie ein universelles Sicherheitskabel an den UVC86 an,
damit Sie den UVC86 sperren können.
D
E
U
T
S
C
H

17
VCH3 VCH2 VCH1 Display3Display2Display1Internet
5V
DC 48V
Line in Line out Video in
UVC86 UVC86 UVC86 UVC86
LED-Anzeige
LED-Anzeigen am UVC86:
LED-Status Beschreibung
Aus Die UVC86 ist ausgeschaltet.
Dauerhaft grün Die UVC86 ist aktiv.
Dauerhaft rot Die UVC86 ist im Sleep-Modus
Blinkt orange Der UVC86 aktualisiert die Firmware.
Blinkt rot Der UVC86 ist im Recovery-Modus.
• Mit dem Videokonferenzsystem verbinden:
MeetingEye 800
Verbinden des UVC86
USB-Kabel
Cat5e
• Verbinden mit PC:
Internet
PoE-Switch entspricht
IEEE 802.3af
D
E
U
T
S
C
H
D
E
U
T
S
C
H

18
Anleitung VCR20 Fernbedienung
Firmware aktualisieren
Nr. Artikel Beschreibung
1Taste Tracking-
Modus
Drücken Sie lange auf die Taste Tracking-Modus, um zwischen
automatischer Bildeinstellung und Sprecher-Tracking zu wechseln oder
das Gerät auszuschalten.
2 Stummtaste Schalten Sie das Mikrofon stumm oder heben Sie die Stummschaltung
auf.
3Navigations-
tasten
Schwenken und neigen Sie die Kamera, um den Betrachtungswinkel
einzustellen.
4 Scrollrad • Scrollen Sie nach oben, um mit der Kamera herein zu zoomen.
• Scrollen Sie nach unten, um mit der Kamera heraus zu zoomen.
5Taste
Voreinstellung
• Drücken Sie lange auf die Zifferntasten, um die voreingestellte Position
hinzuzufügen / zu aktualisieren.
• Drücken Sie kurz auf die Zifferntasten, um die voreingestellte Position zu
übernehmen.
6 Lautstärketaste Stellen Sie die Lautstärke ein.
• Verwenden Sie die Software Yealink Room Connect/USB Connect, um die
Firmware nach dem Anschließen an den PC zu aktualisieren.
• Im MVC-System: Das UVC86 kann über ein Windows-Update automatisch
aktualisiert werden. Anderenfalls sollten Sie das automatische Windows-
Update aktivieren oder die Geräte manuell aktualisieren.
• Im Videokonferenzsystem: Aktualisieren Sie die Firmware über die Web-
Benutzeroberäche des Endpunkts, nachdem die UVC86 mit dem Endpunkt
verbunden wurde.
Weitere Informationen zur Aktualisierung der Firmware finden Sie im
Aktualisierungsdokument.
D
E
U
T
S
C
H

19
Contenu de l'emballage
UVC86 7m
Câble USB
7,5m
Câble Ethernet Adaptateur secteur
(48V/0,7A)
Télécommande
VCR20
Pile AAA ×2 Serre-câbles ×5
Velcro
(sur le support) Support muralet
accessoires Guide de démarrage
rapide
1. Le câble USB dans l'emballage mono-produit UVC86 est de 7 m et de 2,5 m dans l'emballage groupé UVC86.
2. Avant de commencer, veuillez utiliser Yealink Room Connect pour l'étalonnage de l'objectif.
3. Nous vous recommandons d’utiliser les accessoires fournis et approuvés par Yealink. L’utilisation d’accessoires
tiers est susceptible de réduire les performances de l’appareil.
Installation de l'UVC86
• Montage sur le dessus d’un écran
Choisissez la méthode d’installation suivante lorsque l’épaisseur du téléviseur se situe entre 0 et 50 mm.
Faites attention au sens du
support.
• Placement sur une surface plane
Vous pouvez placer l’UVC86 sur la table de conférence, en vous assurant que son angle d’inclinaison est
inférieur à 5 degrés pour qu’il fonctionne correctement.
X 4
X 4
X 5
F
R
A
N
Ç
A
I
S
Table of contents
Languages:
Other Yealink IP Camera manuals