Yenkee YMS 3400 User manual

Programmable Gaming RGB Mouse

EN Programmable Gaming RGB Mouse USER´S MANUAL
CZ Programovatelná herní myš RGB NÁVOD K OBSLUZE
SK Programovateľná herná myš RGB NÁVOD NA OBSLUHU
PL Programowalna mysz do gier RGB INSTRUKCJA OBSŁUGI
HU Programozható RGB gamer egér HASZNÁLATI ÚTMUTATÓ
RS Programabilan RGB miš za igranje UPUTSTVO ZA UPOTREBU
HR Programibilni RGB miš za igrače KORISNIČKI PRIRUČNIK
ΕΛ Προγραμματιζόμενο ποντίκι Gaming RGB ΕΓΧΕΙΡΙΔΙΟ ΧΡΗΣΤΗ
YMS 3400

USER´S MANUAL
EN
• Connect the mouse to the USB port on your computer using the USB connector.
• Wait until your OS detects the mouse and automatically install the necessary drivers for proper functionality.
• After your operating system displays a message confirming successful installation, you can use the mouse freely
1 5
2 6
3 7
4 8
Left button
Right button Front top button
DPI +
Wheel Rear top button
DPI -
Front side button
Navigate forward Centre side button
Triple click
Rear side button
Navigate backward

USER´S MANUAL
EN
To use all mouse functions, download the control program from the official website www.yenkee.com.
You can find it under the product of the same name in the Specifications section.
1. Download the program.
2. Wait for the download to finish and open the file.
3. Double-click the executable .exe file to start the installer.
4. Follow the on-screen instructions to complete the installation.
5. Run the program.
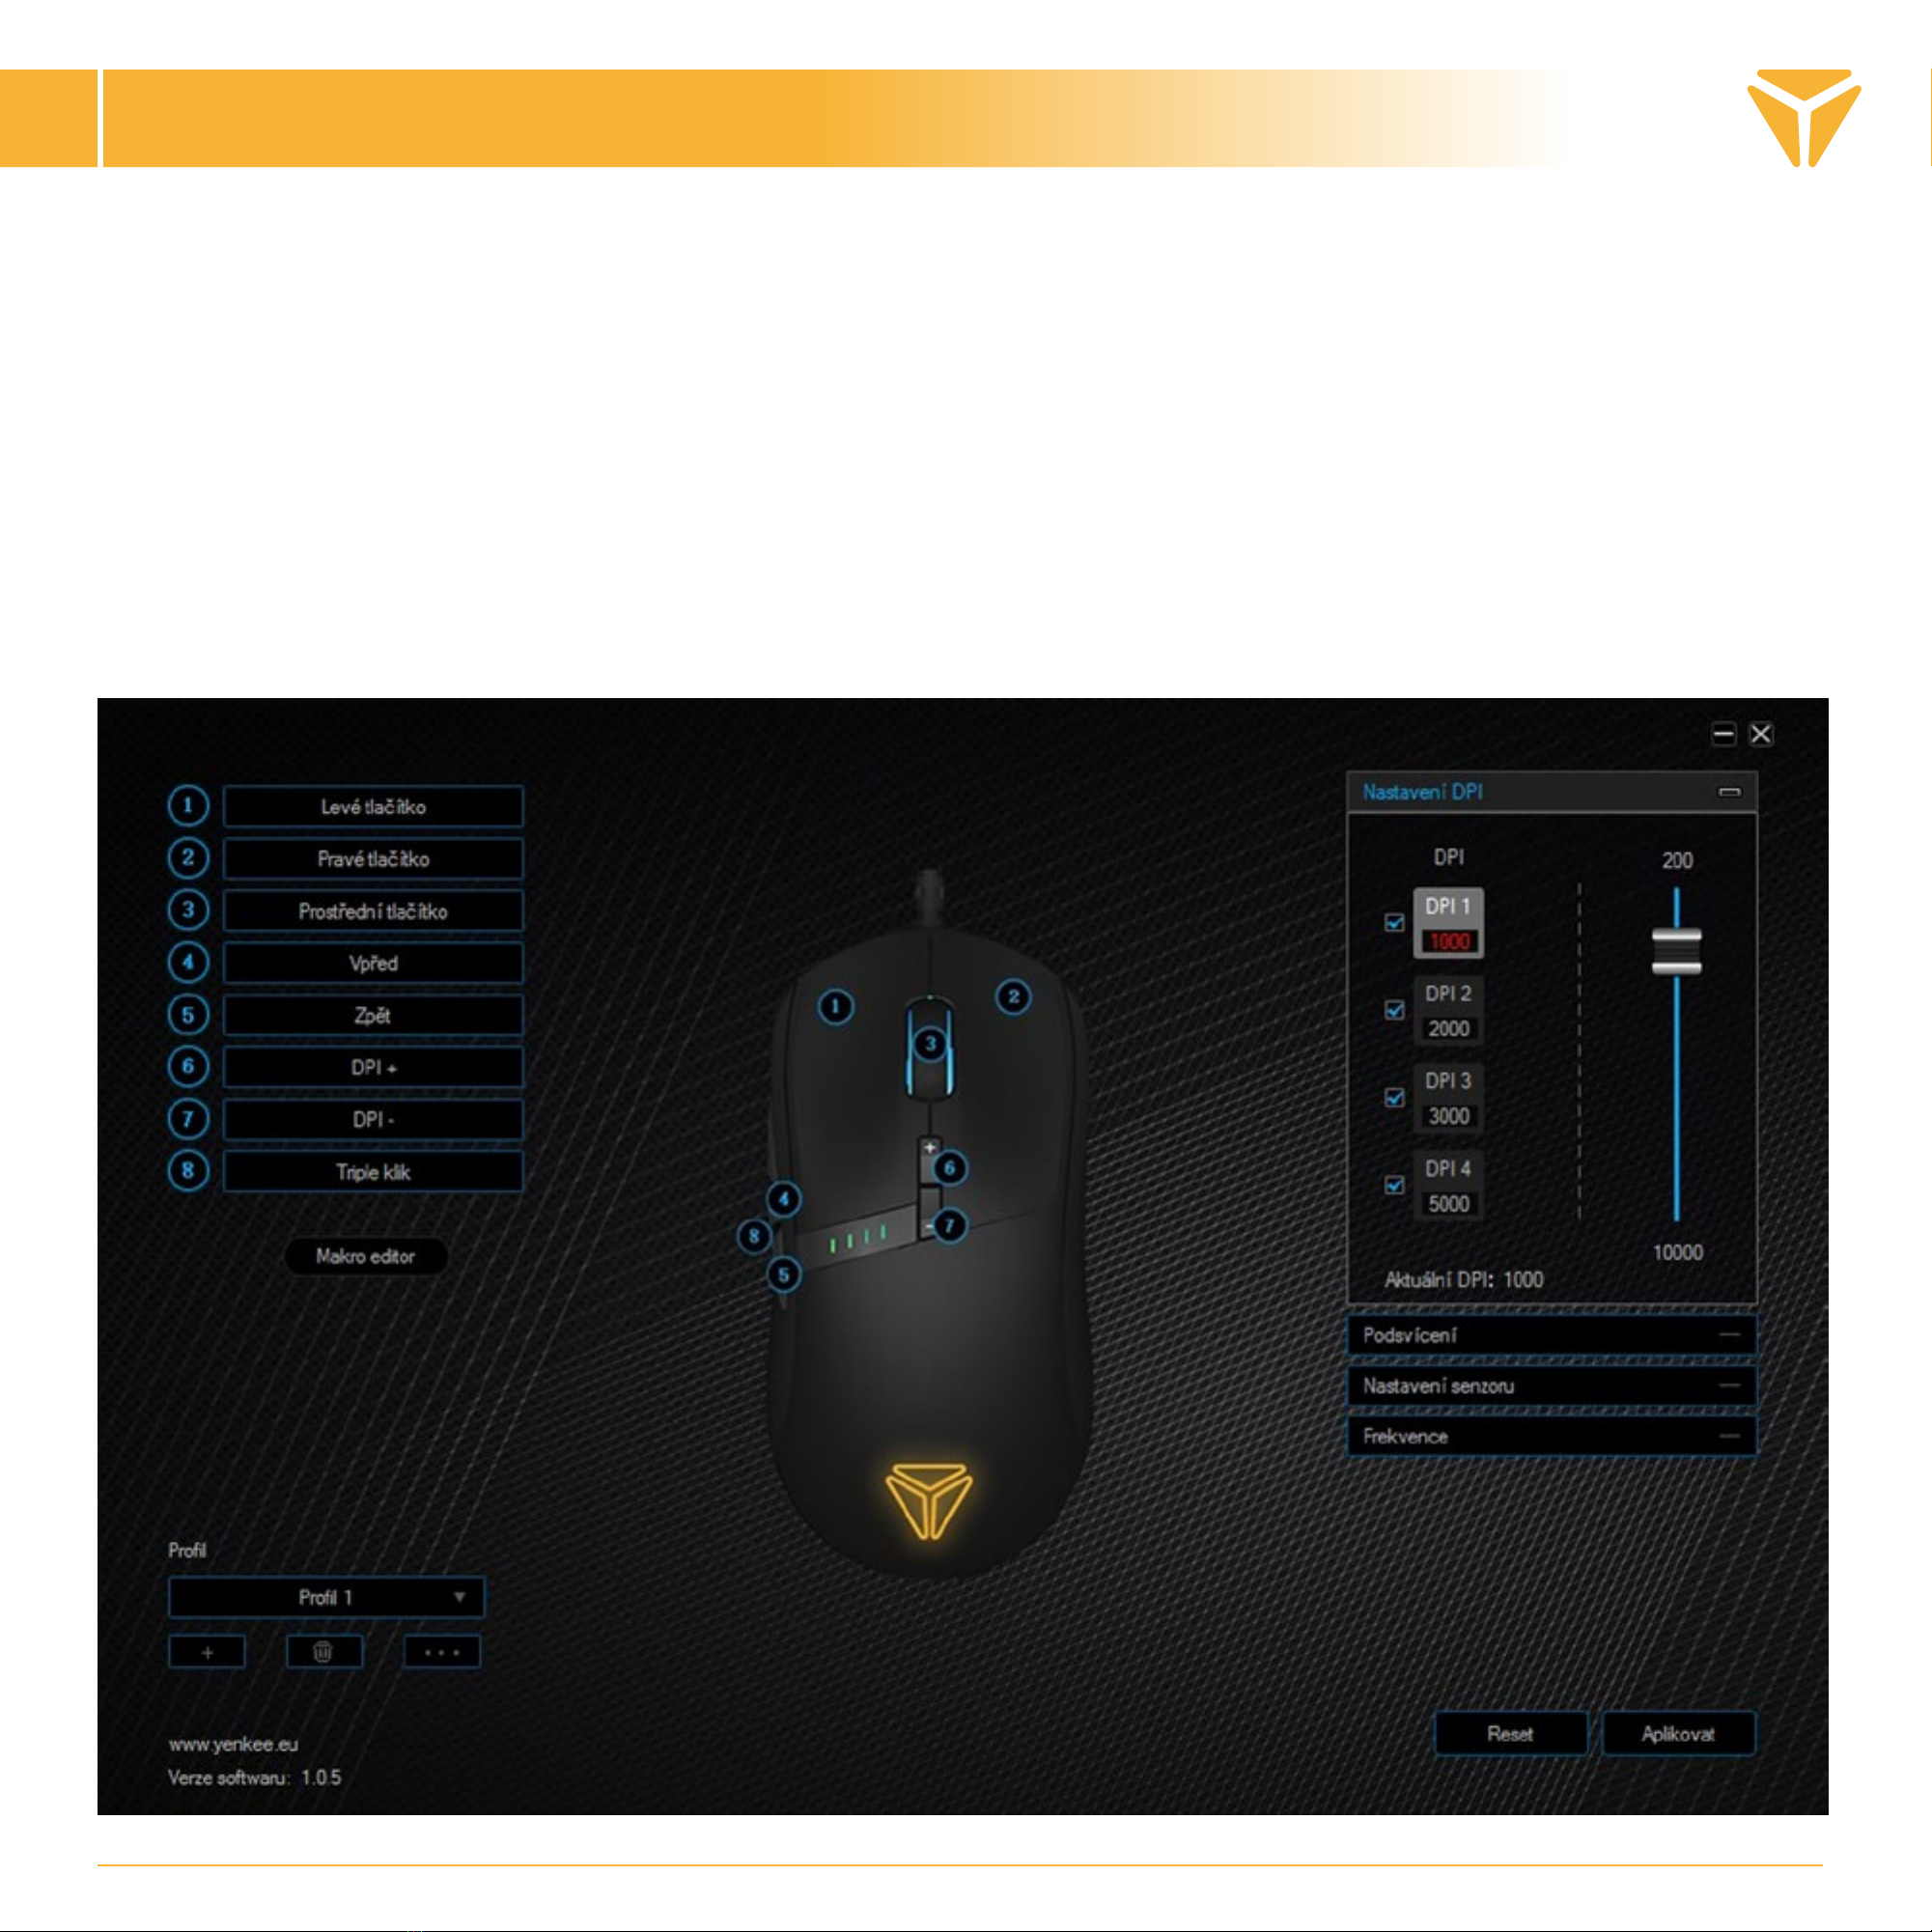
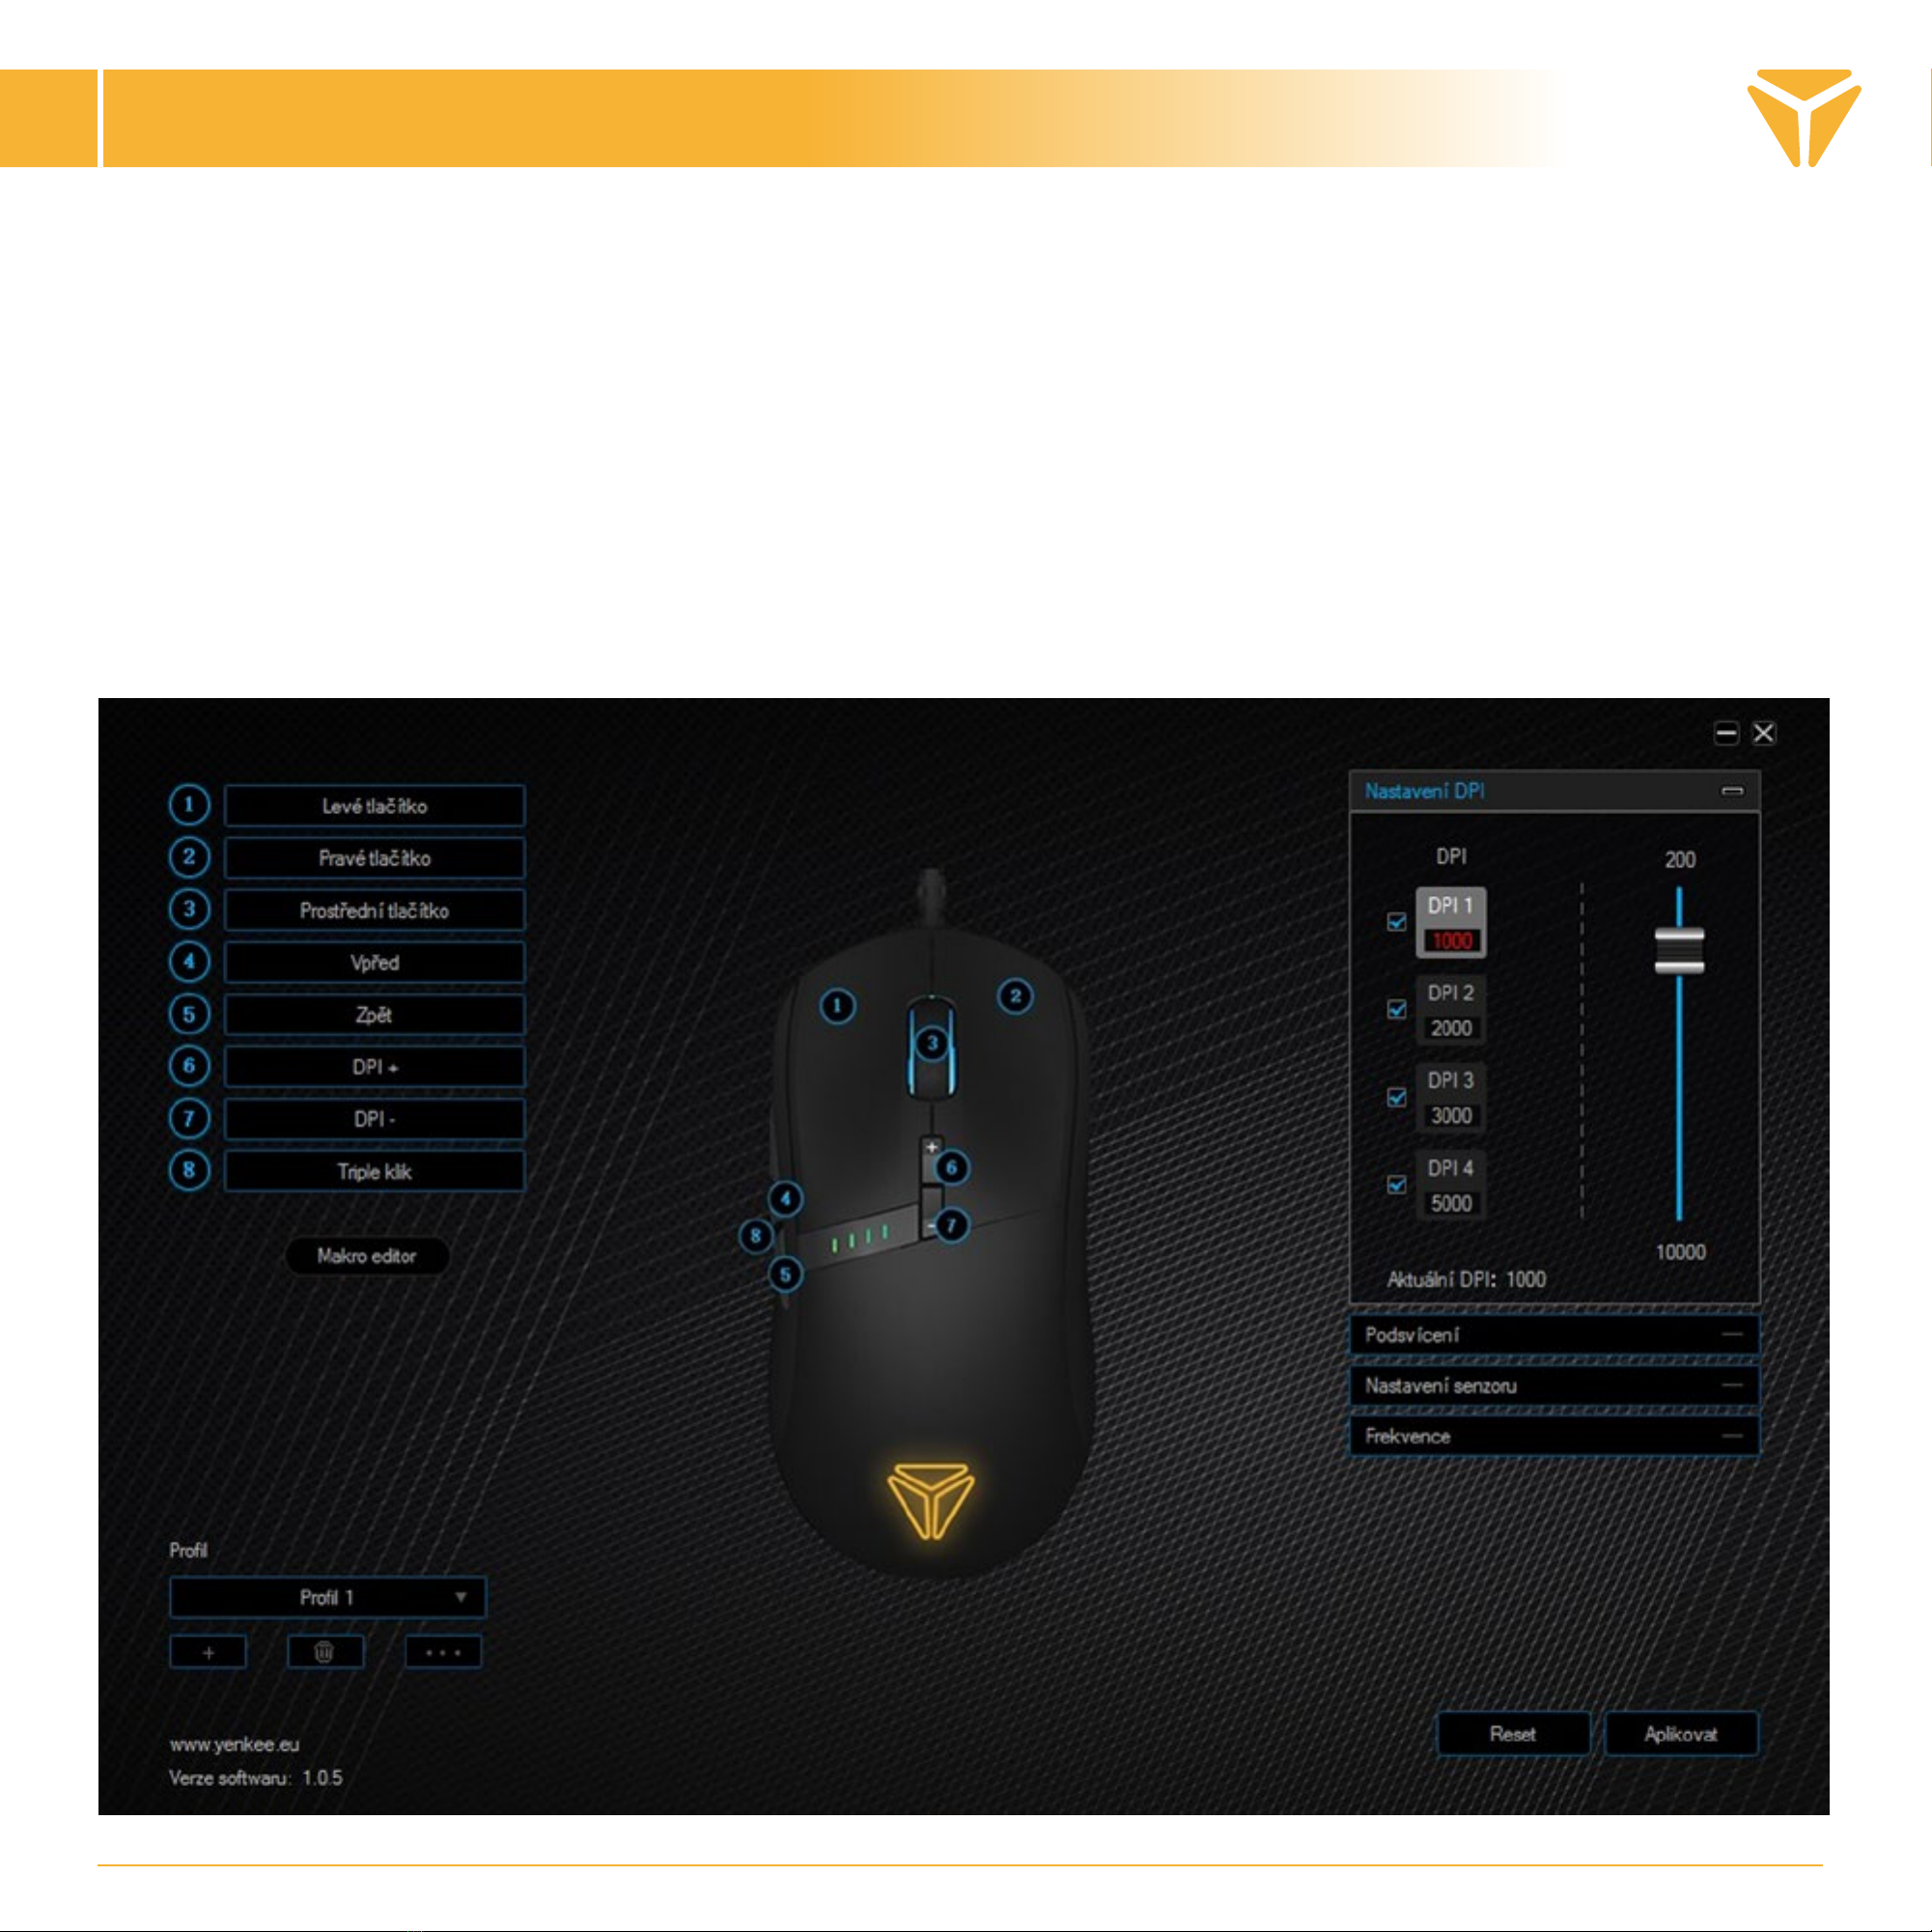
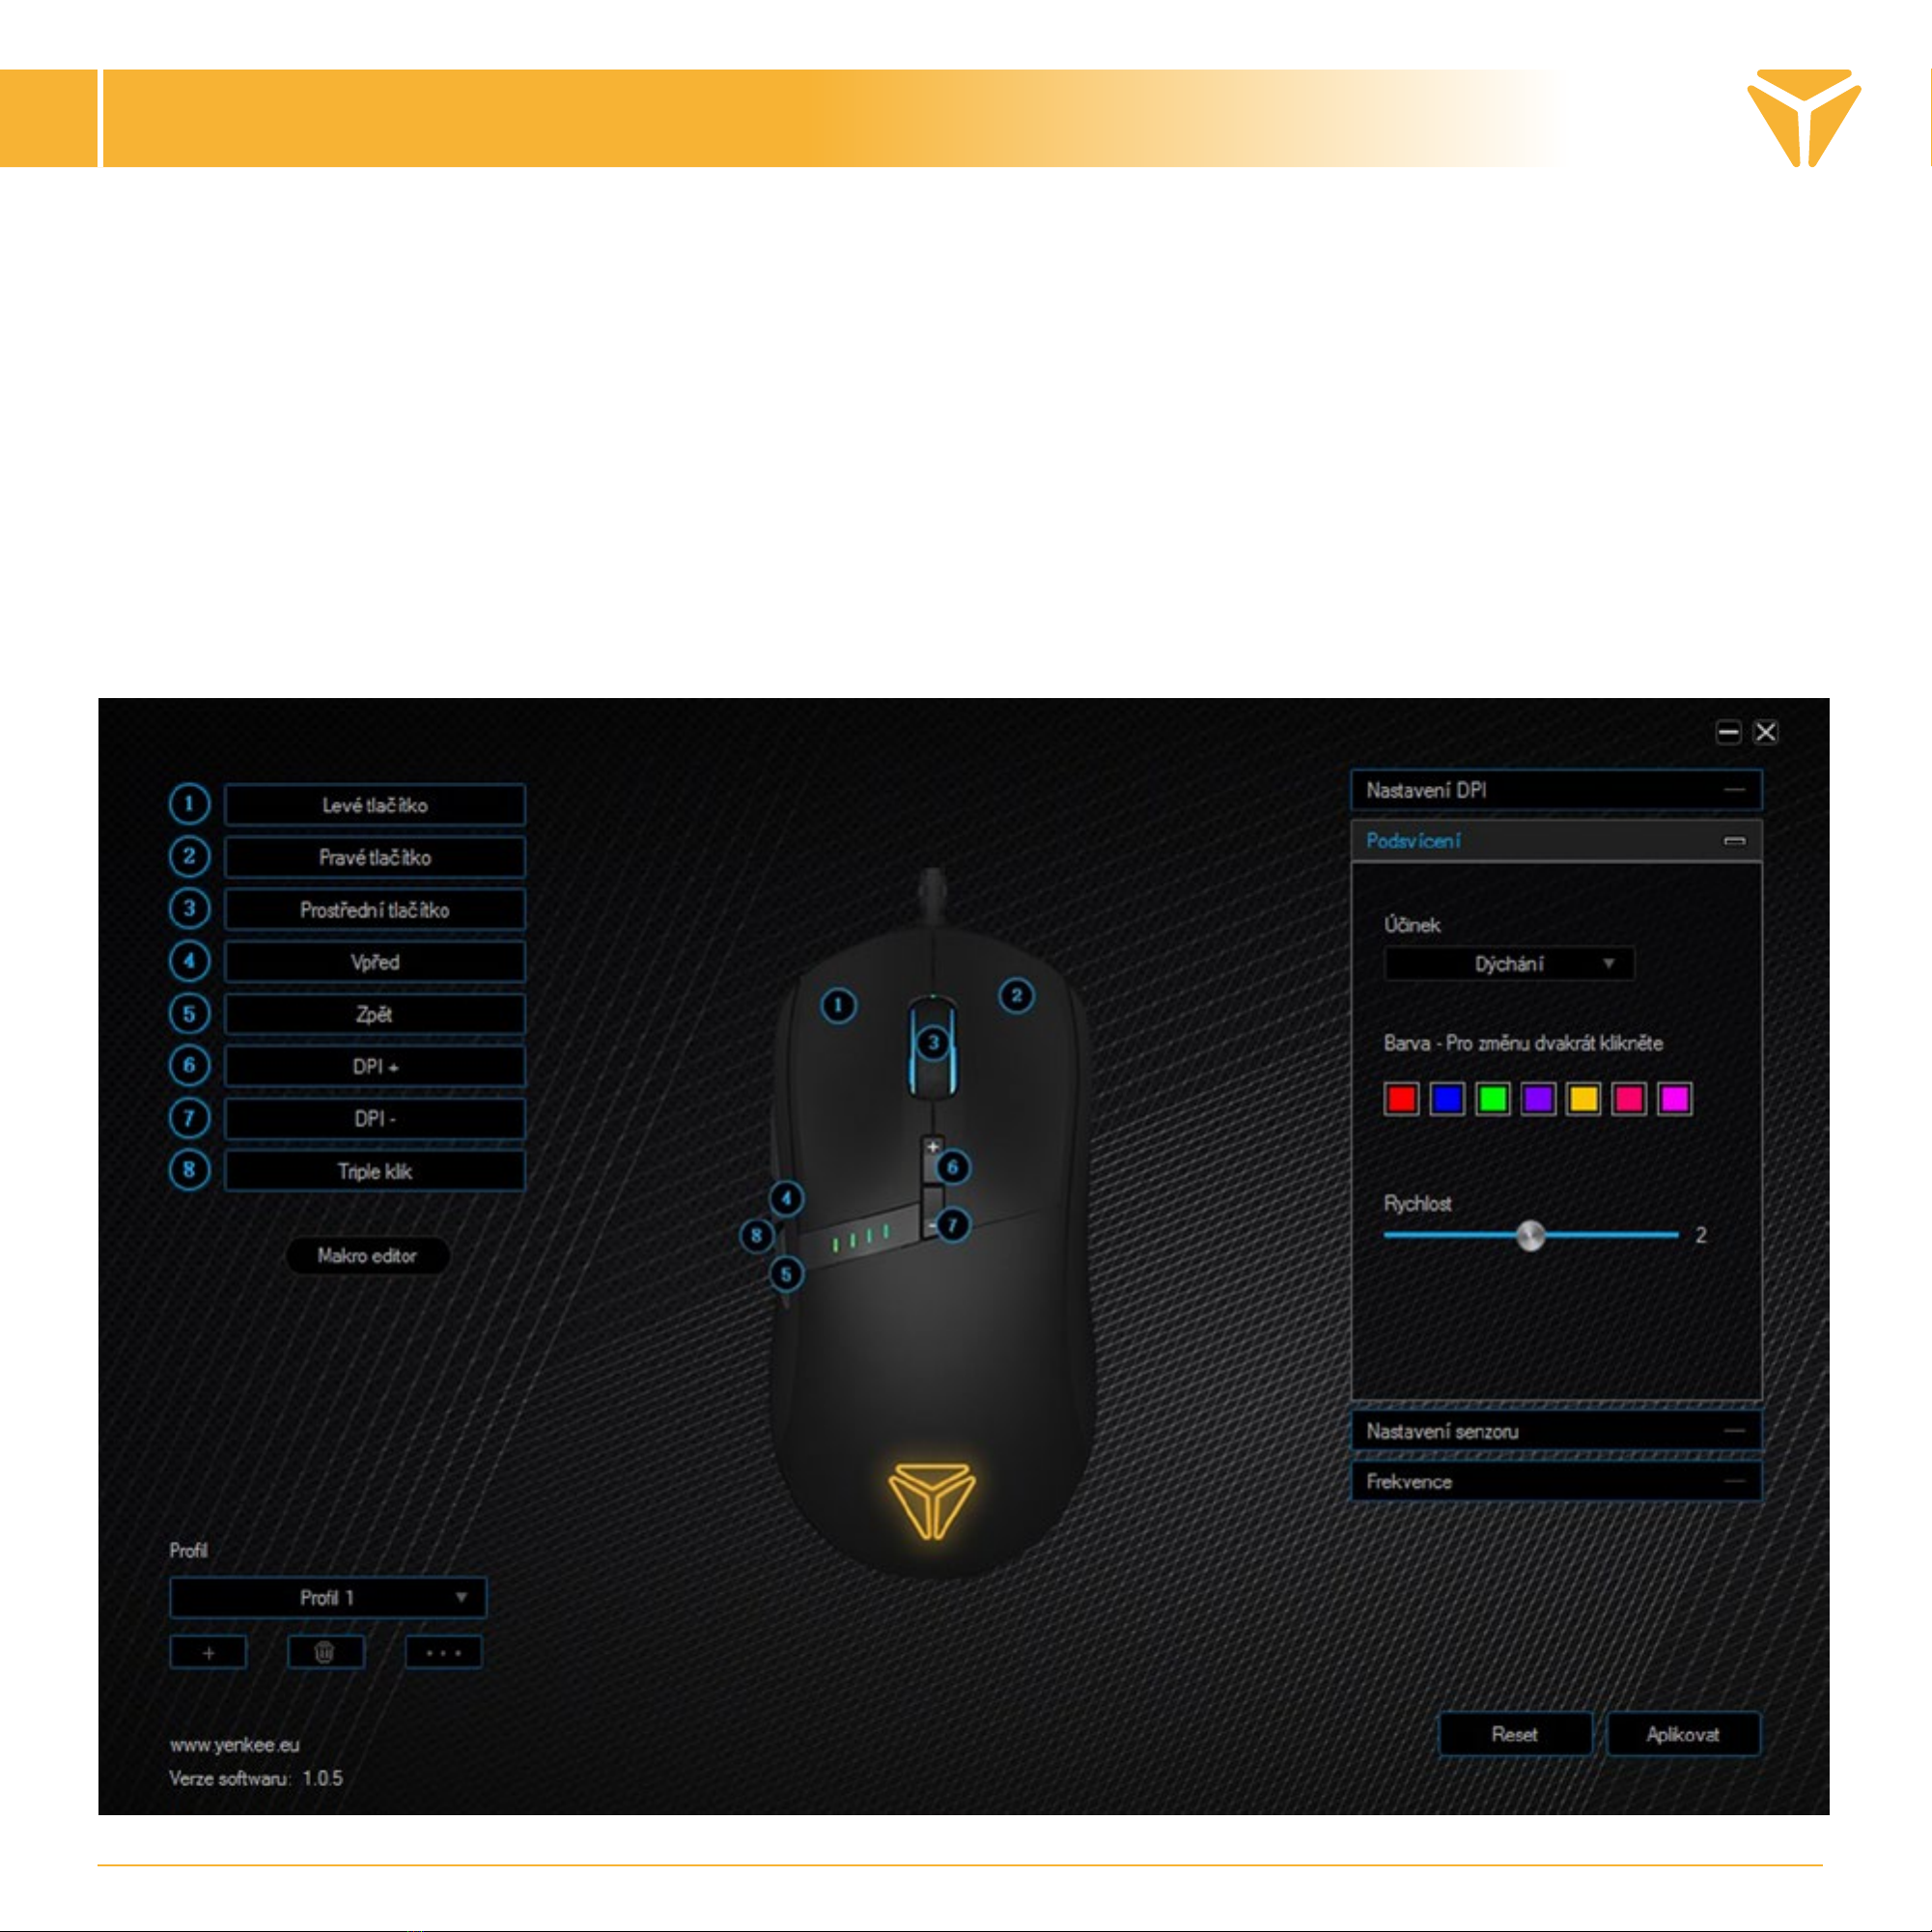
You can now customize the mouse exactly according to your preferences in the user interface of the program. This
includes detailed sensor settings from adjustable DPI up to 4 levels per frequency, colour adjustment and backlight
effect or customizable button functions. Finally, it is possible to create complex macros in a macro editor.

User’s environment
EN
Thecontrolsoftwareoffersonemainsectionwithallsettings.Allyouneedissimplyreachableandensures convenient
mouse setup.

Programming the buttons
EN
The right corner is designed for custom button configuration. Just click the button whose function you want to
change. Then select and left-click the required function from the drop-down menu. To confirm all changes made,
press the Apply button in the bottom right corner.
You can select from the basic functions as well as from those that make gaming and working with your PC much
easier. The gaming functions to be found here include triple click or the Fire function that allows you to launch
a set button’s loop up to 255 times by clicking the button with the option to adjust the time spaces between the
keystrokes. And there are also multimedia functions or mouse control shortcuts.

Setting the DPI value
EN
On the right-hand side, there are 4 individual mouse setting categories. The first one is related to DPI. The
DPI 1- DPI 4 values show the currently saved DPI level. To switch between the levels, press the relevant button.
Basically, these are buttons 6 and 7. Additionally, the mouse is equipped with four LEDs under the left button. The
LEDs are designed to visually check the current DPI value. The number of LEDs being lit represents the current DPI
level number.
To adjust a DPI value, just click the specific level and set any value from 200 to 10000DPI using the right scroll bar
with 100DPI steps. To reconfirm the changes, press the Apply button.

Setting the backlighting
EN
In second category, you can customize the mouse’s backlighting. All the effects available to the mouse can
be found right at the top of this section. Just click the effect name and select your most favourite effect in the
scrolling menu. Some effects also offer the selection of colour and movement direction. There is also the option
to set the effect speed and brightness. All that can be set for a specific effect can be found under the effect’s
name in remaining window area.

Sensor setting
EN
The third program section allows you to set the mouse sensor. This setting is exclusively related to the operating
system. The changes made here will be applied throughout the operating system.
To adjust the mouse sensitivity, use the first scroll bar and thanks to the checkbox present, you can decide whether
or not to increase the pointer accuracy. Another scroll bar allows you to adjust the number of rows to be skipped
while scrolling the wheel with the option to skip the entire page. The program also offers the option to adjust the
double-click speed.

Mouse query frequency
EN
The fourth and last program section is represented by the sensor query frequency selection. You can select
from 125Hz, 250Hz, 500Hz and 1000Hz. The higher the frequency, the more frequently the mouse queries the
current location, making the movement smoother and more detailed. Just click the require value and reconfirm
by pressing Apply.

Macro editor
EN
A gaming mouse can hardly do without the creation of macros. It’s up to you if you use the macros for gaming
performance or merely to simplify your office work. To launch the Macro Editor, click the Macro Editor button
below the button list on the left in the middle.

Macro editor
EN
The Macro Editor will appear. To create a new macro, just click the New macro button and name it to your taste.
This will appear in the macro list then. If you are not satisfied with the macro, you can delete it with the Delete
button or right-click the macro to call the advanced option menu.
In this way, you can create another macro, new macro, create a macro folder, export/import a macro from your
PC, rename or delete a macro. The last two items are designed for the entire list export/import. You can select
whether to record the macro with or completely without the real-time delay even before the recording. For this
purpose, there is a checkbox named Automatic insert delay on the right of the Macro Editor.

Macro editor
EN
To record your macro, press the Start record button, then press the key combination to be inserted. All keystrokes
with a response will be shown in the keystroke list.
To stop the recording, press the same button as for playback, now with the Stop record label.

Macro editor
EN
Keystrokes or latency can be edited or erased. To find the desired task, open the call menu by pressing the right
button or go to the keystroke list.

Macro editor
EN
If you have missed something by mistake, just drop down the Insert event menu on the editor right and select
any item.
The macros are still coupled with their running setting which can be found under Automatic insert delay setting.
Thus, you can set the macro to be executed until the button is released, until the button is pressed again or set
a standard number of cycles when the assigned button is set. In this way, the macro is executed up to 255 times
when the button is pressed.

Macro editor
EN
The macro has been created and set now, you can just assign it to any mouse button. Select one of the eight
buttons on the main program page and find the Macro item in the list.

Macro editor
EN
In the following menu, just select the macro name to be assigned and confirm all changes by pressing the Apply
button again.
All the mouse setting can then be stored in the three basic profiles or other custom profiles. This means you
can store up to three mouse configurations. If you use different settings for various tasks, you needn’t change
the mouse setting every time - just store each setting in a different profile. Then you can switch between them
as you wish. This option can be found in the left program section with the relevant controls. Use the Plus button
to create a new profile, the Bin to delete any profile and the three dots button to export, import and rename
a profile. In this way, you can simply store your profiles to your PC and take them anywhere. Just import your
profile on another PC and use your mouse with the same setting likewise in another location.
Number of buttons: 9
Input: DC 5V / 100 mA
Interface: USB
Mouse sensor: PMW 3325IC
Resolution: 5000 DPI
Poling rate: 500HZ
Acceleration: 20G
Cable length: 180 cm
Dimensions: 125 x 64 x 40 mm
Weight: 163g
System requirements:
USB port
Windows 7/8/10
EN

Instructions and information regarding the disposal of used packaging materials
EN
Dispose of packaging material at a public waste disposal site.
Disposal of used electrical and electronic appliances
The meaning of the symbol on the product, its accessory or packaging indicates that this product shall
not be treated as household waste. Please, dispose of this product at your applicable collection point
for the recycling of electrical & electronic equipment waste. Alternatively in some states of the Europe-
an Union or other European states you may return your products to your local retailer when buying an
equivalent new product.
The correct disposal of this product will help save valuable natural resources and help in preventing the
potential negative im pact on the environment and human health, which could be caused as a result of
improper liquidation of waste. Please ask your local authorities or the nearest waste collection centre
for further details. The improper disposal of this type of waste may fall subject to national regulations
for fines.
For business entities in the European Union
If you wish to dispose of an electrical or electronic device, request the necessary information from your
seller or supplier.
Disposal in other countries outside the European Union
If you wish to dispose of this product, request the necessary information about the correct disposal
method from local government departments or from your seller.
This appliance complies with EU rules and regulations regarding electromagnetic and electrical safety.
Changes to the text, design and technical specifi cations may occur without prior notice and we reserve the
right to make these changes.

• Prostřednictvím USB konektoru zapojte myš do příslušné USB zdířky v počítači.
• Vyčkejte, dokud počítač automaticky nenainstaluje potřebné ovladače a myš nakonfiguruje pro správnou
funkčnost.
• Poté, co váš operační systém zobrazí hlášku o úspěšné instalaci můžete myš volně používat
1 5
2 6
3 7
4 8
Levé tlačítko Boční zadní tlačítko
Navigace vpřed
Pravé tlačítko Horní přední tlačítko
DPI +
Kolečko Horní zadní tlačítko
DPI -
Boční přední tlačítko
Navigace vpřed Boční přední tlačítko
Trojklik
NÁVOD K OBSLUZE
CZ
Table of contents
Languages:
Other Yenkee Mouse manuals
Popular Mouse manuals by other brands

RadTech
RadTech BT-500 mini Quick setup guide

No More Pain Ergonomics
No More Pain Ergonomics Vertical Ergonomic Mouse User instruction guide

3DConnexion
3DConnexion SpaceMouse Enterprise manual

perixx
perixx PERIMICE-819 user manual

VSO TECHNOLOGY
VSO TECHNOLOGY JK-760G24 user manual

Kensington
Kensington K72345EU manual