manuals.online logo
Brands
  1. Home
  2. •
  3. Brands
  4. •
  5. Yoda
  6. •
  7. Transmitter
  8. •
  9. Yoda Smart Home MAGNETIC DELUXE YSH Series User manual

Yoda Smart Home MAGNETIC DELUXE YSH Series User manual

UP button
LCD display
STOP button
DOWN button
CHANNEL + buttonCHANNEL - button
P2
programming button
15-channel MAGNETIC DELUXE YSH remote control,
white (MAGNETIC Deluxe_15R YSH)
1. Control:
can control single motor, or a group
of up to 20 motors on each channel
2. Range:
200 meters outdoor,
35 meters indoor
3. Battery:
CR2450
4. Power supply:
3 V
5. Dimensions:
130 x 45 x 10 mm
6. Transmitting power:
10 mW
7. Operating temperature:
from 0°C to 50°C
8. Protection degree:
IP 30
Radio receiver range is a variable value and can differ from declared values depending on conditions in which device
operates. Possible sources of changes in range are building construction, interference caused by other radio transmitters
etc.
1
2. Detailed description
15-channel transmitter
(front)
15-channel transmitter
(back)
1. Estimated battery lifespan is 1 year if the device runs 4 commends a day in average.
2. Batteries should be changed when receiving device stops reacting to commands.
3. When replacing the battery, pay attention to the correct polarity.
Batteries contain substances that may be hazardous to health and may pollute the environment. Used batteries should
be disposed of properly.
In order to fully explore available functions of MAGNETIC DELUXE YSH series please take a moment and read this manual before using the device.
MAGNETIC DELUXE YSH transmitters are compatible with all YOODA SMART HOME brand devices.
MAGNETIC Deluxe YSH transmitters are dedicated to two-way communication.
MAGNETIC_Deluxe_15R YSH
1. General information
2
Pressing UP or DOWN button exits active channel selection mode. Repeat the following procedure to set the number of
active channels.
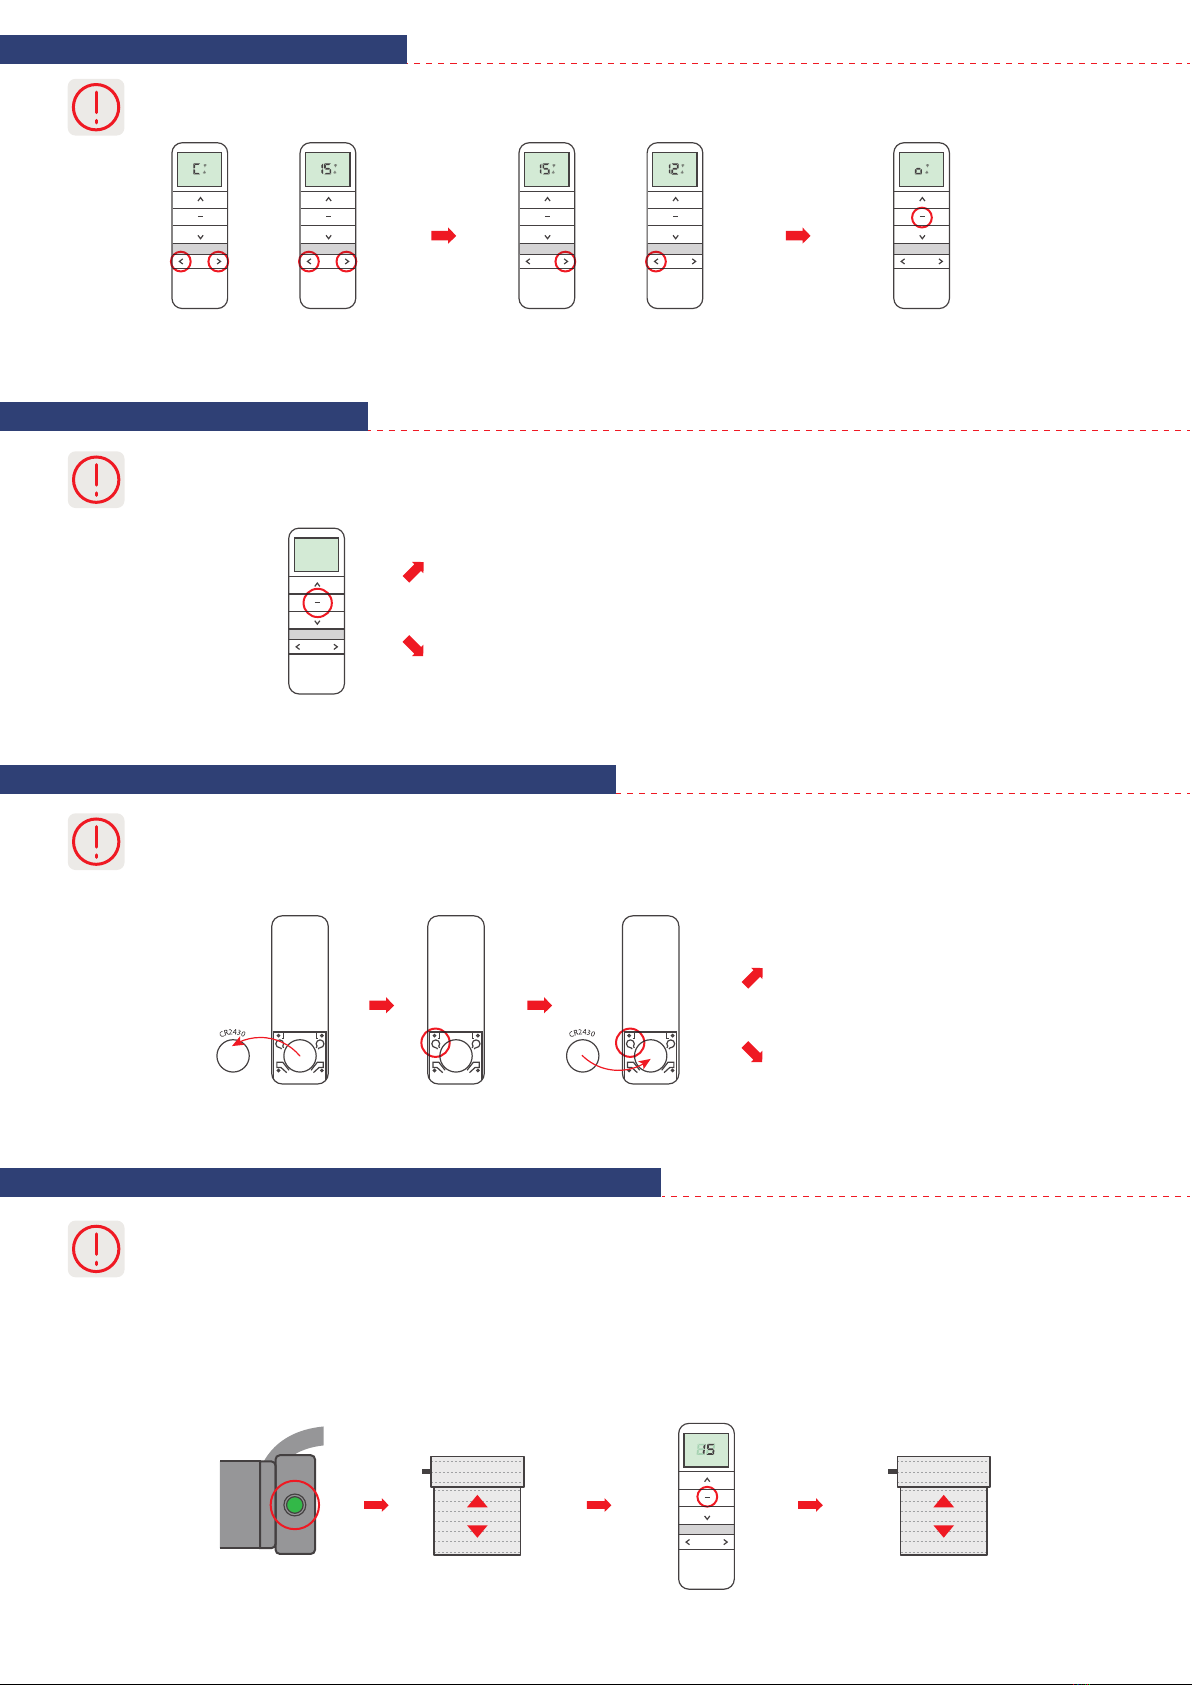
3. Active channel selection
Press simultaneously and hold down the CHANNEL +
and CHANNEL- buttons. "C" symbol appears on the
display and than after 4 seconds it changes
to number 15 with up and down arrows.
Use the CHANNEL + or CHANNEL - buttons
to set the number of displayed channels.
Press the STOP key to conrm your choice.
The symbol "o" should appear.
1. Way of programming first transmitter depends on type of radio receiver. When programming first transmitter please
follow instruction of the device that is going to be controlled by the transmitter.
2. Longer than 6 seconds pause between series of button clicks during programming will cause device to switch off from
programming mode without saving any changes.
3. If the end positions aren't set, the programming of the first transmitter will delete all existing transmitters from memory.
4. Choosing ‘0’ group channel means remote controls all programmed devices on all channels at the same time. No
programming functions can be performed on group channel. All devices programmed to any other channel can be controlled
on group channel without additional programming.
6. Programming first transmitter to EV/S-type motors
Turn on power supply
or press programming
button on motors head (for
2 sec.) when power is on.
Motor will make a sound.
Roller shutter will make
an up/down move.
Press STOP button
for a 2 seconds
on the remote.
Roller shutter
will makean up/down move
and the motor will
make a few short sounds.
1. The function buttons lock prevents accidental operation of two buttons used when programming motors or radio
receivers.
2. This function is factory disabled. To on / off the function, follow the procedure below.
1. The transmitter can operate in one of two modes:
a) two-way
b) one-way
2. The transmitter factory operates in two-way mode.
4. Function buttons lock
5. Selection of the transmitter's operating mode.
Remove the battery
from the transmitter.
Press programming
button P2.
When "L" symbol will appear on
the display the function is on.
When "U" symbol will appear on
the display the function is off.
When "1" number will appear on
the display transmitter is on
two-way mode.
When "2" number will appear on
the display transmitter is on
one-way mode.
When holding the P2
programming button,
insert the battery.
Press and hold STOP button
for about 15 seconds.

Popular Transmitter manuals by other brands

PR Elecronics PReasy 4116 manual

PR Elecronics

PR Elecronics PReasy 4116 manual

delta-mobrey DMSP400 Series user manual

delta-mobrey

delta-mobrey DMSP400 Series user manual

CircuitWerkes CW Broadcast FM1200ES Operating manual and user guide

CircuitWerkes

CircuitWerkes CW Broadcast FM1200ES Operating manual and user guide

Canon Wireless Transmitter WFT-E5A instruction manual

Canon

Canon Wireless Transmitter WFT-E5A instruction manual

Lectrosonics M185 operating instructions

Lectrosonics

Lectrosonics M185 operating instructions

RDL D-TPSL1A quick start guide

RDL

RDL D-TPSL1A quick start guide

Monarch 433TSPW2K quick guide

Monarch

Monarch 433TSPW2K quick guide

Naxa NA-3033 instruction manual

Naxa

Naxa NA-3033 instruction manual

Sony TMR-IF330R Service manual

Sony

Sony TMR-IF330R Service manual

Knick VariTrans P 42000 D2 TRMS-0001-KTA manual

Knick

Knick VariTrans P 42000 D2 TRMS-0001-KTA manual

DreamGEAR I.SOUND DGIPOD-1547 manual

DreamGEAR

DreamGEAR I.SOUND DGIPOD-1547 manual

ABB TTH200 Additional instructions

ABB

ABB TTH200 Additional instructions

Star Meter CWDZ22 installation instructions

Star Meter

Star Meter CWDZ22 installation instructions

Lectrosonics UT200 Operating instructions and troubleshooting guide

Lectrosonics

Lectrosonics UT200 Operating instructions and troubleshooting guide

Telemotive 10K JLTX user manual

Telemotive

Telemotive 10K JLTX user manual

Cervis WARRIOR MCB-9XW manual

Cervis

Cervis WARRIOR MCB-9XW manual

ABB TTH300 Series Safety instructions

ABB

ABB TTH300 Series Safety instructions

NOSHOK 204 Series user manual

NOSHOK

NOSHOK 204 Series user manual

manuals.online logo
manuals.online logoBrands
  • About & Mission
  • Contact us
  • Privacy Policy
  • Terms and Conditions

Copyright 2025 Manuals.Online. All Rights Reserved.