Yoga 2-830F Owner's manual

Carter Seward
YOGA TABLET 2-830F, 2-830L, AND 2-830LC
Hardware Maintenance Manual

Lenovo Yoga Tablet 2 Hardware Maintenance Manual
1
Table of Contents
Lenovo Yoga Tablet 2................................................................................................................ 2
Tools................................................................................................................................... 2
Specifications......................................................................................................................... 3
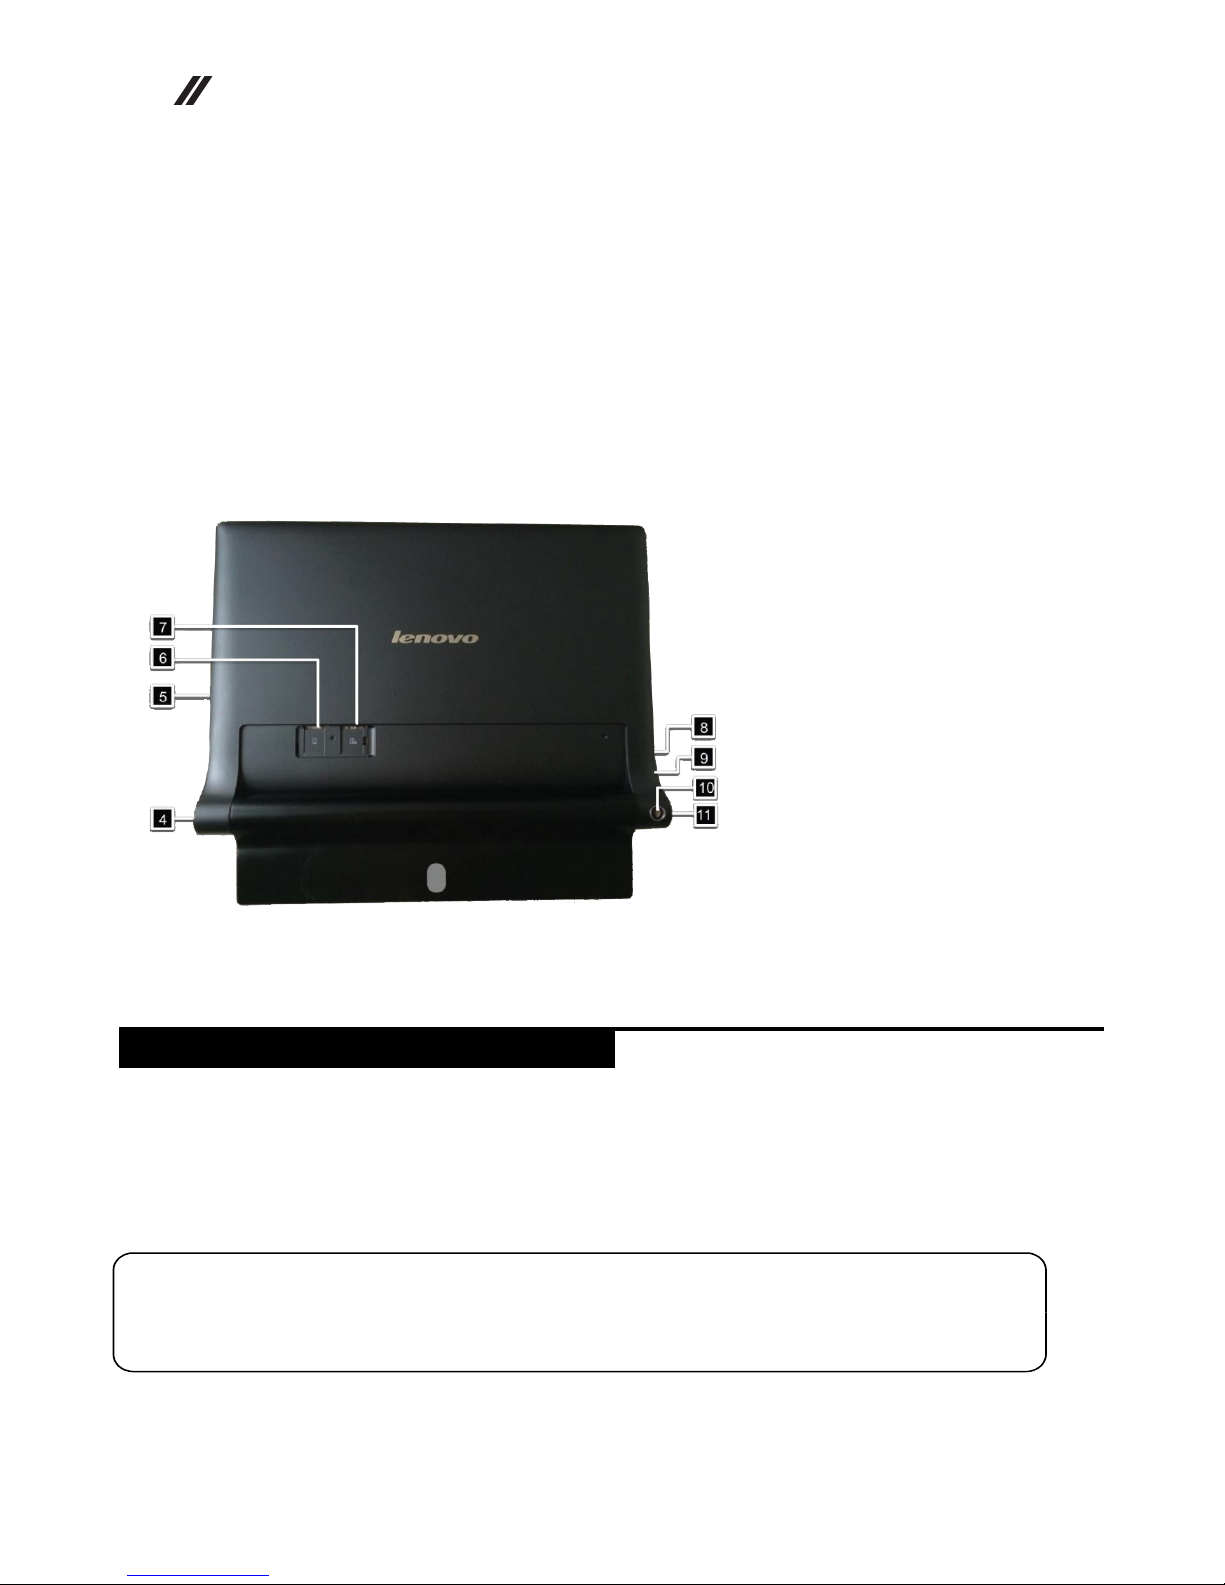
Yoga 830 Tablet: Front and Rear View................................................................................... 4
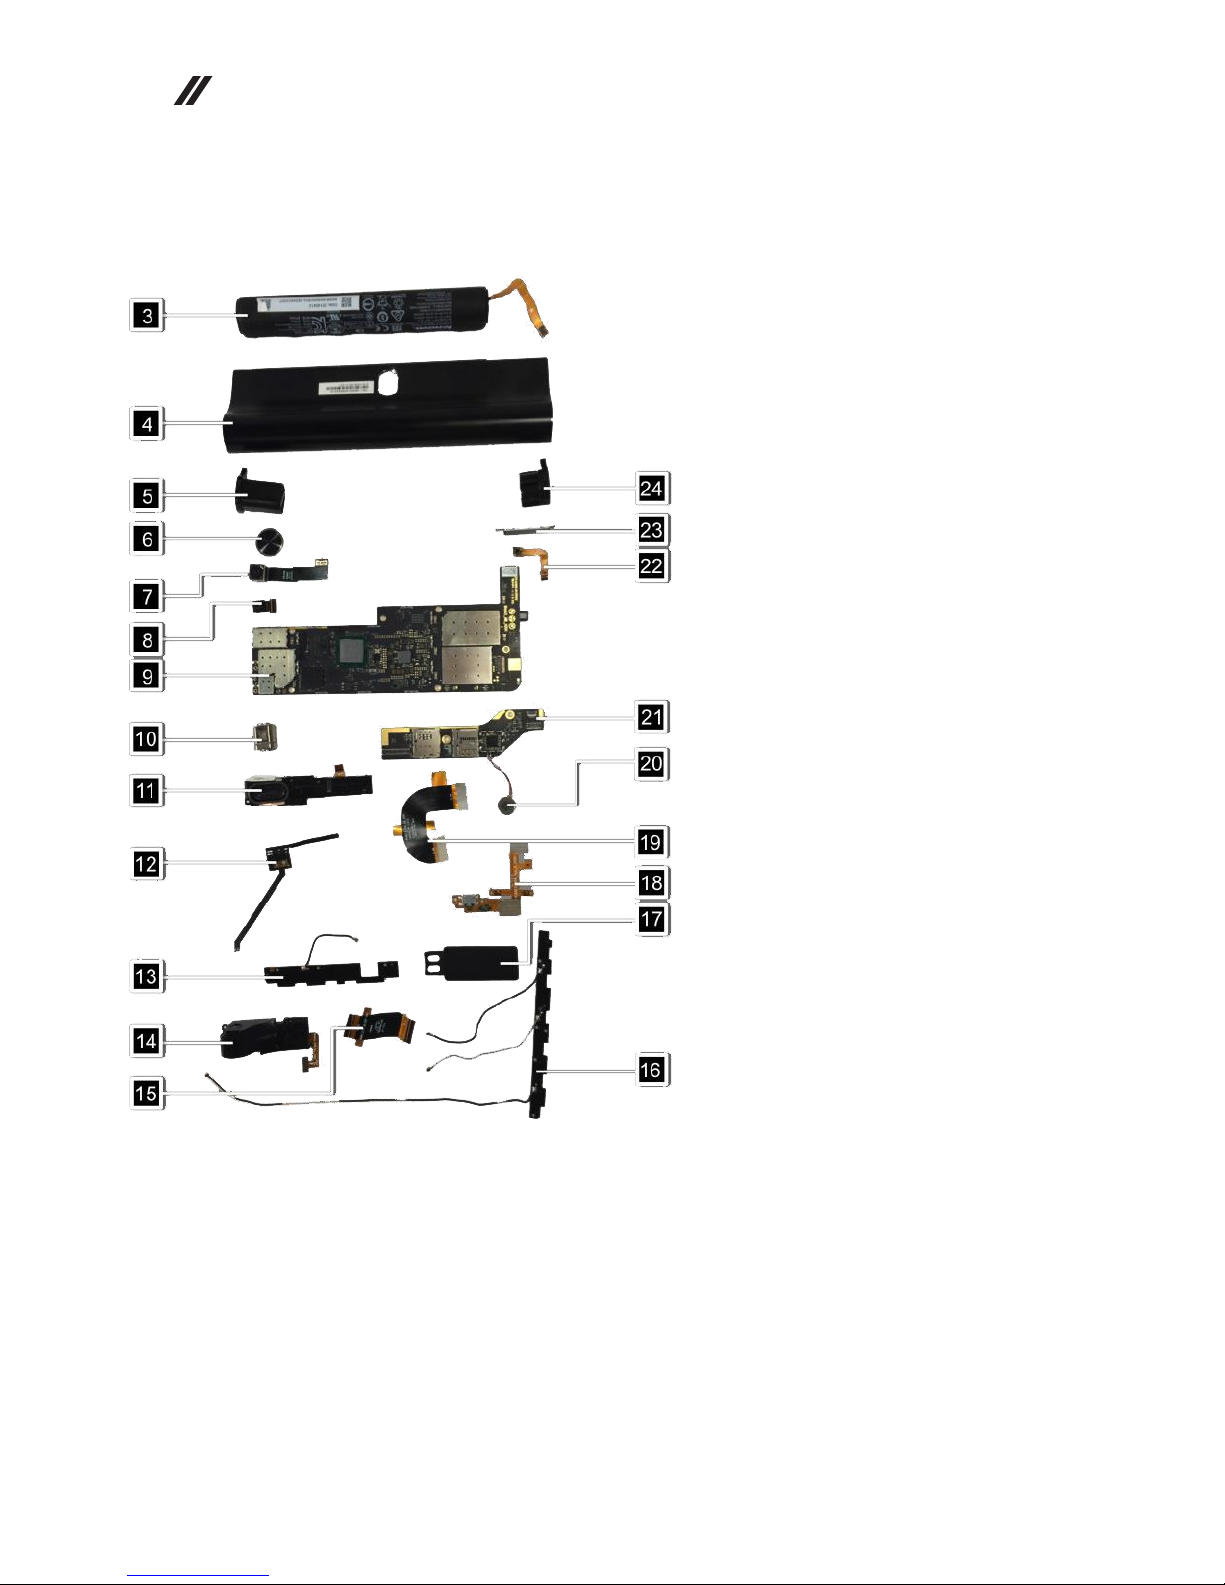
Yoga Tablet 2-830 Parts Information...................................................................................... 5
Locations of Yoga Tablet 2-830 Parts................................................................................. 6
FRU Replacement Notices....................................................................................................10
Instructions for tightening screws.......................................................................................11
Removing and Replacing FRUs.............................................................................................12
Removing the 1010 rear cover...........................................................................................13
Removing the 1020 right speaker ......................................................................................16
Removing the 1030 vibrator motor.....................................................................................19
Removing the 1040 sub board...........................................................................................21
Removing the 1050 LCD FPC............................................................................................25
Removing the 1060 main FPC...........................................................................................28
Removing the 1070 hall sensor FPC..................................................................................30
Removing the 1080 main board.........................................................................................32
Removing the 1090 left speaker ........................................................................................39
Removing the 1100 rear camera .......................................................................................43
Removing the 1110 volume key and USB FPC .................................................................45
Removing the 1120 volume key.........................................................................................47
Removing the 1130 LTE main antenna (LTE Version) or Wi-Fi2 antenna (Wi-Fi Version).48
Removing the 1140 LTE MINO/GPS/Wi-Fi antenna (LTE version) or GPS/ Wi-Fi1 antenna
(Wi-Fi version) ...................................................................................................................49
Removing the 1150 Wi-Fi2 antenna (LTE version).............................................................50
Removing the 1160 battery pack........................................................................................51
Removing the 1170 power key...........................................................................................56

Lenovo Yoga Tablet 2 Hardware Maintenance Manual
2
This section presents the following product-specific service references and product-specific
parts information:
•Tools on page 2.
•Specifications on page 3.
•Yoga Tablet 2-830 front and rear views pages 4-5.
•Parts list on page 5-7.
•FRU replacement notices on page 10.
•Screw table on page 11.
•Removing and replacing field replacement units (FRUs) on page 12.
Tools
Use the following tools to remove and replace field replacement units (FRUs):
Lenovo Yoga Tablet 2
Suction cup
Tweezers
Screwdrivers
Guitar pick

Lenovo Yoga Tablet 2 Hardware Maintenance Manual
3
The following table lists the specifications of the Lenovo Yoga Tablet 2-830.
Table 1: Specifications
Yoga Tablet 2-830F
Yoga Tablet 2-830L and 2-830LC
Feature
Description
Description
Size
210.4 x 148.9 x (2.7-7.0)mm
Weight
<400 g
CPU
2M cache, 4 cores, 1.86GHz
Hardware platform
Intel®Atom™Processor Z3745
RAM
LP-DDR3 2GB(64bit)
Storage Capacity
16GB
LCD
8.0”, 1920 x 1200 pixels
Integrated camera
Front: 1.6M HD fixed focus
Rear: 8MP , Auto focus
Battery
Li-ion, 6,400mAh
Operating system
Android 4.4 or later
Network
WCDMA, GSM, FDD LTE (LTE version only)
Ports
Micro-USB (USB 2.0)
Audio jack, 3.5mm
Micro-SD card slot (support external Micro-
SD card slot
(up to 64GB).
Micro SIM card (LTE version only)
Communication
Wi-Fi: 802.11a/b/g/n
Bluetooth 3.0 and 4.0
GPS
GLONASS
WCDMA: 850/900/1700/1900/210MHz (LTE
version only)
GSM/EDGE: 850/900/1800/1900 MHz (LTE
version only)
FDD LTE: Band 1/2/3/4/5/7/8/19/20 LTE
(version only)
Wireless WAN: FDD LTE Cat.4 150Mbps,
DC-HSPA+42Mbps (LTE version only)
AGPS (LTE version only)
Voice call (LTE version only)
Others
Speaker (left and right)
Microphone
Gravity sensor
E-compass
Ambient light sensor
Vibration
Hall sensor
Digital hall sensor
LED indicator (power on button)
Dolby audio system (DSI)
Miracast
Magnet
HDCP 2.2
Wireless display
Specifications
Note: The specifications listed in the center column for the Yoga Tablet 2-830F also
apply to the 2-830L and the 2-830LC. The specifications listed in the far right column
reflect additional features of the 2-830L and the 2-830LC.
Note: The 2-830L and 280-LC contain
the same features as the 2-830F in the
left column, plus additional features
listed in this column.

Lenovo Yoga Tablet 2 Hardware Maintenance Manual
4
Refer to the front view image below to locate the following Yoga 830 Tablet components:
1. Front Camera
2. Left Speaker
3. Right Speaker
Front view:
Yoga 830 Tablet: Front and Rear View

Lenovo Yoga Tablet 2 Hardware Maintenance Manual
5
Refer to the rear view image below to locate the following Yoga 830 Tablet components:
4. Audio Jack
5. Microphone
6. Micro-SD card slot
7. SIM card slot (for LTE version only)
8. Volume Key
9. Micro-USB connection
10. Rear camera
11. Power key
Rear view:
This section provides the following information:
Parts locations on pages 6-7.
Screws on page 11.
Parts list pages 8-10.
Note: The FRUs listed are applicable to both versions of the product, including the Wi-Fi
version and the LTE version, unless otherwise specified,
Yoga Tablet 2-830 Parts Information

Lenovo Yoga Tablet 2 Hardware Maintenance Manual
6
Locations of Yoga Tablet 2-830 Parts
Refer to Table 2 on pages 8-10 for a list of the corresponding numbered parts shown in the
images below.

Lenovo Yoga Tablet 2 Hardware Maintenance Manual
7
Lenovo Yoga Tablet 2-830 Parts:
Refer to Table 2 on pages 8-10 for corresponding descriptions.

Lenovo Yoga Tablet 2 Hardware Maintenance Manual
8
Table 2: Yoga Tablet 2-830 parts list
Parts list information listed by FRU
No.
FRU
FRU No.
1
830 Front module (TP LCM assembly)
5D69A6N2CN
2
830 Rear cover
Wi-Fi version:
5S59A6N2H4
LTE version:
5S59A6N2CL
3
830 Battery
5B19A6MWSH
(battery cell)
5B19A6MWSK
(battery cell)
5B19A6N2CM
(battery pack)
4
830 Hinge frame
5M89A6MXN4
(silver)
SM89A6N0P6
(silver)
5S59A6MXJR
5S59A6MXJS
5
830 Battery cover (right)
5D79A6MXNM
(silver)
5D79A6MXKS
6
830 Power key
5B69A6N07R
(Silver)
5B69A6MXMW
(Silver)
7
830 Rear camera 8.0MP AF OV8865
5C29A6N016
8
830 Front camera 1.6MP 25PIN 3P FF
5C29A6MWJ8

Lenovo Yoga Tablet 2 Hardware Maintenance Manual
9
Parts list information listed by FRU
No.
FRU
FRU No.
9
830 Main board
Wifi Version:
5B29A6N2CR
LTE version:
5B29A6N2CP
LTE+Voice
Version:
5B29A6N2CS
10
830 Hinge pivot
5SR9A6MXK6
11
830 Left speaker
5SB9A6MXFN
12
830 Wi-Fi2 antenna (LTE version only)
5A39A6MYKF
13
830 LTE Main antenna or Wi-Fi2 antenna
WiFi Version:
5A39A6MYKG
LTE Version:
5A39A6MYKD
14
830 Right speaker
5SB9A6MXFM
15
830 LCD FPC
5F79A6MX4F
16
830 LTE MIMO/GPS/Wi-Fi1 antenna or GPS/Wi-Fi1
antenna
WiFi version:
5A39A6MYKH
LTE version:
5A39A6MYKE
17
830 Card slot cover
5S59A6MXME
(silver)
18
830 USB and volume key FPC
5F79A6MWDL
19
830 Main FPC
5F79A6MWDM
20
830 Vibrator motor
5M79A6MXJM
21
830 Sub-board
Wifi Version:
5P69A6MX74
LTE Version:
5P69A6MW33

Lenovo Yoga Tablet 2 Hardware Maintenance Manual
10
Parts list information listed by FRU
No.
FRU
FRU No.
22
830 Hall sensor FPC
5F79A6MX4D
23
830 Volume key
5B69A6MXMX
(silver)
5B69A6N07T
(silver)
24
830 Battery cover (left)
5D79A6MXNL
(silver)
5D79A6MXKR
This section presents notices related to removing and replacing parts. Read this section
carefully before replacing any FRU.
About screws
Loose screws can cause a reliability problem. In Lenovo computers, this problem is addressed
with special nylon-coated screws that have the following characteristics:
• They maintain tight connections.
• They do not easily come loose, even with shock or vibration.
• They are harder to tighten.
Refer to the table on page 11 for a list of screw specifications.
FRU Replacement Notices
Note: Never re-use a screw that you removed. Use a new one. Make sure that all screws are
tightened firmly.

Lenovo Yoga Tablet 2 Hardware Maintenance Manual
11
Table 3: Screw specifications
Instructions for tightening screws
Tighten screws as follows:
Plastic to plastic-Turn an additional 90° after the screw head touches the surface of the plastic
part:
Screw information for FRU
FRU
Quantity
Type
Size
Color
Part Number
Rear cover
2
Phillips flat head screws
M1.4 x 1.6
Silver
5M89A6N02R
Right speaker
3
Phillips flat head screws
M1.4 x 2.5
Silver
SM89A44142
Sub board
2
Phillips wide head
screws
M1.4 x 1.3
Silver
SM89A462RE
Left speaker
3
Phillips flat head screws
M1.4 x 2.5
Silver
SM89A44142
LTE main antenna
(LTE Version) or
Wi-Fi2 Antenna
(Wi-Fi Version)
3
Phillips flat head screws
M1.4 x 1.6
Black
5M89A6N02R
LTE
MINO/GPS/Wi-
Fi1 antenna or
GPS/Wi-Fi1
3
Phillips flat head screws
M1.4 x 1.6
Black
5M89A6N02R
1160 Battery pack
1
Phillips flat head screws
M1.4 x 3.0
Silver
SM89A44143
More than 90o

Lenovo Yoga Tablet 2 Hardware Maintenance Manual
12
Logic card to plastic-Turn an additional 180° after the screw head touches the surface of the
logic card:
This section presents diagrams with the instructions to indicate how to remove and replace the
FRU. Make sure to observe the following general r
ules:
1. Do not attempt to service any computer unless you have been trained and certified. An
untrained person runs the risk of damaging parts.
2. Before replacing any FRU, review FRU replacement notices on page 10.
3. Begin by removing the failing FRU. FRUs are listed throughout the HMM at the top of the
section that describes how to remove and replace the FRU. Remove them in the order listed.
4. Refer to the figures provided and follow the correct sequence to remove the FRU.
5. Always turn screws in the direction indicated by the arrows in the figure.
6. Remove the FRU in the direction indicated by the arrow in the figure.
7. To replace the FRU, reverse the steps for removal and follow any notes that pertain to
replacement.
8. When replacing an FRU, use the correct screw as specified in the instructions.
Removing and Replacing FRUs
More than 180o
Danger: Before removing any FRU, turn off the computer, unplug all power cords
from electrical outlets, remove the battery pack, and disconnect any of the
interconnecting cables.
Attention: After replacing an FRU, do not turn on the computer until you have made sure
that all screws, springs, and other small parts are in place and that none of them is loose
inside the computer. Verify this by gently shaking the computer and listening for rattling
sounds. Metallic parts or metal flakes can cause electrical short circuits.
The system board is sensitive to, and can be damaged by, electrostatic discharge. Before
touching it, establish a personal grounding by touching a ground point with one hand or by
using an electrostatic discharge (ESD) strap (P/N 6405959) to eliminate the possibility of
electrical shock.

Lenovo Yoga Tablet 2 Hardware Maintenance Manual
13
Removing the 1010 rear cover
Follow the steps below to remove the FRU.
1. Open and remove the hinge frame.
2. Use a narrow, thin, flat blade or guitar pick to open the card slot cover.
Figure 1-1. Opening and removing the hinge frame.
Figure 1-2. Opening the card slot cover.

Lenovo Yoga Tablet 2 Hardware Maintenance Manual
14
3. Remove 2 Phillips flat head screws (M1.4x1.6) from the rear cover as shown below.
4. Use a suction cup to separate the bottom right corner of the rear cover from the main body
of the tablet as shown in the figure below.
Figure 1-3. The screws on the rear cover.
Figure 1-4. Separating the cover from the main body.

Lenovo Yoga Tablet 2 Hardware Maintenance Manual
15
5. Use a guitar pick to unlock the rear cover from the tablet along the joint line by running the
pick along the edge as shown in the figure below.
6. Slowly remove the rear cover.
Caution: Handle with care! You can damage the rear cover or its locks. Do not
try to lift the rear cover off the tablet when it remains tightly locked in some
places. Use a guitar pick to unlock these places.
Figure 1- 6. The removed rear cover.
Figure 1-5. Unlocking the cover from the main body (along the joint line).

Lenovo Yoga Tablet 2 Hardware Maintenance Manual
16
Removing the 1020 right speaker
Follow the steps below to remove this FRU.
1. Use a pair of tweezers to detach the battery FPC from its connector on the main board. This
will disconnect the power supply to the tablet.
2. Remove three Phillips flat head screws (M1.4x2.5) on the holder of the right speaker as
shown in the figure below.
Figure 2-1. Disconnecting the power supply to the tablet.
Figure 2-2. The screws that hold the speaker in place.
Prepare for this step by:
Removing the following FRU:
o1010 rear cover on page 13.

Lenovo Yoga Tablet 2 Hardware Maintenance Manual
17
3. Use a pair of tweezers to detach the FPC connector of the right speaker from the sub board.
4. Use a pair of tweezers and gently detach the side of the case from the right speaker. At the
same time, carefully push the right speaker in the direction shown in the figure below.
Figure 2-3. Detaching the FPC connector of the right speaker.
Figure 2-4. Removing the right speaker.

Lenovo Yoga Tablet 2 Hardware Maintenance Manual
18
5. Remove the right speaker.
Figure 2-5. The removed right speaker.

Lenovo Yoga Tablet 2 Hardware Maintenance Manual
19
Removing the 1030 vibrator motor
Follow the steps below to remove this FRU.
1. To disconnect the power supply to the tablet, use a pair of tweezers to detach the battery
FPC from its connector on the main board.
Figure 3-1. Disconnecting the power supply of the tablet
2. Desolder the wires of the vibrator from the sub board at the position shown in the next
figure.
Figure 3-2. Position for desloldering the wires of the vibrator motor.
Prepare for this step by:
Removing the following FRU:
o1010 rear cover on page 13.
This manual suits for next models
2
Table of contents