Yongnuo YN200 User manual

使用说明
User Manual


Please make sure the power is turned off when
installing and connecting the accessories.
Flash is suitable for ventilated environment, please
keep the heat sink of flash from being blocked when
using.
After using the flash, do not touch the tube with your
hands, otherwise it may cause burns.
Do not touch the product with wet hands and do not
expose it to rain.
Do not use in flammable and explosive environment.
If maintenance or repair is needed, it shall be carried
out by the company or authorized maintenance
personnel. Disassembling and assembling by yourself
may cause electric shock and other accidents.
Keep children away from this product.
Please take out the batteries if this product is not used
for a long time.
When storing and transporting this product, please
remove the flash tube.
Precaution
Thanks for purchasing YONGNUO TTL SPEEDLITE YN200.
Please read this manual carefully to understand the safety
instructions, functions and maintenance of this product. Please
keep this manual properly for reference.
-1-

YN200 is the Yongnuo's first high-power outdoor flash, with flash
power up to 200W, adopts 14.4v 2900mAh lithium battery power
supply design, with extreme speed recycle system, 2 seconds
recycling time , flash firing times at full output up to 500 times.
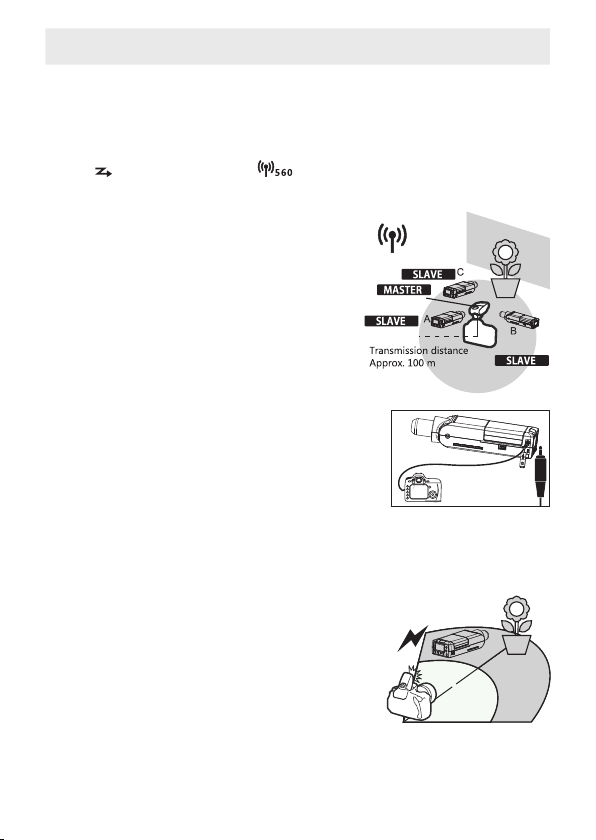
Supports YONGNUO new upgraded RF radio flash system
It can receive the controlling and triggering signal from the TTL
master unit such as YN862 series, YN560-TX PRO series , realizing TTL
and M/Multi mode off-camera flash; It could receive the controlling
and triggering signal from the wireless flash trigger such as YN560-
TX (II)/RF603/RF605 wireless flash trigger, realizing M/Multi mode
flash.
Using removable bare tube lamp tube, GN60 high index
GN60@ ISO100 (using reflector cover). Supports TTL flash, manual
flash, multi flash, high speed synchronization, up to 1/8000 seconds.
16 channels, up to 10,000 configurable photographer ID, six flash
groups A/B/C/D/E/F.
Equipped with attachment bayonet, accessories such as reflective
cover can be installed.
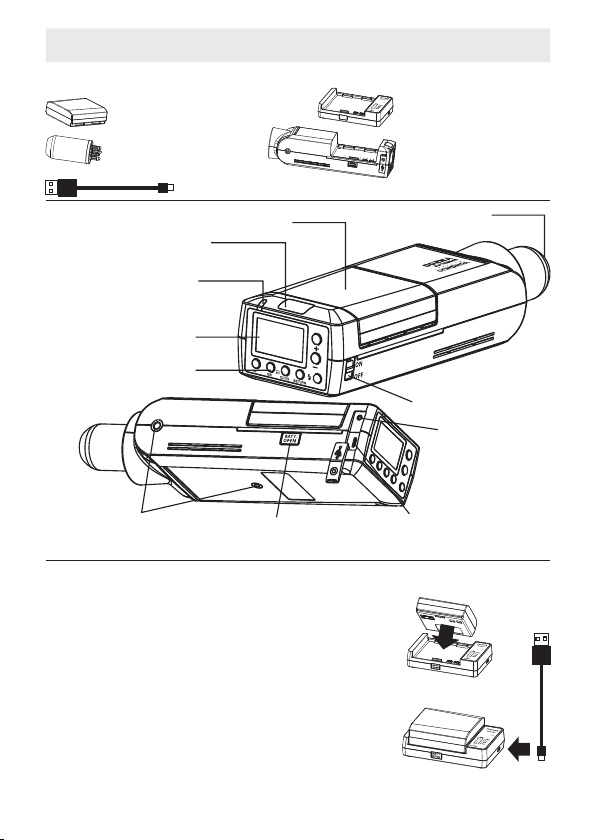
It is equipped with large capacity battery with imported cell, using
Type-C interface charger, which supports quick charging with PD
protocol power adapter (excluded).
Supports USB firmware upgrade
Equipped with Micro USB interface, supports firmware upgrade,
users can log in the Yongnuo official website to download the
firmware upgrade package to upgrade the flash.
Supports wireless optical slave function.
It can receive the master optical control signals of Yongnuo,C/N,
and supports S1 and S2 pre-flash cancel trigger mode.
E qu i p p ed w i th 3 . 5 m m s y n c h r o n i z a t io n j ac k , s u p p o r t s
synchronization interface flash.
Features
-2-

1/4“Mounting
Hole
USB port
(Micro USB)
3.5MM
Sync cord jack
Power Switch
Battery Release Button
LCD
1.YN-B2900 Li-ion Battery
4.YN200 SPEEDLITE
2.YN-C2900 Charger
3.200W Flash Tube
Contains items:
5.USB-A to USB-C Charging Cable
Radio transmission
link lamp
Optical transmission
wireless sensor
Battery Compartment(Battery)Flash Tube
Control panel
C o n n e c t t h e U S B p o w e r a d a p t e r
(excluded) to the YN-C2900 charger with the
Type-C charging cable, and then charge.
If you use the power adapter and charging
cable (excluded) that supports PD quick
charging, it only takes about 3 hours to be
fully charged, and if you use the 5V2A
charger, it takes about 6 hours to be full
charged. When the battery is fully charged,
press the release button to remove the
battery.
YN-C2900 Charger user manual
Components Description
-3-

2.The meaning of [Link lamp]
[LINK]lamp Statues
GREEN LAMP Lit Radio transmissing
RED LAMP Lit Flash trigging
GREEN LAMP Flicker Standby mode*
Meaning
Parts Operations
In wireless mode, short press to enter channel setting and
long press to set ID.
Press this button and the flash will switch between different
flash modes.(Radio mode (YN560 SLAVE)/optical
transmission /S1/S2) in radio mode, long press the button to
switch between M/Multi mode.
It sets up wireless groupings, supports A-F slave groupings.
In different modes, short press to realize setting/confirming
function, such as channel, ID, strobe frequency, times, custom
function, long press to set custom function.
Press the [ +] button to increase parameters, and press the[-]
button to decrease parameters.
The flash is set to be power-on at the ON position and
shutdown at the OFF position.
Red light indicates full power, press test flash.
(Charging
lamp)
Power switch
*About the
Standby mode can reduce the power consumption, which is
enabled by the custom function. In mode, any
button or the radio master unit can awake the slave flash.
Standby mode(see page11 )
standby
1.Control panel
Basic Operations
-4-

2. Install/remove lamp holder accessories (optional)
As shown in the figure, insert the attachment (such as reflector) into
the attachment bayonet of lamp holder, and rotate the attachment
according to the arrow direction to complete the installation. When
removing, rotate in the opposite direction of the arrow and remove
the attachment.
Installation Instruction
3.Install battery
Install the battery as shown in the drawing to the battery
compartment, when you hear the"click",meaning the battery is
installed in place.
When taking out the batter y, first press the battery release button
to take out the battery.
1. Install/remove the flash tube
As shown in the figure, put the thinner foot
of the flash tube at the corresponding
position of the lamp holder and insert the
flash tube.
After using the flash, wait a few minutes
to make sure the tube is cool down before
removing the tube.
4. Power on
Switch the flash power switch to ON to turn
ON the power, and OFF to turn OFF the power.
-5-

2.Triggering through synchronization
interface
Insert the triggering cable(excluded) into
the 3.5mm synchronization trigger port,
and use the camera or universal wireless
flash trigger to synchronize the flash.
Set the flash to radio mode and set the
flash mode to [M] or [MULTI].If the flash is
set to TTL or OFF, it will not be able to flash.
3.Triggering through optical transmission
(see page 9)
A: Using synchronizing flash (S1, S2)
Supports flash mode: M
B: Triggering through flash with master unit
(optical transmission)
Supports optical transmission channel 1-4,
grouping A/B/C
Supports flash mode: ETTL, M
Controlled by the compatible master flash
(camera)
1.Triggering through radio module (see page 7-8)
YN200 can only be used as a slave flash, and Yongnuo YN560-TX PRO
series flash transmitter is recommended as the main control unit,
which suppor t s T T L , manual, multi flash, a n d high-speed
synchronization.
Press [ ] button to set it to [ ] radio mode, and set it to the same
channel and ID as the master unit.
Triggering Mode Selection
Positioning and Operation Range
(Example of wireless flash shooting)
Before shooting, perform a test flash
and test shooting.
The transmission distance may be
shorter depending on the conditions
such as the positioning of slave units, the
surrounding environment and weather
conditions.
-6-

1.Set to radio transmission flash mode.
Short press the [ ]button until the screen
displays that the flash mode is set to radio
mode [ ].
2.Set the wireless channel
Short press the [CH/ID] button, then press
[+] or [-] button to set the channel (1-16),
and press [SET/FN] button to confirm.
5.Master unit setting
T h e m o d e , b r i g h t n e s s , e x p o s u r e
compensation and other parameters of the
flash are set in the master unit.
3.Set the wireless ID
Long press the [CH/ID] button to set the ID
(0000-9999) .Then short press [SET/FN] and
[+][-] button in turn. Set the master unit and
slave unit to the same ID. If the master unit
does not have ID setting, please set the ID of
YN200 to the default 0000.
4.Set up the grouping
Press the [GR] button to set the slave
grouping (A/B/C/D/E/F).
Wireless Flash Shooting: Radio Transmission
-7-

M: manual flash mode - flash output
r a n g e 1 /6 4~ 1 / 1 , w it h 1 / 3 g e a r a s
adjustment increment.
In radio mode, long press the [ ] button to
set the flash mode to M, and press [+] and [-
] button to set the flash output.
Multi: Strobe flash mode - flash output
range 1/64~1/4
In radio mode, long press [ ] button to set
the flash mode to Multi, press [+] and [-]
button to set the flash output. Short press
the [SET/FN] button to set the flash times
and the flash frequency successively.
TTL mode
In TTL mode, the metering system of the
cam e ra will dete c t t he flash ligh t ing
reflected from the subject, and the flash
output is adjusted automatically, equalizing
exposure of the subject and background.
Press the[+] [-] button to set exposure
compensation. The exposure compensation
va l ue s et b y t he s lav e u nit w i ll b e
s u p e r i m p o s e d o n t h e e x p o s u r e
compensation set by the master unit.
Wireless Flash Shooting: Radio Transmission
-8-
6.Flash mode setting*
In radio mode, long press the [ ] button to
switch between TTL/M/MULTI different
flash modes.
*For or
using RF603/RF605 as the master unit.
synchronous interface triggering

Optical Transmission:
Be careful not to block the optical transmission sensor
during use.
The flash unit supports wireless slave flash
shooting (optical transmission)which requires master flash to equip
with optical transmission function, flash mode can be set by the
master flash.
Supported flash mode: TTL,M.
Supported Communication channels: 1,2,3,4.
Supported grouping A,B,C
Supported master unit:
YN 5 6 8E X II / 58 0E X( II )/60 0 E X(RT )S B9 00 /S B800 / S B7 00 ,i ntern a l
flashing command from7D/60D/600D Camera flash, C command of
1.Set flash mode to optical transmission.
Press the [ ] button until the screen
displays that the flash mode is set to [ ].
2.Set up wireless channels and grouping
Short press the [CH/ID] button to set the
channel. Press the [GR] button to set the
grouping.
3.Setting of master unit
The mode and grouping of participating
flash are set in the master unit, please refer
to the manufacturer's manual for details.
S1 mode: In this mode it will work with the
first flash synchronously of the master flash,
with the result consistent with the use of
radio slave. To use this mode properly, the
master flash should be set at manual flash
S2 mode: It is also called "pre-flash cancel
mode". It can neglect the pre-flash given by
TTL flash. Therefore, it can support the
master flash working in TTL mode.
S1 and S2 mode: S1 and S2 mode are suitable for Manual flash
environment and TTL flash environment respectively. Under these
two modes, the way to adjust the output is like that in M mode.
Press the [ ] button until the screen displays that the flash mode
is set to [S1] or [S2].
-9-
Wireless Flash Shooting: Optical Transmission

1.Restoring Factory Settings
Press the [GR] and [CH/ID] buttons for 2
seconds, and the flash will resume factory
settings (radio slave mode, channel CH1, ID
0000).
2.Firmware Upgrade
1).Log in the YONGNUO official website
(www.hkyongnuo.com) to download the
upgrade software and the latest
firmware.
2).Power off, use USB-Micro USB cable
connect to PC. (Do not include cable)
3).Pressing the [ ] button and set the
power switch to [ON], the LCD will display
firmware upgrade interface.
4).Complete the firmware upgrade
operation according to the prompt of
software.
-10-
Other Functions
3.About Overheat protection
When continuous flash, the temperature of the flash tube may
increase, a warning icon[ ] icon will be displayed on LCD panel, and
the recycling time will be longer.
When repeated firings of the flash, the overheat protection
function will be triggered, the LCD is lighting in red, the speedlite will
be locked ,in such case, please wait for about 3 to 5 minutes before
continuing use.
When the speedlite warns overheating, please reduce the use
intensity.
Please mind the flash tube when you take it out after the
continuous shooting.

4.Custom function
Long press the [SET/FN] button to enter the
custom function setting options, short press
the [SET/FN] and press [+] [-] button to set,
and long press the [SET/FN] button again to
exit the custom function setting.
30:30Min 60:60min 90:90min
ON:Enable OFF:Disable
NO.function
Fn1 Beeper*
Fn2 Auto standby time
Fn3 Flash Duration Display(t0.1) ON:Enable OFF:Disable
Meaning
Transmitter
(Speedlite)
Group
Function
TTL/
High Speed Sync M/Multi
YN560-TX PRO
Series
YN862 Series
RF603(II)Series
YN560-TX(II)
Series
YN560IV/YN660
YN720speedlite
Support
RF605Series
Do not support
5.About the YN200 Radio Compatibility ListTransmission
Support
Support
Support
Support
Support Support
Support
Support
Support
Support
SupportSupport
Do not support
Do not support
Do not support
Do not support
-11-
Meaning Method
Tick-a long sound The speedlite is fully charged
Tick-Tick-Tick Low battery
*The meaning of Sound Prompt)Beeper(
The sound Form
Normal
Charge the battery
Enable this function, the flash will make different sounds to indicate
its working status.
Tick- -TickTick-Tick-Tick Overheat Reduce the use intensity
Other Functions

Model: YN200
Flash output:200W
Guide No:60@ISO100 (using the reflector)
Color temperature:5600k
Power supply: 14.4V 2900mAh lithium battery
Recycle time: 0.01-2S
Power Adjustment: 1/1~1/64
Full power flashes: About 500
Trigger mode: Radio slave mode(YN560), optical transmission
mode(SC/SN), S1, S2, synchronous interface trigger
Flash mode: TTL、M、Multi
Synchronous interfaces:3.5MM
Upgrade interface: Micro -USB
Dimensions:
Weight: About
Contains items: YN200 speedlite (1), 200W Flash tube (1),YN-B2900
Li-ion battery (1),YN-C2900 charger (1),charging cable (1)
About
About 205*78*53mm(without flash tube)
540g(without battery and flash tube)
The functions of this user manual are based on test conditions of our
company.Further notice will not be given if the design and
specifications change.
The YONGNUO logo in this manual includes the registered
trademark or trademark of Shenzhen Yongnuo Photography E q u
i p m e n t C o . , L t d i n C h i n a o r / a n d o t h e r
countries(regions). All other trademarks are the property of their
respective owners.
-12-
Specifications

长时间不使用本产品时,请将电池取出。
需要存放和运输本产品时,请将闪光管取下。
安装及连接附件时,务必关闭电源。
闪光灯适用于通风的环境,使用时请保持闪光灯的散热孔不被堵
塞。
使用闪光灯后,严禁用手接触闪光管,否则可能会引起灼伤。
请勿用湿手接触产品,也不可暴露雨中。
请勿在易燃易爆的环境中使用。
若需保养或维修,须由本公司或授权的维修人员进行,自行拆装
可能导致触电等意外发生。
请勿让儿童接触本产品。
注意事项
感谢您选购永诺闪光灯YN200。
请仔细阅读本说明书以了解本产品的各项安全须知,功能,保养等,请妥善保
存本说明书以备查阅。
-1-

YN200是永诺首款大功率外拍闪光灯,闪光功率高达200W,采用
14.4V 2900mAh锂电池供电设计,极速回电系统,2秒回电,全光
输出可达500次。
支持永诺全新升级的RF无线电闪光系统
可接收YN862系列、YN560-TX PRO系列等 TTL主 控 单 元 的 控
制 、 引 闪 信 号 , 实 现T T L以及 M / M u l t i 模 式 离 机 闪 光 ;
可接 收永诺 Y N 5 6 0 - T X (II)/RF603/RF605等无 线引 闪器的控
制、引闪信号,实现M/Multi模式闪光。
使用可拆卸裸管灯管,GN60大指数
GN60@ ISO100(使用反光 罩)支持TTL闪光、 手动闪光 、频闪闪
光,支持高速同步,最高同步速度可达1/8000秒。
支持16个2.4G无线电频道,多达10000个可设置的摄影师ID, 以及
A/B/C/D/E/F六个闪光分组。
带有附件卡口,可安装灯头附件,如反光罩等。
配备进口电芯的大容量电池,并使用Type-C接口充电器,支持使
用PD协议电源适配器(不含)进行快速充电。
支持USB固件升级
配备USB接口,支持固件升级,用户可登录永诺官网下载固件升
级包对闪光灯进行升级。
支持无线光从属功能
可接收永诺、C家、N家光学主控信号,支持S1和S2避预闪触发模
式。
配备有3.5MM同步插孔,支持同步接口引闪。
功能简介
-2-

1/4“安装孔 USB升级接口
(Micro USB)
3.5MM
同步接口
电源开关
电池释放键
显示屏
1.YN-B2900锂电池
4.YN200闪光灯
2.YN-C2900充电器
3.200W闪光管
随附物品
5.USB-A to USB-C充电线
无线电状态
指示灯
光学传输传感器
电池仓(电池) 闪光管
控制面板
将YN-B2900电池按箭头方向将电池装入充电器.
将USB电源适配器(不含)与YN-C2900充电器使用
Type-C充电线进行连接,即可进行充电.
如使用支持PD快充标准的电源适配器,仅需约3个小
时即可充满,如使用5V2A充电器,需要约六小时.
电池充满后,按下电池释放键,即可取出电池。
YN-C2900充电器使用指南
各部位名称
-3-

2.LINK指示灯
颜色 状态
绿色灯 点亮 无线电通信
红色灯 点亮 无线电引闪
绿色灯 闪烁 休眠模式*
含义
部件 操作
在无线模式下,短按进入频道设置,长按进行ID设置
短按该按钮,闪光灯将在各闪光模式切换
(无线电模式(YN560 SLAVE)/光 学传 输/S1/S2)无线
电模式下,长按该按钮可以在M/Multi模式切换
设置无线分组,支持A-F从属分组
在不同模式下短按实现设置/确认功能,如频道、ID、频闪
频率、次数,自定义功,长按设置自定义功能
按+按钮增加参数,按-按钮减小参数
设置在ON位置开机,OFF位置关机
亮红灯表示已充满电,按下测试闪光
(回电指示灯)
电源开关
*关于休眠模式
休眠模式可减少闪光灯电量消耗,可通过自定义功能开启(
休眠模式下,按闪光灯任意按钮或通过无线电主控单元通信
均可唤醒从属闪光灯。
见第
11页),
1.控制面板
-4-
各部位名称

2.安装/拆卸灯头附件(选购件)
如图,将附件(如反光罩)插入灯头附件卡口中,按箭头方向旋转附
件,即可完成安装。拆卸时,往箭头反方向旋转并取出附件。
安装
4.开启电源
将闪光灯电源开关拨至ON开启电源,OFF为关闭
电源。
3.安装电池
将电池按图所示安装至电池仓,听到“咔”一声即为安装到位。
取出电池时,首先按下电池释放键,即可取出电池。
1.安装/拆卸闪光管
如图,将闪光管较细的脚对准灯头相应位置
插入闪光管即可。
警告:闪光 灯使用完毕后, 请等待数分钟以
确认灯管冷却,方可取出闪光管。
-5-

2.通过同步接口引闪
将引闪线(不含)插入3.5MM同步触发口,可使
用相机或通用型无线引闪器同步闪光。
将闪光灯设置为无线电模式,并将闪光模式设
置为【M】或【MULTI】。如果设置为TTL或
OFF,将不能闪光。
3.通过光控引闪(见第9页)
A:使用闪光灯同步引闪(S1,S2)
支持的闪光模式:M
B:使用主控功能的闪光灯引闪(光学传输)
支持光学传输频道1-4,分组A/B/C
支持的闪光模式:ETTL,M
通过兼容的主控闪光灯(相机)控制
1.通过无线电引闪(见7-8页)
YN200只能作为从属闪光灯,推荐使用永诺YN560-TX PRO系列闪光灯信号
发射器作为主控单元,支持ETTL/i-TTL,手动、频闪闪光,支持高速同步。
短按【 】按钮设置为【 】无线电模式,并与主控单元设置为相同的频
道及ID即可,本系统设计为安装在相机上的闪光灯(主控单元)的设置会自动
反映在受无线控制的闪光灯(从属单元)上。因此,在拍摄期间不需要操作从
属单元。
选择引闪方式
定位和操作范围(示例)
开始拍摄前进行测试闪光和试拍。
根据从属单元的位置、周围环 境 和 天 气
状况等,传输距离可能更短。 主控单元
从属单元
从属单元
从属单元
无线电传输距离约100米
-6-
Table of contents
Other Yongnuo Camera Accessories manuals

Yongnuo
Yongnuo yn565ex II User manual

Yongnuo
Yongnuo yn565ex II User manual

Yongnuo
Yongnuo RF-603 User manual

Yongnuo
Yongnuo YN565EXII User manual

Yongnuo
Yongnuo TOYUG YN-622C User manual

Yongnuo
Yongnuo YN60RGB User manual

Yongnuo
Yongnuo YNRAY200 User manual

Yongnuo
Yongnuo YN650EX-RF User manual

Yongnuo
Yongnuo YN-04II User manual

Yongnuo
Yongnuo RF-603 II User manual