Yowza naples plus cardio core evo User manual

NAPLES PLUS Cardio Core EVO
※TABLE OF CONTENTS
1. PRECAUTIONS................................. P1
2. POWER REQUIRMENTS............................. P2
3. BEFORE YOU BEGIN.............................. P3
4. SUPPLIED COMPONENTS / SUPPLIED HARDWARE.............. P4~P5
5. PARTS LIST................................ P6~P10
6. ASSEMBLY INSTRUCTIONS........................ P11~P19
7. EXPLODED DIAGRAM........................... P20~P24
8. WIRE DIAGRAM........................ ........ P25
9. STABILIZER ADJUSTMENT.......................... .P26
10. TRANSPORT INSTRUCTIONS..........................P27
11. IMPORTANT STEPS.............................. P28
12. MUSCLE CHART............................... P29
13. STRETCHING ROUTINE............................ P30
14. WARRANTY............................... P31~P32
15. COMPUTER OPERATION......................... P33~P43
Yowza Technical Support: 877-969-9240
Serial Number: ________________________
Original Sales Order # ________________________
Purchase Date: ______________

1
YOWZA NAPLES PLUS
PRECAUTIONS
Open the boxes:
You are now ready to open the boxes of your new equipment. Make sure to inventory all of the parts that areincluded in the boxes.
Check the Parts List for a full count of the number of parts included for this product to be assembled properly. If you are missing any
parts or have any assembly questions call your local dealer or contact us directly.
Gather your tools:
Before starting the assembly of your unit, make sure that you have gathered all the necessary tools you may require to assemble the
unit properly. Having all of the necessary equipment at hand will save time and make the assembly quick and hassle-free.
Clear your work area:
Make sure that you have cleared away a large enough space to properly assemble the unit. Make sure the space is free from anything
that may cause injury during assembly. After the unit is fully assembled, make sure there is a comfortable amount of free area around
the unit for unobstructed operation.
Invite a friend:
Some of the assembly steps may require heavy lifting. It is recommended that you obtain the assistance of another person when
assembling this product.
User Weight Limitation:
Please note that there is a weight limitation for this product. If you weigh more than 400lbs. it is not recommended that you use this
product. Serious injury may occur if the user’s weight exceeds the limit shown here. This product is not intended to support users
whose weight exceeds this limit.
Attention:
This appliance can be used by children aged from 8 years and above and persons with reduced physical, sensory or mental capabilities
or lack of experience and knowledge if they have been given supervision or instruction concerning use of the appliance in a safe way
and understand the hazards involved.
Children shall not play with the appliance.
Cleaning and user maintenance shall not be made by children without supervision.

2
http://www.yowzafitness.com/
POWER REQUIREMENTS
IMPROPER CONNECTION OF THE EQUIPMENT GROUNDING CONNECTOR CAN RESULT IN THE RISK OF AN ELECTRIC
SHOCK. CHECK WITH A QUALIFIED ELECTRICIAN OR SERVICE MAN IF YOU ARE IN DOUBT AS TO WHETHER THE
PRODUCT IS PROPERLY GROUNDED. DO NOT MODIFY THE PLUG PROVIDED WITH THE PRODUCT, IF IT WILL NOT FIT THE
OUTLET; HAVE A PROPER OUTLET INSTALLED BY A QUALIFIED ELECTRICIAN.
This Cardio Core EVO can be seriously damaged by sudden voltage changes in your home’s electrical power. Voltage spikes, surges
and noise interference can result from weather conditions or from other appliances being turned on or off. To reduce the possibility of
Cardio Core EVO damage, always use a surge protector (not included) with your Cardio Core EVO.
Surge protectors can be purchased at most hardware stores. The manufacturer recommends a single outlet surge protector with a UL
1449 rating as a Transient Voltage Surge Suppressor (TVSS) with a UL suppressed voltage rating of 400V or less and an electrical
rating 110VAC, 20 amps.
This Cardio Core EVO must be grounded to reduce the risk of electrical shock. Grounding provides a path of least resistance for
electric current, should the Cardio Core EVO malfunction. This Cardio Core EVO is equipped with an electrical cord that has an
equipment-grounding conductor and a grounding plug. Always plug the power cord into a surge protector, and plug the surge protector
into an appropriate outlet that is properly installed and grounded in accordance with all local codes and ordinances.
This product is for use on a nominal 110-volt circuit, and has a grounding plug that looks like the plug illustrated in the drawing below.
GFCI outlets and GFCI Circuit Breakers are NOT recommended for use on this product. GFCI outlets and GFCI Circuit Breakers may
cause this equipment to function improperly.

3
YOWZA NAPLES PLUS
BEFORE YOU BEGIN
Before assembling or using the exercise cycle, please read the following instructions carefully. They contain important information for
use and maintenance of the equipment as well as for your personal safety. Keep these instructions in a safe place for maintenance
purposes or for ordering spare parts.
This product has moving parts and users must be careful not to accidentally pinch fingers or other appendages in the
openings especially while in use. Please keep small children and pets away from this product. Interference with the moving
parts can cause serious injury or death.
Product-Scope: This product is made for home use only and tested up to a maximum body weight of 400lbs.
Product-Performance: This ergo meter is speed independent, i.e. the performance is independent from pedal frequency.
Product-Feature: The resistance can be changed by the computer.
Use-Scope: The exerciser may not be used by persons with a weight of over 400lbs.
Use-Scope: This product is designed for the physical exercise by adults. Please ensure that children only use it under the
supervision of an adult.
Use-Environment: Ensure that those present are aware of possible hazards, e.g. movable parts during training.
Use-Environment: Ensure that sufficient space is available to use the home exerciser.
Use-Environment: Place the home exerciser on an even, non-slippery surface.
Use-Environment: Please ensure that liquids or perspiration never enter the machine or electronics.
Use-Environment: Keep the equipment indoors, away from moisture and dust. Do not put the equipment in a garage or covered
patio, or near water.
Use-Environment: The product is made for home use only. Warranty and manufacturer's liability do not extend to any product or
damage to the product caused by commercial purposes.
User-Health: Consult your physician before starting with any exercise programs to receive advice on the optimal training.
User-Health: Incorrect/excessive training can cause health complications and/or injuries.
User-Health: If you feel any sickness, chest pain, fits of dizziness or breathlessness during your training, immediately stop the
training and consult your physician.
Product-Preparation: Ensure that training only starts after correct assembly, adjustment and inspection of the home exerciser.
Product-Preparation: Follow the instructions for assembly carefully.
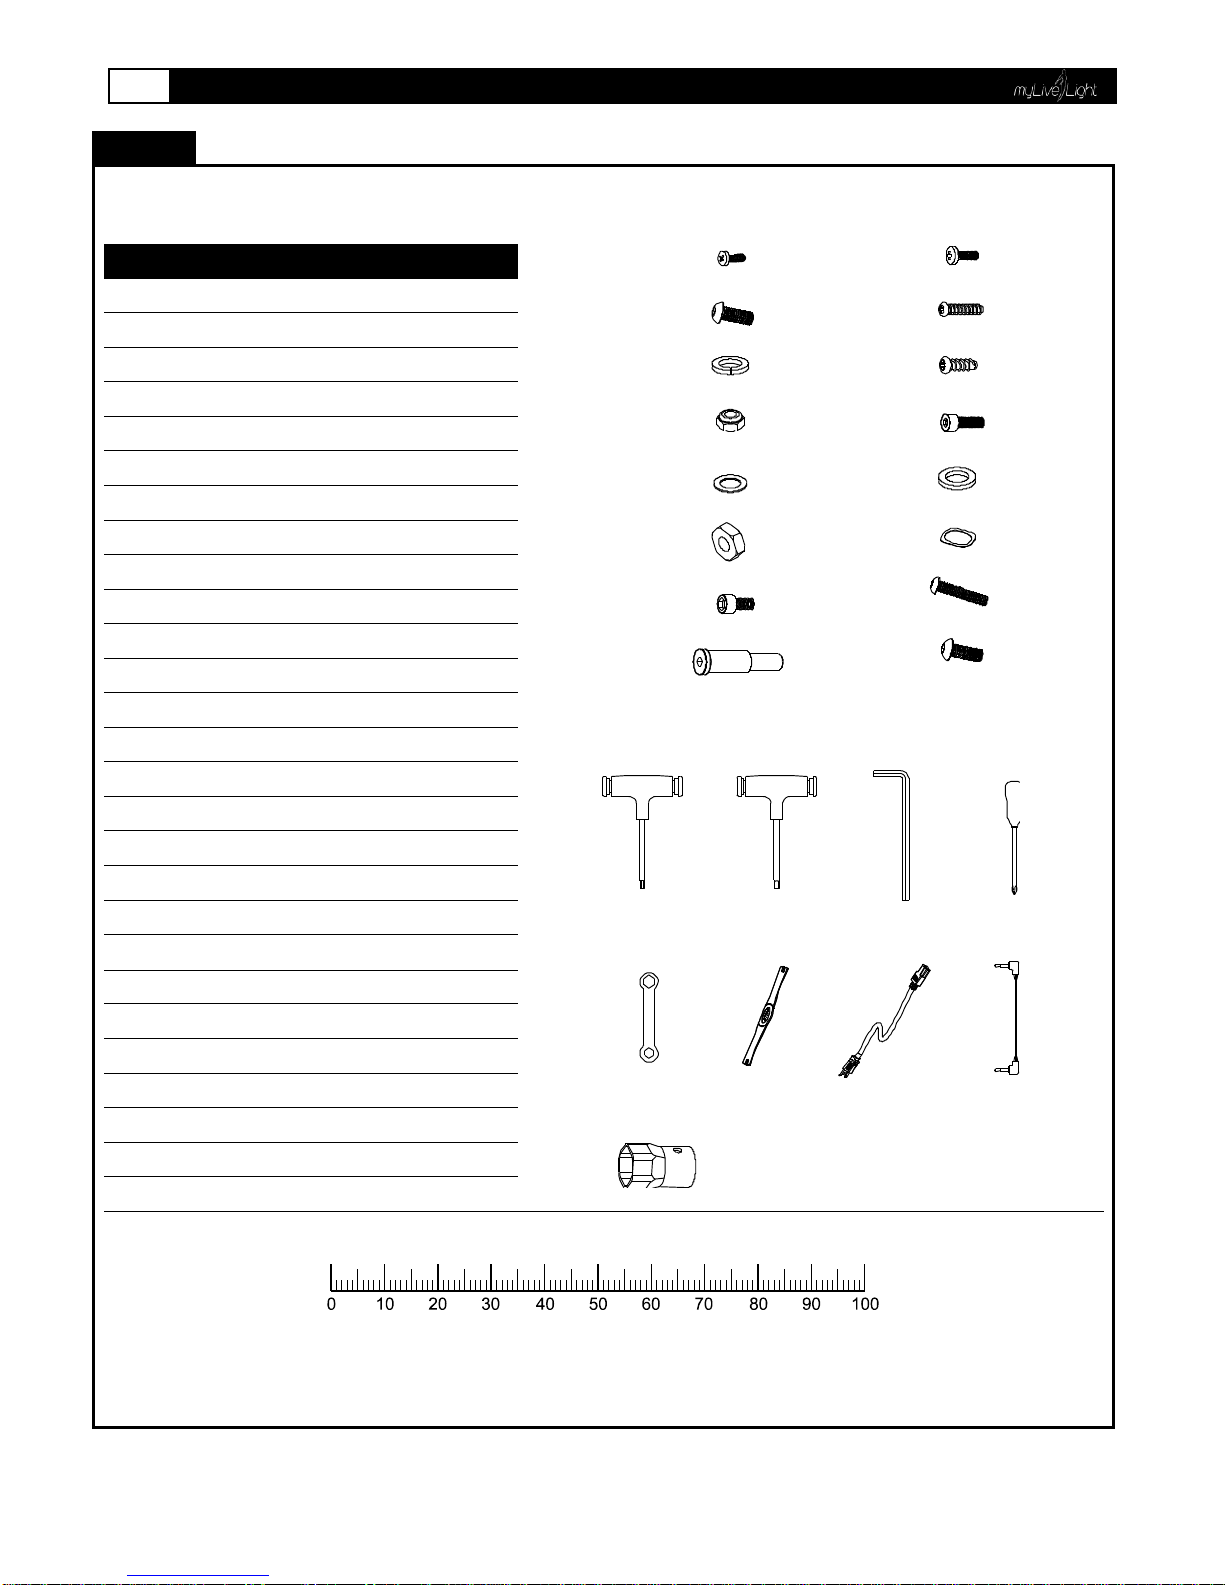
Product-Preparation: Only use suitable tools for assembly and ask for assistance if necessary.
Product-Preparation: Only use original Yowza parts as delivered (see checklist).
Use-Preparation: Tighten all adjustable parts to prevent sudden movement while training.
Use-Instruction: Please follow the advice to correct training as detailed in the training instructions.
Use-Instruction: Do not use the home exerciser without shoes or loose shoes.
Use-Safety: Be aware of non-fixed or moving parts whilst mounting or dismounting the home exerciser.
Use-Safety: Use the height adjustment caps on the rear tube to ensure stable position of the home exerciser
Use-Safety: Make sure the front wheels are placed in the correct position: see assembly instructions.
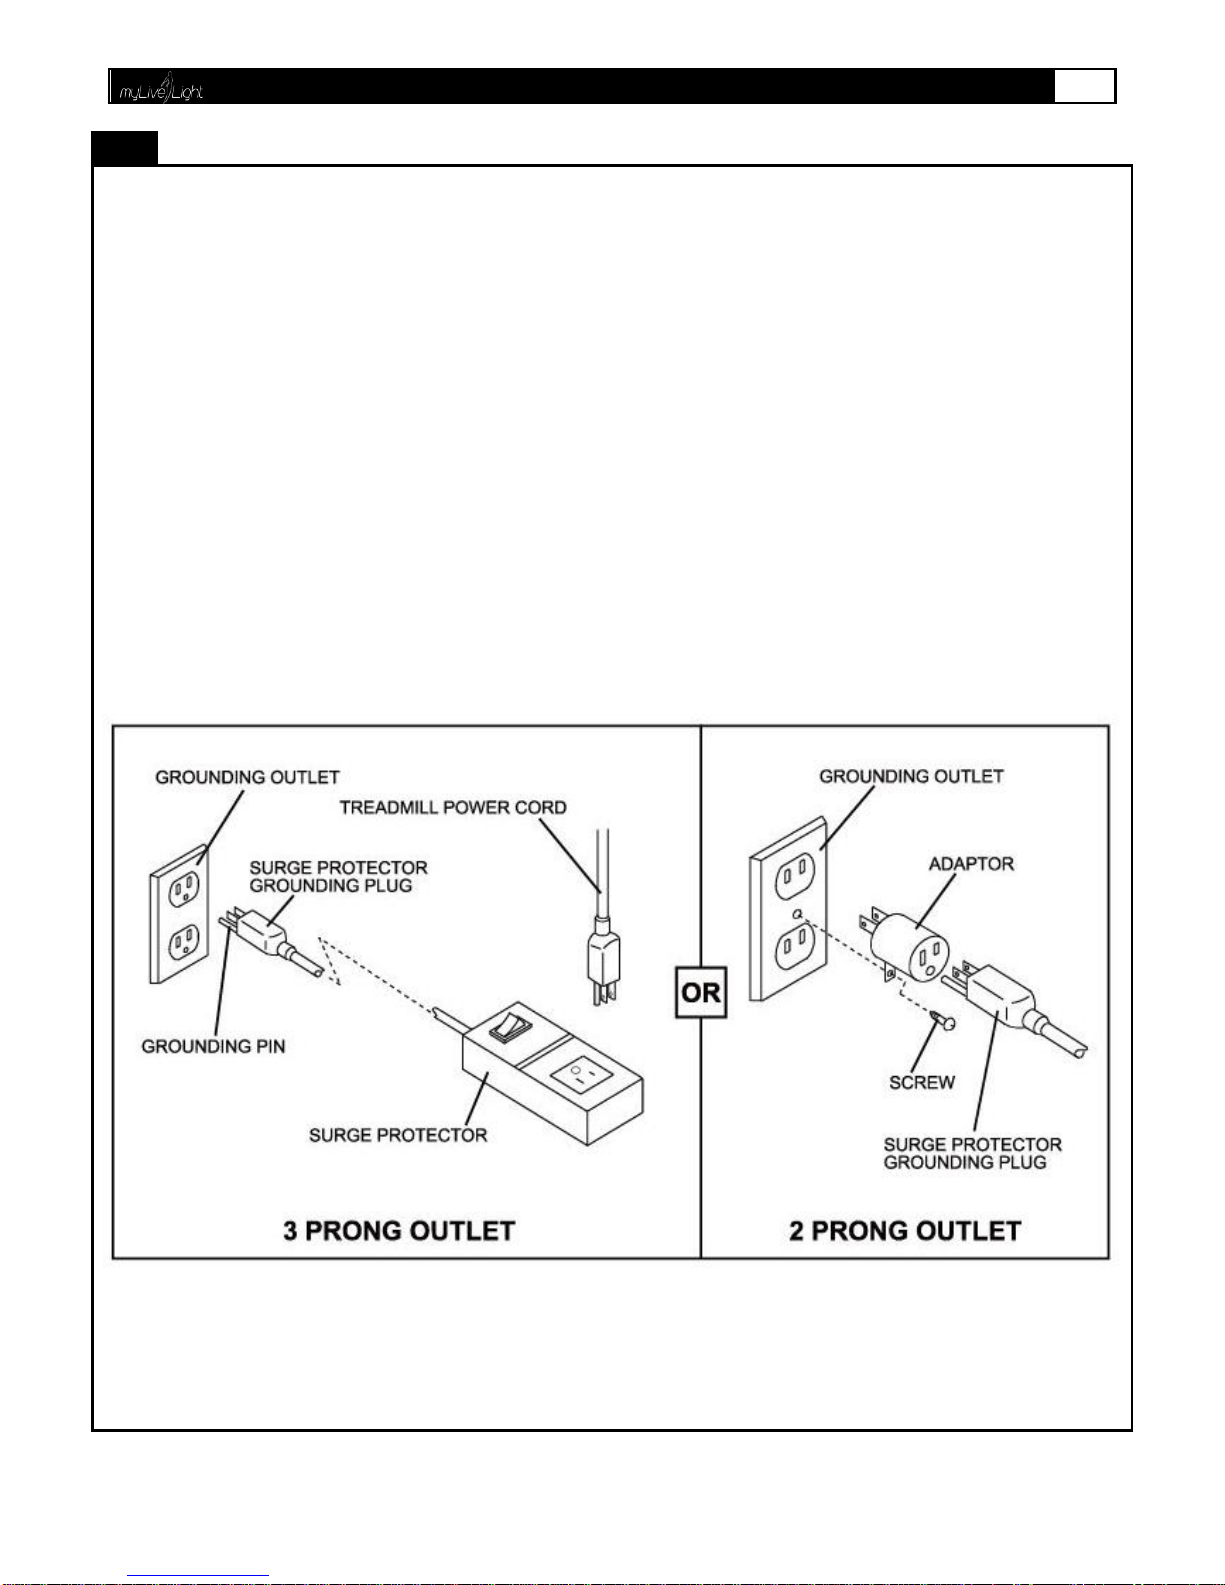
Product-Power-Safety: The unit requires a power supply of 100V –125V / 50-60Hz. It should be connected to a safety socket
with a single 20A fuse. Before commissioning the appliance pay attention to the fact that the correct plug-in power supply unit
(observe marking) has been connected properly
Product-Maintenance: If the equipment is in regular use, check all its components thoroughly every 1 –2 month. Pay particular
attention to the tightness of bolts and nuts. This applies especially to the securing bolts for saddle and handlebars.
Product-Maintenance: Incorrect repairs and structural modifications (e.g. removal or replacement of original parts) may endanger
the safety of the user.
Product-Maintenance: Damaged components may endanger your safety or reduce the lifetime of the equipment. For this reason,
worn or damaged parts should be replaced immediately and the equipment taken out of use until this has been done.
Product-Maintenance: Only use original Yowza spare parts.
Product-Maintenance: Do not under any circumstances carry out electrical repairs or alterations yourself. Always ensure that
such work is done by a properly qualified electrician.
Product-Maintenance: Disconnect the power from the unit before doing repair, maintenance or cleaning work.

4
http://www.yowzafitness.com/
SUPPLIED COMPONENTS
This list identifies the major components you will use to assemble this product.
No.
Description
Qty.
103
102
539
540
541
542
557
343
341
702
703
704
705
708
552
A1
A2
A4
A3
102
Moving Handlebar –Left
1
103
Moving Handlebar –Right
1
341
Base Frame Lower Cover –
Rear
2
343
Base Frame Lower Cover –
Front
2
539
Saddle
1
540
Seat Back Pad
1
541
Seat Back Pad Cover
1
542
Seat Cushion
1
552
Water bottle holder
1
557
CSpring Fixed Block
2
702
Pedal Arm Front Pivot
Cover –32mm
2
703
Base Frame Front Cover
2
704
Undercarriage Cover –Left
1
705
Undercarriage Cover –Right
1
708
Pedal Arm Front Pivot
Cover –37mm
1
A1
Button Control Panel
Assembly
1
A2
Console Upright Assembly
1
A3
Base Frame Assembly
1
A4
Main Frame Assembly
1

5
YOWZA NAPLES PLUS
SUPPLIED HARDWARE
This list identifies the hardware you will use to assemble the product. To help distinguish between the various types of
screws and bolts, use the scale below to measure them and compare them to the sizes listed.
No.
Description
Qty.
F G
DB CA
E H
408
461
494
504
505
506
509
510
514
429
430
517
521
553
556
502
I
408
4X15mm Screw –Cone Point
4
429
M10X20mm Allen Head Bolt
4
430
10X16X2mm SpringWasher
4
461
M6 Nylon Nut
4
494
M5/16X32mm Allen Head Bolt
2
502
M14 Nut
2
504
M8X20mm Allen Head CAP Bolt
4
505
20X79.9-M14X25mm Bolt
2
506
4X12mm Screw –Flat Point
6
509
4X19mm Screw
4
510
4.5X12mm Screw
6
514
M6X20mm Allen Head CAP Bolt
6
517
10X18X2mm Washer
4
521
20.7X29.1X0.3mm Wave Washer
2
553
M6x35mm Allen Head Bolt
2
556
M8x15mm Allen Head Bolt
5
A
5mm T-Type Allen Key
1
B
6mm T-Type Allen Key
1
C
8mm Allen Key
1
D
Screwdriver
1
E
13 &10mm Combination Wrench
1
F
Chest Belt
1
G
Power Cord
1
H
MP3 Audio Wire
1
I
Spanner
1
MILLIMETERS

6
http://www.yowzafitness.com/
PARTS LIST
Item No.
Description
Qty.
Part No.
NAPLES PLUS-100
101
Console Support Tube
1
NAPLES PLUS-101
102
Moving Handlebar –Left
1
NAPLES PLUS-102
103
Moving Handlebar –Right
1
NAPLES PLUS-103
106
Pedal Arm –Left
1
NAPLES PLUS-104
107
Pedal Arm –Right
1
NAPLES PLUS-105
109
Base Frame
1
NAPLES PLUS-106
110
Incline Transmission Tube
1
NAPLES PLUS-107
112
Main Frame
1
NAPLES PLUS-108
115
Tension Wheel Bracket
1
NAPLES PLUS-109
118
Action Arm –Left
1
NAPLES PLUS-110
119
Action Arm –Right
1
NAPLES PLUS-112
NAPLES PLUS -200
201
Flywheel Fixed Plate - Left
1
NAPLES PLUS-113
202
Flywheel Fixed Plate - Right
1
NAPLES PLUS-115
204
Console Cover Support Rear Plate - Left
1
NAPLES PLUS-116
205
Console Cover Support Rear Plate - Right
1
NAPLES PLUS-118
215
Bearing 2203
2
NAPLES PLUS-119
219
Bushing 16X22.2X10.7mm
4
NAPLES PLUS-120
220
12X20X9 Bushing
2
NAPLES PLUS-121
221
Flywheel Pivot
1
NAPLES PLUS-201
222
Bearing 6203
2
NAPLES PLUS-202
224
Flywheel
1
NAPLES PLUS-203
225
Bearing 6300
2
NAPLES PLUS-204
226
Crank
2
NAPLES PLUS-205
227
Crank Disk
1
NAPLES PLUS-206
228
Crank Disk Oval Cap
1
NAPLES PLUS-206
230
Bearing 6005
2
NAPLES PLUS-211
231
Speed Sensor Base
1
NAPLES PLUS-212
231
Crank Disk Pivot
1
NAPLES PLUS-213
233
Belt
1
NAPLES PLUS-214
234
Level Adjuster
3
NAPLES PLUS-215
238
Console Overlay
1
NAPLES PLUS-216
245
Bearing 6904
10
NAPLES PLUS-217

7
YOWZA NAPLES PLUS
PARTS LIST
Item No.
Description
Qty.
Part No.
NAPLES PLUS -300
301
Plastic Bushing 20X26X6mm
2
NAPLES PLUS-224
302
Plastic Bushing 22X26X6mm
2
NAPLES PLUS-225
303
Hand Pulse Sensor
2
NAPLES PLUS-226
304
Button Cover –Top
1
NAPLES PLUS-227
305
Button Cover –Bottom
1
NAPLES PLUS-228
306
Console Bottom Cover –Left
1
NAPLES PLUS-230
307
Console Bottom Cover –Right
1
NAPLES PLUS-231
309
Volume Membrane ButtonOverlay
1
NAPLES PLUS-232
312
Action Arm Drive Gear
2
NAPLES PLUS-233
313
Moving Handlebar Drive Gear
2
NAPLES PLUS-237
319
Switch Plate
1
NAPLES PLUS-238
320
Pedal Soft Cushion
2
NAPLES PLUS-244
321
Left Pedal
1
NAPLES PLUS-301
325
Vent Cover –Rear
1
NAPLES PLUS-302
326
Rear Shroud Inlet –Left
1
NAPLES PLUS-303
327
Rear Shroud Inlet –Right
1
NAPLES PLUS-304
331
Wheel Cap 112X41.5mm
2
NAPLES PLUS-305
332
Wheel Cap 46X12mm
2
NAPLES PLUS-306
333
Wheel 140X51.86mm
2
NAPLES PLUS-307
334
Bearing Bracket
2
NAPLES PLUS-309
335
Control Board Cover
1
NAPLES PLUS-312
336
Oval Tube Cap
2
NAPLES PLUS-313
337
Vent Cover –Left
1
NAPLES PLUS-319
338
Rear Shroud –Left
1
NAPLES PLUS-320
339
Rear Shroud –Right
1
NAPLES PLUS-321
340
Vent Cover –Right
1
NAPLES PLUS-324
341
Base Frame Lower Cover –Rear
2
NAPLES PLUS-325
343
Base Frame Lower Cover –Front
2
NAPLES PLUS-326
349
Right Pedal
1
NAPLES PLUS-327
301
Plastic Bushing 20X26X6mm
2
NAPLES PLUS-224
302
Plastic Bushing 22X26X6mm
2
NAPLES PLUS-225
303
Hand Pulse Sensor
2
NAPLES PLUS-226
304
Button Cover –Top
1
NAPLES PLUS-227
305
Button Cover –Bottom
1
NAPLES PLUS-228
NAPLES PLUS -400
401
8X27X2mm Washer
2
NAPLES PLUS-328
402
6X11X3mm Washer
2
NAPLES PLUS-330
403
Taper Fixing Insert
37
NAPLES PLUS-403
405
8X14XT2.0mm Spring Washer
5
NAPLES PLUS-405

8
http://www.yowzafitness.com/
PARTS LIST
Item No.
Description
Qty.
Part No.
408
4X15mm Screw –Cone Point
4
NAPLES PLUS-406
410
M8X20mm Screw
2
NAPLES PLUS-408
414
M6X12mm Allen Head Bolt
13
NAPLES PLUS-409
415
M8X20mm Allen Head Bolt
4
NAPLES PLUS-415
416
M6 Nut
2
NAPLES PLUS-416
417
M8 Nylon Nut
3
NAPLES PLUS-416
418
M25 C Clip
2
NAPLES PLUS-418
422
M10X45mm Bolt
1
NAPLES PLUS-442
423
4.5X15mm Screw
2
NAPLES PLUS-423
424
M6X12mm Allen Head CAP Bolt
8
NAPLES PLUS-424
425
6X10X1mm SpringWasher
27
NAPLES PLUS-425
426
20X6X1.5mm Washer
5
NAPLES PLUS-426
427
M42 C Clip
2
NAPLES PLUS-427
429
M10X20mm Allen Head Bolt
8
NAPLES PLUS-429
430
10X16X2mm SpringWasher
12
NAPLES PLUS-430
431
10X30X3mm Washer
1
NAPLES PLUS-431
432
M4 Nylon Nut
2
NAPLES PLUS-432
435
16X25XT3.0 Washer
4
NAPLES PLUS-433
436
M10X55mm Allen Head Bolt
1
NAPLES PLUS-434
437
M6X16mm Allen Head CAP Bolt
8
NAPLES PLUS-435
438
17.2X22X1mm Washer
7
NAPLES PLUS-436
440
6X32X2mm Washer
1
NAPLES PLUS-440
442
M22 Nut
2
NAPLES PLUS-442
445
Pedal Arm Pivot
2
NAPLES PLUS-445
446
3/4” Nut
8
NAPLES PLUS-446
447
M10X30mm Allen Head CAP Bolt
2
NAPLES PLUS-447
448
M4X15mm Screw
2
NAPLES PLUS-448
449
4X12mm Screw –Flat Point
11
NAPLES PLUS-449
451
M4X40mm Allen Head CAP Bolt
1
NAPLES PLUS-451
452
M5X8mm Allen Head Bolt
2
NAPLES PLUS-452
453
M4X6mm Screw
4
NAPLES PLUS-453
454
Pin Nut
4
NAPLES PLUS-454
455
M4X45mm Screw
20
NAPLES PLUS-455
456
M3X8mm Screw
2
NAPLES PLUS-456
457
Iron Plate Nut
8
NAPLES PLUS-457
459
M8X45mm Bolt
3
NAPLES PLUS-459
460
8X16X1.5mm Washer
6
NAPLES PLUS-460
461
M6 Nylon Nut
4
NAPLES PLUS-461
463
M6X15mm Screw
2
NAPLES PLUS-463
464
M5/16X32mm Allen Head Bolt
4
NAPLES PLUS-464
466
4X8mm Screw –Flat Point
4
NAPLES PLUS-466
467
M5X15mm Screw
9
NAPLES PLUS-467
468
M5 Nut
10
NAPLES PLUS-468
472
4X15mm Screw –Flat Point
8
NAPLES PLUS-472
476
M5 Nylon Nut
2
NAPLES PLUS-476
477
5X10X1mm Washer
3
NAPLES PLUS-477
478
10X20X5mm Washer
1
NAPLES PLUS-478
479
10X23X2mm Washer
1
NAPLES PLUS-479
480
12X20X0.5mm Plastic Washer
2
NAPLES PLUS-480
483
6X13X1.5mm Washer
12
NAPLES PLUS-483

9
YOWZA NAPLES PLUS
PARTS LIST
tem No.
Description
Qty.
Part No.
484
8X18X2mm Washer
4
NAPLES PLUS-484
485
10X30X1mm Plastic Washer
1
NAPLES PLUS-485
490
M10X62 Screw
2
NAPLES PLUS-490
493
Elevation Motor Plastic Bushing
1
NAPLES PLUS-493
494
20X30X0.5mm Washer
2
NAPLES PLUS-494
496
M5X6.5mm Screw
2
NAPLES PLUS-496
484
8X18X2mm Washer
4
NAPLES PLUS-484
485
10X30X1mm Plastic Washer
1
NAPLES PLUS-485
490
M10X62 Screw
2
NAPLES PLUS-490
493
Elevation Motor Plastic Bushing
1
NAPLES PLUS-493
494
20X30X0.5mm Washer
2
NAPLES PLUS-494
496
M5X6.5mm Screw
2
NAPLES PLUS-496
NAPLES PLUS -500
502
M14 Nut
2
NAPLES PLUS-502
508
M10 Nylon Nut
1
NAPLES PLUS-508
509
4X19mm Screw
4
NAPLES PLUS-509
510
4.5X12mm Screw
6
NAPLES PLUS-510
514
M6X20mm Allen Head CAP Bolt
6
NAPLES PLUS-514
517
10X18X2mm Washer
4
NAPLES PLUS-517
521
20.7X29.1X0.3mm Wave Washer
2
NAPLES PLUS-521
525
M10 Nut
1
NAPLES PLUS-525
526
M6X30mm Allen Head Bolt
2
NAPLES PLUS-526
527
OD11XT1.5XL22mm Bushing
4
NAPLES PLUS-527
528
Nylon Nut 5/16X14X6mm
4
NAPLES PLUS-528
529
OD11XT2.5XL22mm Bushing
2
NAPLES PLUS-529
530
6X13X1mm Washer
2
NAPLES PLUS-530
531
8X16X1mm Washer
7
NAPLES PLUS-531
536
Pivot 15X152.1mm
2
NAPLES PLUS-536
537
Pivot 15X118.1mm
1
NAPLES PLUS-537
538
Pivot 12X66.1mm
1
NAPLES PLUS-538
539
Saddle
1
NAPLES PLUS-539
540
Seat Back Pad
1
NAPLES PLUS-540
541
Seat Back Pad Cover
1
NAPLES PLUS-541
542
Seat Cushion
1
NAPLES PLUS-542
544
M6x16mm Allen Head Bolt
2
NAPLES PLUS-544
545
Bearing 6202
6
NAPLES PLUS-545
546
Bearing 6201
2
NAPLES PLUS-546
547
8X23X2mm Washer
6
NAPLES PLUS-547
548
6X16X1.5mm Washer
2
NAPLES PLUS-548
549
Seat Connection Tube-Upper
1
NAPLES PLUS-549
550
Seat Connection Tube-Lower
1
NAPLES PLUS-550
551
Seat Frame
1
NAPLES PLUS-551
552
Water bottle holder
1
NAPLES PLUS-552
553
M6x35mm Allen Head Bolt
2
NAPLES PLUS-553
554
Seat Front Cover
1
NAPLES PLUS-554
555
Rear Shroud –Up Cover
1
NAPLES PLUS-555
556
M8x15mm Allen Head Bolt
5
NAPLES PLUS-556
557
CSpring Fixed Block
2
NAPLES PLUS-557
558
M8x16mm Screw-Flat Point
6
NAPLES PLUS-558

10
http://www.yowzafitness.com/
PARTS LIST
Item No.
Description
Qty.
Part No.
NAPLES PLUS -600
601
8Pin Power Wire –Upper
1
NAPLES PLUS-601
602
8Pin Power Wire –Lower
1
NAPLES PLUS-602
604
Elector-Magnetic Wire
1
NAPLES PLUS-604
605
1 Pin Power Connection Wire
3
NAPLES PLUS-605
606
3C Power Wire
1
NAPLES PLUS-606
607
2 Pin Hand Pulse Sensor Wire –Upper
2
NAPLES PLUS-607
609
2 Pin Hand Pulse Sensor Wire –Lower
2
NAPLES PLUS-609
610
PC Board Assembly
1
NAPLES PLUS-610
612
Wireless receiver wire-300mm
1
NAPLES PLUS-612
613
Membrane key
1
NAPLES PLUS-613
614
Fan
1
NAPLES PLUS-614
615
Wireless receiver
1
NAPLES PLUS-615
616
Elevation Motor
1
NAPLES PLUS-616
618
Transformer
1
NAPLES PLUS-618
619
Control Board
1
NAPLES PLUS-619
620
Power Insert
1
NAPLES PLUS-620
621
Power Switch
1
NAPLES PLUS-621
622
Power Breaker
1
NAPLES PLUS-622
624
Magnetic Sensor
1
NAPLES PLUS-624
628
Speed Sensor
1
NAPLES PLUS-625
632
Ipod dock connecting wire
2
NAPLES PLUS-632
633
Speaker
2
NAPLES PLUS-633
634
Amplifier PC board
1
NAPLES PLUS-634
635
Audio Wire-300mm
1
NAPLES PLUS-635
NAPLES PLUS -700
702
Pedal Arm Front Pivot Cover –32mm
2
NAPLES PLUS-702
703
Base Frame Front Cover
1
NAPLES PLUS-703
704
Undercarriage Cover –Left
1
NAPLES PLUS-704
705
Undercarriage Cover –Right
1
NAPLES PLUS-705
708
Pedal Arm Front Pivot Cover –37mm
2
NAPLES PLUS-706
710
Ball Shaped Handlebar Grip Cover
2
NAPLES PLUS-710

11
YOWZA NAPLES PLUS
ASSEMBLY
CUT
CUT
CUT
2
3
5
4
1
(A) Remove your Naples PLUS from the carton and place it on the floor in an open area.
(B) Remove the Naples PLUS and all the components and hardware from the box.
(C) Check the quantities of all components and hardware with the component and hardware lists on pages 4-5.
(D) Carefully separate all parts by size and type. This is critical as many are of similar size and shape. Use supplied ruler to size.
(E) After verifying inventory, if any parts are missing, please contact Yowza fitness at 877-969-9240.
.

12
http://www.yowzafitness.com/
STEP1
ASSEMBLY
343
341
341
343
408
408
Step 1
STEP1-A) Attach the Base Frame Lower Cover –Rear and Base Frame Lower
Cover –Front (341, 343) to the Base Frame.
STEP1-B) Carefully snap pieces together using plastic guides.
STEP1-C) Secure using Screw –Cone Point (408).
408
X4

13
YOWZA NAPLES PLUS
STEP2
ASSEMBLY
430517 429
429430517
112112
705705
704
Step 2-A
429
B
429
Step 2-B Step 2-C
Step 2
STEP2-A). Remove the Undercarriage Cover (704, 705) by carefully lifting pedal
Assembly and removing each piece one at a time. Be careful not to snap
Plastic push pins when taking apart.
STEP2-B). Place Styrofoam block under Main Frame (A4) to provide clearance for
Assembly.
STEP2-C).Assemble the Base Frame (A3) to the Main Frame (A4) and secure using
four Allen Head Bolt (429) with Spring Washer (430) and Washer (517) by
Allen Key (B).
429
X4
430
X4
517
X4

14
http://www.yowzafitness.com/
STEP3
ASSEMBLY
Step 3
601
602
112
504 504
510 703
509
506
509
510
Step 3-C
Step 3-B
Step 3-A
704
703
STEP3-A). Assemble the Console Support Tube (A2) to the Main Frame and secure
Using four M8x20mm Allen Head CAP Bolts (504). Connect the 8Pin
Power Wire –Upper (601) to 8Pin Power Wire –Lower (602) by sliding
plastic extrusion on connector under plastic clip on second connector .
STEP3-B). Lift the Pedal Arm and attach the Undercarriage Cover (704, 705) to the
Main Frame (A4), and secure using Flat point screw (506), 4X19mm
Screw (509), 4.5X12mm Screw (510).
STEP3-C). Attach the Base Frame Front Cover (703) to the Base Frame (A3) and
secure using two Screws (510).
504
X4
506
X4
509
X4
510
X4

15
YOWZA NAPLES PLUS
STEP4
ASSEMBLY
103102
514514
A
Step 4-B
Step 4-C
Step 4-A
514
102
514
Step 4
STEP4-A). Connect the Moving Handlebar-Left (102) and Moving Handlebar-Right
(103) to Console Upright Assembly (A2).
STEP4-B). Use M6x20mm Allen Head Bolt (504) to connect Moving Handlebars
(102,103).
STEP4-C). Tight the Allen Head Bolts (514) by 5mm Allen Key (A).
504
X6

16
http://www.yowzafitness.com/
STEP5
ASSEMBLY
607
607
609
609
601
461
Step 5
463
601
607
609
607
609
E
461
Step 5-A
Step 5-B
Step 5-C
Step 5-D Step 5-E
STEP5-A). First, put Button Control Panel (A1) on the Console Support Tube (A2),
then take off two M6x15mm Screws (463) from the Button Control Panel
(A1).
STEP5-B). Open the Panel like step B picture.
STEP5-C). Connect 8Pin Power Wire –Upper (601) to the Panel, and connect 2 Pin
Hand Pulse Sensor Wire –Lower (609) to 2 Pin Hand Pulse Sensor
Wire –Upper(607)
STEP5-D). Use M6 Nylon Nut (461) to hold Button Control Panel (A1) on left and right
side by 13 &10 Combination Wrench (E)
461
X2
463
X2

17
YOWZA NAPLES PLUS
STEP6
ASSEMBLY
708
Step 6-B
702
521
494 505
C
Step 6-A
Step 6
702
521 494 505 708
502
502
STEP6-A). Slide the 20x79.9mm Bolt (505) through the 0.5mm Washer (494) &
Wave Washer (521), Action Arm (118), and Pedal Arm (106) then secure
using one M14 Nut (502) and 8mm Allen Key (C).
STEP6-B). Press the Pedal Arm Front Pivot Cover - 32mm (702) and Pedal Arm
Front Pivot Cover –37mm (708) into both ends of the Pedal Arm.
494
X2
502
X2
505
X2
521
X2
702
X2
708
X2

18
http://www.yowzafitness.com/
STEP7
ASSEMBLY
539
541
540
506
556
556
556
556
540
Step 7
Step 7-B
Step 7-C
Step 7-D
Step 7-A
542
557
539
556
541
506
STEP7-A). Connect the CSpring Fixed Block (557) and Seat Cushion (542) to the
Saddle (539).
STEP7-B). Assemble the Saddle (539) to Seat Frame (551) by three M8x15mm Allen
Head Bolts (556).
STEP7-C). Connect Seat Back Pad Cover (541) to the Seat Frame (551).
STEP7-D). Attach the Seat Back Pad (540) to the Seat Frame (551) and secure using
4X12mm Screw –Flat Point (506) & M8x15mm Allen Head Bolt (556).
556
X5
506
X2

19
YOWZA NAPLES PLUS
STEP8
ASSEMBLY
552
553
553
552
Step 8-A
Step 8
STEP8-). Assemble the Water bottle holder (552) to the Seat Frame (551) by using
two M6x35mm Allen Head Bolts (553).
553
X2
Table of contents
Other Yowza Exercise Bike manuals