May be covered under one or more of the following patents: 4,607,656; 4,924,896;5,244,001; 5,421,356; 5,485,863; 5,490,533;
5,511,572; 5,632,292; 5,632,293;5,794,546; 5,797,412; 5,865,127; 5,921,260; 5,934,301; 6,041,800; 6,070,604;6,076,312;
6,129,102; 6,230,729; 6,240,940; 6,431,193;6,439,251; 6,601,599;95-704390;94/2354; 91461; 132167; 95/0693; 9 5 / 6 1 4 0 ;
95/6141; 84107895; 684,978; 2123096;190486; 289754; 215344; 701077; 2128935; 2949648; 48648; DE 695 10 919 T2;
W096/03561. International Design Registration No. DM/009515. Benelux Design Registration No.16959-04. Other US and fore i g n
patents pending. © Copyright 2009 - 1601 Iowa Ave., Riverside, CA 92507 USA (800) 457-4233, All rights re s e rved. Made in China.
C A N O P Y
6
ft
x 6
ft
(1.8m x 1.8m)
IMPORTANT INFORMATION
CARE AND MAINTENANCE
For long lasting durability and the best possible protection for
your Quest
™
Canopy product, follow these care and maintenance
instructions:
• Use a mild soap (not detergent) and plenty of water for top cleaning.
• Let the Quest
™
top and frame dry completely before closing or storing to
avoid mildew.
• Frame will operate and look better if occasionally wiped with silicone spray,
especially before and after use in damp conditions. Remove excess silicone
residue before attaching top.
• Use a seam sealer if top leaks or drips water. Available at most sporting
goods and hardware stores.
• Slightly tighten bolts if frame becomes loose.
IMPORTANT! Read this information before proceeding. It is the
user’s responsibility to take the following precautions at all times.
•Always stake or weight down your QUEST
™
Canopy. Do not use in any
potentially windy or rainy weather. Wind and rain can damage your
QUEST
™
Canopy and may also result in injury to you or others. Therefore,
do not rely on shelter for protection in heavy or prolonged rain storms.
•The QUEST
™
Canopy is designed as a temporary sun shelter. Do not leave up
for extended periods.
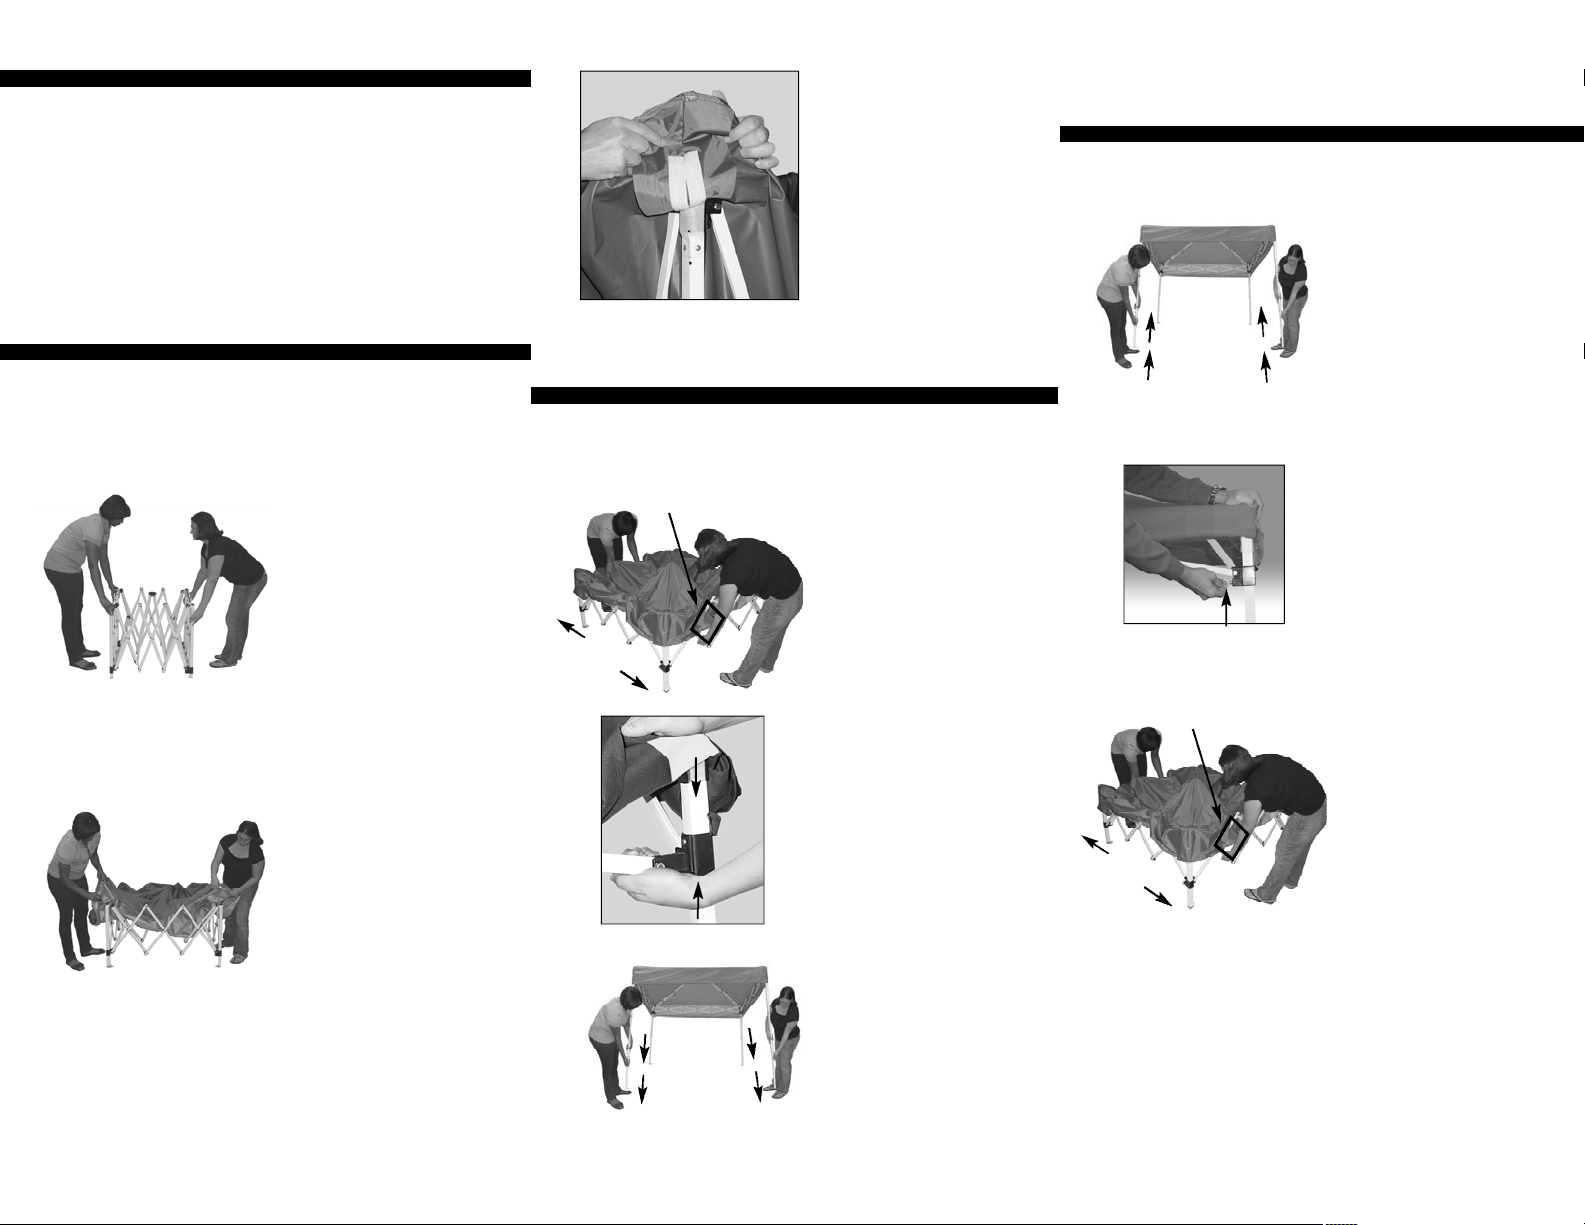
• Use caution when handling the QUEST
™
Canopy frame. Avoid pinching
hands or fingers as frame opens or closes.
• Do not use shelter in a lightning storm.
• Do not leave your QUEST
™
Canopy product unattended.
• Do not build fires under shelter.
WARNING: Keep all flame and heat sources away from
the top fabric. This fabric meet the flammability
requirements of CPAI-84. The fabric may burn if left in
continuous contact with any flame source. The application
of any foreign substance to the fabric may render the
flame-resistant properties ineffective.
0 2 2 A - 0 9 - R 0 0
Z - S h a d e™, manufacturer of the Quest™C a n o p y p ro d u c t ,
w a rrants to the original purchaser who provides a dated
sales receipt from an Authorized Quest™D e a l e r, each part
of the Quest™Canopy to be free from defects in material or
workmanship for a period of one year after the date of
original purchase. The Quest™Canopy frame is covere d
under a limited one year warranty and guarantees the
frame to be free from defects in material or workmanship.
This warranty applies only for normal and expected uses,
as determined by the manufacture r.
Z - S h a d e ’s obligation and liability under this warranty is
limited to the repair or replacement (at its option) of the
p roduct or its parts, after its own review and examination.
RETURN ADVISORY - Please do not re t u rn to the store .
B e f o re re t u rning any part or product to Quest™, or its
designated re p resentative, please phone or write to obtain
specific re t u rn shipping instructions. All shipping costs must
be prepaid, and Quest™, is not responsible for pro d u c t s
damaged in transit.
CONDITIONS - This warranty shall be void as to any
p roduct which has been altered or modified in any manner.
This warranty does not apply to damages caused by wind,
rain, or other forces of nature, not to accidental or
deliberate damage of the product, nor to use of the pro d u c t
that does not conform with the product instru c t i o n s .
This warranty is provided in lieu of all other warr a n t i e s ,
e x p ressed or implied.
1 YEAR LIMITED WARRANTY
Take time to learn how to provide
years of durable and safe use from
your QUEST
™
Canopy product. After
reading these instructions carefully, if
you have any need of assistance, call
our Customer Service Department.
CUSTOMER SERVICE HOT LINE
1 (800) SHADE ME
1601 Iowa Avenue, Riverside, California 92507
(909) 426-0060 • Fax (909) 426-0063
7 4 2 3 3 6 3 Customer Service Hot Line
1 (800) SHADE ME
7 4 2 3 3 6 3
OM_6' QUEST_09 10/29/09 8:47 AM Page 1