ZANE ARTS ZIG User manual

LT-003 / ZIG
MANUAL - V e r 1. 0 0
EN
Please be sure to read the manual before using this product.
If you have any questions or if there is a problem with the
product, please contact the store where you purchased it or
ZANE ARTS directly.
※The bottom features an integrated standard
1/4-20 UNC camera tripod socket.
※Overtightening could cause damage.
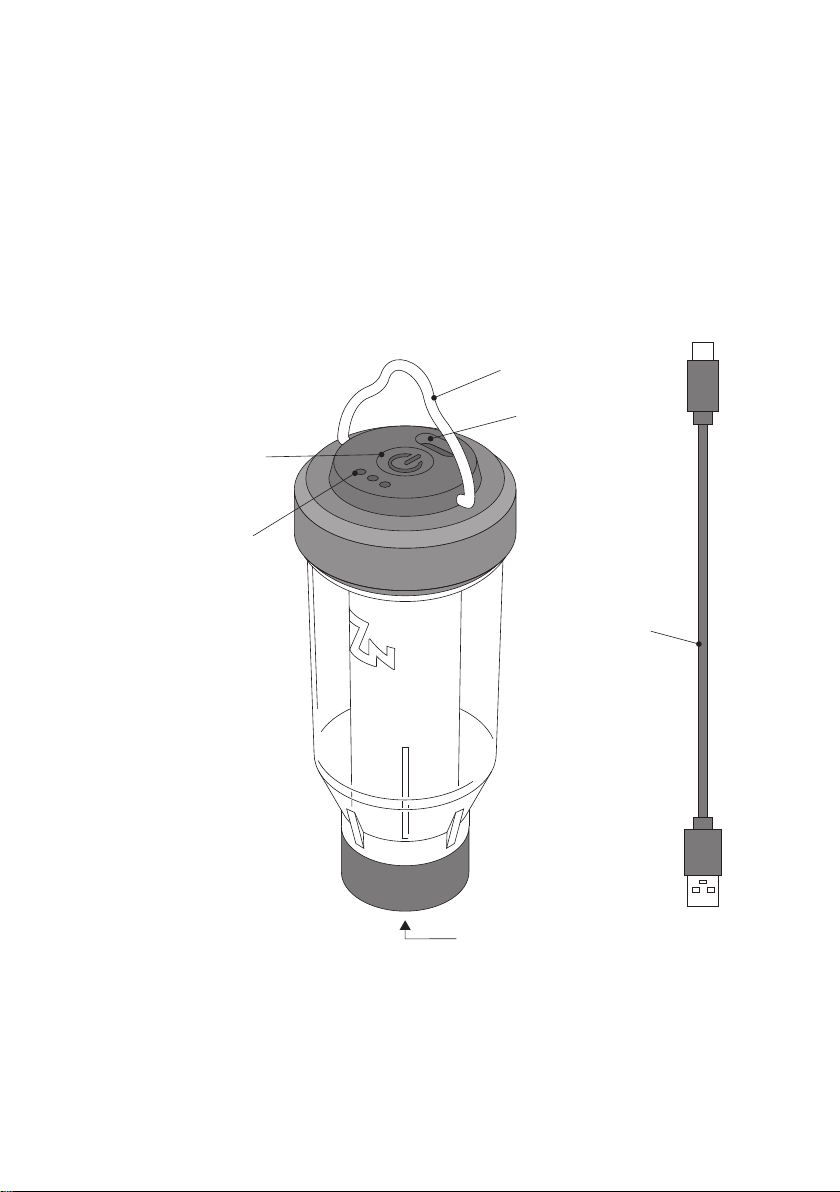
Power Button
Battery Indicator
Hanger
USB Type-C
USB Charging
Cable
Tripod socket (bottom)
2
■ PARTS

3
It is dangerous to charge when the USB port is wet.
Do not plug in the USB charging cable when the USB port is wet.
Doing so may cause an electric shock or malfunction.
Please familiarize yourself with this product before use.
Do not charge when
the USB port is wet!
■ABOUT THIS PRODUCT

4
About the USB Charging Cable
●To unplug during or after charging is complete, always
unplug the USB cable first from the lantern. If it is unplugged
from the outlet, the battery indicator will temporarily display
an error.
About the Lithium-ion Battery
●This product uses a lithium-ion battery.
●Please charge before using for the first time.
●The battery’s charge will gradually reduce over time even
when not in use. If the lantern has been stored or unused for a
long period of time, charge before use.
●Do not store when the battery is fully charged or extremely
low. Doing so may reduce the performance and life of the
battery.
●If not used frequently, please charge the battery every three
months.

Lithium-ion Battery Disposal
●Please follow the instructions of your local government
regarding proper disposal.
About the LED Lights
●Due to the nature of LEDs, the color and brightness of each
product may differ.
●Battery voltage may drop depending on the environment and
may affect brightness.
●Can be powered directly from a USB cable, however the
lights will dim in order to prevent overheating.
For use in Japan only.
●For use in Japan only. Warranty and repair are not covered
outside of Japan.
5

Please follow these guidelines to avoid property damage
and to ensure the safety of yourself and others.
INDICATES SITUATIONS THAT COULD
RESULT IN SERIOUS INJURY OR DEATH.
!
!
●Do not use, charge, or store in the following places. Doing so
may cause fire, electric shock, injury or malfunction.
◎Near water, such as in the rain or a bathroom.
◎Humid environments.
◎Near open flames or in direct sunlight (places over 40°C)
◎Near heaters and places that easily get hot.
◎Places where small children can reach.
●Do not expose to any strong impact, pressure, or vibration.
May cause risk of damage, fire, swelling, explosion, leakage,
or chemical burns.
6
■HANDLING PRECAUTIONS
WARNING

●Do not disassemble or modify. Doing so may cause electric
shock, fire, accident or injury.
●Do not pour liquids on the product or operate it with wet
hands. Doing so may cause an electric shock or malfunction.
●Do not use under a cloth such as a blanket or sleeping bag.
Doing so may cause fire, electric shock, or injury.
●If the rechargeable battery leaks, immediately stop using it
and do not allow the liquid to come in contact with your skin
or eyes. Skin damage and blindness may occur. In case of
skin or eye contact, wash thoroughly with water and seek
medical attention.
●Do not damage the USB charging cable by pulling, bending
or stepping on it. Fire or electric shock may result.
7

INDICATES SITUATIONS THAT COULD CAUSE
MINOR INJURY OR PROPERTY DAMAGE.
CAUTION
!
●Do not use chemicals such as alcohol, gasoline, or benzine
on this product. It may cause damage to the main unit or
injury.
●Do not look directly at the light source. It may hurt your eyes
or cause physical discomfort.
●The bottom features an integrated standard 1/4-20 UNC
camera tripod socket. Using different sized screws may cause
damage.
●When mounting to a tripod be careful not to overtighten as
this may damage the socket.
8

9
■ HOW TO USE
TURNING THE LANTERN ON AND OFF
1
[On] : Long hold the power button for more than 1 second.
[Off] : Long hold the power button for more than 1 second.
Long hold
( > 1 sec)
to turn on
Short press
( >1 sec )
to dim
Short press
( < 1 sec after previous action)
to choose the amount of LEDs
Off
Off
1 light - Hi2 lights - Hi3 lights - Hi
4 lights - Hi
OffOffOff
Off
1 light - Low2 lights - Low3 lights - Low
4 lights - Low
●Follow the guide below to change modes

150lm/10h 100lm/14h 50lm/35h
25lm/55h50lm/28h75lm/20h100lm/14h
Lights indicate the remaining battery level.
3 lights / 80% +
2 lights / 50% +
1 lights / 20% +
1 lights / flashing →off
Hi
3 lights
CHECKING THE BATTERY LEVEL
2
●Battery level displays when on
10
1 light
2 lights4 lights
Low
200lm/7h
●lightingtime/Brightness
This manual suits for next models
1
Table of contents
Popular Light Fixture manuals by other brands

Emos
Emos CLASSIC ZY1431T manual

Westinghouse
Westinghouse Outdoor Lighting Fixture owner's manual

Hedler
Hedler C 12 silent Operation manual

Blizzard Lighting
Blizzard Lighting Puck: CSI manual

Energetic Lighting
Energetic Lighting ELYSL-5004 Series installation instructions

Lightmaxx
Lightmaxx Shaft 5R user manual


Cooper Lighting
Cooper Lighting Halo L3232E Specification sheet

Stageline
Stageline ODW-2410RGBW instruction manual

Light Sky
Light Sky Tornado Series user manual

Lightolier
Lightolier Paralyte 2424 PLA2G9LS26U specification

Lightolier
Lightolier Lytespan 83ED17S specification

Lightolier
Lightolier Calculite CS8226 specification