Zcorporation ZScanner 700 User manual

Self-Positioning Handheld 3D Scanner
ZScan™1.3 User Guide
ZScan: Version 1.3
POWERED BY

ii
CAUTION NOTES...................................................................................................1
LASER WARNING..................................................................................................2
WARNING LABELS AND LOCATIONS.................................................................3
WHAT’S NEW ........................................................................................................4
System Overview...................................................................................................5
System description.............................................................................................5
General care......................................................................................................7
Scanner Manipulation ........................................................................................7
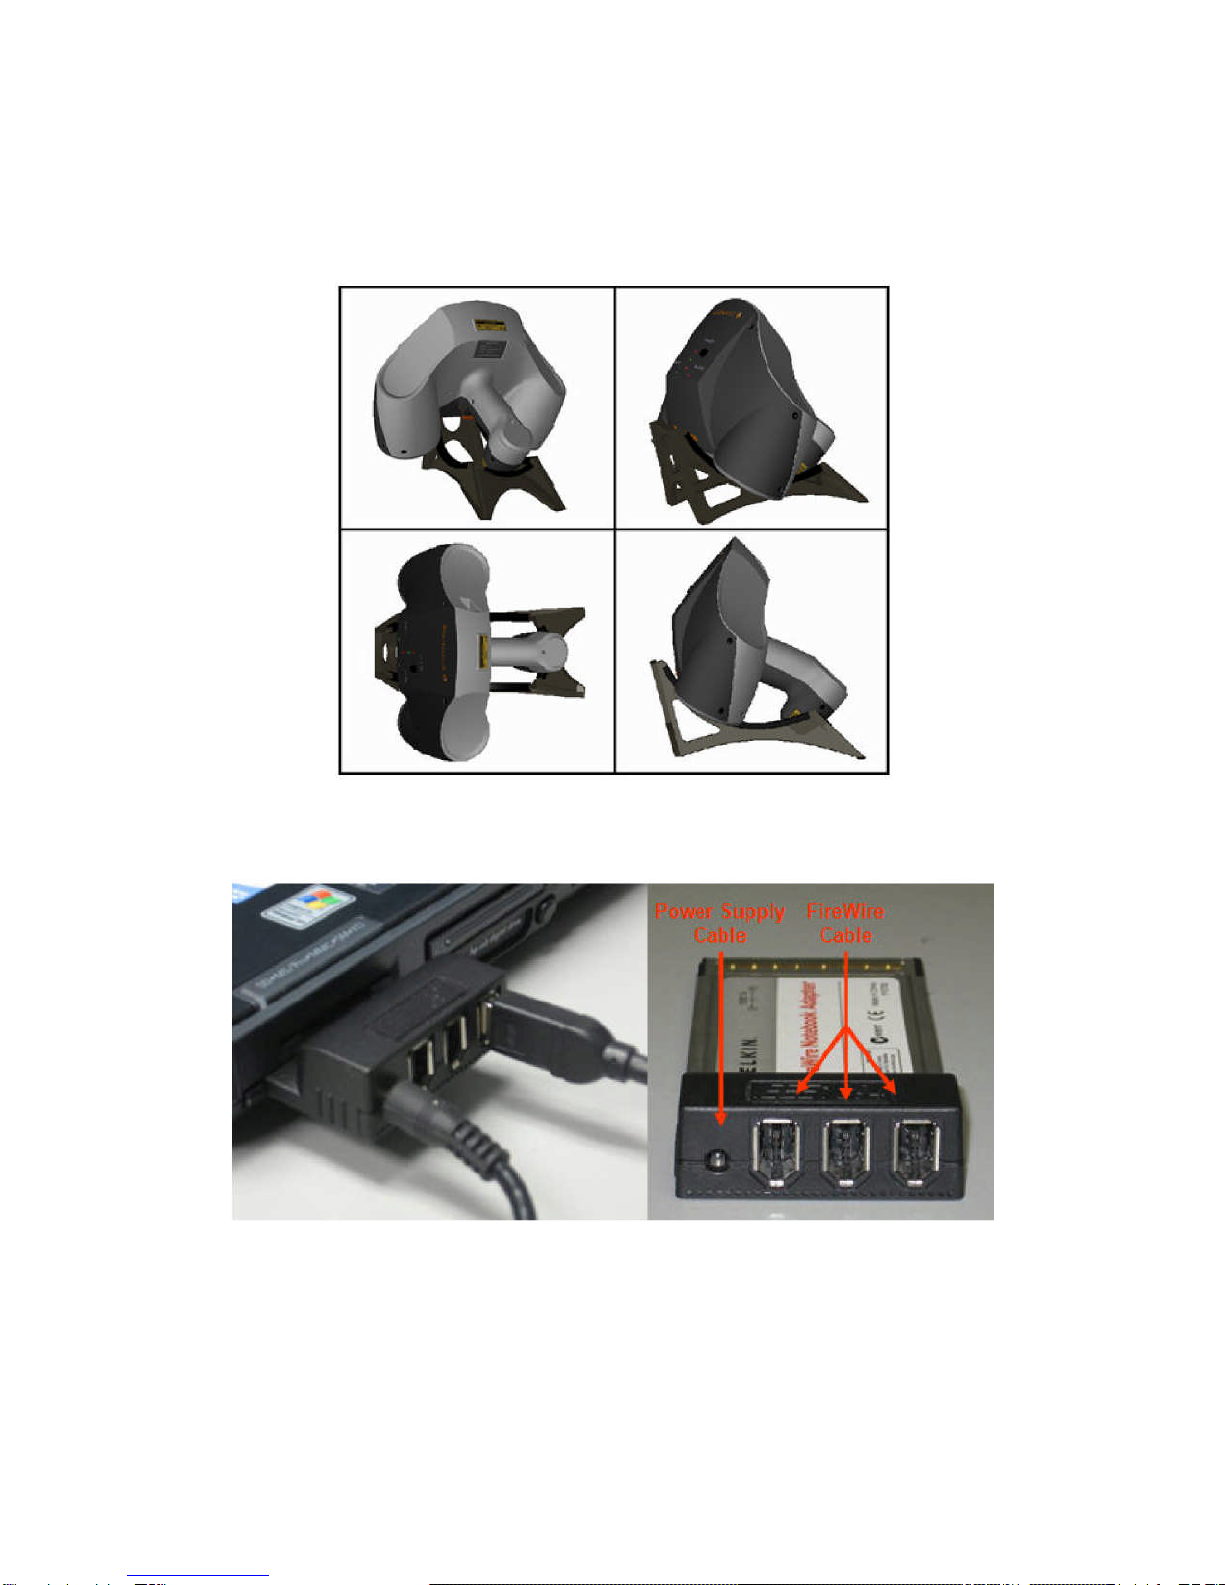
Connecting the scanner .................................................................................8
Storing your ZScanner 700 ............................................................................9
Specifications...................................................................................................10
Concept............................................................................................................11
ZScan™................................................................................................................12
ZScan minimal required configuration..............................................................12
System Installation / Start-up...........................................................................12
ZScan Software installation..............................................................................13
License and configuration files update.............................................................18
ZScan software removal ..................................................................................18
General Concepts............................................................................................19
File Types.....................................................................................................19
Positioning Features.....................................................................................19
References ...................................................................................................20
Surface and Volume .....................................................................................20
Facets, Edition and Multi-resolution..............................................................20
Menu.............................................................................................................21
Toolbar..........................................................................................................23
Scan tree ......................................................................................................26
Expanding Panel...........................................................................................27
3D viewer controls ........................................................................................30
Status Bar.....................................................................................................31
Sensor Configuration .......................................................................................31
Sensor Calibration............................................................................................33
Build Reference ...............................................................................................34
Scanning procedures........................................................................................35
Object preparation............................................................................................35
Applying targets............................................................................................35
Reference targets.........................................................................................36
Starting the Software........................................................................................37
Adjusting the surface settings..........................................................................37
Configuring the sensor.....................................................................................39
Importing positioning targets 40
Acquiring data..................................................................................................40
Proper distance digitizing..............................................................................41
Editing the scan ...............................................................................................43
Saving your work..............................................................................................43
Troubleshooting................................................................................................44

1
PLEASE READ THE COMPLETE MANUAL BEFORE USE. OPERATING
YOUR ZScanner 700 LASER SCANNER USING PROCEDURES OTHER
THAN THOSE SPECIFIED HEREIN MAY RESULT IN HAZARDOUS
RADIATION EXPOSURE.
AVOID DIRECT EYE CONTACT WITH THE LASER BEAM.
ELECTROSTATIC DISCHARGES COULD DISCONNECT THE DEVICE.
DISREGARDING ANY OF THE RULES AND CARE RECOMMENDATION
INCLUDED IN THIS MANUAL MAY VOID THE SYSTEM WARRANTY.
Please read and follow all WARNING statements throughout this manual
USER LICENSE
The ZScanner 700 system and the ZScan software are provided according to a
license agreement. Any partial or complete copying of this software without
proper authorization is prohibited. Distribution of the software without a written
authorization from Z Corporation is forbidden. The Purchaser shall not reproduce
or duplicate, dissemble, decompile, reverse engineer, sell, transfer or assign, in
any manner the Scanner, the Software and the System. ZScanner 700 is a
trademark of Z Corporation.
Copyright 2002 – 2007 Z Corporation All rights reserved.
CAUTION NOTES

2
This system uses a class II laser which is considered eye and skin safe but can
cause eye damage if exposed directly for a prolonged time. Natural human
reflexes will normally make the subject blink or look away before any
damage is inflicted to the eyes. Any usage procedures other than those
specified in this document could result in hazardous laser radiation
exposure. Use the following usage precaution:
Never stare into the beam, neither directly nor from a mirror-like
surface. Human skin is not considered as a reflective surface.
MEDICAL USAGE: warn subject not to stare into the beam.
Subjects under effect of any medication and young children could
possibly have their natural aversion reflex affected and it may be
advisable to wear a blindfold.
The ZScanner 700 should NEVER be opened for any reason as
there are no internal adjustments. In case of a malfunction, contact
the manufacturer or distributor.
LASER WARNING

3
WARNING LABELS AND LOCATIONS
Figure I - Laser labels and locations

4
WHAT’S NEW
ZScan 1.3
Full compatibility with Windows Vista 32 bits OS
Enhanced, more functional and efficient facet edition mode
New reliable, fast and powerful memory
management
algorithms (up to 70% more laser curves than 1.2)
Session title added to the title bar
Help menu
Enhanced overall look & feel
Enhanced copy features functionality
Enhanced surface reconstruction speed (up to 40% faster than
1.2 on Dual Core CPUs)
Multi-Operations enabled volume settings with live preview
New Fit Volume functionality
Calibration information added to the calibration window.
Faster and more reliable than ever!
ZScan 1.2
Automatic isolated patches remover (see 2.7.4.6)
Positioning model optimizer (see 2.7.4.1)
Multilingual support (French and English available, more to
come)
Improved performance and memory management
Improved surface reconstruction for thin surfaces
Clearer and sharper boundaries
Possibility to import targets acquired with photogrammetry (see
3.5)
Full support for UNICODE characters
Improved multi-resolution
Support for user selectable measurement units
Support for reference adapters

5
System Overview
System description
The ZScanner 700 system includes the following components:
ZScanner 700 scanner
Ergonomic stand
Reflective targets
Calibration verification plate
Carry-on case
Firewire PCMCIA card
Firewire cable
Firewire power supply
Laptop computer (optional)
ZScan software
Instruction manual (PDF)

6
Figure 1.1 - ZScanner 700

7
General care
The ZScanner 700 contains optical precision parts and must be handled with
care to avoid damage to the components or the calibration system. For
transportation, the system must be placed in the carry-on case provided with the
kit. The system must be stored in a dry, dust-free place and kept at ambient
temperature.
The scanner must be kept on its support or in its carrying case when not
used.
Clean the interference filters with a clean and dry cloth.
Never open any of the system’s components. By doing so, the user may
inadvertently damage the system and the ZScanner 700 will have to be
recalibrated. Only Z Corporation staff or authorized technicians are qualified to
work on the scanner. No maintenance is required by the end user. If the system
shows troubles or dysfunctions, it must be sent to Z Corporation or to an
authorized reseller.
Sca
nner Manipulation
The first step when it comes to scanning with the ZScanner 700 is to be able to
connect the system properly. Also, in order to avoid recalibration, the ZScanner
700 should always be properly stored in its case.

8
Connecting the scanner
The first step is to turn on the computer.
Safely place the ZScanner 700 on its stand.
Figure 1.2 Position of the ZScanner 700 on the support
Next, the FireWire adapter should be plugged into the computer with the cables
plugged in. The connections are shown on the pictures below:
Figure 1.3 Scanner's connection on the computer
The outlet end of the power supply cable should be plugged into a power outlet
using the appropriate outlet adapter. The end of the FireWire cable with the right-
angle 6-pin plug should be plugged into the ZScanner 700.
Launch ZScan.

9
Storing your ZScanner 700
First of all, the calibration plate should be stored at the bottom of the case,
underneath the foam. The calibration plate is a fragile piece of equipment and
must be handled with care. It should only be taken out of its case at the time of
use. The targets used on that plate are not the usual targets. It is important to
avoid touching them with your fingers since human skin fats could affect the
reflectivity.
Figure 1.5 Scanner's calibration plate location
Next, after putting the foam back in place, every item should be stored properly
into its specific location:

10
Figure 1.6 System content stored properly
Specifications
Features
Values
Laser class II
Wave length 660nm (0.000026 in)
Depth of field 300 mm (12 in)
Power 35 mW
Weight 980 g (2.1 lbs)
Operating temperature 15°C > T > 35°C
59°F > T > 95°C
Table 1.1 - System specifications

11
Concept
The ZScanner 700 was designed to allow easier and faster digitization. With its
easy to use interface, this system does not require any specific knowledge of the
laser-digitizing field. Its principle is based on the alignment of 3D curves of the
part scanned. The surface created will then generate a model that will be
exported for treatment.
Figure 1.7 - ZScanner 700 concept

12
ZScan
ZScan minimal required configuration
Processor with HT (Hyper Threading) or Dual Core technology (Dual Core
recommended).
Dedicated Graphical card with at least 128 Mb on board memory.
Windows XP 32 bits operating system, or Windows Vista x32.
1 GB RAM (2 GB recommended).
CD-Rom drive.
PCMCIA slot
Access to a user account with administrator’s privileges for installation
only.
System Installation / Start-up
The cables provided with the system are:
A FireWire cable (IEEE 1394) to connect the scanner to the computer
A power supply cable for the PCMCIA card (scanner)
Firewire PCMCIA card
If you did not purchase the computer from Z Corporation or if you are using
a different computer than the one provided with the system, you need to
install ZScan BEFORE connecting the sensor cables. Please ensure that
your laptop model is approved by Z Corporation.
Follow the indications to connect the cables to the system:
1. Insert the Firewire PCMCIA card into the laptop computer’s PCMCIA bay
(location may vary depending on the computer).
2. Push firmly to make sure that the card is inserted.
3. Connect the power supply to the PCMCIA card
4. Connect the power supply to the power source (use adapter as needed).
5. Connect the Firewire (IEEE1394) cable to the scanner and to the PCMCIA
card.

13
Figure 2.1 - System connections
ZScan Software installation
If the computer was purchased from Z Corporation with the ZScanner 700 sensor, the
software is already installed. Follow these instructions only to install the software on
another computer.
Verify that all requirements are met on the computer. Note that administrator’s
privileges are required to complete the installation correctly.
Unplug any connected sensor (scanner) from the computer and close all
active applications.
Insert the ZScan CD-ROM in the driver and double click on Setup.exe to launch the
Installation application.

14
Figure 2.2
Click Next to access installation options.

15
Figure 2.3
Select components to install and click “Next”.
Note that if you wish to install the plug-in for Geomagic, it must already be
installed. If this is not the case, cancel the installation, install Geomagic and start over
the procedure to install ZScan. If you do not need the plug-in, click “Next”.

16
Figure 2.4
Select installation folder with the Browse button. Select in which profile the
installation should be done. The “Everyone” option is recommended.
Click “Next” to launch the installation. The application will install all required files in
the selected directory. It will also create shortcuts in the start menu of the desktop
and install drivers for the ZScanner 700.

17
Figure 2.6
The ZScan file manager window will open. You can select the configuration file
and the license file.
Every ZScanner 700 sensor has its own configuration file containing the
calibration parameters. It also has its own license file which is required to use the
device with the ZScan application.
Click “Browse” for each file and choose the correct files for your sensor.
The configuration File is located in the Configuration directory of the ZScan CD-
ROM and is called “YourSensorSerialNumber.cst”.
The license File will be emailed to an end user contact or to your certified
ZScanner dealer and is called “YourSensorSerialNumber.clf”.
Click “OK” to install the selected files on your computer.
Click “Close” to complete the installation.
Connect the scanner. Wait for approximately 5 seconds or until the computer emits a
sound indicating that the device is connected.
Double-click the ZScan icon on the desktop to launch the application.

18
License and configuration files update
If the sensor has been recalibrated after maintenance or if a new license has
been generated for you, you may have to update your sensor configuration or
license files with new ones.
To update your configuration, you can use the ZScan File Manager as described
in the installation procedure (Figure 2.6). The File Manager can be launched by
clicking on the icon in the start menu.
Administrator’s privileges are required to use this tool.
ZScan software removal
The software can be completely removed with the option « Add/Remove
Programs » in the Windows Control Panel.
1. Click on Start button - Settings - Control Panel
2. Open the Add/Remove Programs panel.
3. Select Change or Remove Programs and select ZScan in the
list. Click the “Remove” button to uninstall the software
4. Follow instructions on the screen.
Table of contents
Other Zcorporation Scanner manuals