ZeeVee ZVMXE User manual

User’s Manual
ZvMXE
Media eXperience Engine

Page 2
|
ZvMXE User’s Manual www.zeevee.com ZvMXE User’s Manual
|
Page 3
Safety Instructions
and Precautions
This receiver has been manufactured to comply with international safety
standards. Please read the safety precautions carefully.
1. Main Supply (100-240V ~50-60Hz AC)
• Operate this product only from the type of power source indicated on
the marking label. If you are not sure of the type of power supplied to
the location where the receiver is to be used, consult your local power
company. Disconnect the product from the main power source before
you start any maintenance or installation procedures.
2. Connection to the cable feed
• Disconnect the product from AC mains before connecting or
disconnecting the Ethernet cable.
3. Overloading
• Do not overload a wall outlet, extension cord or adapter as this may
result in electric re or shock hazard.
4. Liquids
• This product should not be exposed to liquid of any kind. In addition,
no objects lled with liquid should be placed on the apparatus.
5. Cleaning
• Disconnect the product from the wall outlet prior to cleaning.
• Use a light, damp cloth (no solvents) to dust or clean the product.
Notice
Warnings Cautions and Notes
Throughout the entire user’s manual, pay special attention to the following
marks that indicate hazardous situations:
Warning
Indicates a hazardous situation which could result in serious injury
Caution
Indicates a situation which could damage the equipment or other
apparatus.
Note
Indicates additional information to make the user aware of possible
problems and important information to help understand, use and
maintain the installation.
Important Symbols
To reduce risk of electric shock, do not open unit or breach power
supply enclosure. There are no user serviceable parts inside.
Contact ZeeVee support at +1.877.493.3833.
DANGEROUS VOLTAGE
This symbol indicates dangerous voltage inside the receiver
that presents a risk of electric shock or personal injury.
IMPORTANT INSTRUCTIONS
This symbol indicates important instructions accompanying
the receiver.

Page 4
|
ZvMXE User’s Manual www.zeevee.com ZvMXE User’s Manual
|
Page 5
6. Ventilation
• The slots and openings on the case of the product must be left
uncovered to allow for air to pass in and out for proper cooling.
• Do not operate the product on soft furnishings or carpet.
• Do not stack anything on top of the product.
7. Attachments
• Do not use unsupported attachments as these may be hazardous or
cause damage to the product.
8. Extraneous Objects
• Do not insert anything into the openings of the unit.
9. Location
• Place the product indoors and avoid exposing it to lightning, rain, or
direct sunlight.
• Do not place the product near a radiator or heat register.
• Try to place the unit at least 2 inches (~10cm) from any appliance
susceptible to electromagnetic inuences, such as a television or radio.
• Insure the ventilation considerations are followed when the unit is in
service.
• Do not place the product on an unstable cart, stand, tripod, or bracket
where it can fall. A falling object can cause injury and may cause
serious damage to the product.
10. Lightning, Storm, or Not in Service
• Unplug the product from the wall outlet and disconnect the aerial
during a thunderstorm or when left unattended and unused for long
periods of time. This will prevent damage due to lightning or power
surges.
11. Replacement Parts
• Replacement parts should be purchased through an authorized
ZeeVee distributor and approved by the manufacturer. Unauthorized
parts may result in damage to the units and will void any warranty.
Contents
1 Introduction ............................................6
2 Quick Setup ............................................7
3 Remote Control.........................................8
3.1 BUTTON DEFINITIONS ................................9
3.2 PROGRAMMABLE BUTTONS ..........................10
3.3 PROGRAMMING THE P1-P5 BUTTONS...................10
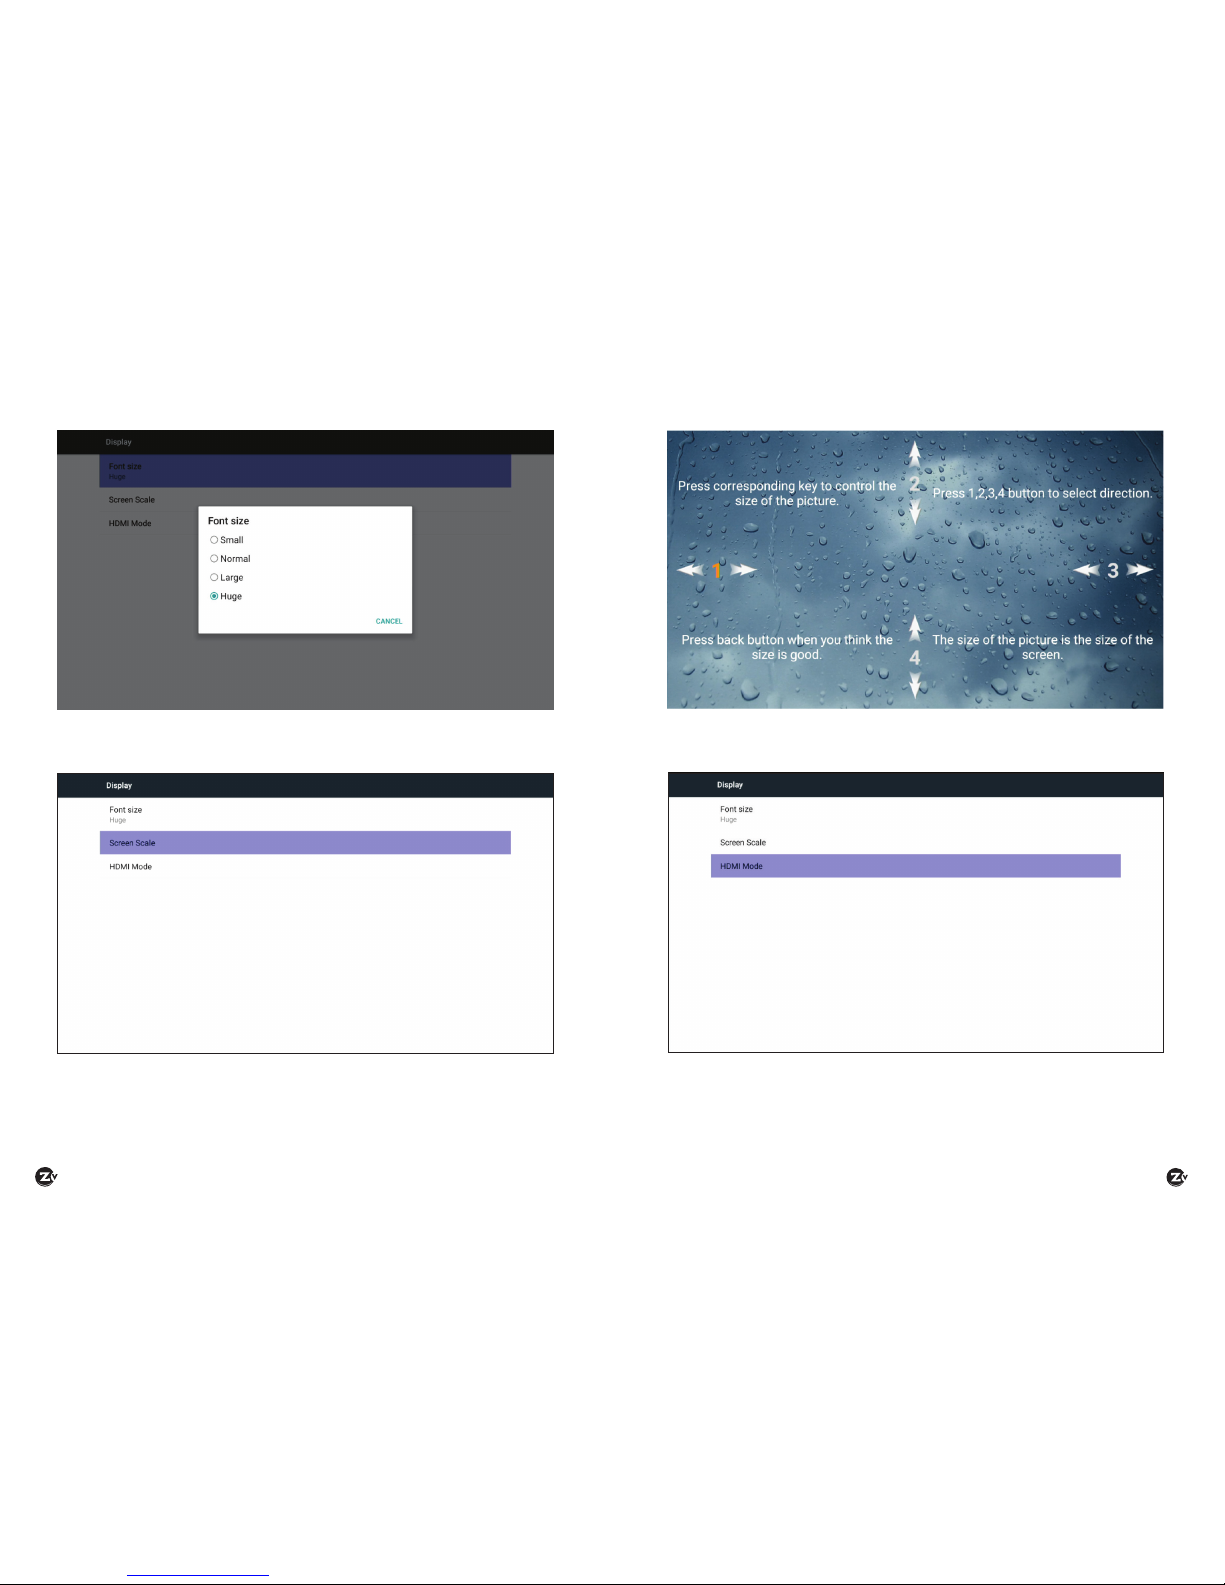
4 Adjusting the TV Screen ...............................12
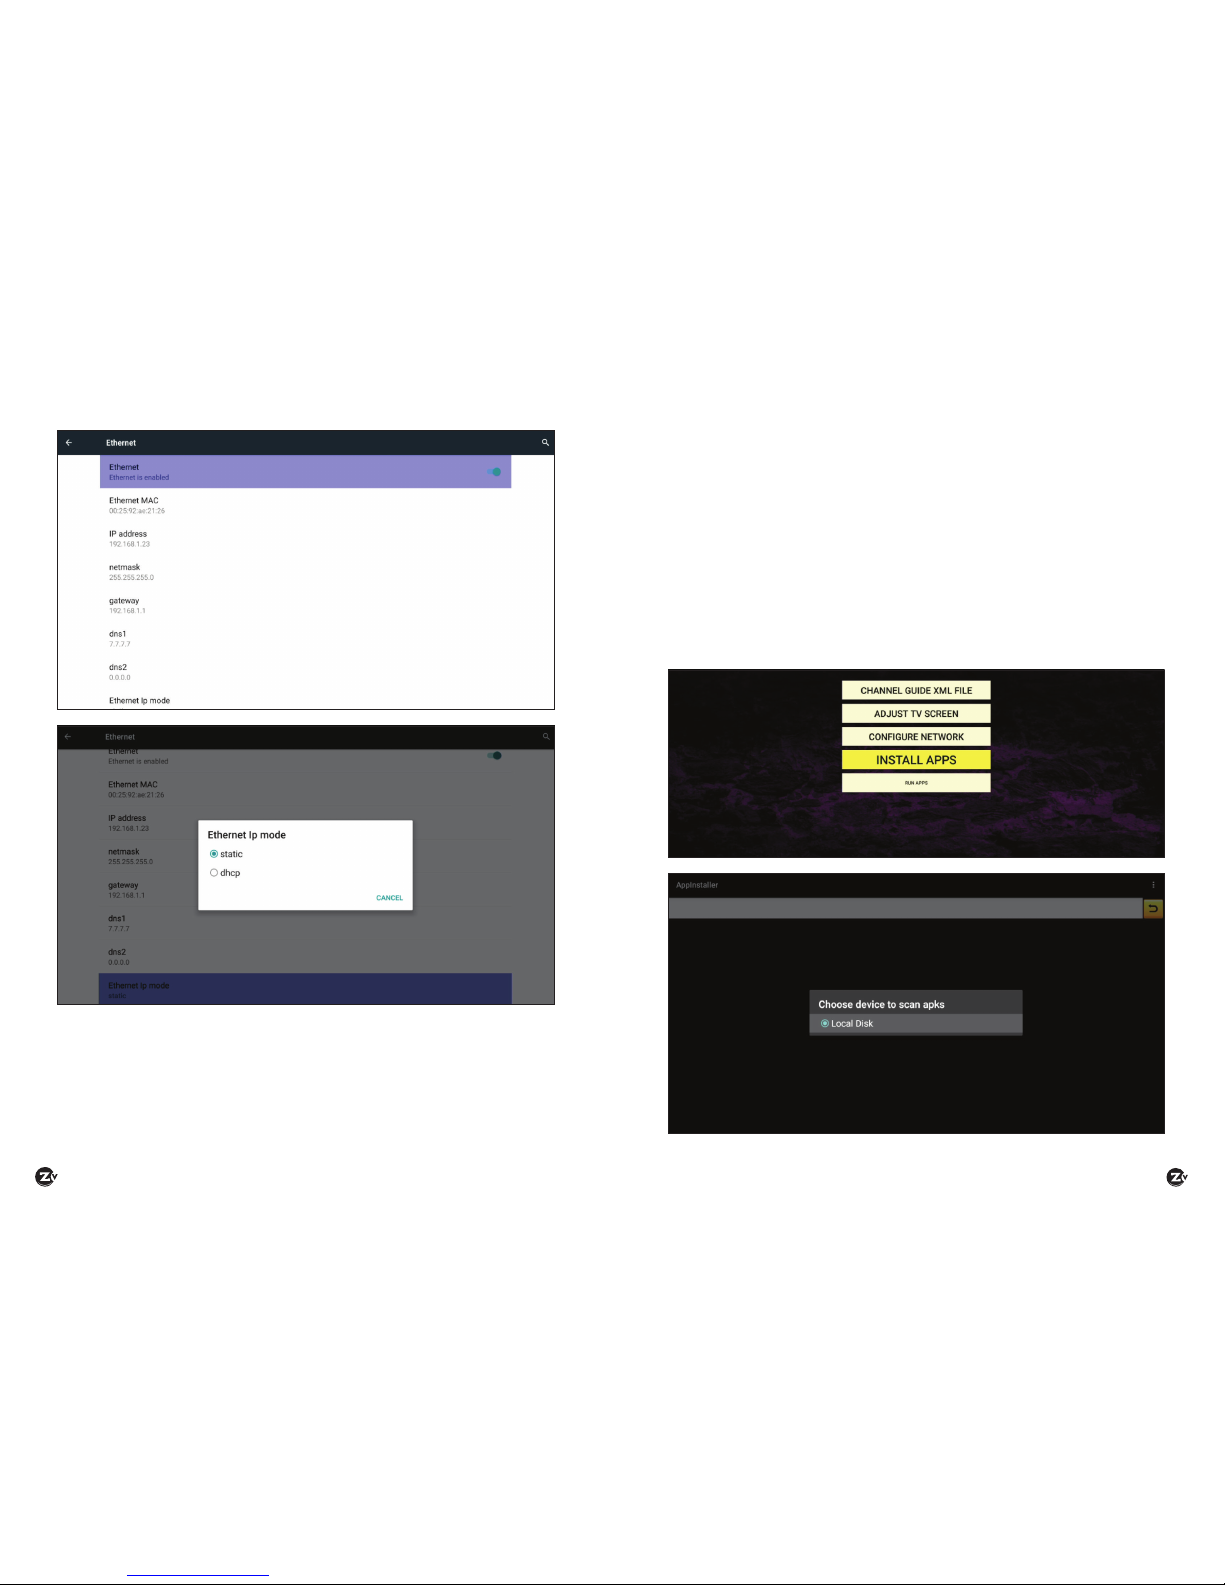
5 Conguring the Network...............................16
6 Installing Applications .................................19
7 Running Applications ..................................20
8 Custom Channel List Deployment .....................21
8.1 BACKGROUND .....................................21
8.2 CHANNEL GUIDE MODES.............................22
8.3 SERVER REQUIREMENTS .............................24
8.4 SETUP ON ZVMXE FOR REMOTE GUIDE . . . . . . . . . . . . . . . . .25
8.5 CHANGING CHANNEL REMOTELY. ......................29
9 Channel Guide File Specication.......................30
10 Troubleshooting ......................................37
11 Technical Specications ..............................38
12 Declaration of Conformity ............................39
13 Contact ZeeVee ......................................40

Page 6
|
ZvMXE User’s Manual www.zeevee.com ZvMXE User’s Manual
|
Page 7
2 Quick Setup
Connect the ZvMXE to power and connect the ZvMXE to a display using
an HDMI cable. Use a standard Ethernet cable to connect to the Network
Router or Switch.
Prior to streaming video, you must rst congure the Network settings on
the ZvMXE.
Using the remote control, hit the MENU button to access the Main options
screen. Using the arrow keys navigate to the setup icon (the GEARS) and
click there. See details below in the section “Conguring the Network”.
Tip: The ZvMXE can make use of a USB HID device. Simply connect a
standard USB keyboard to one of the USB-Type A ports on the ZvMXE. The
on-screen keyboard can be used with the remote control, but it is slow and
cumbersome for anything more than a single box.
Note: It is critical to ensure that the ZvMXE is assigned an IP address either
statically or using DHCP before you will be able to stream video.
Once the Network is congured the ZvMXE will automatically detect and
add to the channel lineup any multicast video stream from ZyPerMX and
ZvPro devices on the same network. To add video streams from other
sources the Channel Guide must be updated manually. Please see the
“Channel Guide File Specication” chapter for details.
1 Introduction
The ZvMXE IP Set Top Box is a small, powerful, unit designed to receive IP
streams, decode, and present to the user the IP-delivered content as simply
as if they were watching broadcast television.
The ZvMXE is designed to work in tandem with ZeeVee ZyPerMX and ZvPro
iSeries streams. ZvMXE features include:
• ZvMXE auto-discovers the ZyPerMX and ZvPro iSeries streams, which
are added automatically to the channel lineup.
• Additional channels/streams can be added manually.
• Supports common compressed HD formats: H.264, MPEG- 2, MPEG-
4, and others.
• Supports many kinds of IPTV programs.
• Infrared remote control with programmable buttons allows direct
control of the television (unied remote control for controlling user
experience).

Page 8
|
ZvMXE User’s Manual www.zeevee.com ZvMXE User’s Manual
|
Page 9
3 Remote Control
The ZvMX decoder is supplied
with a partial learning remote
control device. Buttons P1-P5
can be programmed to mimic
the functions of a select set of
buttons from another remote
control unit.
The intention is that the TV
viewing experience can be
controlled from a single
handset to include power and
volume control of the television
set and all other functions
directed at controlling the
ZvMXE decoder.
Button Denitions
Key Denition
Power. Pressing once turns on ZvMX again turns it off
Mute. Disables/Enables audio
Displays Electronic Program Guide information
Quick channel up and down buttons when watching television
programs.
Cancels/Exits menu levels when navigating interface.
Displays current playback information
Causes repeat mode to be entered when playing stored media
Color buttons. Program specic meaning
Dash button for entering digital channel numbers (ie: “23-1”)
Recall last channel being played
0-9 Numeric digits for entering channel numbers
Navigation buttons when driving conguration interface.
During normal playback Up/Down sets channels,
Left/Right sets volume and OK displays channel list.

Page 10
|
ZvMXE User’s Manual www.zeevee.com ZvMXE User’s Manual
|
Page 11
To program a key the following sequence shall be executed:
Step1: Press and hold the “SET” button for three
seconds
The RED LED lights immediately when the button is pressed
After 3 seconds the LED changes to a very bright state
Step 2: Press the key you wish to program (P1-P5)
The RED LED changes to a slow ash (1/second)
Step 3: Press the key on the remote that you are
copying
The RED LED performs three quick ashes to acknowledge
RED LED turns on solid again.
Repeat steps 2 and 3, or simply wait for light to extinguish
Step 4: Test Programmed key on television or device to
be controlled
If command is not executing properly, repeat steps 1-3
Programmable Buttons
The upper-left portion of the remote
houses a set of programmable keys. The
intent is to allow for common television
functions to be programmed so the
user only needs to use a single remote
control device to manage their television
experience when using the ZvMXE
receiver/decoder.
Keys P1 though P5 can be set to any
function the user desires. The labeling is present only to provide visual cues
the user may use to help remember which key has been programmed to
which function.
The “SET” key has a xed function that is not programmable. It initiates the
programming process for setting the P1-P5 key functions.
Programming P1-P5 Buttons
The ZvMXE remote has been tested to be compatible with a large number
of remotes. However, some manufacturers use infrared codes that are
obscure and cannot be “copied” into the programmable keys of the ZvMXE
remote.
ZvMXE Remote

Page 12
|
ZvMXE User’s Manual www.zeevee.com ZvMXE User’s Manual
|
Page 13
Navigate to, and click on the “ADJUST TV SCREEN” button.
This will bring up the Display menu for adjusting Font Size, Screen Scale
and HDMI Mode.
Font Size can be adjusted by selecting Font Size option in the menu.
Valid options for Font Size are Small, Normal, Large and Huge.
4 Adjusting the TV Screen
While watching television -> Hit the MENU button
That brings up the Main options screen.
Then navigate over to the Setup icon (the GEARS) and click there.
After the Gear icon has been clicked, the Conguration Screen appears.

Page 14
|
ZvMXE User’s Manual www.zeevee.com ZvMXE User’s Manual
|
Page 15
Select the HDMI mode button from the menu to view or adjust the screen
resolution.
Note: Display must support selected resolution. Selecting a resolution not
supported by the display can result in loss of image.
Select the Screen Scale option from the menu to adjust screen size and
position.
The numbers 1-4 or the directional arrows can be used to adjust the screen
height and width.

Page 16
|
ZvMXE User’s Manual www.zeevee.com ZvMXE User’s Manual
|
Page 17
This will bring up the Wireless & Networks menu for conguring Ethernet
and VPN.
Select the Ethernet option from the menu to congure Network settings for
the MXE.
Ethernet MAC eld is hard coded and cannot be changed.
The remaining elds can be manually congured if “Static” IP mode is
selected.
Fields are auto lled in the case of “DHCP” mode selection. (Requires
access to DHCP server)
5 Conguring the Network
Navigate to, and click on the “CONFIGURE NETWORK” button.

Page 18
|
ZvMXE User’s Manual www.zeevee.com ZvMXE User’s Manual
|
Page 19
6 Installing Applications
Navigate to, and click on the “INSTALL APPS” button. This will bring up a
menu to select any valid Android applications.
Note that any applications must be on a connected USB Flash device. The
MXE cannot search for applications on the Network and cannot access the
Play Store.
Please note that ZeeVee will not support the installation of any 3rd party
applications on the ZvMXE. Please contact the software provider for the
support of any applications.

Page 20
|
ZvMXE User’s Manual www.zeevee.com ZvMXE User’s Manual
|
Page 21
8 Custom Channel List Deployment
8.1 BACKGROUND
The ZvMXE IP Set Top Box is a small, powerful, unit designed to receive IP
streams, decode, and present to the user the IP-delivered content as simply
as if they were watching broadcast television.
When decoding and displaying content generated by ZeeVee content
sources, the discovery of the streams and the population of a channel list
and plan is automatic. The sources send “beacons” and the ZvMXE units
receive those beacons, learn the sources, and populate a channel guide
and list for selection by the user.
There are cases where a custom channel list is desired:
• Restricting User Access to certain channels
• Adding custom names and logos
• Adding content to the ZvMXE channel list that is NOT sourced by
ZeeVee
• streaming video les from a server, for example
Requirements:
All ZvMXE units to participate in the remote guide must be connected
to a common network.
An accessible server capable of serving les.
A means for the manager to edit, install and manage the les on that
server.
7 Running Applications
Navigate to, and click on the “RUN APPS” button. This will bring up a menu
to showing all Android apks applications that have been installed on the MXE.
Select one using the arrow keys on the remote and hit “OK” to run.
Please note that ZeeVee will not support the running of any 3rd party
applications on the ZvMXE. Please contact the software provider for the
support of any applications.

Page 22
|
ZvMXE User’s Manual www.zeevee.com ZvMXE User’s Manual
|
Page 23
8.2 CHANNEL GUIDE MODES
Full-Auto
The default channel guide mode is “Full-Auto”. This mode is available
when the streaming sources are ZeeVee products (ZvProxxx-I, ZyPerMX,
HDb2920-i, or HDb3000 media module with IP options). The ZeeVee
products automatically broadcast “Beacons” which contain information
about the available stream.
The channel guide in the ZvMXE will be populated based on information
contained in the received beacon information from each of the sources. No
the management is required. This is the baseline “Plug-and-Play” option and
may be sufcient for the majority of installations.
Additive
Normally, if a channel guide le is specied, the channels specied will
be added to the plan. If channels are specied in the channel plan le that
overlap those that correspond to Beaconed channels being generated by
ZeeVee equipment, the information in the channel plan le will supersede
that being broadcast by the ZeeVee unit sending the beaconed channel.
If the guide le is in “Additive” mode only the non-ZeeVee channels need to
be specied in the guide le. The ZeeVee channels will send beacons that
are learned by the ZvMXE and those channels will automatically be added
to the guide. In the diagram shown Source4 and Source5 are streams
supplied by non-ZeeVee equipment. Only stream information for Source 4,
and Source 5 need to be specied in the guide le.
Even in additive mode, the ZeeVee channels can be specied in the guide
le. This allows for the channel number, label, icon, etc., to be altered in one
common place without having to individually manage the ZeeVee sources.
Information provided in a guide le supersedes the information contained
in the beacon.
Exclusive
A channel guide le can be specied such that it is “exclusive”. Guide les
that are exclusive specify that ONLY the channels in the guide le are to be
included in the channel lists presented to the user. Any beaconed or self-
advertised channels are to be ignored by the ZvMXE if there is not an entry
in the guide le.
In the diagram shown, if the guide le is specied as exclusive, and the only
entries in that guide le are for ZyPerMX-1, ZyPerMX-2, and Source 5, then
any other channel will be ignored and not included in the guide. The only
stream the user will be able to select are for the channels described in the
guide le.

Page 24
|
ZvMXE User’s Manual www.zeevee.com ZvMXE User’s Manual
|
Page 25
8.3 SERVER REQUIREMENTS
The ZvMXEs may be congured to fetch a channel list and supporting
elements.
The channel list le and others (icon les, etc) must be served by a web
server on a network accessible to the ZvMXE units.
That server (LAMP, WAMP, whatever…) should be congured to serve a
directory that contains the les that will be used to control the channel list
of the ZvMXE units.
If the Internet is accessible, a Google drive could even be used. The ZvMXE
units only fetch the channel guide les at power-up or upon direct request
by the user. At all other times the ZvMXE units use locally cached copies of
the channel guide information.
Easy Test: Point a
browser at the directory
that will be used and
make sure the supporting
information is visible while
on the same network as
the ZvMXE units.
In the case shown, the
server QA20 is serving a
directory called “ipsettop”
to the same network as the
ZvMXE.
If a browser can see the
les, the ZvMXE units will
be able to see the les.
All le accesses by the
ZvMXE device are via HTTP
le requests.
8.4 SETUP ON ZVMXE FOR REMOTE GUIDE
To congure the ZvMXE to use a remotely specied guide, the device itself
must be congured to point to the location from where the guide le(s) are
being served.
While watching television —> Hit the MENU
button
That brings up the Main option screen.
Then navigate over to the Setup icon (the GEARS)
and click there.

Page 26
|
ZvMXE User’s Manual www.zeevee.com ZvMXE User’s Manual
|
Page 27
After the Gear icon has been clicked, the Conguration Screen appears.
Navigate to, and click
on the “CHANNEL
GUIDE XML FILE”
button.
This will bring up a le
dialog
In the dialog, enter the
pointer to the location
on the web server
where you have placed
the Channel Guide le.
In this example the le
is: OfcePlanA.xml
The exact location
depends on where the
IT admin has allowed
HTTP le browsing to.
Pro Tip: The ZvMXE can make use of a USB HID device. Simply connect
a standard USB keyboard to one of the USB-Type A ports on the ZvMXE and
the name can be typed in. The on-screen keyboard can be used with the
remote control, but it is slow and cumbersome for anything more than a
single box.
Once the name is entered, navigate to and click the “SUBMIT” button.
The ZvMXE device will read the remote Channel Guide le. The number of
channels congure will be shown as below. Verify that this matches the
expected number.
This completes all the setup required on the ZvMXE.
Hit the EXIT button once to return to the Conguration Buttons.
Hit the EXIT button again to return to the main Option Screen.
Then Navigate to the “Watch TV” icon and click that. You should be
watching the streaming content.

Page 28
|
ZvMXE User’s Manual www.zeevee.com ZvMXE User’s Manual
|
Page 29
At any time while watching television, the CHAN+ CHAN- keys will advance
sequentially up or down the channel list.
At any time the up and down arrows can also be used to advance
sequentially up and down the channel list.
Hitting the EPG button on the remote brings up the entire electronic
program guide.
Scroll up and down with the arrow keys to verify presence of all the
expected channels.
Hitting the OK button will tune directly to the highlighted channel.
8.5 CHANGING CHANNEL REMOTELY
There is a feature that allows MXE channel to be changed remotely.
HTTP channel change feature:
http://ip_address:8080 returns the MXE channel list. The current channel
has an ‘*’ next to it.
http://ip_address:8080/channel=n tunes the MXE to specied channel
number. Will return “Invalid Channel Number” as appropriate.
EXAMPLE
Assuming MXE IP Address is: 192.168.1.23
http://192.168.1.23:8080 This will return MXE channel list
http://192.168.1.23:8080/channel=77 This will tune MXE to channel 77

Page 30
|
ZvMXE User’s Manual www.zeevee.com ZvMXE User’s Manual
|
Page 31
9 Channel Guide File Specication
The Channel Guide le is an XML les that describes the program
information to be displayed as part of the channel guide to the ZvMXE user.
Basic File Format:
IP channel stream information will be describe with the following XML
syntax.
<?xml version=”1.0” encoding=”UTF-8”?>
<ZVIP type=[“guide” | “guideonly”] >
<CHAN>
<ip>streamIPAddr</ip>
<port>streamPort</port>
<tstype>[tsoverudp | tsoverrtp | http]</tstype>
<name>shortChanName</name>
<icon>webLink</icon>
<pnum>channelNumber</pnum>
</CHAN>
...
</ZVIP>
Header Line:
<?xml version=”1.0” encoding=”UTF-8”?>
The header line denes the le type and must appear exactly as shown as
the rst line in the le.
ZVIP Type Line:
The second line must be the Type line and denes attributes that apply to
the entire guide.
<ZVIP type=[“guide” | “guideonly”] >
type is a required tag and must have one of the
following options
“guide” - channels described are added to auto
discovered channels to form ZVMXE channel list.
For duplicate channel descriptions(same stream
address and port), the data in the guide le will
supersede data from auto discovery.
“guideonly” - Disable auto discovery of Zeevee
channels on the network. Only channels described
in guide le will be presented in channel list of
the ZVMXE.
Channel Guide Information Block:
The following represents a block of data that would describe the associated
guide information for a given stream.
<CHAN>
<ip>streamIPAddr</ip>
<port>streamPort</port>
<tstype>[tsoverudp | tsoverrtp | http]</tstype>
<name>shortChanName</name>
<icon>webLink</icon>
<pnum>channelNumber</pnum>
</CHAN>
Note that there can be as many <CHAN> … </CHAN> blocks in a Channel
Guide le as the user wishes to add to the guide.
In the case of Additive operation (the type eld set to guide) only those
streams that are desired to be included that are not sourced by ZeeVee
equipment need be described. The rest can be auto-discovered and the
guide information included as it is delivered in the channel beacons.
Alternately, if is desired to override the information that arrives in the
ZeeVee source beacons, the information contained in the Channel Guide
les will supersede the beacon data.
In the case of Exclusive operation (the type eld set to guideonly) only
those channels explicitly listed in the Channel Guide le will be included in
the channel list presented to the ZvMXE user. None of the auto-discovered
beaconed channels will appear in the user list.

Page 32
|
ZvMXE User’s Manual www.zeevee.com ZvMXE User’s Manual
|
Page 33
IP Tag: <ip>streamIPAddr</ip>
The IP tag indicates the stream address/pointer associated with the
channel. *required
streamIPAddr is a required value for the channel
String describing the IP address/string
specication for the stream to be “tuned”.’
For UDP or RTP multicast streams, the streamIPAddr
represents the IP multicast address for the IP
stream (example: <ip>224.1.2.99</ip>)
For les played from a server that allows serving
of http requested media les the streamIPAddr is
the URL describing the location of the le to be
played (example: <ip>http://qa20/ipsettop/Bangles.
mp4</ip>)
Port Tag: <port>streamPort</port>
The Port tag indicates the stream data associated with the channel.
*required when the streamIPAddr is a multicast IP address. Not required for
when the tstype is http.
streamPort is a required value for non-http streams
String describing the IP port for the stream to be
“tuned” (example: <port>21216</port>)
TSTYPE Tag: <tstype>[tsoverudp | tsoverrtp |
http]</tstype>
The transport stream tag indicates the stream data associated with the
channel.
tstype is a required tag for a channel description block
“tsoverudp” - indicates the stream is carried in
UDP transport format
“tsoverrtp” - indicate that the stream is carried
in RTP transport format.
“http” - indicate that the stream is delivered as
a le from an http server.
NAME Tag: <name>shortChanName</name>
The name tag of the stream. The specied name will be displayed in the
guide when browsing or tuning the channel. *required
shortChanName is a required string of 7 ASCII characters
or less.
String describing the short channel name for the
stream to be “tuned” (example: <name>CNN-HD</
name>)

Page 34
|
ZvMXE User’s Manual www.zeevee.com ZvMXE User’s Manual
|
Page 35
ICON Tag: <icon>webLink</icon>
The le pointer to an icon picture to be used as a display icon when
browsing channels on the ZvMXE guide page. Optional.
webLink is a string representing the pointer to a le.
The le pointed to by webLink shall be a .PNG
formatted le to be used as the channel icon
when displaying the guide on the ZvMXE. The .PNG
image size target is 128x128 pixels. Images
smaller than this will be scaled up to 128x128.
Larger images will be scaled down to t. Images
that require “on-the-y” scaling may aect the
performance when scrolling through the guide.
(example: <icon>http://qa20/ipsettop/cnn128.png</
icon>)
If no icon is specied the image shown will be the
“ZVdot” logo.
PNUM Tag: <pnum>channelNumber</pnum>
The Program Number tag for the stream. The specied name will be
displayed in the guide when browsing or tuning the channel. *required
channelNumber is a required string representing the
program number for the stream .
Number in the range of 0-999. The number will
represent the channel number of the stream. The
number will determine the order the channels are
displayed in the guide. Additionaly, the use may
enter the program number directly into the remote
to tune immediately to the channel (example:
<pnum>801</pnum>)
The following is a complete Channel Guide File shown as an example.
<?xml version=”1.0” encoding=”UTF-8”?>
<ZVIP type=”guideonly”>
<CHAN>
<ip>224.1.2.20</ip>
<port>21216</port>
<tstype>tsoverudp</tstype>
<name>ABC-HD</name>
<icon>http://qa20/ipsettop/ICONS/abc.png</icon>
<pnum>600</pnum>
</CHAN>
<CHAN>
<ip>224.1.2.24</ip>
<port>21216</port>
<tstype>tsoverudp</tstype>
<name>Weather</name>
<icon>http://qa20/ipsettop/ICONS/twc.png</icon>
<pnum>601</pnum>
</CHAN>
<CHAN>
<ip>224.1.2.25</ip>
<port>21216</port>
<tstype>tsoverudp</tstype>
<name>History</name>
<icon>http://qa20/ipsettop/ICONS/history.png</icon>
<pnum>602</pnum>
</CHAN>
<CHAN>
<ip>224.1.1.73</ip>
<port>25600</port>
<tstype>tsoverudp</tstype>
<name>NFL-Net</name>
<icon>http://qa20/ipsettop/ICONS/n.png</icon>
<pnum>701</pnum>
</CHAN>
<CHAN>
<ip>224.1.1.75</ip>
<port>25600</port>
<tstype>tsoverudp</tstype>

Page 36
|
ZvMXE User’s Manual www.zeevee.com ZvMXE User’s Manual
|
Page 37
<name>ESPN-HD</name>
<icon>http://qa20/ipsettop/ICONS/ESPN128.png</icon>
<pnum>702</pnum>
</CHAN>
<CHAN>
<ip>http://qa20/ipsettop/JayneManseld.mp4</ip>
<port>0</port>
<tstype>http</tstype>
<name>5-6-7-8</name>
<icon>http://qa20/ipsettop/ICONS/badj128.png</icon>
<pnum>801</pnum>
</CHAN>
<CHAN>
<ip>http://qa20/ipsettop/Bangles.mp4</ip>
<port>0</port>
<tstype>http</tstype>
<name>Bangles</name>
<icon>http://qa20/ipsettop/ICONS/anubis128.png</icon>
<pnum>802</pnum>
</CHAN>
</ZVIP>
10 Troubleshooting
Problem Potential Reason Possible Action
No Picture Power is not connected Connect power supply
Check wall source
The power is switched off Switch on Power to ZvMXE
No Sound
from speaker
Incorrect or faulty
connection with audio
cable
Correctly connect the audio
cables
Sound on Mute Select the mute/unmute on
the remote
“i-series” of the
HDbridge3000, ZvPro
or HDb2000 defaults to
“AC3” audio which is not
supported by the MXe
In Maestro on the “i-series”
change the Dig. Audio eld
to MP2 via the Device page
with “advanced controls”
checked. Note – i-series
will require a reboot after
this conguration change
is made.
Remote
control is not
working
The battery is exhausted Replace the remote control’s
batteries
Remote control is not
facing or visible to ZvMXE
sense window
Reorient ZvMXE sense
window and remote control
No channels
found
No IP address assigned to
the ZvMXE
Connect ZvMXE to network
with DHCP server or assign
static IP address to ZvMXE

Page 38
|
ZvMXE User’s Manual www.zeevee.com ZvMXE User’s Manual
|
Page 39
11 Technical Specications
Item Sub-Item Parameter
Video Decoder Format MPEG4 AVC/H.264 HP@l4
MPEG2 MP@ML/HL
Output Format 480i, 480p, 720p, 1080i,
1080p60Hz
Aspect Ratio 4:3, 16:9, Auto
Output Port HDMI(v1.3C)
Audio Decoder Format MPEG-1(layer 1 & 2 & 3)
Audio Output Digital Audio over HDMI,
RCAx2(L/R)
USB2.0 Supported Capacity Unlimited
Supported Media MP3, WMA, JPEG, BMP, AVI
12 Declaration of Conformity
The Original Equipment Manufacturer herewith declares the conformity of
the product with the following directives and standards:
Low Voltage Directive 2006/95/EC
EN 60065:2002+A1:2006
EMC Directive 2004/108/EC
EN 55 013:2001+A1:2003+A2:2006
EN 55 020:2007
EN 61 000-3-2:2006
EN 61 000-3-3:2008
FCC, CE, C-Tick
SK-903
Table of contents