Zeiss cinemizer OLED User manual

Operating instructions

Introduction Requirements 1
The multimedia video glasses 2
Overview Contents of the package 3
cinemizer OLED controls 4
Battery box controls 5
Usage Powering on 6
Wearing comfort 7
Nose pad adapter 7
Ear clips 8
Acuity adjustment 9
Earpieces 10
Stereo audio jack 12
Volume 13
Integrated battery 14
Battery status 15
Battery charging 17
HDMI®connection 19
iPod/iPhone and iPad connection (30 pin) 20
iPod/iPhone and iPad connection (lightning) 21
Other playback devices via cinch video cable 22
Travel case 23
Additional functions 3D support 24
3D formats supported 25
OSD settings 28
Activation of the OSD 28
Navigation in the OSD 29
Video 31
Aspect 36
Contrast 38
Info 38
Advanced 39
Exit 41
Accessories Adapter kit for iPod and iPhone (30 Pin) 42
Headtracker (movement sensor) 43
Light shield 45
Further information Troubleshooting 46
Technical support 46
Index 47
Overview

1
Requirements
ATTENTION: For your own safety, read the complete instructions on the
usage of the cinemizer ® OLED multimedia video glasses in this manual,
the safety information in the quick guide for the cinemizer OLED multime-
dia video glasses (provided in the package and available from
www.zeiss.com/cinemizer/documents) and the instructions for the
devices to which the cinemizer OLED multimedia video glasses are con-
nected, before you use the cinemizer OLED.
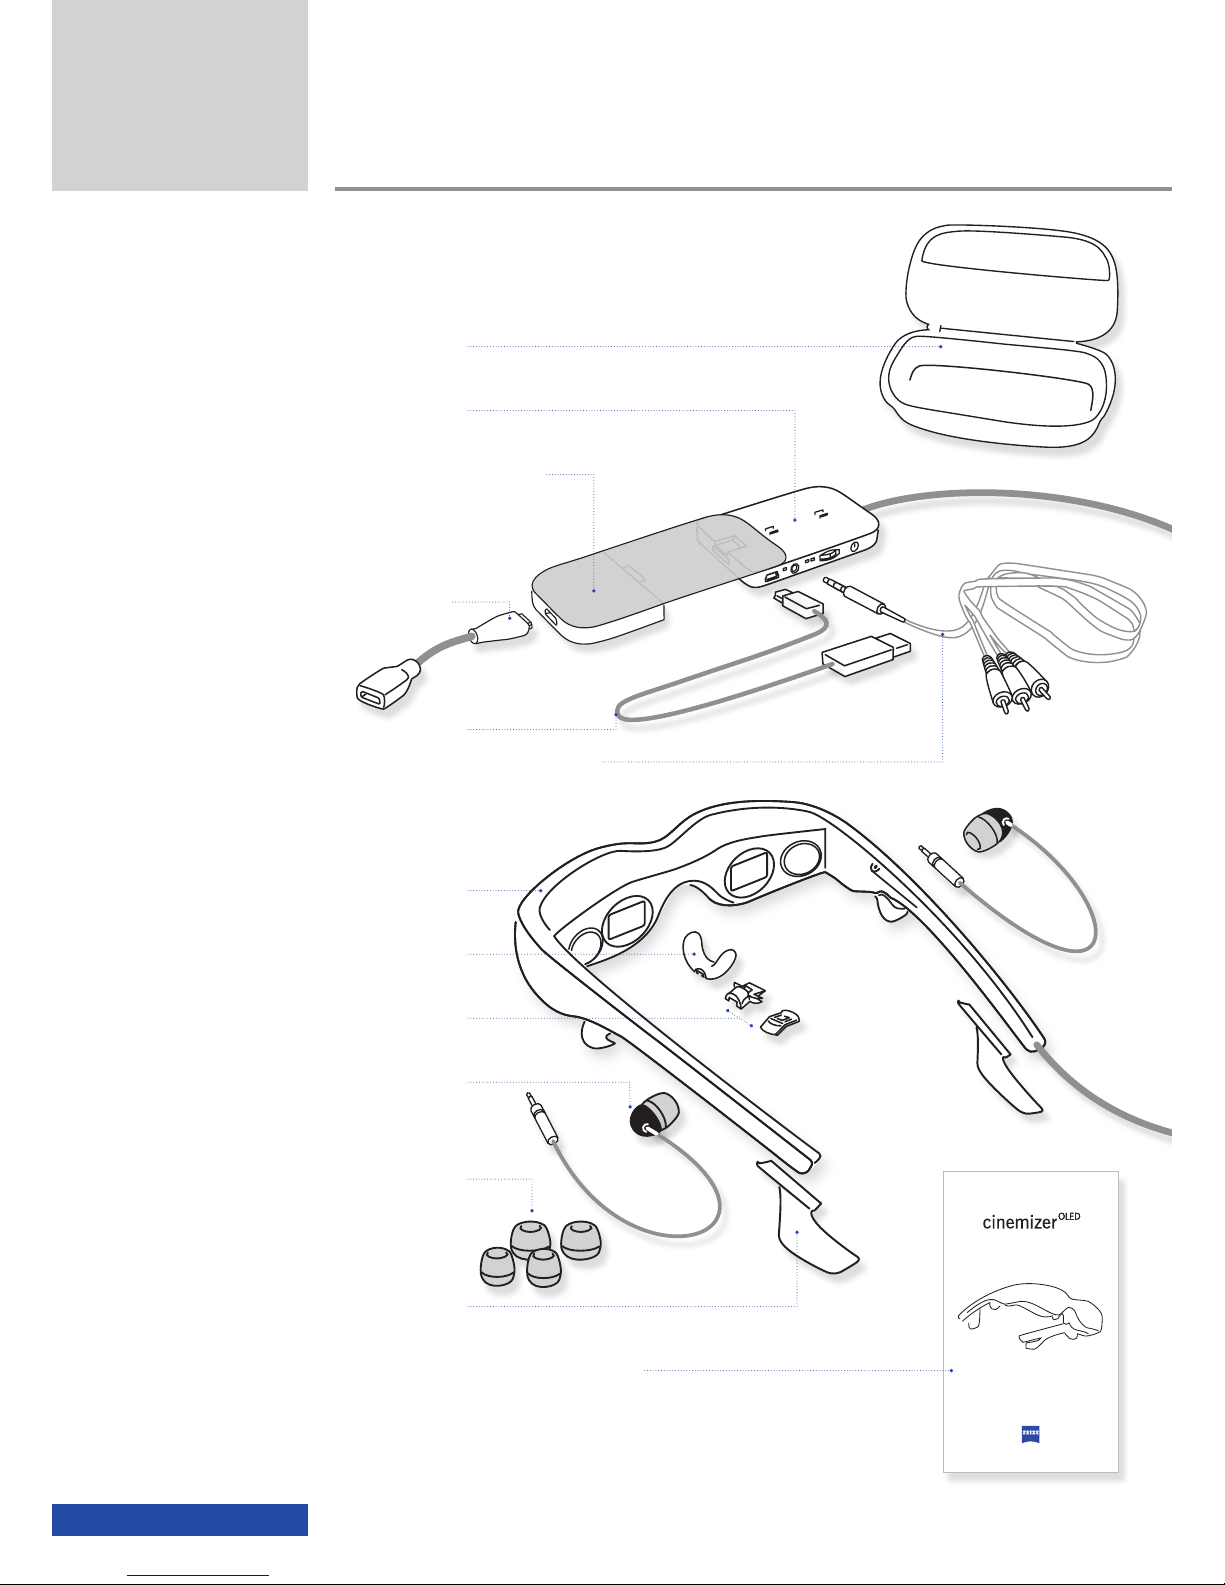
The following are required to use the cinemizer OLED video glasses:
- A device with a USB connection for charging the battery, if necessary,
- A playback device, e.g. a computer, iPod/iPhone, gaming console, etc.
- A connection adapter (HDMI®, iPod/iPhone), or connection cable (3.5mm
4-pin jack to cinch)
If a stationary image (e.g. a log-on screen or permanently displayed
image/icon) remains on the screen for an extended period, you may still
see it as a feint residual image, even after the image has been changed.
This is termed "burn-in". For this reason avoid the playback of unchang-
ing images! If feint residual images are visible, they can be eliminated
by playing back varied content that fills the screen.
Introduction
!
Introduction
Registration
Please register at www.zeiss.com/cinemizer/registration to receive
notifications directly when a firmware update is available.

2
The multimedia video glasses
As you look into the cinemizer OLED video glasses you will obtain the visual im-
pression of a television picture with a screen diagonal of 105 cm at a distance
of 2 metres.
The ergonomic design and simple acuity adjustment between -5 and
+2 dioptres for each eye make the cinemizer OLED video glasses very
convenient to wear, even for the wearers of spectacles.
The stereo 3D support converts the cinemizer OLED multimedia video glasses
into a portable 3D screen of universal application with which you can im-
merse yourself in virtual worlds.
Introduction

3
Contents of the package
cinemizer ® OLED at a glance
Travel case
Battery box
cinemizer-HDMI®adapter
(HDMI®mini jack type C)
HDMI®to mini HDMI®
Adapter cable
Mini USB cable
Video cable 3.5mm to 3 x cinch
cinemizer OLED
Nose pad
Adapter A + B
Earpiece
with ear cap (medium)
Ear caps
(in 2 sizes
small/large)
Ear clip
Quick guide and safety instructions
Quick Guide
Overview

4
cinemizer OLED controls
Overview
Ear clip
for fixing the glasses ergonomically
Removable earpiece
Earpiece storage clip (magnetic)
for the safe storage of the earpieces
Nose pad
for the ergonomic adjustment of the position of the
glasses
Viewing window
for different eye distances (59-69mm)
Adjustment wheel
for the stepless adjustment of the acuity for each eye
(-5 to +2 dioptres)

5
Battery box controls
Overview
On/Off button
video glasses
Multifunction switch
for activating the On-Screen Display (OSD), switching between 2D and 3D
mode and for adjusting the volume
Mode LEDs
2D/3D mode display
AV-in jack
for connecting (3.5mm, 4-pin) other playback devices
Battery status LED
charging/battery status display
Mini USB jack
for charging the battery
cinemizer socket
for the connection of the HDMI®adapter or optionally an iPod/iPhone
adapter
Earpiece jack
for the connection of stereo earpieces (3.5mm)
Reset button
for resetting the video glasses

6
Powering on the cinemizer OLED video glasses
Power on the cinemizer OLED video glasses by briefly pressing the On/Off but-
ton until the mode and then the battery status LEDs illuminate.
If an LED does not illuminate green after pressing the On/Off button, the
battery is probably discharged and you should charge the battery for the
cinemizer OLED video glasses using a USB cable. If the battery has been fully
discharged, it can take up to 15 minutes until the battery status LED starts to
flash on charging the cinemizer OLED via USB.
As long as video signal is not provided via the cinemizer HDMI®adapter or
iPod/iPhone adapter, the text "NO SIGNAL" appears on the virtual screen in
the multimedia video glasses. If a signal is not provided within 2 minutes of
powering on, the cinemizer OLED power off automatically (time out).
Powering off the cinemizer OLED video glasses
If powered on, the cinemizer OLED can be powered off by pressing the On/Off
button. The battery status and video mode LEDs go out.
Usage
Usage

7
Nose pad adapter
The soft silicone nose pad adapter ensures you find it pleasant to wear the
cinemizer OLED glasses on your nose. Due to anatomical differences in the
shapes of faces and noses, comfort can be improved using the optional nose
pad adapters A and B.
The nose pad can be fastened in 3 different ways:
1) Nose pad without adapter
2) Node pad with adapter A
3) Nose pad with adapter B
The simplest method is to try all 3 ways and decide
which suits you best.
Adapter B
Usage
Adapter A
!

8
Ear clips
The ear clips for the cinemizer OLED help both to securely attach the glasses to
your head and to reduce the weight on your nose. You can then comfortably
wear and use the cinemizer OLED video glasses for an extended period.
Prior to putting on the cinemizer OLED video glasses, please push the ear clips
a little to the rear, put on the glasses and then push the ear clips from the
rear to your ears.
Prior to putting away the cinemizer OLED multimedia video glasses in the
travel case, you should remove the ear clips and place them loose in
the travel case. In this way the ear clips are not subjected to mechanical
forces that may irreparably damage them.
Usage
!
1 2 3

9
Acuity
The cinemizer OLED video glasses offer stepless adjustment of the acuity in the
range from -5 to +2 dioptres. In this way wearers of spectacles with the need
for eyesight correction in this range can use the cinemizer OLED video glasses
without using their spectacles. Before you adjust the acuity, you should have
adjusted the nose pad and the ear clips to suit you. You can continuously
correct the dioptres separately for each eye using an adjustment wheel. How-
ever it is not possible to correct astigmatism.
Please turn the adjustment wheel until the picture is sharp.
For this purpose close one eye while you make the adjustment for the
other eye.
Usage
!

10
Earpieces
You can enjoy stereo sound with the cinemizer OLED using the two earpieces.
1. Connect earpieces
The earpiece connectors are connected as shown in figures 1-3.
First the connector is loosely fitted in the 2.5mm jack, then pushed with the
fingernail until it engages, and finally the cable pressed into the cable chan-
nel.
Usage
1
Insert connector loosely into
the jack.
2
Push to the stop using your
fingernail.
3
Press cable into the cable
channel.

11
2. Use earpieces
With the glasses opened, please take the earpieces out of the magnetic stor-
age clips and put on the cinemizer OLED glasses. Please insert the earpieces in
your ears.
The rubberised ear caps fitted to the earpieces are important for the correct
seating of the earpieces.
Ear caps
Ear caps in three different sizes are included with the earpieces: small (S),
medium (M) and large (L). Please try the different sizes and decide which size
is most suitable for you. The medium-sized ear caps are fitted in the factory.
Proceed as follows to fit different size ear caps:
Usage
1
Pull the ear cap off the earpiece.
2
Push the different size ear cap
onto the earpiece.

12
Stereo audio jack
If you want to use your own stereo earphones, you can connect them to the
3.5mm stereo audio jack provided.
In this case please remove the cinemizer OLED earpieces as shown in the
figure below.
Usage
1
Remove cable from the
cable channel.
2
Press briefly using your
fingernail.
3
Tilt slightly to remove the
connector.

13
Volume
You can change the volume of the cinemizer OLED video glasses using the
multifunction switch.
On the usage of an iPod or iPhone with the cinemizer OLED glasses, the
volume control on the iPod or iPhone is inhibited. On some iPod or iPhone
models, the volume may still be indicated on the display if the volume but-
tons are actuated, but the volume in the cinemizer OLED will not change.
With an iPod or iPhone connected you can only adjust the volume on
the cinemizer OLED.
Each time you change the volume, the volume symbol will be displayed
briefly on the virtual screen in the cinemizer OLED glasses.
Mute Lowest volume Maximum volume
A total of 11 different volume settings and a mute setting are available. Each
time you power on the cinemizer OLED video glasses the volume is set to the
default volume, which is 50% of the maximum volume.
+
-
Usage
+
!

14
Integrated battery
The integrated battery allows you to use the cinemizer OLED glasses for up to 6
hours while you are travelling. The battery must have been fully charged prior to
use. It takes approx. 2.5 hours to charge the battery.
Connection Operating time in hours
Video cable 6
iPod/iPhone 6
HDMI®2.5
Usage

15
Battery status
When the cinemizer OLED is powered on, the battery status LED indicates to
you the charge status of the battery. Low battery capacity is signalled by an
orange (critical) or red (very critical) LED.
If the battery status LED illuminates red or orange, you should try to charge
the battery using a USB cable.
Battery status LED Battery status
Illuminated red
The battery capacity is very low and therefore it is imperative the battery is
charged. Depending on the playback device and the connection used (HDMI®,
iPod, video), the battery will be able to supply power for max. 30 minutes.
Illuminated orange
The battery capacity is low and therefore the battery should be charged.
Depending on the playback device and the connection used (HDMI®, iPod,
video), the battery will be able to supply power for max. 60 minutes.
Illuminated green
The battery for the cinemizer OLED video glasses is charged. Depending on the
playback device and the connection used (HDMI®, iPod, video), the cine-
mizer OLED can be operated portably for up to 6 hours.
Usage

16
If the battery charge drops below one of the two limits (orange, red) dur-
ing operation, the related battery symbol will be displayed on the screen in
orange or red.
Charging recom-
mended
Very critical charge status
Charging recommended
Charging imperative
With the cinemizer OLED powered on, the battery symbol is also displayed
briefly in the glasses if the volume is changed using the multifunction switch.
Usage

17
Battery charging
To charge the cinemizer OLED battery you can connect the USB cable supplied
to either a computer or a USB mains power supply plug. It is recommended
to ensure the power source supplies at least 500 mA (e.g. USB 2.0).
While you charge the cinemizer OLED battery, the battery status LED flashes.
The colour of the flashing battery status LED indicates the battery capacity in
3 different colours.
If the battery is completely discharged, the battery status LED will not flash
immediately when the video glasses are connected using a USB cable. Please
leave the cinemizer OLED video glasses connected to the PC via the USB cable
for at least 15 minutes. Then disconnect the USB cable and connect again.
The charging function is continued and the battery status LED illuminates.
The charging activity is indicated in the on-screen display by a progress bar
in the battery symbol. This symbol is only visible if the volume is changed
using the multifunction switch.
Usage

18 Usage
Battery status LED Battery status
Flashing red The battery capacity is very low. After charging for
approx. 40 minutes the colour of the battery status
LED will change from red to orange.
Flashing orange The battery charging status has reaches a state
that is sufficient for approx. 1-3 hours of operation
depending on the playback device and the connec-
tion used.
Flashing green The battery capacity is almost fully charged.
The battery is fully charged when the battery status LED no longer flashes,
but instead is continuously illuminated green.
Please read the safety instructions on the rechargeable battery in the section
"Safety and usage" in the short guide included in the package.
Other manuals for cinemizer OLED
1
Table of contents
Other Zeiss 3D Glasses manuals