7
Thank you for purchasing a generator. We want to help you get the best results from your new
generator and to operate it safely.
This manual contains the information on how to do that; please read it carefully.
All information and specifications in this publication is based on the latest productinformation
available at the time of printing. We reserve the right to make changes at any time without notice
and without incurring any obligation. No part of this publication
may be reproduced without written permission.
This manual should be considered a permanent part of the generator and should remain with it if it
is resold.
Safety Messages
Your safety and the safety of others are very important. We have provided important safety messa-
ges in this manual and on generator. Please read these messages carefully.
A safety message alerts you to potential hazards that could hurt you or others; Each safety messa-
ge is preceded by a safety alert symbol
Andone of three words:
DANGER, WARNING, or CAUTION. These mean:
You Will be KILLED or SERIOUSLY HURT if you don’t
Other important messages are preceded by the word NOTICE.
This word means:
Your generator or other property could be damaged if you
don't follow instructions.
△
!
WARNING
△
!
CAUTION
The purpose of these messages is to help prevent damage to your generator, other properly, or the
environmen
1. SAFETY
The generators are designed to give safe and dependable service if operated
according to instructions. Read and understand this owner’s manual before operating
your generator. You can help prevent accidents by being familiar with yourgenerator’s
controls,and by observing safe operating procedures.
Operator Responsibility
- Know how to stop the generator quicklyin case of emergency.
- Understand the use of all generator controls, output receptacles. And connections.
- Be sure that anyone who operates the generator receives proper instruction.Do
not let children operate the generator without parental supervision. Keep children
and pets away from the area of operation.
Place the generatoron a firm, level surface and avoid loose sand or snow.lf the
generator is tilted or overturned, fuel spillage may result. Also. If the generator is
over turned or sinks into a soft surface , sand, dirt, or water may enter thegenerator.
Carbon Monoxide Hazards
- Exhaust Contains poisonous carbon monoxide. a colorless and odorless gas
breathing exhaust can cause loss of consciousness and may lead to death.
- If you run the generator in an area that is confined or ever partially enclosed. The air you breathe
could contain a dangerous amount of exhaust gas. To keep exhaust gas from building up ,provide
adequate ventilation.
Electric Shock Hazards
- The generator produces enough electric power to causea serious shock or
electrocution if misused.
- Using a generator electrical appliance in wet conditions, such as rain or snow, or
near a pool or sprinkler system, or when your hands are wet: could result in
electrocution. Keep the generator dry.
- If the generator is stored outdoors, unprotected from the weather, check all electrical components
on the control panel. Before each using. Moisture or ice can cause amalfunction or short circuit in
electrical components which could result inelectrocution.
- Do not connect to a building's electrical system unless an isolation switch hasbeeninstalled by a
qualified electrician.
Fire and Burn Hazards
- The exhaust system getshot enoughto ignite some materials.
— Keep the generator at least 1 meter (3 feet) away from buildings and other equipment during
operation.
— Do not enclose the generator in any structure.
— Keep flammable materials away from the generator.
- The muffler becomes very hot during operation and remains hot for a while afterstopping the
engine. Be careful not to touch the muffler while it is hot. Let the enginecool before storing the
generator indoors-.
- Gasoline is extremely flammable and is explosive under certain conditions. Do not smoke or allow
flames or sparks where the generator is refueled or where gasoline is stored. Refuel in a well-venti-
lated area with the engine stopped.
- Fuel vapors extremely flammable and may ignite after the engine has started.Make sure that any
spilled fuel ha& been wiped up before starting the generator.
2. COMPONENT IDENTIFICATION
3. CONTROLS
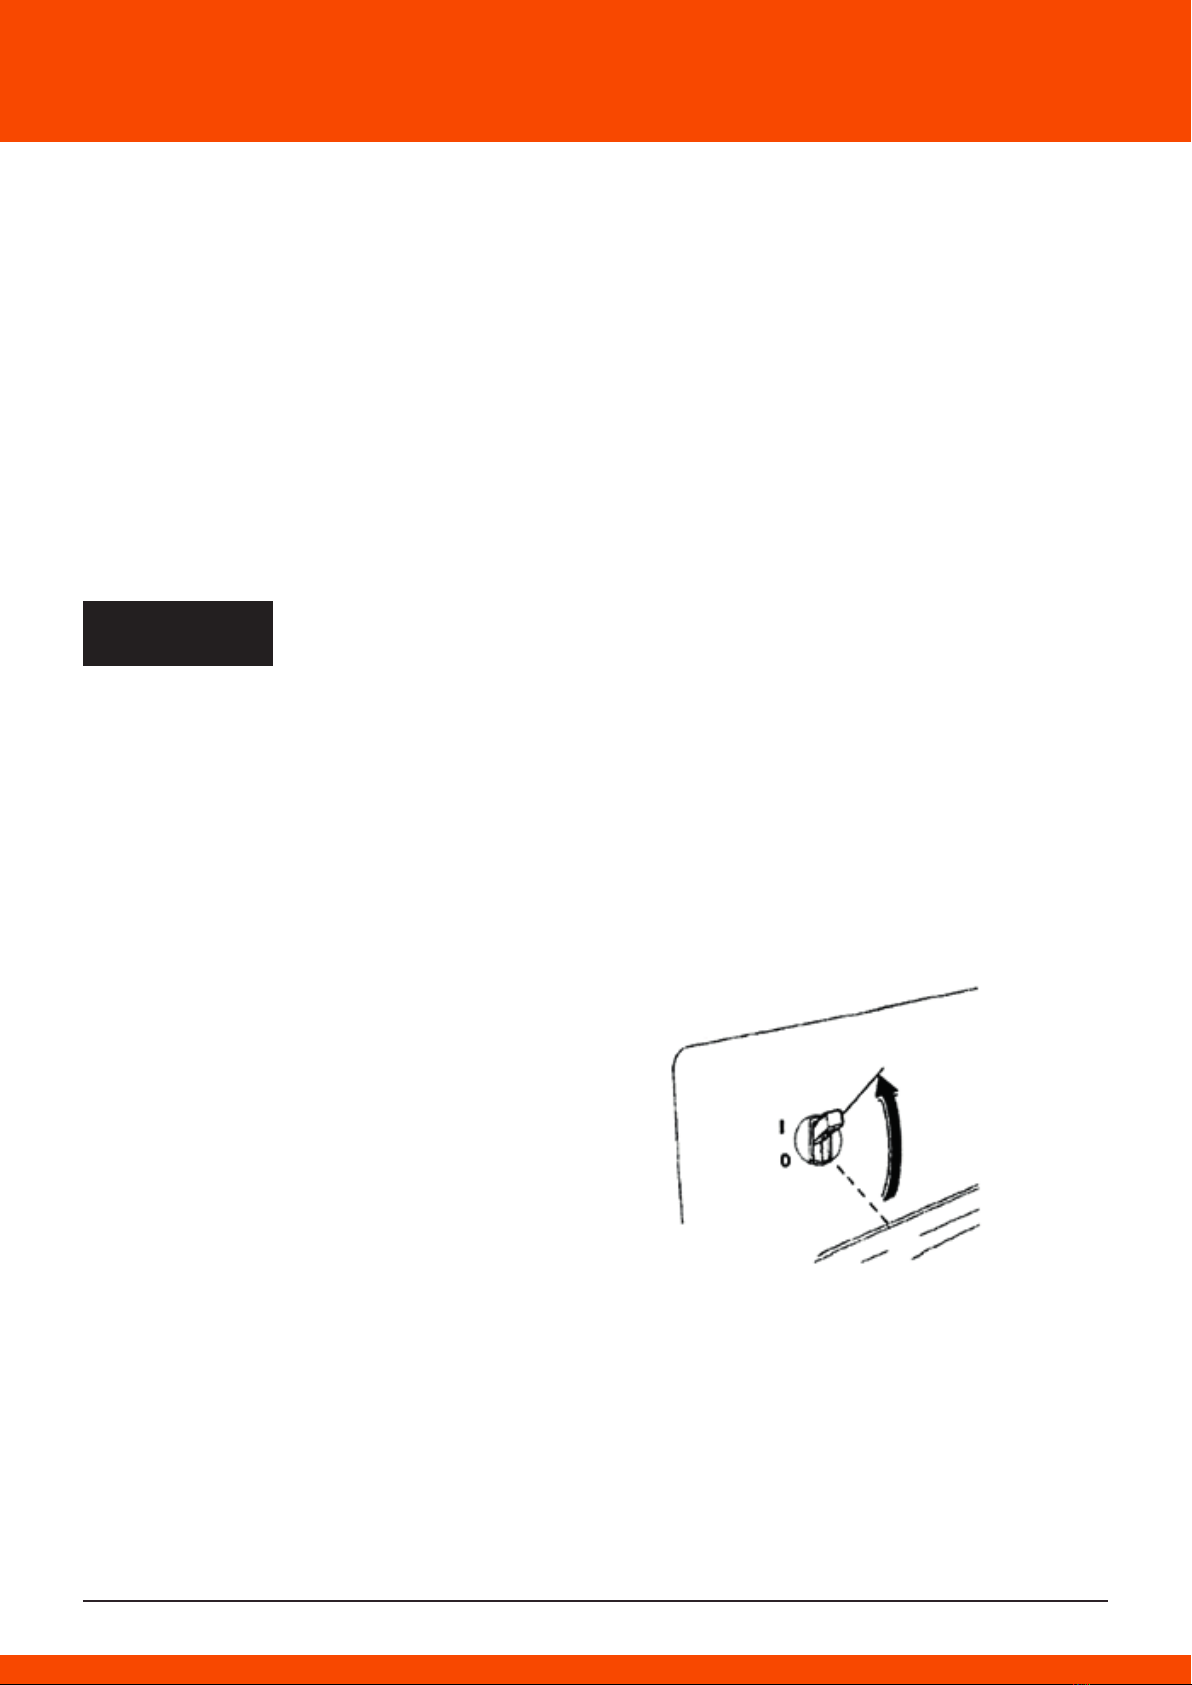
1) Engine Switch
To start and stop the engine.
Switch position:
OFF: To Stop the engine. Key can be removed / inserted.
ON: To run the engine after starting.
START: To start the engine by turning the starter motor.
Return the key to the ON position once the engine has started. Do not use the starter for more than
5 seconds at a time. Ifthe engine fails to start, release the switch and wait 10 seconds before opera-
ting the starter again.
2) Recoil Starter
To start the engine, pull the starter grip lightly until resistance is felt, then pull briskly.
3) Fuel Valve
The fuel valve is located between the fuel tank and carburetor. When the valve lever is
in the ON position, fuel is allowed to flow from the fuel tank to the carburetor. Be sure to return the
lever to OFF after stopping the engine.
4) Choke
The choke is used to provide an enriched fuel mixture when starting a cold engine. It can be opened
and closed by operating the chock lever or choke rod manually. Move the lever or the rod to the
CLOSE position to enrich the mixture.
5) Circuit Breaker
The circuit breaker will automatically switch OFF if there is a short circuit or a significant overload of
the generator at the receptacle. If the circuit breaker is switched OFF automatically, check that the
appliance is working properly and does not exceed the rated load capacity of the circuit before
switching the circuit breaker ON again,The circuit breaker may be used to switch the generator
power ON or OFF,
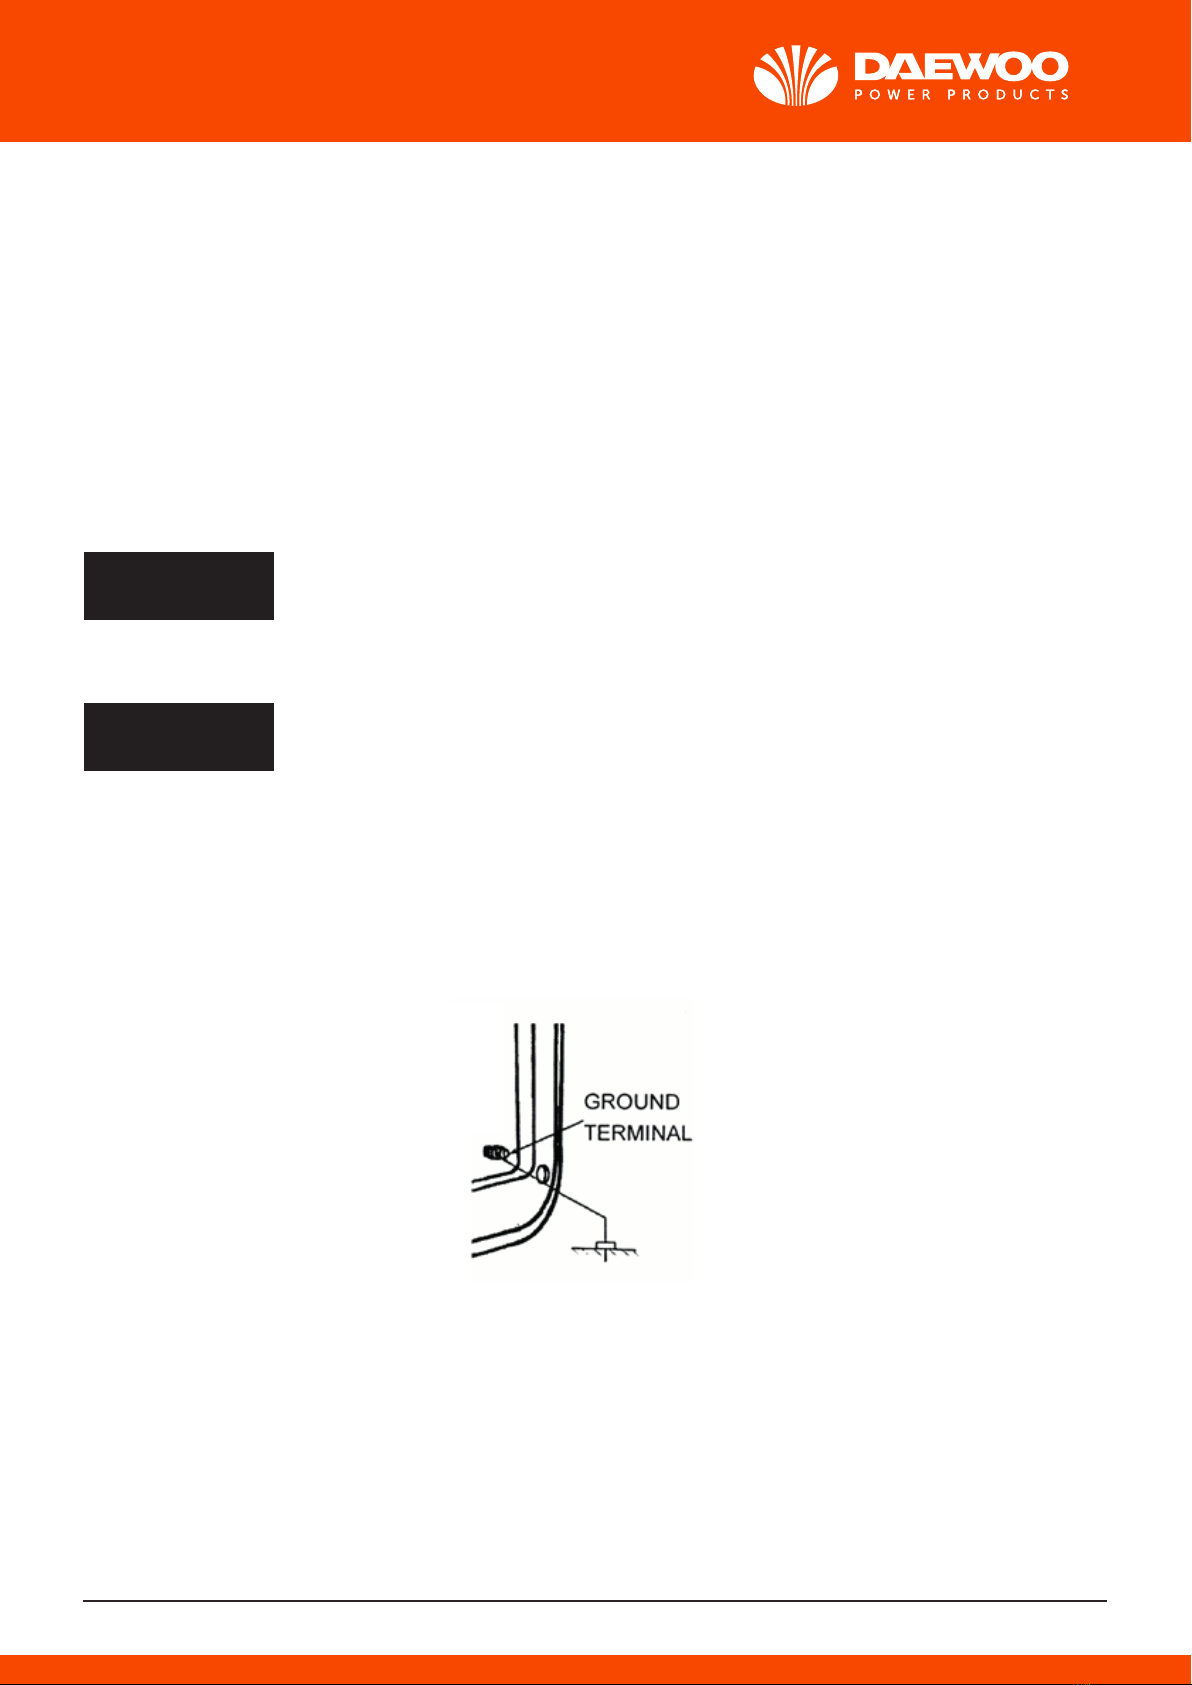
6) Ground Terminal
The generator ground terminal is connected to the panel of the generator, the metal
non-current carrying parts ofthe generator, and the ground terminals of each
receptacle. Before using the ground terminal, consult a qualified electrician, electrical
inspector or local agency having jurisdiction for local codes or ordinances that apply to the intended
use of the generator.
7)Oil Alert System
The oil alert system is designed to prevent engine damage caused by an insufficient
amount of oil in the crankcase. Before the oil level in the crankcase can fall below a
safe limit the oil alert system will automatically shut down the engine (the engine
switch will remain in the ON position). The oil alert system shuts down the engine and
the engine will not start. If this occurs, first check engine oil.
4. GENERATOR USE
1) Connections to a Building’sElectrical System
Connectionsfor standby power to a building’selectrical system must be made by a
qualified electrician. The connection must isolate the generator power from utility powerand must
com ply with all applicable laws and electrical codes.
2) Ground System
To prevent electrical shock from foully appliances, the generator should be grounded.Connect a
length of heavy wire between the ground terminal and the ground source.The generators have a
system ground that connects generator frame components to the ground terminals, in the AC output
receptacles. The system ground is not connected to the AC neutral wire. If the generates is testedby
a receptacle tester. It will not showthe same ground circuit condition as tor a home receptacle.
Special Requirements
There may be Federal or State Occupational Safety and Health Administration (OSHA) regulations,
local codes, or ordinances that apply to the intended use of the generator Please consult a qualified
electrician, electrical inspector, or the local agency having jurisdiction.
- In some areas, generators are required to be registered with local utility companies.
- If the generator is used at a construction site, there may be additional regulations which must be
observed
Improperconnections to a building’s electrical system, can allow electrical
current from the generator to feedback into the utility lines, Such feedback
may electrocute utility company workers or others who contact the lines
during a power outage. Consult the utility company or a qualified
electrician.
Improper connections to a building’s electrical system can allow electrical
current from the utility company to feedback into the generator. When
utility power is restored, the generator may explode, burn, or cause fires in
the building’s electrical system.
2) AC Applications
Before connecting an appliance or power to the generator:
- Make sure that it is in good working order. Faulty appliances or power cords can create a potential
for electrical shock.
- If an appliance begins to operate abnormally, becomes sluggish or stops suddenly. Turn it off
immediately. Disconnect the appliance, and determine whether the problem is the appliance, or if
the rated load capacity of the generator has been exceeded.
- Make sure that the electrical, rating of the tool or appliance does not exceed that ofthe generator.
Never exceed the maximum power rating of the generator. Power levels between rated and maxi-
mum may be used for no more than 30 minutes.
Limit operation requiring maximum power to 30 minutes.
For continuous- operation, do not exceed the rated power
In either case. the total power requirements (VA) of all appliances connected must be considered.
Appliance and power tool manufacturers usually list rating information near the model number or
serial number.
4) AC Operation
①. Start the engine
②. Switch the AC circuit breaker ON
③. Plug in the appliance
Most motorized appliances require more than their rated wattage for startup.
Do not exceed the current limit specified for any one receptacle. if an overloaded circuit causes the
AC circuit breaker to switch OFF, reduce the electrical load on the circuit, wait a few minutes and
then reset the circuit breaker.
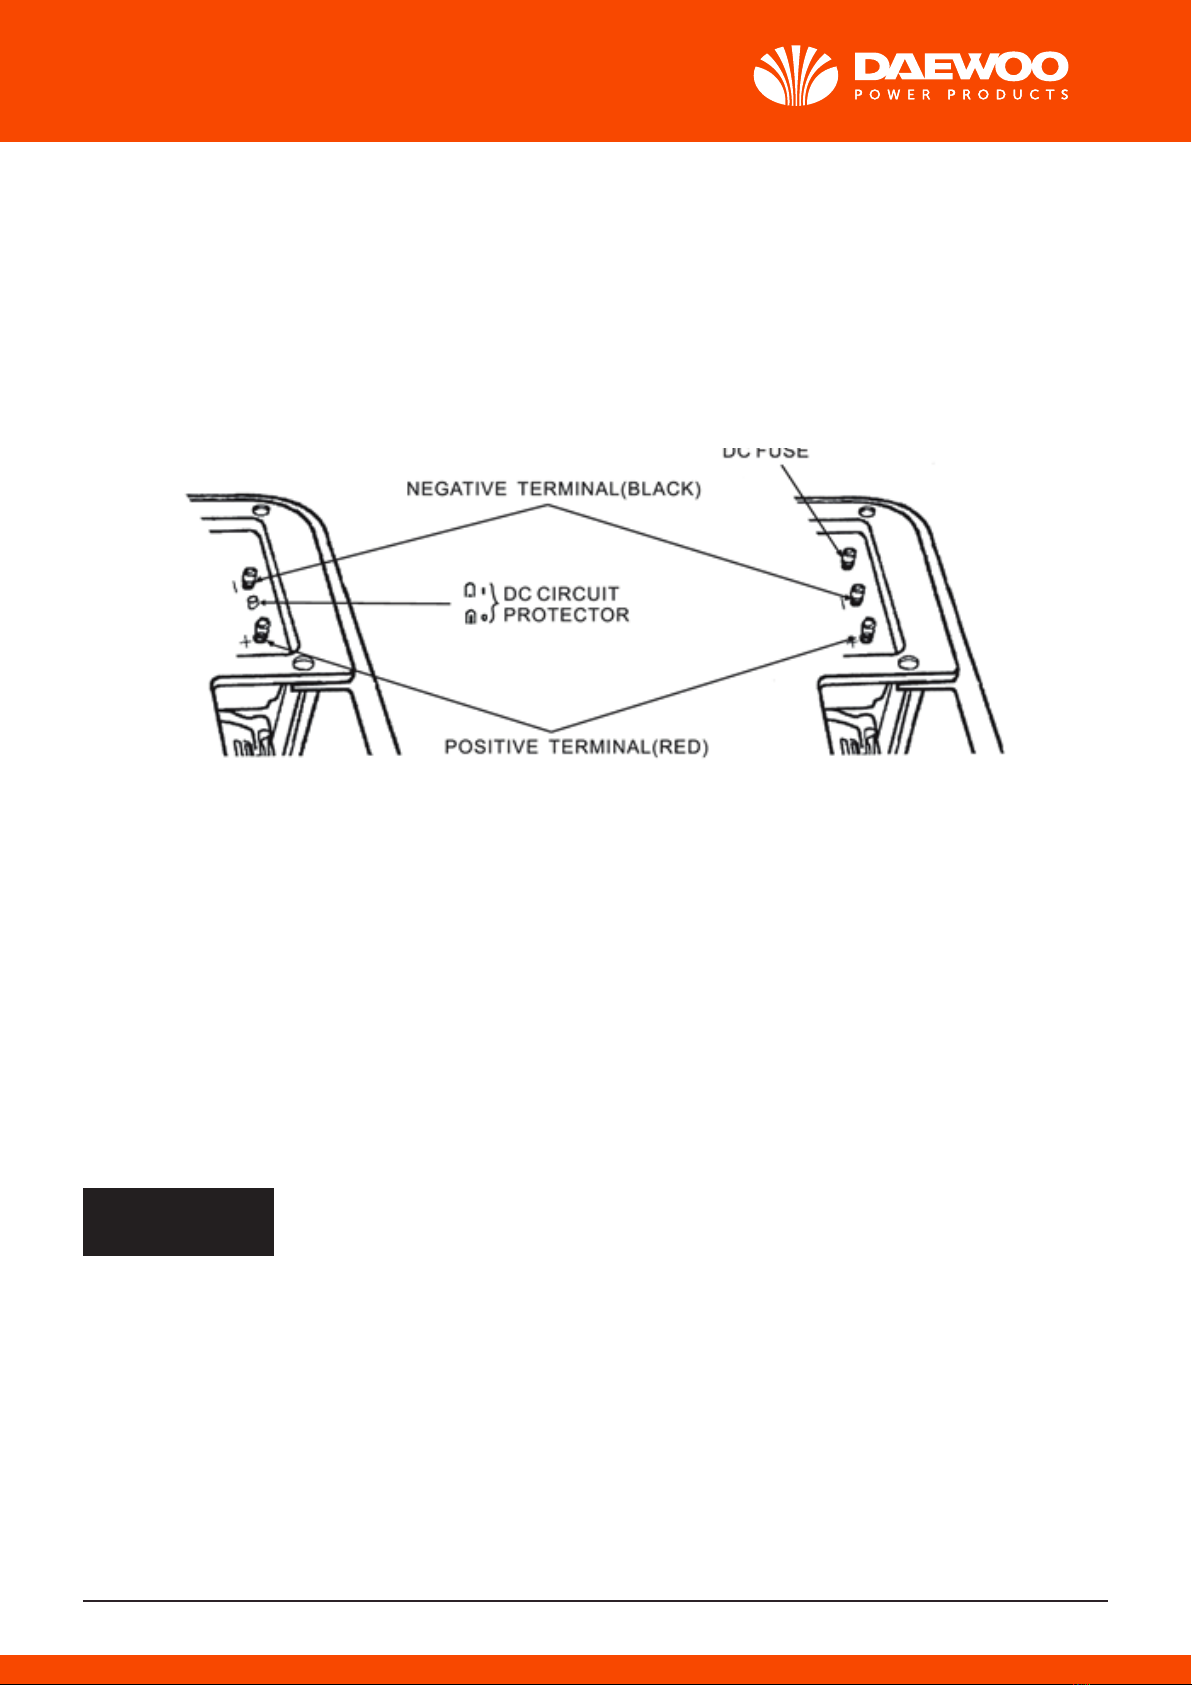
5) DC OPERATION
DC Terminals
The DC terminals may ONLY be used for charging 12 volt automotive type batteries.
The terminals are colored red to identify the positive (+) terminal and black to identify the negative
(-)terminal. the battery must be connected to -he-generator DC terminals with the proper polarity
(battery positive to generator red terminal and battery negative id the generator black terminal).
The DC circuit protector(or DC Fuse) automatically shuts off the DC battery.
charging circuit when the DC circuit is overloaded, when there is a problem with the
battery, or the connections between the battery and the generator are improper.
the indicator inside the DC circuit protector button will pop out to show that the DC
circuit: protector has switched off. Wait a few minutes and push the button in Io reset the DC circuit
protector.
Connecting the batter/ cables:
①. Before connecting charging cables to a battery that is installed in a vehicle
Disconnect the vehicle’s grounded battery cable.
②. Connect the positive (+) battery cable to the battery positive (+) terminal.
③. Connect the other end of the positive(+) battery cable to the generator
④. Connect the negative (-) battery cable to the battery negative (-) terminal.
⑤. Connect the other end of the negative(-) battery cable to the generator
⑥. Start the generator.
An overloaded DC circuit will fuse the DC fuse, if this happens, replace fuse.
An overloaded DC, excessive current draw by the battery, or a wiring problem
will trip the DC circuit protector (Push button extends out). If this happens, wait a few minutes
before pushing in the circuit protector to resume operation. If the circuit
protector continues to go OFF. discontinue changing and see your authorized generator dealer.
Disconnecting the battery cables:
①. Stop the engine,
②. Disconnect the negative (-) battery cable from the generator negative (-)terminal.
③. Disconnect the other end of the negative (-) battery cable from the battery negative (-)terminal.
④. Disconnect the positive(+) battery cable from the generator positive (+)terminal,
⑤. Disconnect the other end of the positive(+)battery cable to the battery positive(+) terminal.
⑥. Connect the vehicle ground cable Io battery negative (-) terminal.
⑦. Reconnect the vehicle grounded battery cable.
6) High Altitude Operation
At high altitude, the standard carburetor air-fuel mixture will be excessively rich.
Performance will decrease, and fuel -consumption will increase.
High altitude performance can be improved by installing a smaller diameter main fuel
jet in the carburetor and readjusting the pilot screw, If you always operate the engine
at attitudes higher than 5000 feel (1500 meters) above sea level, have an authorized
generator dealer perform this carburetor modification.
Even with suitable carburetor jetting, engine horsepower will decrease approximately
3.5% for each 1000 foot (300 meter) increase in altitude. The effect of altitude on
horsepower will be greater than this if no carburetor modification is made.
5. PRE-OPERATION CHECK
1) Engine oil
Use 4-stroke oil, or equivalent high detergent, premium quality motor oil certified to meet or exceed
U.S. .automobile Manufacturer’s requirements Cot Service Classification SG. SF/CC. CD. Motor oils
classified SG SF/CC, CD will show this designation on the container.
SAE 10W 3D is recommended for general temperature use. Other viscosities shown in the chart may
be used when the average temperature in your area is. Within the
indicated range.
1.Remove the oil filler cap and wipe the dipstick clean.
2. Check the oil level by inserting the dipstick into tine filler neck without screwing it in.
3. If the level is low, add the recommended oil to the upper mark on the dipstick.
2) Fuel Recommendation
- Check the fuel level gauge.
- Refill the tank if the fuel level is low. Do not Fill above the shoulder of the fuel strainer. Gasoline is
extremely flammable and is explosive under certain conditions. Refuel in a well-ventilated area with
the engine stopped. Do not smoke or allow flames or sparks in the area where the engine is refueled
or where gasoline is stored.
- Do not overfill the fuel tank (there should be no fuel in the filler neck). After refueling make sure the
tank cap is closed properly and securely. Be careful
not to spill fuel when refueling. Spilled fuel or fuel vapor may Ignite. If any fuel is spilled, make sure
the area is dry before starting the engine.
- Avoid repeated or prolonged contact with skin or breathing of vapor.
- KEEP OUT OF REACH OF CHILDREN.