One to One MO-36E-18Y User manual

MO-36E-18Y
Installation & Operation Manual

Contents
1. Precautions 1
2. Operating Instructions and Functions 1
2.1 For Control Panel and Remote Control 1
2.2 Cleaning and Maintain for Cooling pad 2
3. Construction Diagram 4
4. Troubleshooting Guide 5
5. Product Dimension 6
5. Technical Information 6
6. Circuit diagram 8
7. Exploded view 8
9

Control Panel
1.Precautions
Avoid using the evaporative cooling fan in a closed space. The unit
should be used in well-ventilated areas only.
Voltage should be monitored to make sure that it is within ±5%
range. If the voltage is too low, the cooler may not turn on or may be on
and off. Too low or too high voltage may cause damages to the cooler.
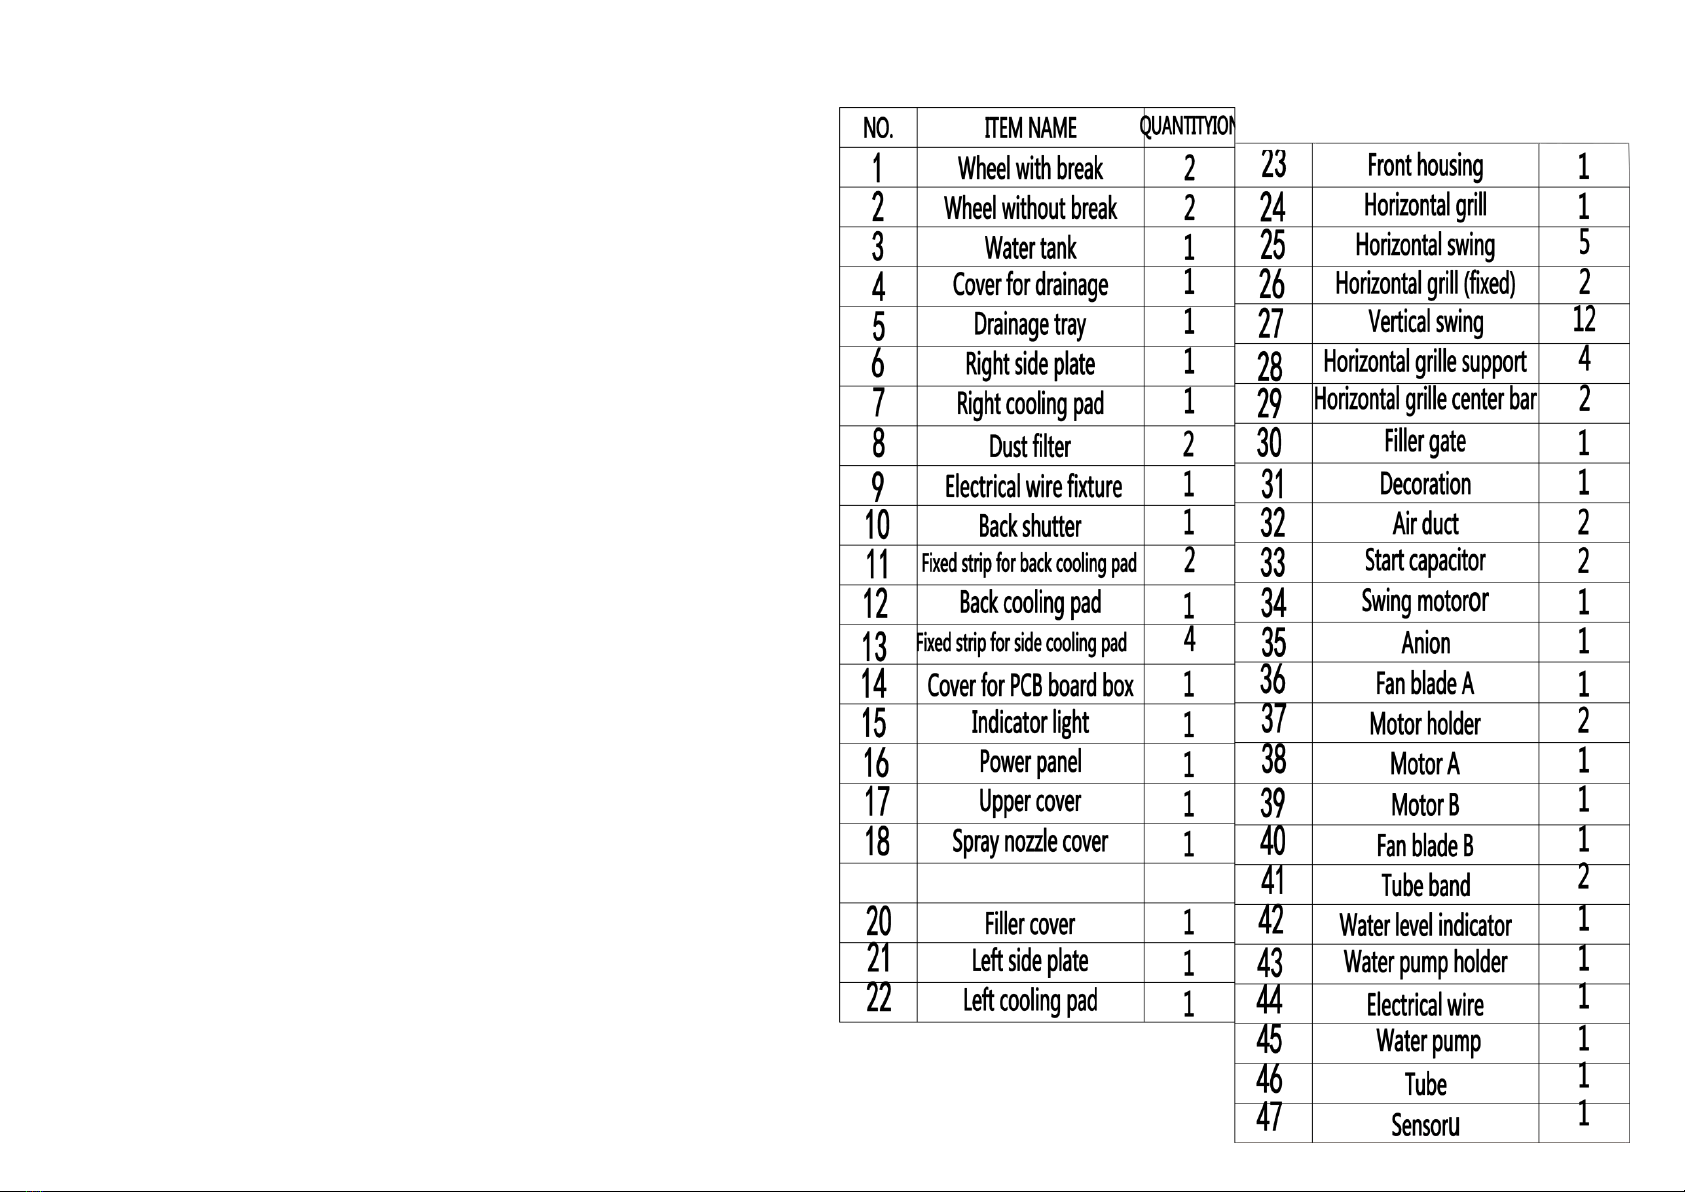
User manual, qualified certificate, remote control, warranty card, etc.
are attached for specific models.
Before turning the unit on, fill the tank with clean water to ensure efficient
operation of the evaporative air cooler. Avoid operating Cool function while
the water tank is empty. Remarks: Do not put any other liquid into the tank.
Water level must not exceed the limit of water level scale
Remote Control
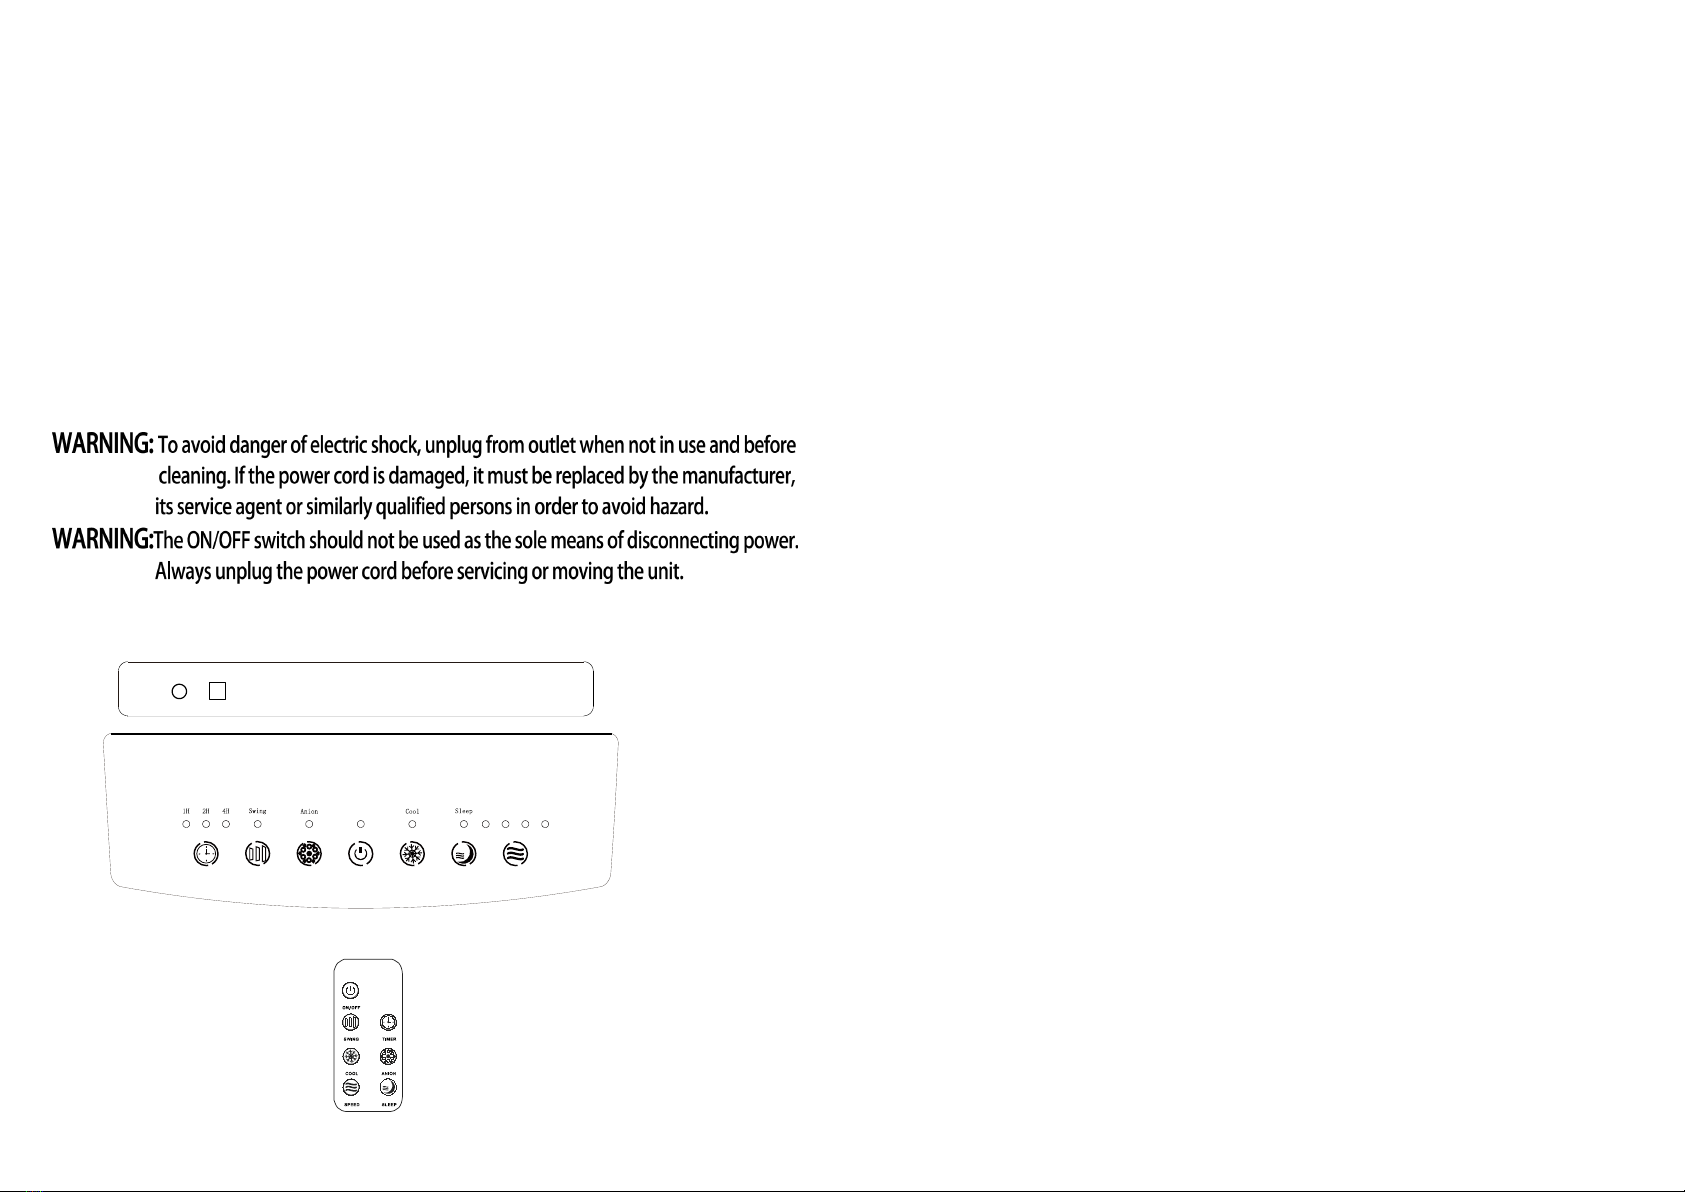
Start up/Air Circulation
When the air cooler is switched on, it is on standby mode with a beep. After pressing the “ON/OFF”
button, the air cooler will start operating in a low air circulation speed or “Level 1 (low)”. Press the
“Speed” button on the control panel or remote control if you want to change speeds. There are four
speeds, including Level 1 (low), Level 2 (medium), Level 3 (high) and Level 4 (strong). The air speed
levels will work on a rotating cycle. When the power is on, the indicator light is on and keep pressing
the “ON/OFF” button to turn off the light. The indicator light can be on again by pressing any button.
Cool
Enter the Cool mode by pressing the “Cool” button on the control panel or remote control. To turn off
the Cool mode, press “Cool” again. The system will automatically exit the Cool mode. When the Cool
mode is on and the indicator light of “Cool” button keeps flashing, it means the water tank need to be
refilled. In the case where the wind speed is high, when the “Cool” button is pressed, the cooler will
drop to the lowest speed for 80 seconds before resuming the speed previously set.
Swing
Press the “Swing” button on the control panel or remote control to have the vertical louvers swing
automatically and the unit will enter the Swing mode with indicator light on. Press again and the
louvers will stop swinging with indicator light off.
Anion (optional component)
Enter the Anion mode by pressing the “Anion” button on the control panel or remote control with
indicator light on. Press again to exit the Anion mode with indicator light off.
Timer
Press down the “Timer” button on the control panel or remote control and select “Time ON”, the time
will change from 1H to 2H to 4H and from 4H to non-time mode by each press. The indicator light will
be off if select non-time mode.
SLEEP
1.Pressing the “Sleep” button when the air speed is at 4
th
level, the air speed will be dropped down to
3
rd
level. The air speed will be dropped down to 2
nd
level after half an hour, and then be in sustained
air speed at 1
st
level after half an hour.
2.Pressing the “Sleep” button when the air speed is at 3
rd
level, the air speed will be dropped down to
2
nd
level after half an hour. The air speed will be in sustained air speed at 1
st
level after half an hour.
3.Pressing the “Sleep” button when the air speed is at 2
nd
level, the air speed will be dropped down to
1
st
level after half an hour.
4.The air speed remains at 1
st
level when press “Sleep” button.
(When press “Sleep” button, the highest air speed can reach to 3
rd
level. And the air speed can
reach to 4
th
level without pressing the “Sle
ep” button.
1
2
2. Operating Instructions and Functions
2.1 For Control Panel and Remote Control
TIM ER
41 2 3
S P EEDSW IN G C OO LA NIO N O N/ O FF SLE EP
zzz
zzz

2.2 Cleaning and Maintain for Cooling pad
I
n order to ensure cooling effect, the cooling pads should be cleaned regular (suggest
cleaning every year). When cleaning cooling pads, the hydraulic pressure can not be too
high and the temperature should not be more than 40 degrees centigrade. It is
recommended that using soft brush to wipe off the dust on the cooling pad. After
cleaning, the cooling pads should be dried off and put back to cooler. If the cooler does
not work for a long time, in order to avoid damaging the cooler due to weather condition
like freezing, and avoid breeding mosquitoes and other insects, the water tank should be
drained and turn on the cooler by pressing “ON/OFF” button to dry off the cooling pads.
Shut off the cooler after cooling pads are dried off.
There is a hole for uncovering
By pulling out upward
to refill water steadily.
After removed the supporting rod for cooling pad and
air-inlet grille, the cooling pads can be pulled out.
3. Construction Diagram of Evaporative Air Cooler
MO-36E-18Y
3
4
Back Cooling
Pad
Top Cover
Control Panel
Swing
Air outlet
Outlet decoration
Front Shell
Water Level Indicator
Water Tank
Caster
Side Cover
Water Filling
Tray
Dust Proof Net
Drain Plug
Back Cover
Plastic Screw
Supporting Rod for Cooling Pad
side Cooling Pad
Cleaning the cooling pads by water
and wipe off the dust by soft brush.

4. Troubleshooting Guide
MO-36E-18Y
No.
Problem
Possible Cause
Corrective Action
Remarks
1
The evaporative air
cooler is not
functioning and
does not respond
when buttons are
pressed.
Blackout or faulty power
connection
Measure the input voltage
and connect to a
designated power supply.
We recommend
that a voltmeter is
used because an
electrician’s
screwdriver
cannot correctly
measure voltage.
AC fuse is damaged or
the circuit stops
functioning in order to
prevent power overload.
Replace the fuse or restart
the unit.
Restart the power
overload
prevention system
and find out the
cause of the
overload.
2
Remote control
does not respond or
is less responsive.
Remote control batteries
have run out or remote
control is out of control
area.
Change the batteries and
use remote control with
control area.
3
No air flows from
the unit after the
“On/Speed” button
is pressed.
Heat protection
equipment inside the
motor is working.
Leave the unit off until the
fan motor is cool enough
to be used as usual.
Damaged motor
Repair or replace the
motor with another of the
same model.
Loose motor connection
Determine whether or not
the motor connections are
in order.
Damaged heat relay
Repair or replace the
control panel with another
of the same model.
5
6
4
The pump functions
but it is not cool
enough.
Air ventilation chamber is
not large enough. Filter
pads are clogged or dirty.
Clean or replace the filters.
Check the
parameters of the
replacement parts.
The filter pads are dry or
contain insufficient water
while the air cooler is
working.
Check the water distribution
system to determine whether
or not there is a clog.
Determine if the pump is
functioning correctly.
Excessively high relative
humidity
When the cooler is used for a
prolonged of time, the room
humidity will be very high, so
the cooler will be unable to
lower temperatures as much
as when the room’s humidity
is lower. Turn the pump off
and increase ventilation.
5
The pump fails to
function and provide
cooling
Damaged pump
Repair or replace the pump
with a pump of the same
model.
Loose motor connection
Tighten connection
6
The pump functions
but does not
circulate water, or
the filter pads
contain too little
water.
Clogged or dirty strainer
Clean the strainer.
Clogged water supply hose
Clean the hose.
Clogged drain
Clean the drain.
7
Undesirable odor
The unit is placed in an
area where undesirable
odors are present, or algae
are present in the water
tank.
Clean the cooling machine.
8
White sediments in
the water tank
Water has a high content
of salt
Drain the tank more
frequently.

7. Product Dimension
6. Technical Information
Model No.
MO-36E-18Y
Air Volume
9216 CFM
Voltage/Frequency
110 V/60 Hz
Power
128 W
Water tank capacity
8.45 US gal
Overall dimension
12.6x16.54x47.24 in
No. of Cooling pad
3 PCS
Net weight
22.00 lb
Area Coverage
322.92ft²
7
47.24 in
8. Circuit diagram
8. Exploded view
8
12.6 in
16.54 in
Table of contents
Popular Heater manuals by other brands

ALPATEC
ALPATEC MSBT 20 operating instructions

EUROM
EUROM Safe-t-Shine 1200 Compact instruction manual

Intertec Data Systems
Intertec Data Systems CP BLOCKTHERM D.A HI operating instructions

Schwank
Schwank STS-JZ Installation & owner's manual

BN Thermic
BN Thermic SMH-45 instructions

EUROM
EUROM CK501R Series user manual