manuals.online logo
Brands
  1. Home
  2. •
  3. Brands
  4. •
  5. Zfish
  6. •
  7. Fishing Equipment
  8. •
  9. Zfish Helios User manual

Zfish Helios User manual

INSTALACE BATERIE:
Nainstalujte 9voltovou baterii do každého signalizátoru záběru a přijímače,
posunutím krytu baterie na zadní straně každé jednotky.
PÁROVÁNÍ SIGNALIZÁTORŮ A PŘIJÍMAČE:
Krok 1: Zapnětě signalizátor ON a vypněte přijímač OFF.
Krok 2: Stiskněte a držte tlačítko „Kódování“ na přijímači a zapněte ON.
Krok 3: Opakovaným stiskem tlačítka „Kódování“ nastavte barvu, které chcete
přiřadit signalizátor.
Nechte hlásič vydat tón (přejet přes kolečko signalizátoru).
Krok 4: Zapněte a vypněte přijímač, tím uložíte nastavení.
TEST DOSAHU SIGNALIZÁTORŮ:
Krok 1: Nastavte na signalizátoru kolečko „S“ na hodnotu 5 a zapněte
signalizátor. Signalizátor začne vydávat nepřetržitý tón.
Krok 2: Nyní zapněte přijímač, který vydává tón/vibruje a vzdalujte
se od signalizátoru.
Krok 3: V momentu kdy přestane přijímač vydávat tón,
byl dosažen maximální dosah.
SLABÁ BATERIE:
Každý signalizátor využívá alarm pro nízkou kapacitu baterie, což je indikováno krátkým
pípnutím .
ÚDRŽBA:
Po každém použití utřete signalizátory a přijímač. Odstraňte vlhkost a nečistoty suchou
čistou látkou. Pro dlouhou dobu skladování vyjměte baterie.
PZN: Signalizátory a přijímač v zakoupeném setu, jsou již spárovány.
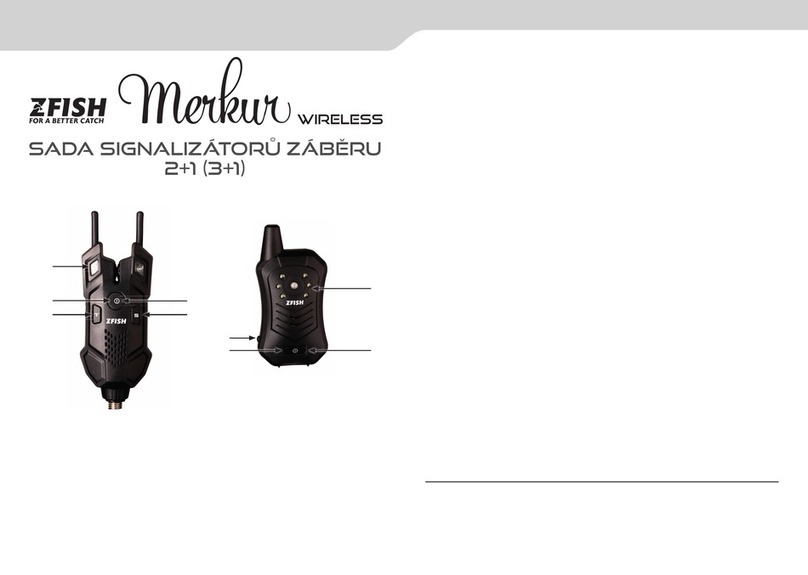
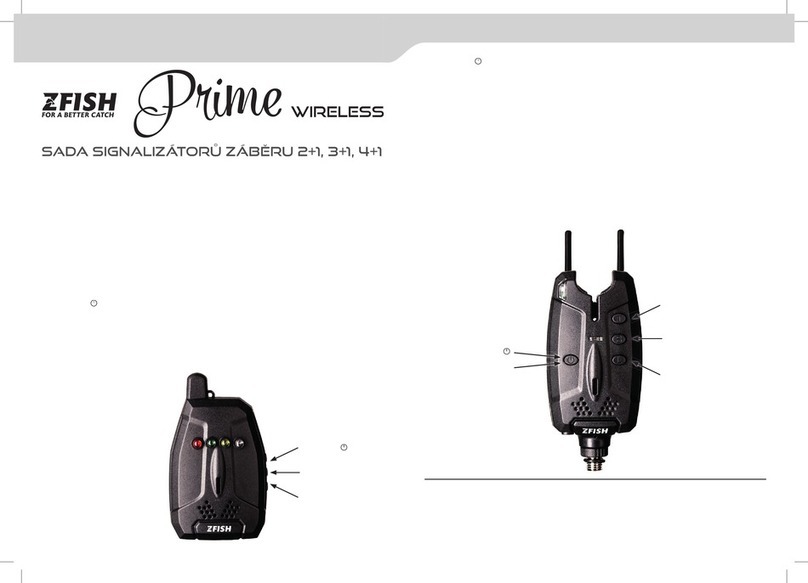
SIGNALIZÁTOR ZÁBĚRU:
1 Odjímatelné uši
2 Vícebarevná LED dioda
3 Nastavení tónu (5 možností)
4 Nastavení barevného režimu
(7 různých barev)
5 Konektor
6 Kolečko
7 Nastavení hlasitosti
8 Nastavení citlivosti (5 možností)
9 Hlavní vypínač (on/off/noc/den)
Uživatelský manuál
PŘIJÍMAČ:
10 LED diody
11 Nastavení tónu (5 možností)
12 Hlavní vypínač (on/off/vibrace)
13 Kódov ání
14 Nastavení hlasitosti
Dovozce a distributor:
Zfishing Sport Wholesale s.r.o., Za Mototechnou 1375/7, 155 00, Praha 5
E-shop: www.zfishingsport.cz, tel. 235 311 522
Technická podpora: info@zfishingsport.cz
BITE ALARM RECEIVER
BITE ALARM
1 Snag Bar
2 Multi-colour LED Lights
3 Tone Dial (5 settings)
4 Multi-colour LED Dial (7 colour options)
5 Power Socket
6 Roller
7 Volume Dial
8 Sensitivity Dial (5 settings)
9 Power Switch (on/off/night light)
RECEIVER
10 LED Lights
11 Tone Dial (5 settings)
12 Power Switch (on/off/vibrate)
13 Coding Dial
14 Volume Dial
BATTERY INSTALLATION
Install a 9-volt battery in each of the alarms and the receiver by sliding
down the battery cover plate on the back of each unit.
SYNCHRONISING ALARM SEQUENCE WITH RECEIVER LED ORDER
Step 1 Turn ON alarm and turn receiver OFF.
Step 2 Press and hold the ‘Coding Button’ on the receiver and turn ON.
Step 3 Release ‘Coding Button’ on the receiver and press again
to change the LED order.
Step 4 Trigger the alarm and turn receiver OFF and ON.
RANGE TEST
Step 1 Turn ON Receiver.
Step 2 With the bite alarm powered off turn the sensitivity dial to ‘5’.
Step 3 Turn the bite alarm ON - Audible alarm noise indicates alarm range.
Step 4 Quit the range test by turning OFF alarm.
LOW BATTERY
Each alarm unit utilizes a low battery alarm is indicated by a short beep.
MAINTENANCE
Wipe alarms and receiver unit after each use. Remove moisture and
debris with a dry clean cloth. For long storage periods remove batteries.
Note: NGT Dynamic Bite Alarms are supplied pre-paired.
For technical support contact: [email protected]
BITE ALARM SET
SIGNALIZÁTOR ZÁBĚRU PŘIJÍMAČ
Bite alarm set 2+1 (3+1)
BATTERY INSTALLATION:
Install a 9V battery in each of the alarms and receiver by sliding down the battery cover
plate on the back of each unit.
SYNCHRONISING ALARM SEQUENCE
WITH RECEIVER LED ORDER
Step 1: Turn ON alarm and turn OFF receiver.
Step 2: Press and hold the “Coding Button” on the receiver and turn it ON.
Step 3: Release “Coding Button” on the receiver
and press again to change LED order.
Step 4: Trigger the alarm and turn receiver OFF and ON.
RANGE TEST:
Step 1: Turn ON Receiver.
Step 2: With the bite alarm powered off turn the sensitivity dial to 5.
Step 3: Turn the bite alarm ON – Audible alarm noise indicates alarm range.
Step 4: Quit the range test by turning OFF alarm.
LOW BATTERY:
Each alarm unit utilizes a low battery alarm indicated by a short beep.
MAINTENANCE:
Wipe alarms and receiver units after each use. Remove moisture and debris with a dry
clean cloth. For long storage periods remove batteries.
NOTE: Bite alarms and receivers in set are pre-paired.
BITE ALARM:
1 Adaptable Snagbar
2 Multi-Colour LEDs
3 Tone Dial (5 tone settings)
4 Multi-Colour LED Dial
(7 colour options)
5 Power Out Socket
6 Bite Sensor
7 Volume Dial
8 Sensitivity Dial (5 options)
9 Power Switch (ON-OFF-Nightlight)
User Manual
Receiver
10 LEDs
11 Tone Dial (5 Options)
12 Power Switch (ON-OFF-Vibrate)
13 Coding Button
14 Volume Dial
Importer & distributor
Zfishing Sport Wholesale s.r.o.
Za Mototechnou 1375/7, Prague, Czech rep.
www.zfishingsport.com
BITE ALARM RECEIVER
BITE ALARM
1 Snag Bar
2 Multi-colour LED Lights
3 Tone Dial (5 settings)
4 Multi-colour LED Dial (7 colour options)
5 Power Socket
6 Roller
7 Volume Dial
8 Sensitivity Dial (5 settings)
9 Power Switch (on/off/night light)
RECEIVER
10 LED Lights
11 Tone Dial (5 settings)
12 Power Switch (on/off/vibrate)
13 Coding Dial
14 Volume Dial
BATTERY INSTALLATION
Install a 9-volt battery in each of the alarms and the receiver by sliding
down the battery cover plate on the back of each unit.
SYNCHRONISING ALARM SEQUENCE WITH RECEIVER LED ORDER
Step 1 Turn ON alarm and turn receiver OFF.
Step 2 Press and hold the ‘Coding Button’ on the receiver and turn ON.
Step 3 Release ‘Coding Button’ on the receiver and press again
to change the LED order.
Step 4 Trigger the alarm and turn receiver OFF and ON.
RANGE TEST
Step 1 Turn ON Receiver.
Step 2 With the bite alarm powered off turn the sensitivity dial to ‘5’.
Step 3 Turn the bite alarm ON - Audible alarm noise indicates alarm range.
Step 4 Quit the range test by turning OFF alarm.
LOW BATTERY
Each alarm unit utilizes a low battery alarm is indicated by a short beep.
MAINTENANCE
Wipe alarms and receiver unit after each use. Remove moisture and
debris with a dry clean cloth. For long storage periods remove batteries.
Note: NGT Dynamic Bite Alarms are supplied pre-paired.
For technical support contact: [email protected]
BITE ALARM SET
BITE ALARM RECEIVER
Bite alarm set 2+1 (3+1)
Other Zfish Fishing Equipment manuals

Zfish Merkur User manual

Zfish

Zfish Merkur User manual

Zfish Prime User manual

Zfish

Zfish Prime User manual

Popular Fishing Equipment manuals by other brands

Big Fin Scientific 10MF1 user manual

Big Fin Scientific

Big Fin Scientific 10MF1 user manual

Hobie Fighting Cup instructions

Hobie

Hobie Fighting Cup instructions

Clam 100XT THERMAL manual

Clam

Clam 100XT THERMAL manual

LOOP OPTi manual

LOOP

LOOP OPTi manual

Amewi B500 V2 instruction manual

Amewi

Amewi B500 V2 instruction manual

Cannon Magnum 5 ST owner's manual

Cannon

Cannon Magnum 5 ST owner's manual

Offshore Angler Seafire SF4/0 user guide

Offshore Angler

Offshore Angler Seafire SF4/0 user guide

Daiwa TANACOM 750 operating manual

Daiwa

Daiwa TANACOM 750 operating manual

Clam Dave Genz YUKON THERMAL XT manual

Clam

Clam Dave Genz YUKON THERMAL XT manual

VEXILAR FL-8SLT Operation manual

VEXILAR

VEXILAR FL-8SLT Operation manual

Eskimo QuickFlip 1 Operator's manual

Eskimo

Eskimo QuickFlip 1 Operator's manual

Riffe Competitor Series CARE & MAINTENANCE MANUAL

Riffe

Riffe Competitor Series CARE & MAINTENANCE MANUAL

Rush Creek Creations 40-0002 quick start guide

Rush Creek Creations

Rush Creek Creations 40-0002 quick start guide

Garmin PANOPTIX LIVESCOPE LVS32 installation instructions

Garmin

Garmin PANOPTIX LIVESCOPE LVS32 installation instructions

Eskimo F1 ROCKET Operator's manual

Eskimo

Eskimo F1 ROCKET Operator's manual

Ocean Guardian BOAT01 user manual

Ocean Guardian

Ocean Guardian BOAT01 user manual

Raymarine DRAGONFLY Ice Fishing Kit installation instructions

Raymarine

Raymarine DRAGONFLY Ice Fishing Kit installation instructions

Jaxon AJ-SYB110X Operation manual

Jaxon

Jaxon AJ-SYB110X Operation manual

manuals.online logo
manuals.online logoBrands
  • About & Mission
  • Contact us
  • Privacy Policy
  • Terms and Conditions

Copyright 2025 Manuals.Online. All Rights Reserved.