ZIGLINT Z8 User manual

Z8
Cordless vacuum cleaner
User Manual


CONTENTS
English···························1-9
Deutsch······················10-18
Français······················19-27
Español······················37-45
Italiano·······················28-36
日本語·······················46-54

EN-1
Product structure and accessories
1234567
8
9
10
11
12
13
22
14
15
16
17
18
19
20
21
23
24
26
25

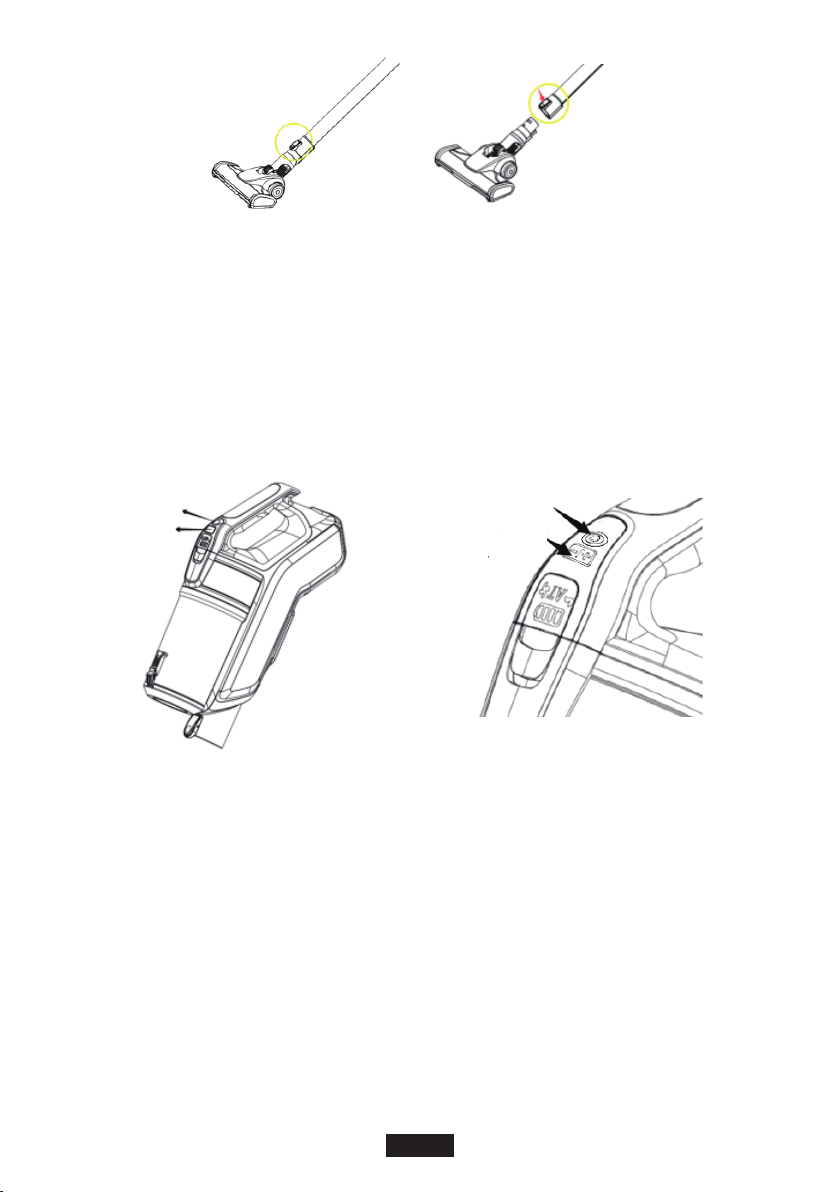
1.Vacuum cleaner handle
2. Switch button
3. High and low speed control button
4. High and low display
5. Automatic file display
6. Battery display
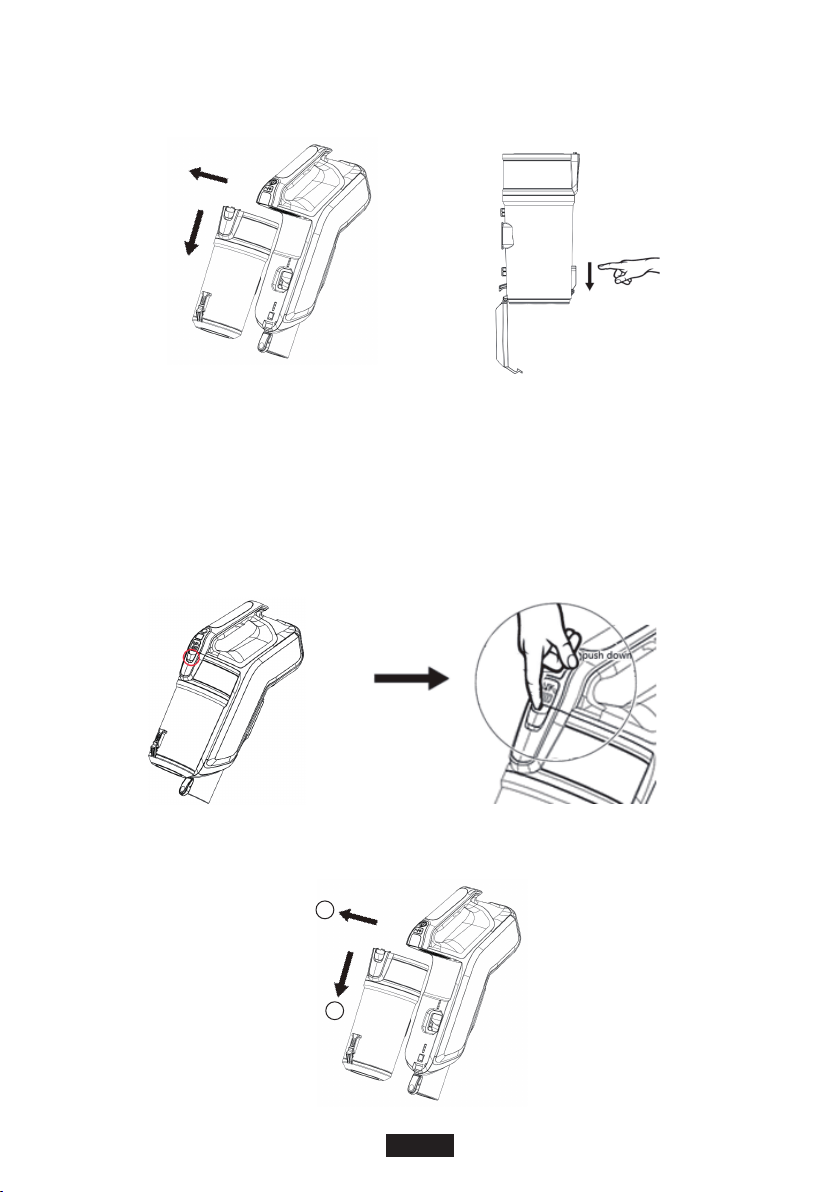
7. Dust cup release button
8. Dust cup
9. Dust cup central filter components
10. One-button ash button
11. Dust bucket cover
12. Ground brush release button
13. Outlet
product technical parameters
Product: Hand-held rechargeable vacuum cleaner
Model: Z8
Battery type: lithium battery
Battery capacity: 2000mAh
Product voltage: 22.2V
Rated power: 250W
Charger input: 100-240V, 50/60Hz
Charger output: 26.5V 440mA
Dust capacity: 500ml
Assembly diagram
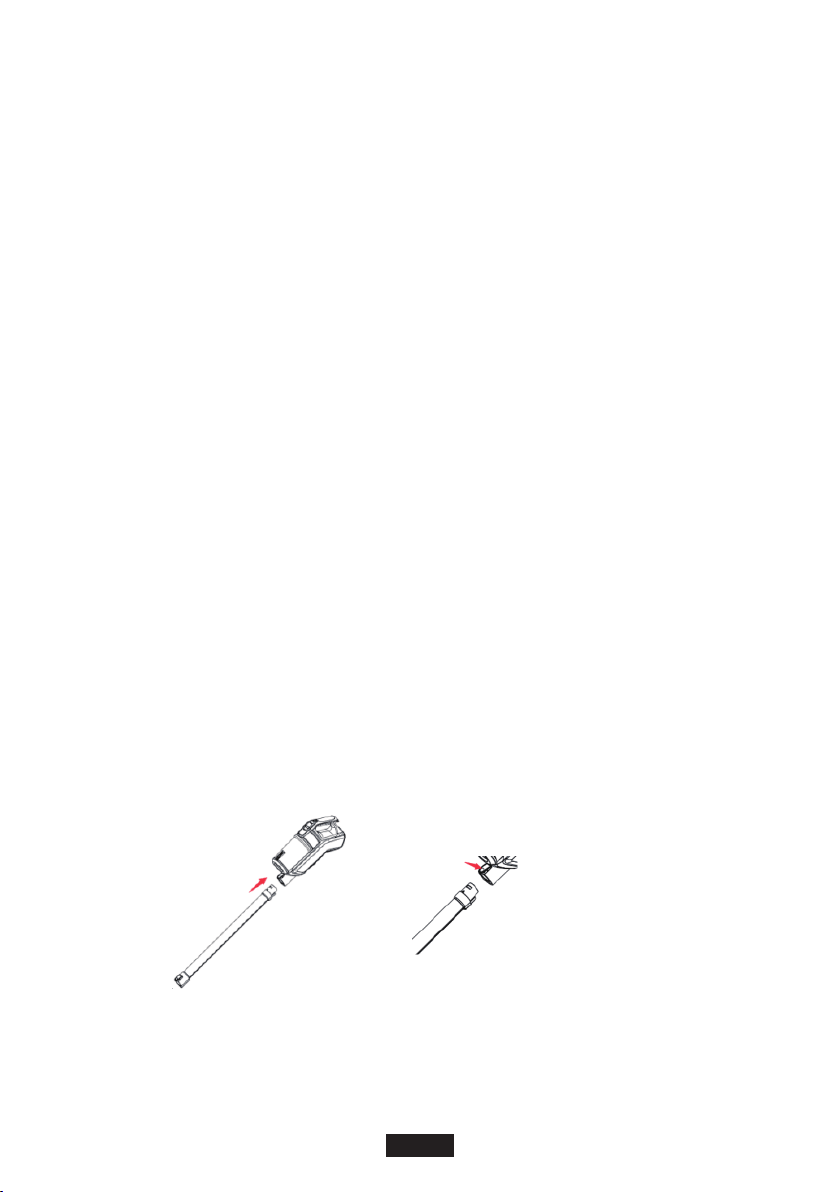
Connection of conductive tube
(1) Insert the conductive tube into the machine case component in the direction as shown on the picture, till a
click is heard.
(2) Press down the release button and then take out the conductive tube as shown on the picture.
Connection of conduction tube and floor brush
(1) Insert the electric floor brush into the conductive tube in the direction as shown on the picture, till a click is
heard.
(2) Press down the release button and then take out the floor bush.
14. Removable battery pack
15. Suction
16. Conductive tube
17. Ground brush release button
18. Electric floor brush
19. Floor brush LED lighting
20. Long flat suction
21. Round brush
22. Charging hole
23. Charger
24. Muti-function charging stand
25. Expansion screw rod
26. Expansion screw
EN-2

Attention
Assemble and disassemble must in the state of power failure.
How to use
Switch operation
Press the on/off switch, Vacuum cleaner will under automatic transmission, then press the adjustment button,
the machine will change to 2nd gear, press again, the machine will change to 1st gear, then press the on/off
switch, the machine will be closed.
Indicator light display
Battery display:
Note: When the battery capacity is insufficient, the indicator will flash.
The battery status indicator has 4 indicators to indicate the battery capacity.
4 white light: battery capacity > 100%;
3 white light: battery capacity > 75%;
2 white light: battery capacity 25% ~ 75%;
1 white light: battery capacity < 25%;
4 white light flashing: out of battery.
Dust detection display: the suction force of the machine can be controlled according to the amount of dust.
1, 2 display: The machine will display the suction according to the gear you choose.
on/off switch
High and low
Adjustment
buttopn
on/off switch
High and low
Adjustment
buttopn
EN-3

Charging operation
Attention: the Vacuum cleaner cannot be working when the machine is charging.
1. Place the machine or portable vacuum cleaner near the power stand and plug in the charger.
2. Charging mode 1: Connect the charger to the charging hole at the rear of the machine.
3. Charging mode 2: Plug the machine into the charging stand.
4. Charging mode 3: take out the battery pack and charged directly.
5. Charging display: The battery status indicator on the machine will be illuminated dynamically, indicating
that the vacuum cleaner is connected to the charger and being charged. When it is fully charged, 4 lights
will all illuminate.
Automatic file display
Charging mode 1 Charging mode 2
Charging mode 3
Charging stand
High and low display
Battery display
EN-4

one-key ash operation
Pour out the dust according to the picture shown. Push down the “one-key ash button” with your hand to
open the dust bucket bottom cover and pour out the dust.
Attention!
Ensure the the mouthpiece is open and not blocked by objects when using, otherwise the machine will be
damaged.
Cleaning filtration system
1. Remove the dust cup
a. Press the dust cup release button and take the dust cup out of the machine.
b. Move the dust cup toward arrow 1 and lift it up in the direction of arrow 2.
EN-5
2
1

2. Disassemble the Central filter components
a. Take out the dust bucket. First make the arrow and lock side of the component face yourself (hold the
upper and lower ends of the dust bucket assembly with both hands). Rotate the dust bucket in clockwise
direction by the right hand and keep the left hand without moving , vice versa for close
b. Hold on the inlet filter holder and lift it up, remove the center filter components from the machine.
Attention: after cleaning the central filter components, please ensure the part in dry when you assemble for
normal using.
3. Assemble the Central filter components
Reversed the above action, assemble the central filter components and assemble the dust cup on the
machine.
Assembly direction
The arrow (projection) on the air filter frame is aligned with the arrow (notch) on the filter, and the lower part is
fixed and rotated in the clockwise direction; otherwise, it is removed.
Unlock Lock
EN-6

Disassemble Roller brush
Press the roller brush release button on the electric brush as shown , then open the cover at the bottom.
Grasping the roller brush by hand and rotated as shown, then take it out and clean the hair. Reversed the
above action to install the roller brush.
Multi-function charging stand
The accessory can be placed on the multi-function charging stand and the machine also can be hung on it.
Rotate
press down the bottom
to open the lock
length between screw holes
the length between
the screw hole and
floor
EN-7

Product features
• 2-in-1 stick and handheld vacuum
The machine can be used in handheld and stick, it suit for cleaning all the corners
• Ergonomic design
Simplified use in one hand;
Roller assisting, scientific and morelaborsaving;
• Stylish and lightweight
Lightweight body let you easy to clean all corners
Maintenance
Attention!
1. Turn off the power and pull out the plug when cleaning the machine
2. Do not expose the machine to humid outdoor conditions. Do not install any accessories in the dishwasher.
3. The vacuum cleaner shell and dust cup can be cleaned with a wet towel, but beware of the liquid
substance penetrating into the machine while the machine is running.
4. Never use a strong detergent (release agent) to clean the machine to prevent corrosion of the outer
surface of the machine.
5. Ensure that all the fuselage, accessories, etc. are all under dry condition before using and then plug into
the power.
Breakdown and Repair
FAULT SYMPTOM POSSIBLE REASON POSSIBLE SOLUTION
Press the switch
button, the vacuum
cleaner does not
work
1.The battery is too low and the indicator
is blinking
2. battery no power(cannot be charging)
3. The charger does not completely leave
the machine
4. The machine is under charging
1. Charging
2. Contact the customer service or
dispose of the machine.
3. The machine leaves the charger.
4. Unplug the charger.
Weakened suction
1. Dust cup is full
2. Central filter components need to be
cleaned or changed
1. Clear dust cup
2. Remove the central filter assembly,
check for anything to block and
remove, clean or replace the central
filter components
Vacuum cleaner
leaks ash
Battery can’t
charging
1. Dust cup is full
2. Central filter components hasn't been
installed properly
3. Central filter components be blocked
is damaged
1. Clear dust cup
2. Assemble the central filter compo-
nents again
3. Change the center filter system
Battery is old Contact the customer service
EN-8

Working with
Abnormal noise
1. Floor brush, the connect tube or
central filter components is blocked
2. Dust cup is full
1. Check whether the floor brush, the
connect tube or central filter
components be blocked
2. Clear dust cup
If the vacuum cleaner can’t work properly, please contact the seller or the special repair point
Important attention
1. The suction port must be in a state of being unblocked and free of any objects. Otherwise, the motor
may be overheat and damaged.
2. The center filter assembly is washable. In order to achieve the best cleaning performance, please
timely ash and clean the center filtration system. Please clean the center filter assembly after about
10 times of use. However, in order to ensure the most Good performance, according to the machine
usage, it is recommended to change every 3-6 months.
3. When re-installing the center filter assembly into the dustbin, ensure the center filter assembly under
completely dry condition.
4. It is not recommended to use 2 files for a long time.
EN-9

DE-10
Produktstruktur und Zubehör
1234567
8
9
10
11
12
13
22
14
15
16
17
18
19
20
21
23
24
26
25

DE-11
1. Staubsaugergriff
2. Stromschalter
3. Taste für hohe und niedrige Geschwindigkeit
4. Hohe und niedrige Anzeige
5. Automatische Dateianzeige
6. Batterieanzeige
7. Staubbehälter-Freigabeknopf
8. Staubbehälter
9. Staubfilter Zentralfilter Komponenten
10. Ein-Knopf-Ascheknopf
11. Staubbehälterabdeckung
12. Bodenbürste-Freigabeknopf
13. Luftauslass
14. Entfernbarer Batteriepack
15. Mundstück
16. Metallrohr
17. Bodenbürste-Freigabeknopf
18. Elektrische Bodenbürste
19. Bodenbürste LED-Beleuchtung
20. Lange flache Absaugung
21. Rundbürste
22. Ladeöffnung
23. Ladegerät
24. Multifunktionsladeständer
25. Dehnschraube Typ 1
26. DehnschraubeTyp 2
Produktspezifikationen
Produkt: Handbetriebener wiederaufladbarer Staubsauger
Modell: Z8
Batterietyp: Lithium-Batterie
Batteriekapazität: 2000mAh
Produktspannung: 22,2 V
Nennleistung: 250W
Ladegerät Eingang: 100-240V, 50 / 60Hz
Ladegerät Ausgang: 26.5V 440mA
Staubkapazität: 500ml
Volle Ladezeit: 4-5 Stunden
Zusammenbaudiagramm
Anschluss die Metallröhre
(1) Installieren Sie das Metallrohr wie unten gezeigt.
(2) Mit Ton Klick zeigt das Mentallrohr erfolgreich montiert Wird. es Drücken Sie den Freigabeknopf und dann
Nehmen Sie das Metallrohr wie auf dem Bild gezeigt heraus.
Die Verbindungsmethode zwischen Metallrohr und Bodenburst
(1) Legen Sie die Bodenburst in das MetallRohr in der gezeigten Richtung mit Ton Klick Auf dem Bild.
(2) Drücken Sie den Freigabeknopf und dann Den Bodenbusch herausnehmen.

DE-12
Achtung
Montieren und demontieren müssen im Ausschaltzustand.
Wie zu verwenden
Schaltvorgang
Drücken Sie den Ein / Aus-Schalter, wird Staubsauger unter Automatikgetriebe, dann drücken Sie die
Anpassungstaste, wird die Maschine in der 2. Stufe wechseln, drücken Sie noch mal, wird die Maschine in
der 1. Stufe wechseln, dann drücken Sie den Ein- / Ausschalter, wird die Maschine geschlossen.
Anzeigeleuchte
Batterieanzeige:
Hinweis: Wenn die Batteriekapazität nicht ausreicht, blinkt die Anzeige.
4 weiße Lampe: Batteriekapazität> 100%;
3 weiße Lampe: Batteriekapazität> 75%;
2 weiße Lampe: Batteriekapazität 25% ~ 75%;
1 weiße Lampe: Batterie Kapazität <25%;
4 weiße Lampe blinken: Kein Strom mehr.
Staubdetektionsanzeige: Die Saugkraft der Maschine kann entsprechend der Staubmenge gesteuert
werden.
1, 2 Display: Die Maschine zeigt die Saugleistung entsprechend dem von Ihnen gewählten Stufen an.
Ein / Aus-Schalter
Hoch und Niedrig
Einstellungsknopf
Ein / Aus-Schalter
Hoch und Niedrig
Einstellungsknop

DE-13
Ladevorgang
Achtung: Der Staubsauger kann nicht funktionieren, wenn das Gerät geladen wird.
1. Stellen Sie die Maschine oder den tragbaren Staubsauger in die Nähe des Ständers und schließen Sie das
Ladegerät an.
2. Lademodus 1: Schließen Sie das Ladegerät an die Ladeöffnung an der Rückseite des Geräts an.
3. Lademodus 2: Schließen Sie das Gerät an den Ladeständer an.
4. Lademodus 3: Entnehmen Sie Batteriepack und laden Sie ihn direkt auf.
5. Ladeanzeige: Die Akku-Statusanzeige an der Maschine leuchtet dynamisch auf und zeigt damit an, dass
der Staubsauger an das Ladegerät angeschlossen und geladen ist. Wenn es vollständig geladen ist,
leuchten 4 Lampe auf.
Automatische Dateianzeige
Lademodus 1 Lademodus 2
Charging mode 3
Ladestation
Hohe und niedrige Anzeige
Batterieanzeige

DE-14
Ein-Klick Staubbehälteröffnung
wie auf dem Bild gezeigt heraus, drücken Sie den "Ein-Knopf-Ascheknopf" nach unten, um die Staubbehälter-
bodenabdeckung zu öffnen und den Staub auszustoßen.
Achtung!
Stellen Sie sicher, dass das Mundstück offen ist und nicht durch Gegenstände blockiert wird, da sonst die
Maschine beschädigt wird.
Reinigung des Filtersystems
1. Entfernen Sie den Staubbehälter
a. Drücken Sie den Staubbehälter-Freigabeknopf und nehmen Sie den Staubbehälter aus dem Gerät.
b. Bewegen Sie den Staubbehälter in Richtung Pfeil 1 und heben Sie ihn in Richtung Pfeil 2 an.
2
1

DE-15
2.Entfernen die zentralen Filterkomponenten
a. Nehmen Sie die Staubbehälterbaugruppe heraus und dann richten Sie die Seite der Komponente mit dem
Pfeil und dem Schloss aus (Halten Sie die oberen und unteren Enden der Staubbehälterbaugruppe fest).
Drehen Sie die Staubbehälterbaugruppe mit der rechten Hand im Uhrzeigersinn , ohne die linke Hand zu
bewegen, um es zu öffnen; Nach Gegenteil wird es geschlossen.
b. Halten Sie den Einlassfilterhalter fest und heben Sie ihn an, werden Sie die Staubfilter Zentralfilter Kompo-
nenten aus der Maschine entfernen .
Achtung: Nach der Reinigung der zentralen Filterkomponenten, stellen Sie bitte sicher, dass das Teil trocken
ist, wenn Sie es für den normalen Gebrauch zusammenbauen.
3. Montieren Sie die zentralen Filterkomponenten
In umgekehrter Reihenfolge, montieren Sie die zentralen Filterkomponenten und montieren Sie den Staubbe-
hälter an der Maschine.
Montagerichtung
Der Pfeil (Vorsprung) am Luftfilterrahmen ist mit dem Pfeil (Kerbe) am Filter ausgerichtet und der untere Teil ist
im Uhrzeigersinn fixiert und gedreht; Andernfalls wird es entfernt.
entsperren sperren

DE-16
Entfernen die Rollenbürste
Drücken Sie den Rollenbürste-Freigabeknopf an der elektrischen Bürste wie gezeigt, und öffnen Sie dann die
Abdeckung an der Unterseite. Greifen Sie die Rollerbürste und drehen Sie sie wie gezeigt, nehmen Sie sie
dann heraus und reinigen Sie die Haare. In umgekehrter Reihenfolge, montieren Sie die Rollenbürste.
Multifunktionsladeständer
Das Zubehör kann auf dem Multifunktions-Ladeständer platziert werden und die Maschine kann auch daran
aufgehängt werden.
Rotate
Drücken Sie den Boden nach
unten, um das Schloss zu öffnen
Bodenabstand der Schraubenlöcher
Die Länge zwischen
dem Schraubenloch
und dem Boden

DE-17
Produkteigenschaften
• 2-in-1-Stick und Handstaubsauger
Die Maschine kann in der Hand und im Stock benutzt werden, sie ist für die Reinigung aller Ecken passend.
• Ergonomisches Design
Vereinfachte Verwendung in einer Hand;
Rollenhilfe, wissenschaftlich und arbeitssparend;
• Stilvoll und leicht
Leichter Körper lässt Sie alle Ecken leicht reinigen.
Instandhaltung
Beachtung!
1. Schalten Sie das Gerät aus und ziehen Sie den Stecker heraus, wenn Sie das Gerät reinigen
2. Setzen Sie das Gerät keinen feuchten Außenbedingungen aus. Installieren Sie kein Zubehör in der
Spülmaschine.
3. Die Staubsaugerschale und die Staubschale können mit einem nassen Tuch gereinigt werden, aber hüten
Sie sich vor der flüssigen Substanz, die in die Maschine eindringt, während die Maschine läuft.
4. Verwenden Sie niemals ein starkes Reinigungsmittel (Trennmittel), um die Maschine zu reinigen, um eine
Korrosion der äußeren Oberfläche der Maschine zu verhindern.
5. Stellen Sie sicher, dass sich der Rumpf, das Zubehör usw. vor der Verwendung in einem trockenen
Zustand befinden, und schließen Sie ihn dann an die Stromversorgung an.
Aufschlüsselung und Reparatur
FEHLERSYMPTOM MÖGLICHER GRUND MÖGLICHE LÖSUNGT
Drücken Sie den
Schalter, der
Staubsauger
funktioniert nicht
1. Die Batterie ist zu schwach und die
Anzeige blinkt
2. Batterie keine Energie (kann nicht
aufladen)
3. Das Ladegerät verlässt die Maschine
nicht vollständig
4. Die Maschine wird geladen
1. Aufladen
2. Kontaktieren Sie den Kundendienst
oder entsorgen Sie das Gerät.
3. Die Maschine verlässt das
Ladegerät.
4. Ziehen Sie das Ladegerät ab.
Geschwächte
Absaugung
1. Der Staubbehälter ist voll
2. Zentralfilterkomponenten müssen
gereinigt oder gewechselt werden
1. Klären Sie den Staubbehälter
2. Entfernen Sie die zentrale Filterbau-
gruppe, prüfen Sie, ob die zentralen
Filterkomponenten blockiert und
entfernt, gereinigt oder ersetzt
werden können
Staubsauger leckt
Asche
Die Batterie kann
nicht geladen werden
1. Der Staubbehälter ist voll
2. Die Zentralfilterkomponenten wurden
nicht ordnungsgemäß installiert
3. Die Zentralfilterkomponente sind
beschädigt
1. Ausgießen der Staubbehälter
2. Setzen Sie die zentralen Filterkom-
ponenten erneut zusammen
3. Wechseln Sie das ZentralFiltersys-
tem
Die Batterie ist alt Kontaktieren Sie den Kundendienst
Table of contents
Languages:
Other ZIGLINT Vacuum Cleaner manuals