Zodiac Pool Systems X7 Quattro User manual

Congratulations!
You have just acquired the Zodiac X7 Quattro.
Thank you for purchasing our product.
Please read this user manual carefully and follow
he instructions for assembly.
PARTS LIST 15
ADVICE 15
ASSEMBLY 15
FITTING THE HOSE 16
CONNECTION 17
FLOW TEST 19
CLEANING THE LEAF TRAP 20
PROBLEM SOLVING 21
CHANGING THE DIAPHRAGM 22
GUARANTEE 24
Contents
1 4
Notice X7 ANG.qxd 9/12/08 10:31 Page 3

Parts List
1 5
The items included in the package and needed to install your
X7 Quattro are listed below:
The X7 Quattro cleaner
1 short 17.5 cm Flexi Hose
12x1 m hose sections
1 hose weight
1 automatic flow control valve
1 pool pulse
1 hose weir adaptor
1 weir adaptor
1 hose protective mesh
1 leaf trap
During the season we recommend you leave your X7 Quattro
in the pool and remove it when you do shock treatments.
If you wish to remove it while bathing, remove the hose,
but do not roll it up.
Never expose the hose to direct sunlight.
When the season is over, we recommend that you rinse the hose
sections in clear water and you store them in a dry place.
Your X7 Quattro is delivered fully assembled, you only have
to connect the hose sections.
1
2
3
4
5
6
7
8
9
10
6 5 4 3 2 1 00
001 2 3 4 5 6
1
2
3
4
5
6
8
9
Male end
Female end
7
10
ADVICE
ASSEMBLY
Notice X7 ANG.qxd 9/12/08 10:31 Page 4

The hose for your X7 Quattro is composed of 12 x 1 m sections,
plus a smaller section of 17.5 cm.
•The ideal hose length for your pool corresponds
to one 1 m hose section plus the greatest distance
between the plug in point (suction point or skimmer)
and the furthest point in your pool (Figure 1).
Ex: if the greatest distance between the suction point
or skimmer and the furthest point equals 10 metres,
you will need 11 sections of 1 metre.
•Once you have calculated the total length, assemble your
hose by inserting the 1 m sections into each other, male end
connected to female end. In order the join them correctly,
give the hose a quarter turn so as to position the latch in
the notch (Figure 2).
•Connect the shorter section (17.5 cm) to the cleaner
(Figure 3).
•Fit the assembled hose onto the smaller 17.5 cm hose section.
•A hose weight is supplied, to be used if the X7 Quattro tends to
lift off the bottom of the pool (Figure 4). Adjust the hose weight
approximately 2 m from the cleaner (Figure 5) and ensure that
the disc is perfectly flat on the bottom of the pool when the robot
is operating.
Fitting the hose
1 6
Figure 2
Figure 3
2 m
Figure 5
Lock latch
17.5 cm
shorter hose
section
Figure 1
Figure 4
Greatest
distance
incorrect incorrect
correct
Notice X7 ANG.qxd 9/12/08 10:31 Page 5

•Orient your pool inlet jets downward.
•Close the main drain of your pool as well as all other unused
outlets (skimmers or suction points).
•Activate the pool pump.
•Fill the X7 Quattro hose with water using the flow generated
by the return fitting and maintain the hose underwater for
the remained of the operations (Figure 6). The hoses must be
emptied of all the air they contain in order for the cleaner to
operate correctly. Once all the air has been removed, the robot
will sink to the bottom of the pool.
IMPORTANT NOTE:
You can connect the X7 Quattro hose to the suction point or to one
of the skimmers in your pool.
It is preferable to use a suction point situated at mid-distance
of the main length of your pool.
CONNECTING TO THE VACUUM POINT OR TO THE SKIMMER
IMPORTANT: When connecting the last elements (leaf trap, last
section of hose and automatic flow control valve) ensure that
these remain underwater so that there is absolutely no risk of air
entering the system and draining the pump.
•Install the automatic flow control valve on the suction point using
the weir adaptor.
IMPORTANT:
The automatic flow adjustment valve is pre-set in the factory to
number 3, the most suitable position for European pools.
For an optimal performance from your cleaner, we recommend
that you do not move the valve from this position.
Secondly, always check that the valve's dark grey flap is not held
in the open position by the red lever – otherwise your cleaner
cannot function (Figure 7).
•Connect the first 1 m section to the flow control valve, after
filling it with water to remove the air.
•Connect the leaf trap to the other end of the hose section after
it too has been filled with water.
IMPORTANT: Make sure that the arrows on the automatic flow
regulator valve and on the leaves basket point toward the suction
point and not toward the robot.
Connection
1 7
Figure 6
Figure 7
Notice X7 ANG.qxd 9/12/08 10:31 Page 6

Connect the male part of the hose adaptor to the leaf trap.
Check that there is no air in the hose assembly, then connect it to
the vacuum point by joining the last hose section to the female
part of the hose adaptor (Figure 8).
Connection to the vacuum point
Connection to the skimmer
If you choose to connect to the skimmer, first place the protection
mesh on the first section of pipework.
This will prevent wear due to friction against the skimmer mouth.
NOTA: If your pool is fitted with two
skimmers, connect the device to the
skimmer situated in the main pool.
Check that there is no air in the hose
assembly before connecting it to the
skimmer.
Figure 10
Example with the connection to
the vaccuum point
Connection
1 8
Figure 8
Figure 9
Figure 10
Notice X7 ANG.qxd 9/12/08 10:31 Page 7

You can always check the flow rate, particularly if you have doubts
about the suction power of your pump.
NB: all these operations must be carried out under water so that
the pump does not take in air.
•Remove the X7 Quattro from the hose and replace with the pool
pulse (Figure 11).
To remove the small Flexi Hose section, press the 2 latches on either
side to unlock the hose (Figure 12).
Note the zone indicated on the tester (Figures 13 to 15)
“Ideal”: The red indicator is on 3.
The flow is perfect to operate your X7 Quattro. Remove the tester
and reconnect the cleaner to the hose.
“Minimum”: The red indicator is below 3.
Increase the flow by closing the skimmer valve if the cleaner is
connected to the suction point or by closing the suction outlet
valve if the cleaner is connected to the skimmer, until the indicator
on the tester is in the ideal zone. Remove the tester and reconnect
the device to the hose.
“Maximum”: The red indicator is above 3.
Reduce the flow by opening the skimmer valve if your cleaner is
connected to the suction point or by opening the suction outlet
valve if your cleaner is connected to the skimmer, until the
indicator on the tester is in the ideal zone. Remove the tester
and reconnect the cleaner to the hose.
Flow test
1 9
6 5 4 3 2 1 00
001 2 3 4 5 6
Figure 11
Figure 12
6 5 443 2 1 0
0 1 2 3 445 6
Figure 13
6 5 4 33221100
001122334 5 6
Figure 14
66554 3 2 1 0
0 1 2 3 4 5566
Figure 15
Notice X7 ANG.qxd 9/12/08 10:31 Page 8

How to remove the transparent container:
•Stop the pump before opening the Zodiac leaf trap.
•Without taking off the hose sections, hold the Zodiac leaf trap lid
in one hand. Using your other hand, hold the handle of the Zodiac
leaf trap and turn the container until you hear a click. Pull the
transparent container downwards (Figure 16).
WARNING: Ensure that the lid connected to the hoses is not pulled
above the water, otherwise air will enter the filtration system.
•Take the transparent container out of the water. Hold the
container above the water level and let the water run out through
the drain hole.
How to remove the debris:
•Move away from the pool and tip out the debris.
•Take out the basket, then clean it and the transparent container.
•Remove all the debris caught in the drain hole and the sieve of
the basket (Figure 17).
•Rinse the basket and the transparent container, and re-insert
the basket.
•Check that the basket is in the right way round - the word "TOP"
should appear uppermost. The leaf trap will not re-close if the basket
is inserted upside down.
Refitting:
•Refill the transparent container with water before attaching it to
the lid.
•Align the fixing points for the lid and the container, push the lid
downwards and turn the container anticlockwise (Figure 18).
•Check that the leaf trap is closed properly before restarting
the pump.
Cleaning the leaf trap
2 0
Figure 18
Figure 16
Figure 17
Notice X7 ANG.qxd 9/12/08 10:31 Page 9

•Control the flow using the flow tester.
If the flow is insufficient:
•Check that the valve of the main drain is closed.
•Check that the skimmer strainer and basket are clean.
•Check that the hose and automatic adjustment valve are
correctly connected.
IMPORTANT:
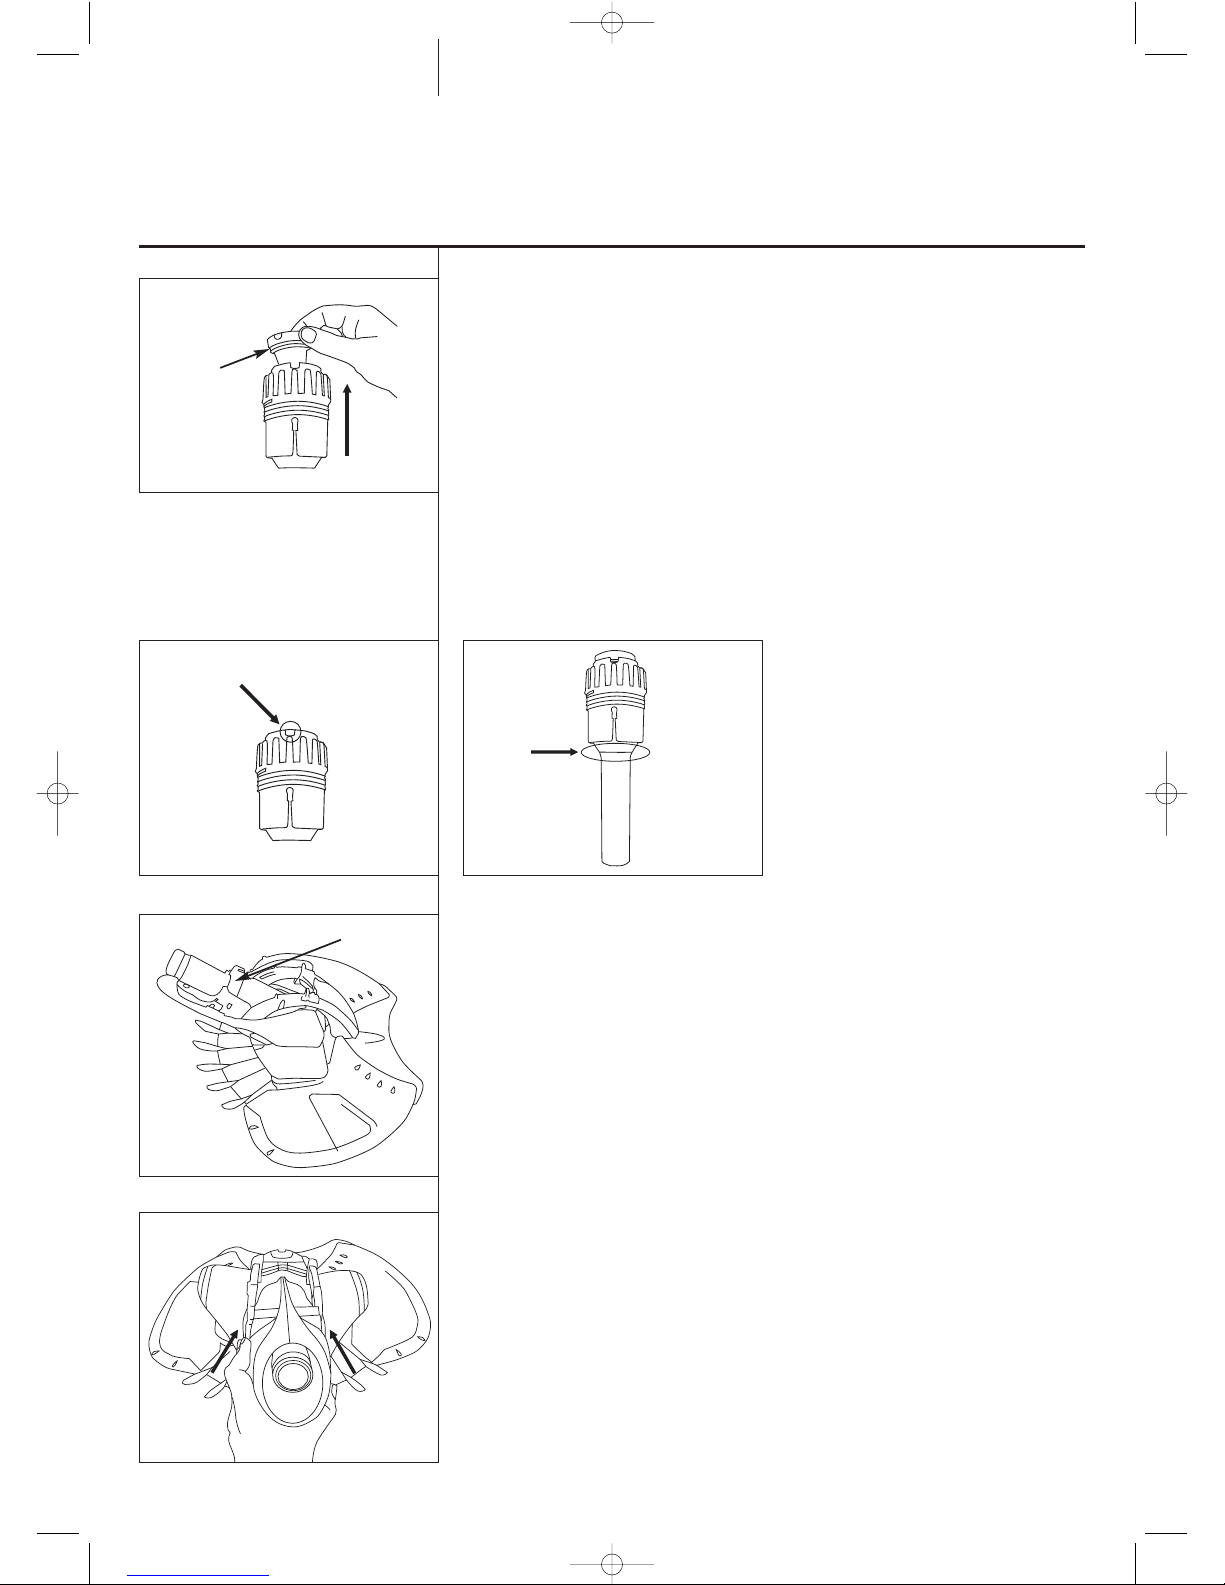
Always check that the dark grey flap gate on the valve is not held
in the open position by the red lever – otherwise your pool cleaner
cannot operate.
If the water flow is correct:
•Check that the cleaner suction inlet is not clogged up with debris.
•Is the X7 Quattro Diaphragm damaged?
(see pages 10 and 11)
•In order to ensure complete cleaning of the pool, the total time
may be split into periods. For example, 6-hour filtration performed
as 3 times 2 hours will provide better coverage than a single
6-hour filtration.
•Is your hose long enough: add hose sections if necessary.
•Have you oriented all inlet jets downwards?
•Is the hose in perfect condition?
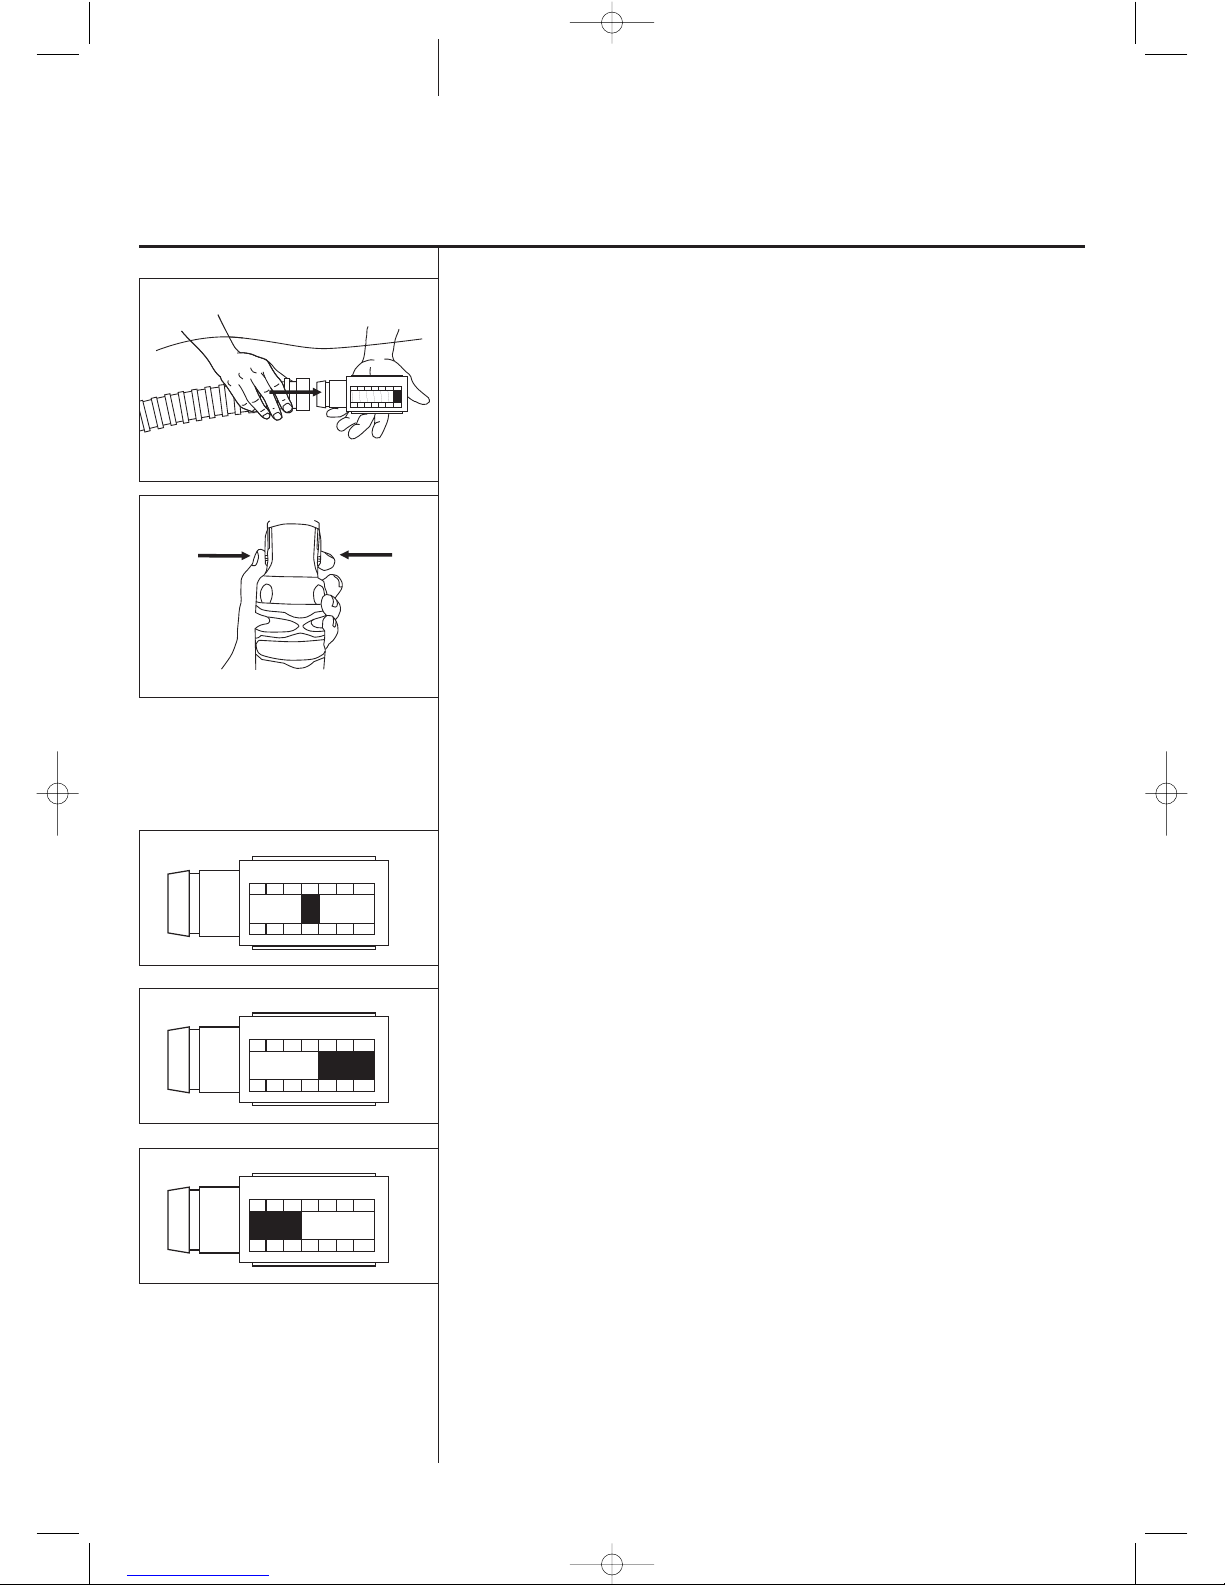
•Check the position of the float on the hose (see figure 4 page 4).
•Test the flow and increase it if necessary (see page 7).
•Plug the hose in the suction fitting situated furthest from
the stairs.
•Modify the hose length by adding or removing a section.
•Orient the inlet jets so as to push the hose away from the steps.
•Check the air tightness of the circuit: between all hose sections,
between the hose and the valve, between the valve and the
skimmer.
•Reduce the flow (see page 7).
•Close the main drain valve.
Problem solving
2 1
X7 Quattro is not operating
correctly
The X7 Quattro doesn't
clean all the zones of
your swimming pool
The X7 Quattro does not stay
on the bottom of the pool
The X7 Quattro stays stuck
at the stairs of your pool
ladder
The X7 Quattro moves slowly
and air bubbles form at the
level of the suction outlet
The X7 Quattro moves above
the waterline
The X7 Quattro stays stuck
at the main drain plug
Notice X7 ANG.qxd 9/12/08 10:31 Page 10

•1st step: removing the Diaphragm
•Place the X7 Quattro on a flat surface. Remove the small Flexi
Hose section by pressing the latches on either side of the hose
(see figure 12 page 7).
•Push the 2 clips maintaining the handle of the robot upwards
(Figure 19).
•Pull the the handle of the
robot downwards (Figure 20).
•Remove the case from its
holder (Figure 21) by pulling
it towards you.
•Extract the holder from its housing by pulling it upward
(Figure 22).
•Unscrew the holder
(Figure 23) and keep the
upper part.
•Pull hard on the handle to
separate it from the holder
(Figure 24).
Changing the Diaphragm
2 2
Figure 21
Figure 22
Figure 23 Figure 24
Figure 19
Figure 20
Notice X7 ANG.qxd 9/12/08 10:31 Page 11

•Then simply remove the Diaphragm from the holder by pulling
it upward (Figure 25).
•2nd step: fitting the new Diaphragm
•Place the new Diaphragm
on the handle and replace the
handle in the casing by aligning
the notches correctly with
the grooves (Figure 26).
•Pull on the handle so as
to ensure that the edge of
the Diaphragm is visible
(Figure 27).
•Place the upper part of the case in the lower part and screw the
2 parts together.
•Reinsert the case in the device, after having put the tightening
ring back in place (Figure 28).
•Reposition the housing around the case (Figure 29).
•Place the handle upright and push the clips back into place.
Changing the Diaphragm
2 3
Figure 25
Figure 26 Figure 27
Figure 28
Figure 29
Diaphragm
Ring
Notice X7 ANG.qxd 9/12/08 10:31 Page 12

Conditions:
All our technical experience and concern for quality have been
used in the manufacture of ZODIAC automatic pool cleaners.
All our cleaners are subject to quality control tests and are
guaranteed against manufacturing defects. If, in spite of all the care
and know-how used in the manufacture of our products, you were
to have need of the guarantee, please be aware that it only
applies to the free replacement of faulty parts.
Our models are regularly updated and improved to make the
most of technological advances. It is understood that these
improvements cannot be added to previous models within the
context of our guarantee.
Period of guarantee:
The period of the guarantee is fixed at 3 YEARS for the X7 Quattro,
from the date of invoicing the first user.
The X7 Quattro cleaner benefits from an unconditional guarantee
of 3 years: whatever the causes of its deterioration, it will be
mended or exchanged within a period of 36 months following
your purchase.
Under no circumstances can repairs or replacements made as part
of the guarantee prolong the appliance's guarantee period.
Object of the guarantee:
During the guarantee period defined above, any part recognised as
faulty will be mended or exchanged by the manufacturer with a
new part or in correct operating condition. This guarantee covers
all faults relating to conformity existing at the time the article is
delivered.
In the event of a return to the workshop, return transport costs will
be the responsibility of the user, but labour costs remain the
responsibility of the retailer.
The immobilisation and the prevention of possession of an appliance
in the event of any necessary repairs cannot give rise to
compensation. In all circumstances, the legal guarantee of the
seller continues to be applied in accordance with article 4 of decree
n° 78- 464 of 24 March 1978. The legal guarantee of article 1641
of the civil code is applied.
THIS GUARANTEE APPLIES PENDING STATUTORY PROVISIONS COMING
INTO FORCE THAT HAVE NOT AS YET BEEN PUBLISHED AT THE TIME
OF THESE CONDITIONS GOING TO PRESS.
Transport damage:
Appliances always travel at the risk and peril of the user. It is up to
the user, before taking delivery of the appliance, to check that it is
in perfect condition. Under no circumstances can we be held
responsible for transport damage.
Guarantee
2 4
Notice X7 ANG.qxd 9/12/08 10:31 Page 13

WARNING: USE OF THE X7 QUATTRO IN A VINYL LINER POOL
Certain vinyl liner patterns are particularly susceptible to rapid
surface wear or pattern removal caused by objects coming into
contact with the vinyl surface, including pool brushes, pool toys,
floats, fountains, chlorine dispensers, and automatic pool cleaners.
Some vinyl liner patterns can be seriously scratched or abraded
simply by rubbing the surface with a pool brush.
Ink from the pattern can also rub off during the installation process
or when it comes into contact with objects in the pool.
Zodiac®is not responsible for, and the Limited Warranty does not
cover, pattern removal, abrasion or markings on vinyl liners.
Zodiac®can not be held responsible for any damage to the swimming
pool lining (vinyl liner, reinforced PVC, etc.) occurring as the result
of an excessive level of disinfectant (chlorine, brome, active oxygen,
etc.) or an incorrect pH value (outside the range of 6.8 minimum
and 7.6 maximum). Any such damage will be excluded from the
guarantee.
For further information please contact your dealer
or write to us at:
ZODIAC POOL CARE EUROPE
Parc du Chêne - 2, rue Edison
69500 BRON - France
www.zodiac-poolcare.com
Warning
2 5
Notice X7 ANG.qxd 9/12/08 10:31 Page 14
Table of contents
Other Zodiac Pool Systems Swimming Pool Vacuum manuals

Zodiac Pool Systems
Zodiac Pool Systems Nature2 Express User manual

Zodiac Pool Systems
Zodiac Pool Systems Polaris ATLAS User manual

Zodiac Pool Systems
Zodiac Pool Systems Baracuda MX 8 User manual

Zodiac Pool Systems
Zodiac Pool Systems Baracuda MX 8 User manual

Zodiac Pool Systems
Zodiac Pool Systems Polaris MAXX User manual
Popular Swimming Pool Vacuum manuals by other brands

Remington Solar
Remington Solar Solar Pool Ionizer and Purifier operating instructions

Milagrow
Milagrow RoboPhelps 15 user manual

Aqua EZ
Aqua EZ RPV5 user manual

Kokido
Kokido Manga RC30 user manual

Davey
Davey Maverick APCSMAV Quick reference guide

Zodiac
Zodiac Vortex 3 Instructions for installation and use