Zontes VX 350 User manual


Preface
Thank you for using ZONTES brand motorcycles. We use most advanced technology to design,
test and produce the type of motorcycle, to provide you with joy, fun and safe driving. When you are
fully familiar with all the essentials in this manual, you will feel riding a motorcycle is one of the most
exciting sports, at the same time, can feel the real pleasure of driving.
This manual summarizes the right repair and maintenance methods of motorcycle. As long as in
accordance with the provisions to do, your motorcycle will be durable. ZONTES distribution unit has
trained technical personnel, with the complete tools and equipment, to provide you with high quality
and service at any time.
All the data, illustrations, photos and specifications collected in this manual are compiled
according to the updated products at the time of publication of this manual.However, due to the
continuous improvement of products and changes in other aspects, your motorcycle may have some
inconsistencies with this manual.The distribution unit will give you the correct guidance at any time.
The contents of this manual are updated quickly, and the official website shall prevail. The PDF
version of the manual can be downloaded from the official website.

1
Content
Content.........................................................................1
User instruction...........................................................2
Special Warning.........................................................2
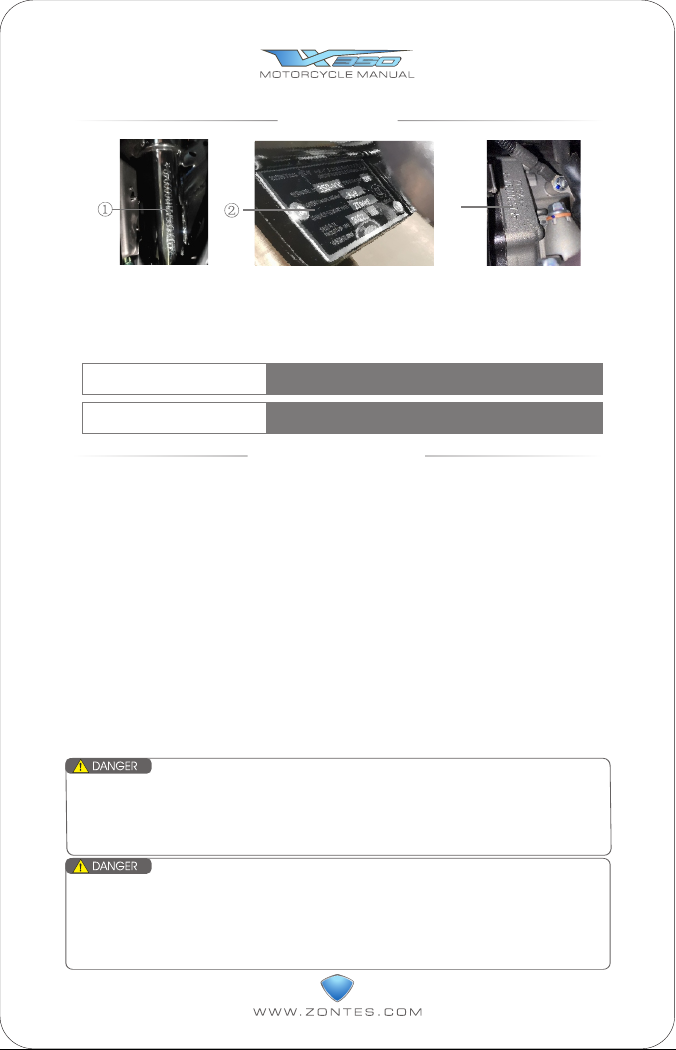
Code position..............................................................3
Maintenance of muffler..............................................3
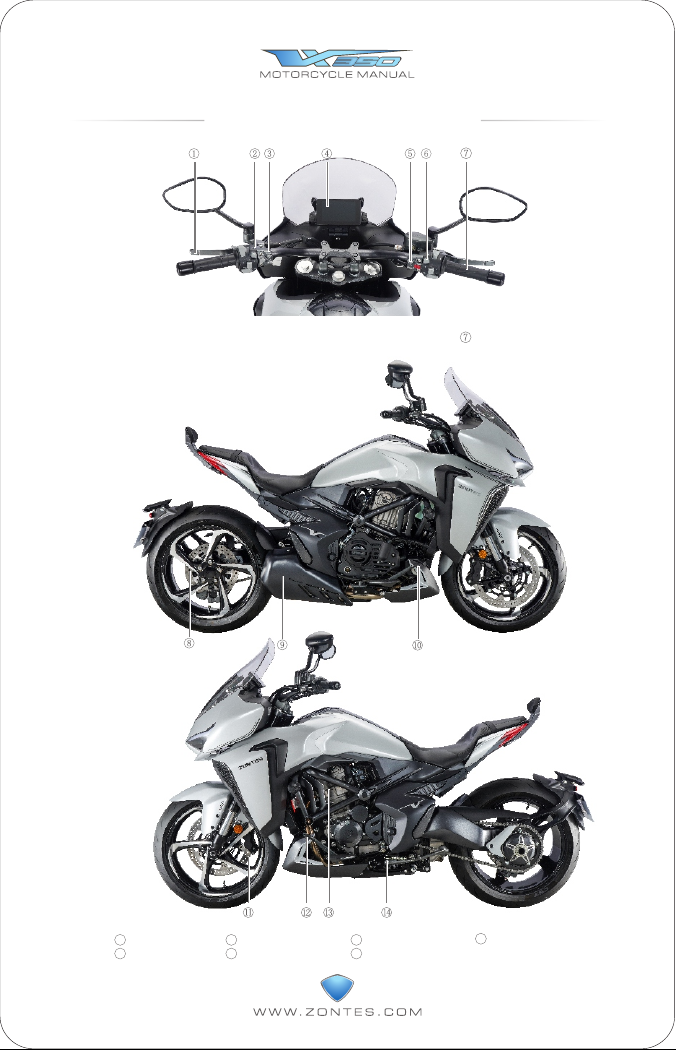
Installation of location parts.......................................4
PKE user manual.......................................................5
TFT Instrument........................................................ 7
Mobile interconnection operation instructions.......11
Left/Right handle control system............................12
Front pedal installation ...........................................13
Fuel tank ..................................................................14
Shift lever...................................................................14
Rear brake pedal......................................................14
Rear shock absorber................................................14
Side stand..................................................................14
Notes for fuel, engine oil and cooling liquid..........15
Fuel oil........................................................................15
Engine oil...................................................................15
Engine coolant/antifreeze.........................................15
Running-in of new motorcycle.................................16
Gear and speed of engine......................................16
Gear position and rotate speed of engine............16
Running-in of new motorcycle................................16
Avoiding the rotation of fixed low speed...............16
Engine oil cycling before driving.............................17
First inspection..........................................................17
Inspection before driving..........................................17
Driving essentials......................................................18
Starting of engine......................................................18
Driving........................................................................19
Use the transmission system..................................19
Climbing driving.........................................................19
Brake and park.........................................................20
Inspection and maintenance...................................20
Regular maintenance table.....................................20
Toolkit.........................................................................21
Disassembly of fuel tank instruction......................21
Lubricating point.......................................................21
Storage battery.........................................................22
Charger Manual ......................................................23
Air filter....................................................................24
Spark plug..............................................................25
Engine oil................................................................26
Engine oil filter........................................................27
Clutch controller free stoke...................................27
Throttle cable clearance.......................................28
Idling........................................................................28
Fuel evaporative pollutants control system........28
Cooling liquid..........................................................28
Fuel pipe.................................................................29
Transmission chain................................................29
Brake system..........................................................32
Tires..........................................................................34
Disassembly of tires..............................................35
Check the wheel..............................................35
Lighting and Signaling...........................................37
Accelerant...............................................................37
Trouble shooting....................................................38
Fuel system inspection ........................................38
Ignition system inspection.....................................38
Engine inoperation.................................................38
Engine short of power...........................................39
Carbon deposit cleaning.......................................39
Fuel injection attention..........................................40
USB port.................................................................42
Adding electrical parts...........................................42
Storage method.....................................................43
Restart method......................................................43
Motorcycle cleaning...............................................44
Transportation.........................................................44
The use instruction of storage battery.................45
Specification table..................................................46
Circuit diagram.......................................................47

2
User instruction
There are all kinds of accessories on the market can be assembled on your motorcycle, and we
cannot directly control the market quality and applicability of accessories The inapplicable
accessories will endanger the safety of the riding personnel. The selection of accessories and
installation, therefore, must be especially careful. Though we can't examine the applicability of
accessories for sell on the market, but your distribution unit can help you to choose high quality
accessories on the market, and can be installed correctly.
Windshield, chair back, saddle bags, luggage, etc., are all laid accessories, easy to cause the
instability of driving. Especially in the side wind or with large vehicles encountered. If the accessories
installed wrong or poorly designed accessories, would endanger the safety.
Additional electrical accessories can make the electrical system overload, serious overload may
damage the wiring, make the engine stalling when driving, and even destroy vehicles.
When transporting goods, they should be fixed in the low position as far as possible close to the
motorcycle. Fixed goods incorrectly can lift the center of gravity which is very dangerous. It can make
the motorcycle hard to control. The size of the goods will affect the air drag and motorcycle
maneuverability. Please balance the left sides of the motorcycle, and fixed the goods.
Modification
Motorcycle modification or removal device cannot guarantee the original motorcycle driving safety,
and it is illegal. The user will lose the rights of quality guarantee if they modify the motorcycles.
Safe driving instruction
Driving a motorcycle is a very interesting and exciting sport activity. It also requires special
precautions to ensure the safety of drivers and motorists. Preventive measures are as follows:
Inspection before driving
Carefully read the instructions in the "Inspection before driving" section, and check each item
according to the instructions, do not forget, this can ensure the safety of the driver and passengers.
Your driving skill and mechanical knowledge, is the foundation of safe driving. First practice at
where there are fewer motorcycle, until you can fully familiar with the mechanical performance and
operation method of motorcycle. Remember that! Practice makes perfect.
Realize your own driving skills
At any time drive within the scope of your own skilled. Know your skills limit and not to be reluctant
so as to avoid accidents.
Beware of driving on rainy days
Pay extra attention to driving on cloudy and rainy days, and keep in mind that the braking distance
is twice that of sunny days. When driving, avoid road marking paint, manhole covers, and oily roads
to avoid slippage. Drive with extreme caution over railroad crossings, iron fences and bridges. If you
cannot clearly judge the road conditions, you should slow down.
Speed limit
Do not let the vehicle speed too high at any time, and do not let the engine rev too high to avoid
accidents.
Description of product configuration
The motorcycles in this manual have many configurations. The illustrations in this manual can
only represent one or several configurations, not all configurations. The specific configuration should
be subject to the actual object.
Special warning
Accessories or cargo added to the locomotive, weakly alter the weight distribution of the
locomotive, may chan's stability and handling. In order to avoid the possibility of accidents,
the bearing mass of the rear tailstock is less than 10KG, and the bearing mass of the side box
is less than 10KG. Please do not overload or modify the rear tailstock without permission.
Accessories installed incorrectly or modified motorcycles will change handling of the
motorcycle, this will cause an accident. Never use inappropriate accessories, to ensure that
parts are installed correctly. All accessories and parts should use part of the company
original.
You should be properly installed accessories and spare parts, If you have any questions,
please contact the company's authorized dealership or special maintenance shop.

3
Code positing
Please write down the number in the space below for your reference.
Vehicle identification number:
Engine number:
Vehicle identification code and engine number is for the registration of motorcycles, when ordering
parts or entrust the special service, this number can make distribution unit provide a better service for
you.
① Identity code will be carved on the turning vertical pipe,② 3C nameplate card will be fixed
in the bottom of the frame,③ Engine code will be printed on the right side of the crankcase.
This motorcycle muffler with catalyst can effectively reduce the operation process of motorcycle
emissions of harmful substances into the atmosphere. To make the device work effectively, please
refer to “maintain” the preventive maintenance in the section table.
In order to improve the service life of the muffler, and avoid faults caused by not-normal-use and
maintenance of the mufflers rust, catalytic conversion efficiency decrease, please be sure to comply
with the following items:
·It is forbidden to hit the accelerator at high speed in place for a long time
·It is forbidden to drive in heavy-load low-speed for a long time.
·It is forbidden to add anti-rust oil or engine oil to the muffler.
·It is forbidden to directly flush the muffler with cold water when the motorcycle is hot
·It is forbidden to slide when shut off.
·It is forbidden to use inferior oil.
·Use unleaded gasoline
·Keep clear the dirt of muffler to the rear and the surface
·Keep the engines running on good condition, regular maintenance and inspection. Avoid failure
Leads to engine combustion exhaust gas in the exhaust pipe to cause secondary combustion
catalyst sintering failure.
· Installing a muffler, be sure to properly installed muffler gasket.
·If you need to dismantle oxygen sensor, be sure to use the right tools, and be sure to stay muffler
outfit after cooling to room temperature.
Maintenance of muffler
Please pay attention to the following items and similar items. Any violation may cause damage to parts or
vehicles, or even casualties of riders.
When driving, the side parking frame must be stowed to prevent the vehicle from overturning when turning,
causing casualties to the riders.
When driving, you must check whether the braking system is working properly. If there is a problem, please
repair it immediately.
Non-professionals should not unplug the fuel pipe to discharge the fuel, so as not to encounter open flames
and damage the vehicle; do not let the muffler of the motorcycle contact foreign objects to avoid fire, and the use
and storage environment of the motorcycle must not have fire hazards.
When vehicle maintenance needs to replace parts, be sure to use the company's genuine parts, use non-
genuine parts, especially electrical parts, which may damage the motorcycle or even burn the vehicle
Please do not arbitrarily add accessories, especially electrical components, if the wiring is improper or the
electrical load is too large, the vehicle may be burned.
③

4
single swing arm
installation position of accessories
Gearshift pole
Rear disk brake
Muffler
Rear brake pedal
Front disk brake
11
Ignition coil
Side stand
12
13
9
810 14
①Clutch handle
②Switch on left handle
⑤Front brake liquid cylinder
⑥Switch on right handle
③Secondary handle
④Meter
Accelerator control handle

5
PKEusermanual
PKE (Passive Keyless Entry) system user manual:
The PKE system consists of a PKE accessory (Figure 1), a PKE host (Figure 2), a key (Figure 3),
a non-electric induction antenna (Figure 4) and a low-frequency transmitter antenna the line (Figure
5) consists of five parts.
PKE host (Figure 1) function description:
①Battery charging DC port ②Charging fuse ③PKE fuse
1. Use of the sensor key
The motorcycle is equipped with two sensor keys, one of which should be kept for future use.
The two induction keys are marked with numbers, which correspond to the numbers of the PKE
host. The PKE host can automatically identify an induction key corresponding to the approaching
vehicle without activation
2.PKE power up:
When the PKE is connected to the power supply for the first time (such as connecting to the
battery power supply or plugging in the PKE fuse), when the key is not within the sensing range of
the vehicle, the vehicle will beep 4 times, representing
1) PKE normal reset work prompt.
2) Press the power button to prompt (similar to pressing the START button), if the key is detected,
it will turn on, otherwise it will immediately switch to the non-electric induction mode to turn on.
3) Press the power button for a long time, and the no-electric induction mode is activated.
4) Inductive shutdown prompt in non-eletrict induction mode.
If the main lock is not unlocked successfully, it may be that the handle is pinned to the faucet lock locking
shaft, turn the handle lightly to let the lock move freely, or the battery power is too low to unlock the lock, please
check whether the battery power is normal.
After checking that the battery power is normal, short press the red power-on button, the motorcycle cannot
be turned on, but the main unit will emit a "di" prompt, please check the battery power of the key and try to use
the wireless induction start mode (for details, see the follow-up instructions) If the battery power is normal and the
host does not emit a beep sound, please check whether the PKE fuse (picture 1) is normal, and replace the fuse
with the same specification fuse (15A)
When the battery is dead, please try to turn it on after charging is complete and unplug the charger.
3.Turn on the PKE:
Short press the START button on the right auxiliary handle (Figure 6), the turn signal flashes
twice, the faucet lock is automatically unlocked, and then the buzzer "di" prompts once, and the
circuit is connected.
The detection time of non-electric induction is between the third and fourth sound, and the
detection time is 5 seconds.
3
45
12
6
3D antenna
sensing area
Fuel tank
lock button
Seat lock button
S T A R T button
There are two green and red LEDs on the sensor key. When the battery of the sensor key is sufficient, it will flash
green light every 3 seconds or so when the host is turned on. When the battery is low, the red light will flash.
(When the key battery is just installed, the key light will flash once, you can judge whether the key battery status is
based on the key light) Due to the limited capacity of the key battery, the normal battery life is about 6 months. If
your sensor key is not sensitive or the sensor key indicator flashes red, please consider replacing the battery.
(There is a pry opening on the back cover of the induction key, which can be replaced by prying open, and the
battery is a 1225 button battery)

6
PKEusermanual
4. Turn off the PKE:
After stopping and parking the motorcycle, put handlebar to the left, turn off the engine, long press
the red power-on button on right handlebar, the turning signal will double flash twice, the steering lock
will be locked automatically, then the buzzer beep sound to prompt, the electric circuit is
unconnected.
5.Non-electric induction start mode:
When the battery power of the induction key is low or there is no key battery, you can start the
machine through the non-electric induction mode. The specific steps are as follows:
1) Press and hold the red button "START" on the handlebar (Figure 6) in the off state, and hear a
"di" sound,or unplug the PKE fuse (Picture 1), then re-plug the PKE fuse after 10 seconds, and hear
the third "beep".
2) Press the key induction area (picture 3) against the non-electric induction area (picture 4) within
5 seconds.
PKE Host buzzer sound
The PKE host buzzer prompts the user to detect an abnormal condition by a combination of long
and short “Bi” other prompt sounds. The specific meanings are as follows:
The remote control battery
is low
START button stuck
Seat lock button stuck
Fuel tank lock button
stuck
High frequency reception
abnormality
Main lock open
abnormal
no paired remote
Main lock is abnormal
Low frequency transmitting
antenna is abnormal
Induction key away from
detection area
One long and
two short
After power on, it is detected that the button is stuck, and the alarm
is once, and the detection time is 10 seconds.
One long and
four short
After turning on the machine, it is detected that the key is stuck, the
fuel tank lock is opened and an alarm is issued, and the detection
time is 10 seconds.
After the power on, it is detected that the key is stuck, the seat
cushion lock is turned on and an alarm is issued, and the detection
time is 10 seconds
Two long and
one short
When the power is turned on, it detects that the unlocking in-position
signal is abnormal, and the alarm is once not turned on.
Five short
Abnormal low-frequency transmitting antenna is detected when the
machine is turned on, and an alarm is given once
Five short
the key is not detected after turning on normally, the alarm is once
and the machine is turned off
Three long and
one short
Eight short
Abnormal high frequency reception of the PKE host is detected
when powering on, and an alarm will be given if it is not turned on
The abnormal high frequency reception of the PKE host is
detected when it is turned on, and it will alarm once when it is not
turned on.
After the power is turned on, the battery of the transponder is
detected to be low, and an alarm is given once.
When the power is turned on, it detects that the unlocking in-position
signal is abnormal, and the alarm is once not turned on.
Note: When the vehicle is starting or moving, all buttons of the right auxiliary handle
switch (Figure 6) are shielded, and can only be used when the vehicle is stopped and the
ignition is off.
You can also place the key induction area (Fig. 3) against the non-electric induction area
(Fig. 4) first, and then proceed to step 1.
The key is no longer detected after power-on without electric induction, please pay
attention to power off when leaving the vehicle.
Two long
Two long and
three short
Three long
After turning off the motorcycle, please check if the steering lock is locked. If the steering
lock is unlocked, please put the handlebar to the left, the motorcycle will be locked
automatically.
If the handlebar is not put to the left and turn off the motorcycle, it is forbidden to push the
motorcycle or let the motorcycle slide, in case to put the handlebar to the left to lock the head
lock, it is dangerous.
When pushing the motorcycle or let the motorcycle slide from the hill, make sure the PKE
is turned on (the steering lock is unlocked successfully)

7
TFT Instrument
The meter consists of four different interfaces which are leisure, racing, street and simplicity
version,respectively.The interface can be switched and selected according to personal preference.A
brief description of the meter is made with the leisure interface shown in the picture below.
Do not use high pressure water washing instrument directly.
Do not use dishcloth with organic solvent such as gasoline, kerosene, alcohol, brake fluid to wipe the
instrument, Otherwise, the instrument may cause local cracks or discoloration due to exposure to organic
solvents.
Short press the “ ” button of meter,then the meter will perform the process of self-test.
1. Left turn light
When the turn signal switch to the left, the left turn signal light will be flashing.
2. Distance light lamp
When using the high beam headlights, indicator light will be lighter.
3. Battery voltage prompt
When the engine is off, if the detection voltage is less than 11.9V, the display symbol will alarm in
the way of flashing this flashing frequency is 1Hz. When the detection voltage is greater than 12.1V,
the alarm will be canceled automatically.
When the engine is on, if the detection voltage is less than 12.6V, the display symbol will alarm in
the way of flashing this flashing frequency is 1Hz. When the detection voltage is greater than 12.8V,
the alarm will be canceled automatically.
When the low voltage indicator of the battery flashes, it means the voltage of the vehicle is lower
than the set value. If the indicator is continuously on for a long time, it means that it is an abnormal
phenomenon. Please contact our company for after-sales inspection. After the inspection, If the
battery is dead, charging the battery will make it back to normal. If the battery is damaged, the battery
needs to be replaced.
When the fuel injection system is showing error, it will break the fuel injection system when you still drive the
mortorcycle. Please contact the after-sales dealership shop to check the fuel injection system.
Front view figure arrow: 1 Left turn lights, 2 Distance light lamp; 3 Battery fuel gauge of voltage
prompt lable; 4 Emergency light;5 clock; 6 ABS anti-lock braking system light; 7 Tire pressure
indicator light; 8 Maintenance indicator light; 9 Bluetooth; 10 Right turn signals light;11 Gear display;
12 Engine speed record; 13 Water temperature; 14 Tripmeter; 15 E/S model;16 Odometer; 17 Fuel
level gauge; 18 Driving information;19 Speedometer;
4. Fuel injection error signal light
After the engine is successfully started, during normal running, the EFI fault light is off; if the EFI
fault light is on at this time, it indicates that the EFI system is faulty.
If the voltage is higher than 16V, you must stop using the vehicle immediately and contact after-sales service
point of the company for inspection.
5. Clock
The clock display in the 24 hours system.
If the battery is removed or battery lost electricity, it will be shown from "00:00" clock.
19

18
When the oil indicator light is on, it means that the motorcycle has already traveled to a certain mileage.
Therefore, It is necessary to change the oil to maintain the engine. Otherwise, If you continue to drive the
motorcycle without maintenance, the engine and the transmission system will be damaged.
When the oil indicator light is on, please turn off the engine firstly, and then check the oil level to confirm
whether the oil capacity is correct or not, and whether the oil needs to be replaced or not.
9. Bluetooth
The indicator light will be on when the phone is connected to Bluetooth, and will be off when
disconnected.
10. Right turn signal light
When press the right turn signal right to the right, it will be flashing.
11. Gear display
The motorcycle is using international gear, and there are six gear display which is 1,N,2,3,4,5,6
shown on the instrument.
12. Engine tachometer
Displays the engine speed, which means the number of revolutions of the engine shaft per
minute.
13. Water temperature
After the power is turned on, turn off the engine switch of the handle. After the EFI is powered on,
the water temperature state is displayed. One grid indicates that the water temperature is lower than
or equal to 60 °C, 61-70 °C shows two grids, and 71-80 °C shows three grids, 81- 90°C shows
four grids, 91-100°C shows five grids, 101-110°C shows six grids, 111-120°C shows seven grids,
and 121°C above shows eight grids. When the water temperature is greater than 111 °C, the water
temperature indicator will start to alarm and the cooling system needs to be checked.
14. Tripmeter
There are two functions in the display area of the screen, which are the TRIP MODE and the ODO
MODE.
The TRIP MODE records accumulated mileage per drive, Long press the MOD button to reset, the
maximum recorded value is 999.9.
15. E/S model
"E" means economy mode, "S" means sport mode.
16. Odometer
The ODO MODE records the driving mileage in total from the beginning to the present. The
recorded information cannot be cleared, and the maximum recorded value is up to 999999.
17. Fuel level gauge
The fuel level gauge shows the amount of fuel remaining in the fuel tank. The fuel level gauge
shows 8 segments, indicating that the fuel tank is full. When the remaining fuel is low, the fuel
indicator flashes, and fuel should be added as soon as possible.
When the motorcycle is parked with the side rack support, the fuel level gauge is slow to
update the accurate fuel volume. Straighten the vehicle to the normal driving state, then turn
on the power supply of the whole vehicle, and the fuel level display will update to show the
current accurate fuel volume.
18. Driving information
The record displays motorcycle information such as fuel consumption, average speed, cruising
range, tire temperature and air pressure. The average fuel consumption is displayed when the
motorcycle is stationary, and the instantaneous fuel consumption is displayed after the motorcycle is
started.
7. Tire pressure indicator light
When the tire pressure and temperature are abnormal, it will flash an alarm and need maintenance
and inspection.
8.Maintenance indicator light
The first indication is 1000km. After every 3000km, the maintenance reminder will flash, and long
press SET to clear it.200km in advance each time, it will flash for 5 seconds after power-on to
indicate maintenance.
6. ABS anti-lock braking system signal light
ABS working situation.
19. Speedometer
Speedometer shows the speed is how many kilometers per hour (/miles).
TFT Instrument

9
As shown in figure 1: Main menu
Menu operation: Short Press the SET button on the main interface to enter the main menu. Long
Press the SET button at any time to return to the main interface, or the screen can automatically
return to the main interface without any operation for 8 seconds. Short press the MOD button, then
the cursor will moves downwards, short Press SET button to enter the secondary menu or set
options.
①Interface style
The four interface styles are leisure, racing, street, and simplicity, respectively .
Short press MOD button to move the cursor to select the option, short press SET button to
confirm the option, then it will automatically return to the previous level.
②The hours and minutes
The clocks and minutes are set individually in digital bits. When entering the clock setting, press
digit setting from left to right, short press MODE key to increase digits, loop around, short press SET
key to determine the current digit key, and then switch to the lower digit setting. After the last digit
setting is completed, short press SET key to determine, and the interface will automatically return to
the upper menu.
Figure 1
③Instrument backlight brightness adjustment (figure 3)
Press the MOD key to change the backlight brightness gear (auto, 1, 2, 3, 4, 5) and press
the SET key to confirm the selection.
Automatic transmission: the old instrument has the darkest backlight when the headlight
switch is turned on, and the backlight is the brightest when the headlight switch is turned off,
automatically switching between two brightness levels; the new instrument automatically
adjusts the backlight brightness and darkness according to changes in the light sensing
environment.
④Unit setting
Short press the SET button to alternately switch the unit display, and the speed unit can be
switched between mph and km/h. Correspondingly, the mileage unit can be switched between mile
and km.
⑤Language setting
Short press the SET button to switch language between Simplified Chinese and English.
⑥Bluetooth connection
Short press SET button to turn on and off Bluetooth.
⑦Malfunction information ( figure 4)
Current fault code, historical fault code, software version number.
34
TFT Instrument
5
Tire pressure monitoring function(figure 5)
The tire temperature and pressure data can be viewed on the main interface by short-pressing
MOD to switch driving information or entering the "Main Menu-Tire Pressure Settings".
There are three pressure units: Psi, Kpa and Bar. Short press the SET button to switch, short
press MOD to confirm and jump to the next item.

10
TFT Instrument
Tire pressure function description:
1. Tire pressure and temperature alarm
When the instrument receives that the tire pressure temperature information from the sensor
exceeds the limit value, the instrument interface displays the corresponding tire pressure temperature
alarm text, and the tire pressure indicator flashes (1 Hz).
2. Low voltage alarm
When the tire pressure sensor detects that the battery voltage value is lower than 2.6V, the
interface shows that the sensor battery is low, the alarm will not disappear until the new sensor is re-
matched, and the tire pressure indicator flashes (1Hz).
3. Air leakage alarm
When the sensor detects the change of tire pressure (decompression), it will prompt a leak alarm
and the tire pressure indicator will flash (1 Hz).
4. Unlearned alarm
When the meter does not match the sensor and the tire pressure setting interface displays "Not
Learned", the main interface displays "Not Learned Alarm" and the tire pressure indicator flashes (1
Hz).
5. Sensor loss alarm
When the signal from the sensor is not received, the meter shows that the sensor is missing and
the tire pressure indicator flashes (1 Hz).
Remove alarm: The alarm disappears after receiving valid data.
6. Sensor failure alarm
When the meter receives the sensor chip fault information, the interface displays the sensor fault
alarm and the tire pressure indicator flashes (1 Hz). At this time, the sensor needs to be replaced,
otherwise the tire pressure information cannot be displayed normally.
7. System failure alarm
When the chip that receives the signal inside the instrument fails, the instrument interface displays
a system failure alarm and the tire pressure indicator flashes. At this time, the instrument needs to be
replaced, otherwise the tire pressure information cannot be displayed normally.
8. Learning matching function.
① First adjust the motorcycle meter to the learning mode, that is: power on the meter → enter the
menu → tire pressure setting interface → operate the instrument button to set the front (rear) wheel to
"learning..." and wait for the tire pressure sensor to learn information.
② Continue to inflate or deflate the corresponding front wheel or rear wheel until "Success" is
displayed.
③ When the meter receives the matching signal from the tire pressure sensor, after the match
is successful, the text "Learning..." on the tire pressure setting interface will be displayed as
"success". At this time, the meter can receive the tire pressure temperature information of the
sensor.
If the learning is unsuccessful, you need to repeat the above operation and increase the time of
inflation and deflation.

11
Mobile interconnection operation
instructions
Android system:
1.On the home screen, press SET to enter the secondary menu, select “Easy Conected" to
enter the wireless screen, and scan the QR code at the upper right corner of the screen to
download "Driving Partner".
2. The mobile phone interconnection defaults to the Android system. If it is an IOS, please
press the SET button, then press the MOD button to switch to the IOS system, and finally
press the SET button to confirm the switch.
3. Turn off the WLAN, set the mobile network sharing place, and set the account and
password of the hotspot(the account and password should be the same as those displayed
on the meter. Note that the English letters of the account only have lowercase "o" and no
uppercase "O", enter Errors will cause the connection to be unsuccessful), then turn on the
hotspot, and you can check whether it is connected to the corresponding device on the
connected device side. (AP frequency band is set to 5GHz)
4. After the hotspot is successfully connected, open the "Driving Partner" APP, and you
can enter the Yilian screen projection interface on the meter. By clicking on the mirror image
screen, you can project the application on the mobile phone to the meter.
5. If the connection is unsuccessful for a long time, please turn off the mobile WIFI, keep
the hotspot on the mobile phone, turn off the meter and wait for 30s, then turn it on again, and
wait for automatic connection.
6. Short press the MOD button to exit the connection and return to the home screen.
IOS system:
1.Set the meter to IOS system mode, short press the SET button on the mobile phone
interconnection interface, then short press the MOD button to switch to the IOS system, and
finally short press the SET button to confirm.
2. Enter the mobile phone settings--Wi-Fi--select the account with the same name
displayed on the instrument and input the password "88888888". Wait for the successful
connection, and then open the Driving Partner APP to realize the interconnection.
Wireless projection interface
Hotspot settings Successful screen projection interface

12
Single arm/double arm(upgrades)
Left/Right handle control system
1. Clutch controller
When starting the engine or shifting gears, hold the handle to separate the clutch discs to cut off
the power transmission.
2. Overtaking warning lights
When speeding up, press the button warning the motorcycle in front or behind.
3. Dimmer switch
high beam&low beam operation
When the dimmer switch on position, the distance light is flashing. At the same time on the
surface of the dashboard in light is lit will switch to dipped headlight will be turn on and distance
light is turn off. At the same time the high beam indicator on the dashboard surface lights up. When
the switch is changed to , the low beam lights up.
8. SET:Enter the main menu/confirm the option.
9. MOD:Select the next (Move the cursor to select the option).
4. Danger warning button
Press the button, the four lights are flashing, and warned nearby vehicles to pay attention to the
safety.
5. Electronic windshield switch
The electric windshield will go up and down.
6. Horn button
Press the button, the horn will ring.
7. Turn signal operation
When turn the switch to the left , the left turn light is flashing. When turn the switch to the right
, the right turn light is flashing. The indicator light on the instrument surface also flashes at the same
time.
When driving, you must develop the habit of sending the turn signal first before changing
lanes and turning. After changing lanes or making a turn, be sure to turn off the turn signals.
10. Fuel tank lock switch
When the engine does not start, press “ Fuel ” button, the fuel tank cover will be opened
automatically.
12.Engine flameout switch
This switch is installed on the right hand switch assembly, is a kind of wave plate card, shaft in
wave plate center. Dial in position, the circuit connected, the motor can start.
If the switch in position, starting circuit completely cut off, the motor can't start. It's an
emergency way to shut down the switch.
13.Front brake controller
When braking the front wheel, hold the brake handle on the right side. When braking the front
wheel, we must grip on the right side of the front wheel brake. Because using the vehicle hydraulic
brake disc, the brake holding force doesn't need to be large. When you hold front brake handle,
brake lights will light up automatically.
11. ECO button
Press the ECO button, the indicator E of the instrument lights up, and E represents the economy
mode; press the ECO button again, the indicator S of the instrument lights up, and S represents the
sport mode.
In any case, E and S modes can be switched.

13
Single arm/double arm(upgrades)
Left/Right handle control system
14.Throttle control handle
Throttle control handle is used to control the engine rotating speed. When turn towards to the
user's side is acceleration; On the other hand, turn towards to the opposite user's side is reduction.
15.Electrical starting button
Press this button to turn on the start-up circuit. When starting, you must set the gear position to
the neutral position, confirm that the engine flame-off switch is in position, and hold the clutch
handle to ensure safety.
W hen c ontinue starting the engine, consecutive start time not more than five seconds at a time. Because a
large number of start can make some abnormal heating to circuit and start motor. If you still can't start it a few
time, you should stop and check the oil supply system and start the circuit system. (please refer to
"troubleshooting" section.)
16. Light switch
Position: When the engine is working,the left and right hand switches backlight, front light,
front position light, rear position light, and nameplate light are all on together.
Position: front position light, rear position light and nameplate light are all on together.
17. Red power-on button
When the host is in the sleeping version, press the "START" button in short time to wake up the
host. After detecting the response signal of the key and the signal of the handle bar lock, the whole
vehicle will START up. Press the "START" button in long time, the host will enter into sleep version,
and the whole vehicle will be shut down.
For details of the operation of MOD button and SET button, please refer to the main menu of the
meter.
18. Seat cushion lock switch
When the engine is not starting with the seat cushion locking, press the SEAT switch to open the
seat cushion lock.
If the seat is not installed into position, the seat will glide which and will lead to the driver to lose control of the
motorcycle. Make sure the seat cushion is locked in the correct position.
Front pedal installation
1. Adjust the position of the front left pedal
Tools: No. 8 open-ended wrench, No. 10 open-ended wrench, No. 14 Torx wrench
1. Use a wrench to unscrew the M6×30 bolt①;
2. Remove the front fender bushing ③ from the adjusting screw to shorten the adjusting screw;
3. Remove the support mounting bolts M10×25②, install the pedal support on the rear hole, re-
tighten the M10×25 bolts, and tighten them.
2. Adjust the position of the front right pedal
Tools: No. 14 open-ended wrench, No. 10 open-ended wrench, No. 14 Torx wrench
1. Remove the cotter pin and pin ④, and use the No. 10 and No. 14 open-end wrench to unscrew
the extension rod ② and U-shaped joint ③;
2. Connect the U-shaped joint directly to the rear brake main pump ①;
3. Remove the support mounting bolts M10×25⑤, install the pedal support on the rear hole, re-
tighten the M10×25 bolts, and tighten them.
Front pedal installation
①③
① ② ③⑤
②
④
The front pedal is installed in the frontmost position before leaving the factory, and the
user can adjust it to the latter installation position by himself.

1114
The fuel tank is located in the fuel tank shell in front of the seat cushion. When opening the outer
fuel tank cover, make sure that the engine shutdown switch is turned off.
Press the fuel tank cap switch button ①, the cover plate ② opens automatically, and turn the fuel
tank cap ③ counterclockwise to open. When assembling the cover, proceed in the reverse order.
N ot excessively fill in fuel, so as to avoid overflow of fuel flow to the high temperature engine. Fuel oil level
height shall not exceed the fuel tank as shown at the bottom of the mouth, or fuel will overflow after the heat
expansion, and will damage the motorcycle parts.
To turn off the engine when refueling, make sure the turn off switch is shut down. Do not close to fireworks.
Oil gun against excessive stretch into the fuel tank, so as not to damage the fuel sensor.
When you fill in the fuel , you should have some prevention measures, otherwise it will cause fire or fuel vapor
into the eye. When you fill in the gas, go to the open air. Make sure the engine has been closed to avoid oil spills.
No smoking, make sure no heat or fire source around. Avoid fuel vapor into the eye. When Refueling, keep
children and pets away.
The motorcycle is equipped with six gear transmission, its operation as shown. Pick on, or change
the gear shift lever , the shift lever will recover to the original position, so as for subsequent shift.
Before in low position, please reduce the speed or increase the engine speed; Before in high-grade
place, please raise the speed or lower engine speed. After this will prevent transmission system
components and unnecessary tire wear.
When the gear is in the neutral position, the neutral position indicator light is lit, please slowly release the
clutch handle, to confirm whether really is in the neutral position.
Rear brake pedal
When press on the rear brake pedal, rear wheel brake will work, brake lights up at the same time.
Side stand
When you are using the side stand, the side stand turn off switch will cut off the power if you don't
hold the clutch handle and the shift level is on idle condition.
Rear shock absorber spring
The rear shock absorber's spring is adjustable according to willing of the driver, the loading
condition and road condition. The adjusting method is non-polar adjustment. You only need to stop
the motorcycle with the side stand. And then you turn the spring adjustment to the needed position.
The rigidity will decrease when we adjust it down; the rigidity will increase when we adjust it up.
Fuel tank
Shift lever
Do not use high pressure water to rinse when washing the motorcycle fuel tank cover to avoid water to get in
the fuel tank.

15
Notes for fuel, engine oil and
coolant/antifreeze
The unleaded gasoline, poor quality fuel oil and engine oil can damage the system
components, and it will shorten the service life of catalyst in spark plugs and muffler. Unclean
fuel oil can block the oil-way, resulting in abnormal engine working, don't use that kind of oil.
Please properly deal with waste engine oil, do not prevent the environment. We suggest
that you will put waste oil into a sealed container to a local recycling center. Don't put them
Engine coolant/antifreeze
The coolant/antifreeze we use is suitable for the aluminum radiator. The coolant/antifreeze is a
mixture of coolant/antifreeze concentrate and water. If the outdoor temperature is higher than the
freeing point of the coolant/antifreeze, it can be used. When you add or cool the coolant/antifreeze,
please use alcohol as the foundation.
It is bad for health if you swallow or absorb the coolant/antifreeze. Therefore, when you use it,
please don't eat and drink. After every work, please clean your hands, face or any skin parts
demonstrated. If you swallow it mistakenly, please go to the hospital immediately. If you absorb it
mistakenly, please breathe more fresh air in the environmental in where there is full of fresh air. If the
coolant/antifreeze runs into your eyes mistakenly, please watch your eyes with large amount of water
at once. Also, keep the liquid away from kids and pets.
The coolant/antifreeze which splash out is possibly do harm to the surface of the motorcycle.
Please be careful when you refill the coolant/antifreeze. If it splash out, please clean it immediately.
Distill water for coolant/antifreeze
If you need to add water, please use the distill water. If you use other kinds of water, it would
probably do harm to the cooling system.
coolant/antifreeze
coolant/antifreeze can prevent routing and lubricate the coolant/antifreeze pump. Therefore, if the
outdoor temperature is higher than the freeing point of the coolant/antifreeze, it can be used.
Please refer to the instruction of coolant/antifreeze product when you use it.
When adding coolant/antifreeze, ensure that the engine is cold. Do not open the tank cover
of the hot engine, which may cause danger!
After the tank is filled with coolant/antifreeze, do not close the tank cover and start the
engine idling (Appropriate fueling) for a period of time. At this time, air is discharged from the
water inlet. After the air is discharged, add more coolant/antifreeze. Once, until there is no air
discharge from the water inlet, it can be considered that the water tank has been filled up
before the water tank cover can be closed.
The sub tank coolant/antifreeze is added between “L” and “H”.
The volume of coolant/antifreeze
coolant/antifreeze volume (total volume): 1580ml.
Please choose the suitable coolant/antifreeze according to the driving air environment.
Fuel oil
The pure 95# or more unleaded gasoline must be used. The pure 92# unleaded gasoline can only
be used in a short time in case of emergency, otherwise the engine lifetime will be shortened.
If there are tapping based on experience, you can use level higher gasoline or use other sellers of
gasoline. Because there are differences between different brands.
Engine oil
Use high quality SN or above level four-stroke engine oil can prolong engine life. Please choose
ZONTES API SN level or higher level of "four stroke motorcycle engine oil", It is on sale in all
ZONTES shops.
Water tank cover

16
Avoid operation under fixed low speed
In fixed (light load) under operation at low speed, it will make the parts wear and bad matching. As
long as no more than recommended throttle opening (no more than 3/4 of the opening of the throttle),
it can make the engine speed under various rotational speed. However, during the period of the first
500km, it should not be more than three quarters of the throttle opening.
Let the engine oil cycling
No matter in hot or cold machine status, before starting, you should let the engine had good idle
running time in order to make the oil flow to all lubrication part.
Routine first time examination
The initial 1000 kilometers of maintenance is one of the most important work. During this period,
all engine parts should have good running-in. In the case, maintenance and repair should put all the
parts to readjust, tighten all fasteners, replace parts abrasive dust pollution of the oil. Repair, about
1000 kilometers seriously for the first time, will guarantee your motorcycle to play the best
performance and prolong its service life.
The correct new running-in can prolong the service life of the motorcycle, it can also give full play
to the performance of the new motorcycle. Below is a list of running in right way.
recommended maximum engine speed
Gear and speed of engine
The gear and speed of the engine should be changed from time to time, and do not run
continuously in a certain gear and speed. During the run-in period, the accelerator can be
appropriately increased to make it fully run-in.
Running-in of tires.
Like engine running-in, the adaptation of the new tires need to be correct to ensure the best
performance. In use within the first 150km new tires, we should gradually increase the turning Angle
to connect the ground surface in order to achieve the best performance of the tire. In the use of new
tires within the first 150km, we should avoid nasty acceleration, a sharp turn, and emergency braking.
Running-in of new motorcycle
If the tires are not well run in, it will cause the tires to slip and lose control. After changing
tires, drive with extreme caution. Use the tires correctly according to the contents of this
section, and avoid sharp acceleration, sharp turns and sudden braking during the first 150
kilometers of using the tires.
According to the instruction for use in the inspection and maintenance of an execution
section for 1000 kilometers Maintenance and repair. Please pay special attention to the danger
and warning content of this section.
First 500 kilometers below 5500 RPM
Up to 1500 kilometers below 8250 RPM
Over 1500 kilometers below10000 RPM

17
Inspection before driving
If it's not well check before driving the motorcycle, and there is no proper maintenance, it will
increases the risk of accidents and the risk of motorcycle damage. Always check the motorcycle
during daily usage, make sure it is safe to run. Refer to the instruction manual inspection and
maintenance of the chapters.
If the motorcycle uses inappropriate tires, or operating motorcycle not correctly, or tire pressure is
not correct, you will lose control of the motorcycle. have to use in this instruction manual provisions
size and specifications of the tires. Always in accordance with the requirements of the inspection and
maintenance section to keep proper tire pressure.
It is dangerous to run the engine during the inspection. If your hands or clothing are
caught in the moving parts of the motorcycle, you will be seriously injured. In addition to
checking the engine kill switch and the throttle to run the engine, perform other checks with
the engine off.
Keep proper wheel pressure
The importance of these tests can never be neglected. Complete all of the inspection before
driving and necessary repairs.
Key points for inspection
Active steering, no block for moving,
no working loose
Correct accelerator inhaul space,
smooth operation; smooth holding
for accelerator
Correct controller free stroke and
smooth operation
Smooth and active controlling
Enough planning distance oil level
No wear; clean and lubricate from time
to time; correct looseness
Correct air pressure; proper depth of
tread; no wear
Brake
Inspection content
Steering system
Accelerator
Clutch
Shock absorber
Fuel oil
Tires
Normal operation on braking controller
and braking pedal; braking liquid above
The LOWER line of the braking liquid
cylinder; no feeling of inactive braking;
no brake drag and brake liquid leak;
braking plate wear within range
Transmission chain
Correct oil level
No oil leaking
Normal working for all kinds of light in the
motorcycle
Distance light, neutral position light,
turn signal right working normally
Working normally
Working normally
Working normally
Normal controlling
Engine oil
Cooling system
Lamplight
Indicator light
Horn
Brake switch
Shut down switch
Side stand/ignition interlock
switch

18
If you are driving this vehicle for the first time, we recommend that you practice on a non-
public road until you are familiar with the controls and handling of the vehicle.
Driving with one hand is dangerous, and should be driven with both hands firmly gripping
the handlebars with both feet on the footrests. In any case, do not drive with your hands off
the handlebars.
Reduce speed to a safe speed before turning.
The road surface is wet and smooth, the tire friction is small, and the braking ability and
cornering ability are naturally reduced, so it is necessary to decelerate in advance.
Crosswinds are usually most likely to occur at tunnel exits, valleys, or when large vehicles
are overtaking from behind, so you must be careful and slow down.
Obey traffic rules and speed limits.
Starting of the engine
When you start the system without key, all the motorcycle will be connected automatically. Check
whether the engine turn off switch is in the position of . At this moment your motorcycle is in the
neutral position, the neutral light will light up on the dashboard.
This motorcycle equipped with ignition circuit and the starter circuit interlock switch. Only
under the condition of the following the engine will start:
1.Transmission is under neutral gear, hold the clutch handle.
2.Transmission is not under neutral gear, side stand is packed up and you hold the clutch
Dumping of sensor when the motorcycle is overturned, will cut off the power and stop the
oil supply, and make the motorcycle stall, and fault indicator will light up. Motorcycle starting
again, you need to turn off the ignition switch, after waiting for 1 minute, reopen the ignition
switch, and starting the engine.
Driving essentials
When the engine is in hot machine status
1.Pack up the side stand.
2.Throttle control handle is on idling position.
3.First pinch the clutch and then press the electric start button to start.
When the engine is in hot machine status and hard to start
1.Pack up the side stand.
2.Turn the throttle 1 / 8th opening, and at the same time pinch the clutch before pressing
the electric start button to start.
3.When after several times that the engine is hard to start, it is most likely that the cylinder
submerged. In that case, you have to do the clear cylinder process: open the acceleration entirely,
press the starting button for 3 seconds.
When the engine is in cool machine status and hard to start:
1.Pack up the side stand.
2.Turn the throttle 1 / 8th opening, and at the same time pinch the clutch before pressing the
electric start button to start.
3.After starting the engine, keep the engine turning to fully preheated.
The colder is the weather, the longer time the engine needs to preheat. After fully preheat,
you can reduce the engine wear and tear.
When the engine is in cold machine status:
1.Pack up the side stand.
2.Throttle control handle is on idling position.
3.First pinch the clutch and then press the electric start button to start.
4.When after several times that the engine is hard to start, it is most likely that the cylinder
submerged. In the case, you have to do the clear cylinder process: open the acceleration entirely,
press the starting button for 3 seconds.
When starting the hang gear in neutral, throttle back to bottom, form a habit of holding the
clutch handle before starting. Avoid-error, when it is starting, moving forward immediately.
whether the gear is in neutral or not, you need to squeeze the clutch handle first, otherwise
it will not start, and do n't forget to put away the side stand.
Do not start motorcycle without fuel and engine oil.
Table of contents
Other Zontes Motorcycle manuals

Zontes
Zontes ZT310T 2022 User manual

Zontes
Zontes ZT310-X1 2021 User manual

Zontes
Zontes ZT310-X User manual

Zontes
Zontes ZT310-V User manual

Zontes
Zontes ZT125-G1 User manual

Zontes
Zontes ZT350-S 2022 User manual

Zontes
Zontes ZT350-R 2022 User manual

Zontes
Zontes ZT250-R User manual

Zontes
Zontes ZT350-GK 2022 User manual

Zontes
Zontes ZT125-C User manual

Zontes
Zontes ZT125-Z2 User manual

Zontes
Zontes ZT310-VX EURO IV User manual

Zontes
Zontes ZT350-T EURO V 2022 User manual

Zontes
Zontes ZT310T-M User manual

Zontes
Zontes ZT125-GK User manual

Zontes
Zontes ZT125/310T-M User manual

Zontes
Zontes Z2 User manual

Zontes
Zontes ZT350-VX 2022 User manual

Zontes
Zontes ZT125-U User manual

Zontes
Zontes 250 User manual