SPAZIO
!WARNING
IMPORTANT: Read the instructions carefully before use and keep for future reference.
WARNING: This product is only suitable for a child who can not sit up unaided.
WARNING: Only use on a firm, horizontal lever and dry surface.
WARNING: Do not let other children play unattended near the product.
WARNING: Do not use it, if any part of is broken, torn or missing.
Only use the replacement parts supplier or approved by the manufacturer.
Do not use the product near heat sources, open flames or dangerous objects that are within reach
of the child.
Do not add any mattresses are not approved by the manufacturer.
Before carrying and lifting, make sure that the handle is in the correct position of use.
It could be dangerous to leave your child unattended.
Assembly and preparation of the item must be carried out by adults.
Before use, make sure that all of the attachment mechanisms are connected properly.
Do not insert the fingers into the mechanisms.
It could be dangerous to use accessories which are not approved by the manufacturer.
This product is designed for the children from birth up to a weight of 9 kg.
Take care when adjusting the mechanisms (handle, backrest) with the child present.
Regularly check the handle (or the handles) and the bottom of the carriage to make sure that
there are no signs of breakage or damage.
This product can be used with ZIBOS frame collection only.
Instructions for use
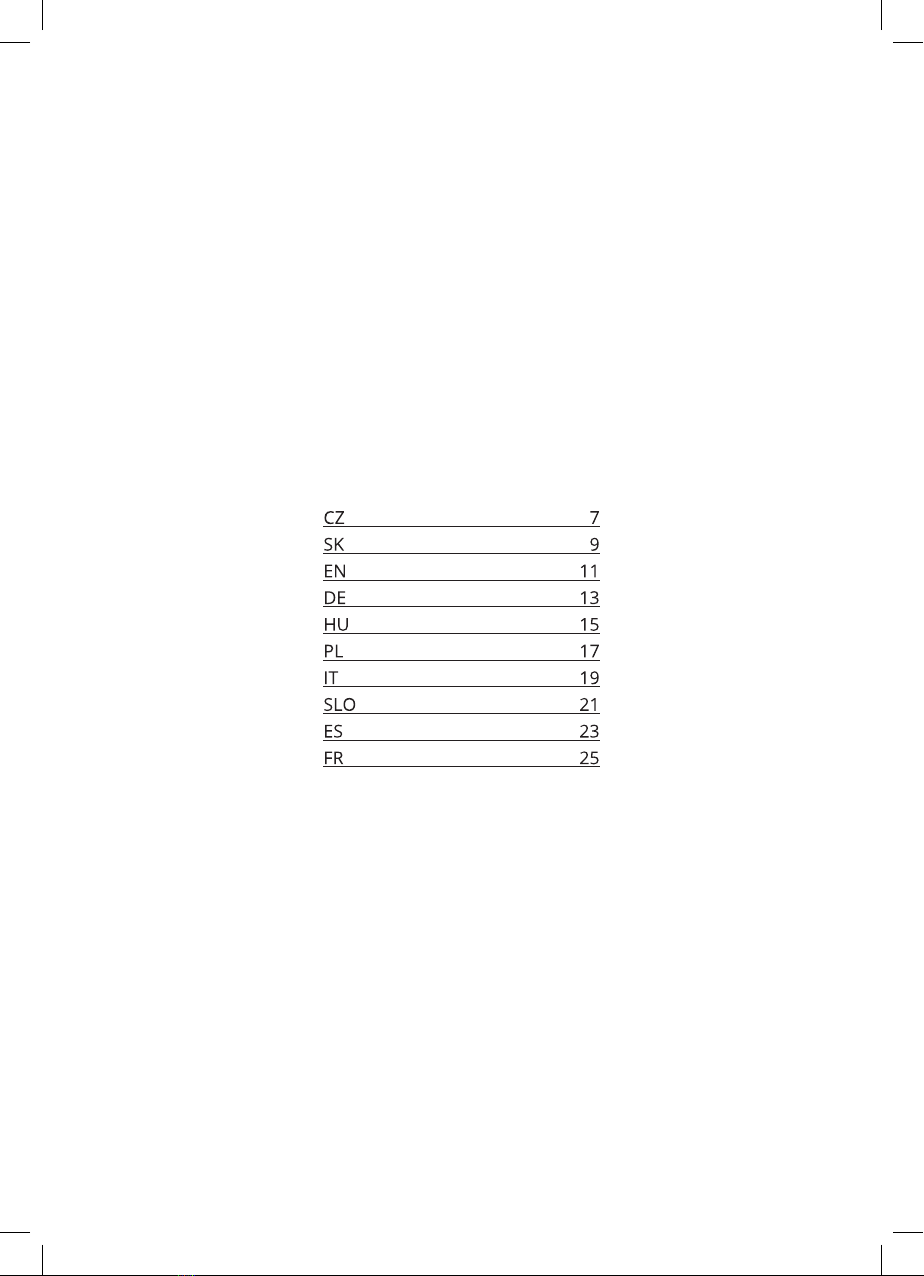
1.OPENING THE CARRYCOT: Turn the handle of carrycot upwards.
2.To open and lock the base in the open position, move the sliders from the centre of the base
towards the two extremities (fig. a) until they click into place (fig. b).
3.HOOD: On the opening zip, a mesh insert allows the parent to monitor the baby (fig. a).
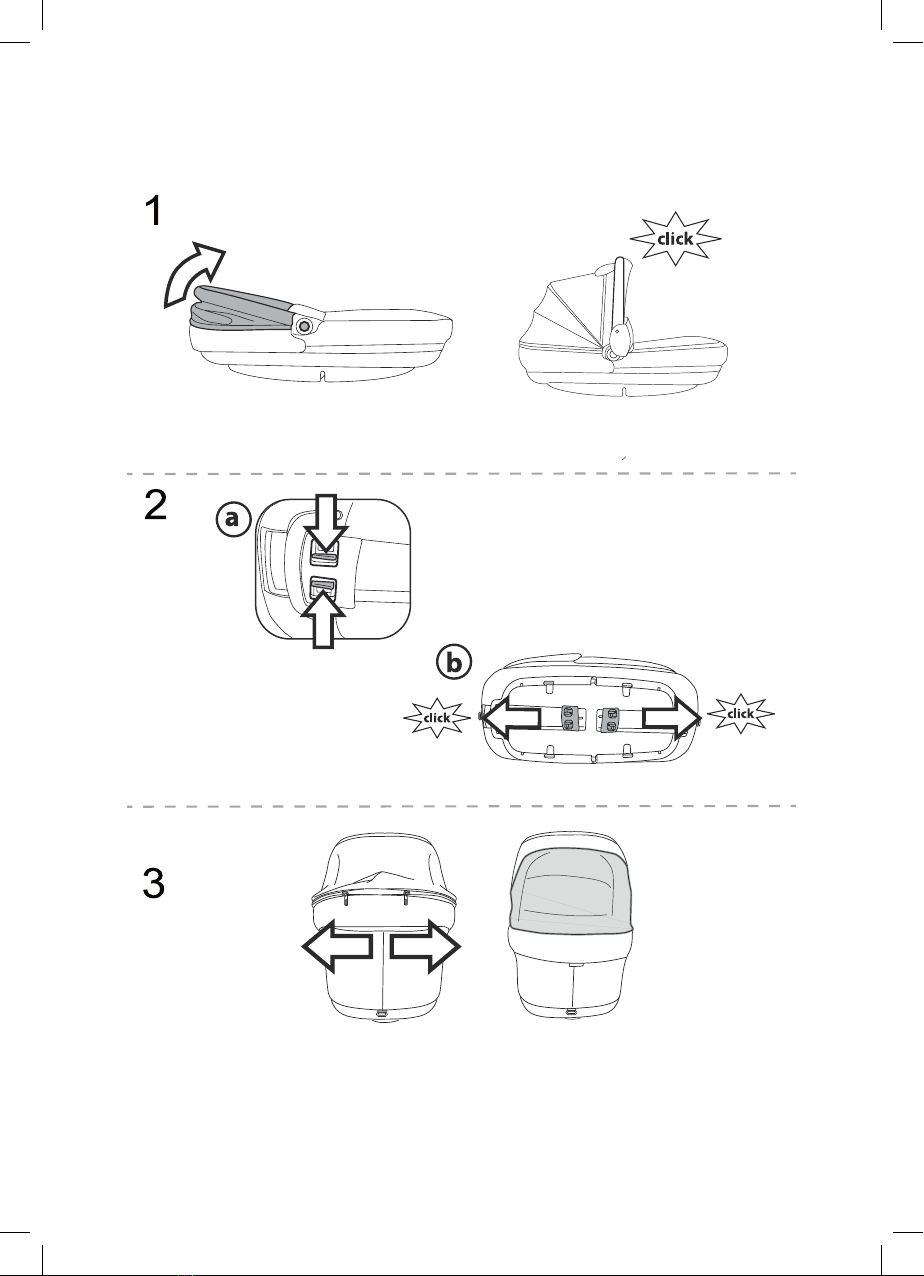
4.COVER: Place the cover over the carrycot; fasten the zip around.
5.HANDLE: The handle is only locked in the vertical position (fig. a). To lower the handle, press the
two side buttons simultaneously and push it downwards (fig. b). The handle is useful to carry the
SPAZIO and fasten it onto the chassis (fig. c).
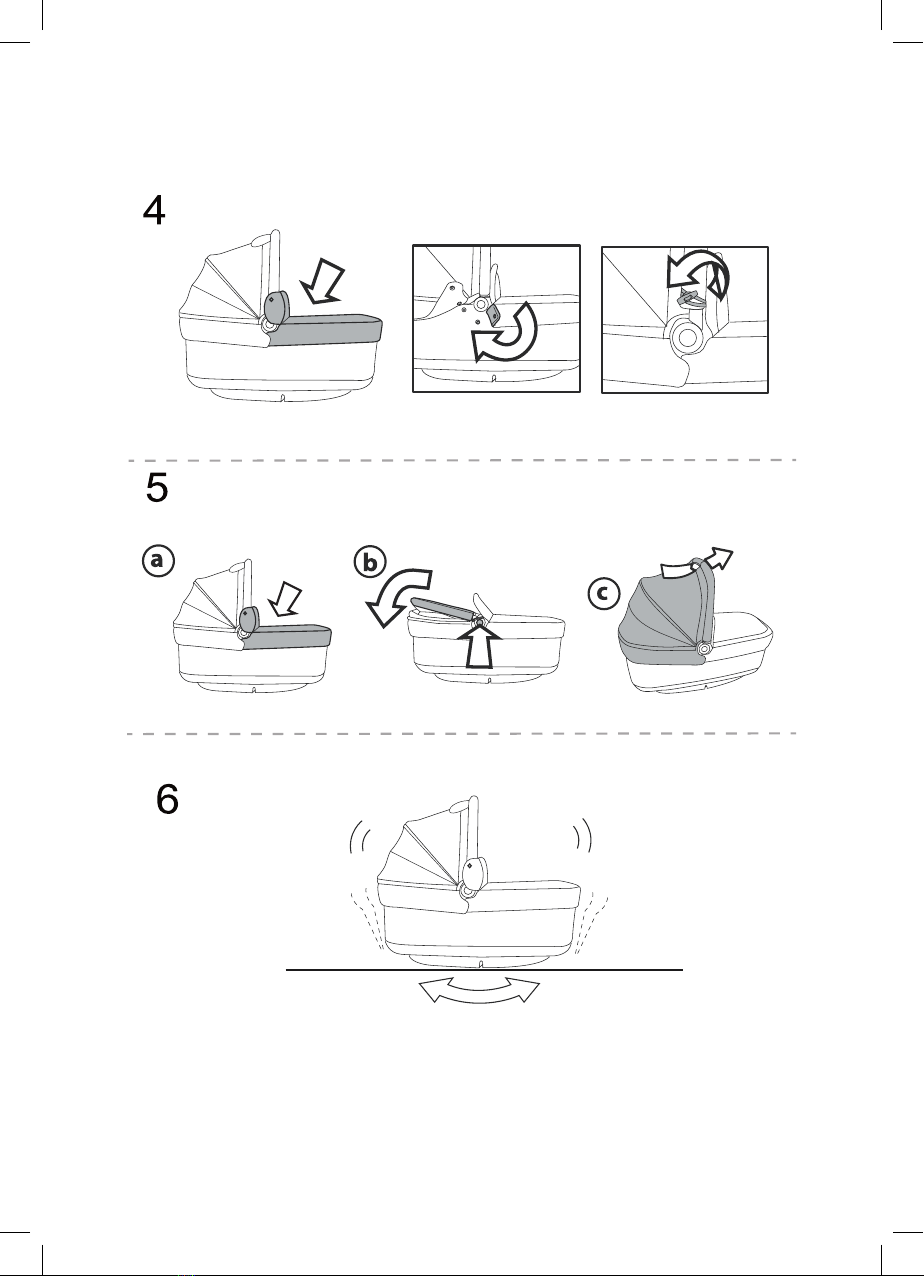
6.ROCKING POSITION: The base of the carrycot has a shape that allows you to rock your child when
placed on the flat surface.
7.SLEEPING POSITION: To turn the carrycot into a non-rocking cradle, extract the 4 feet positioned
under the base.
8.ADJUSTING THE BACKREST: The backrest can be adjustable into 3 positions. Just open act under
the backrest.
9.CLOSING THE CARRYCOT: The carrycot can be closed to reduce its bulk. Press and push the tabs
of the sliders beneath the base of the carrycot (fig. a) and move them simultaneously towards the
centre of the base (fig. b).
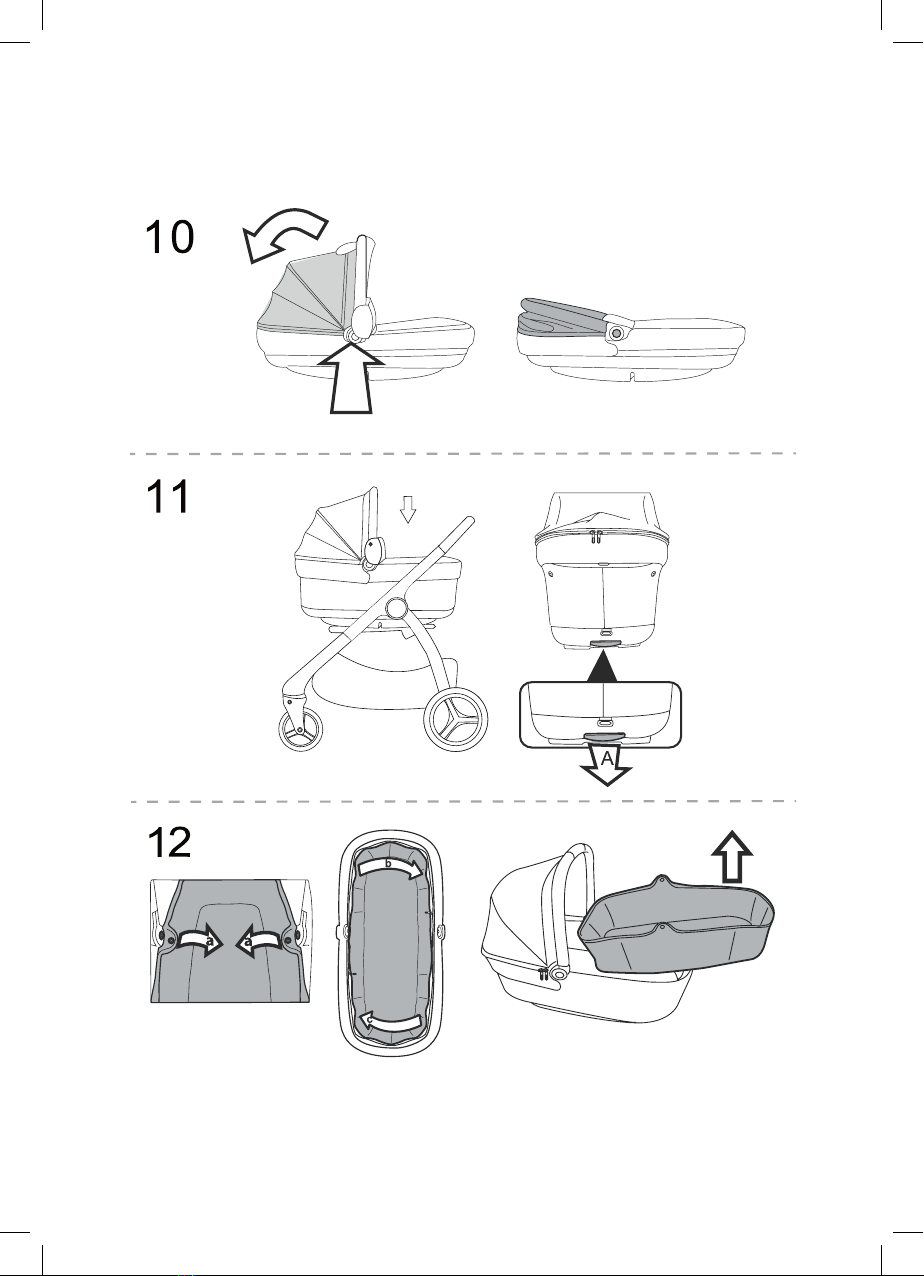
10.Rotate the handle downwards, pressing the two side buttons simultaneously.
Spazio System
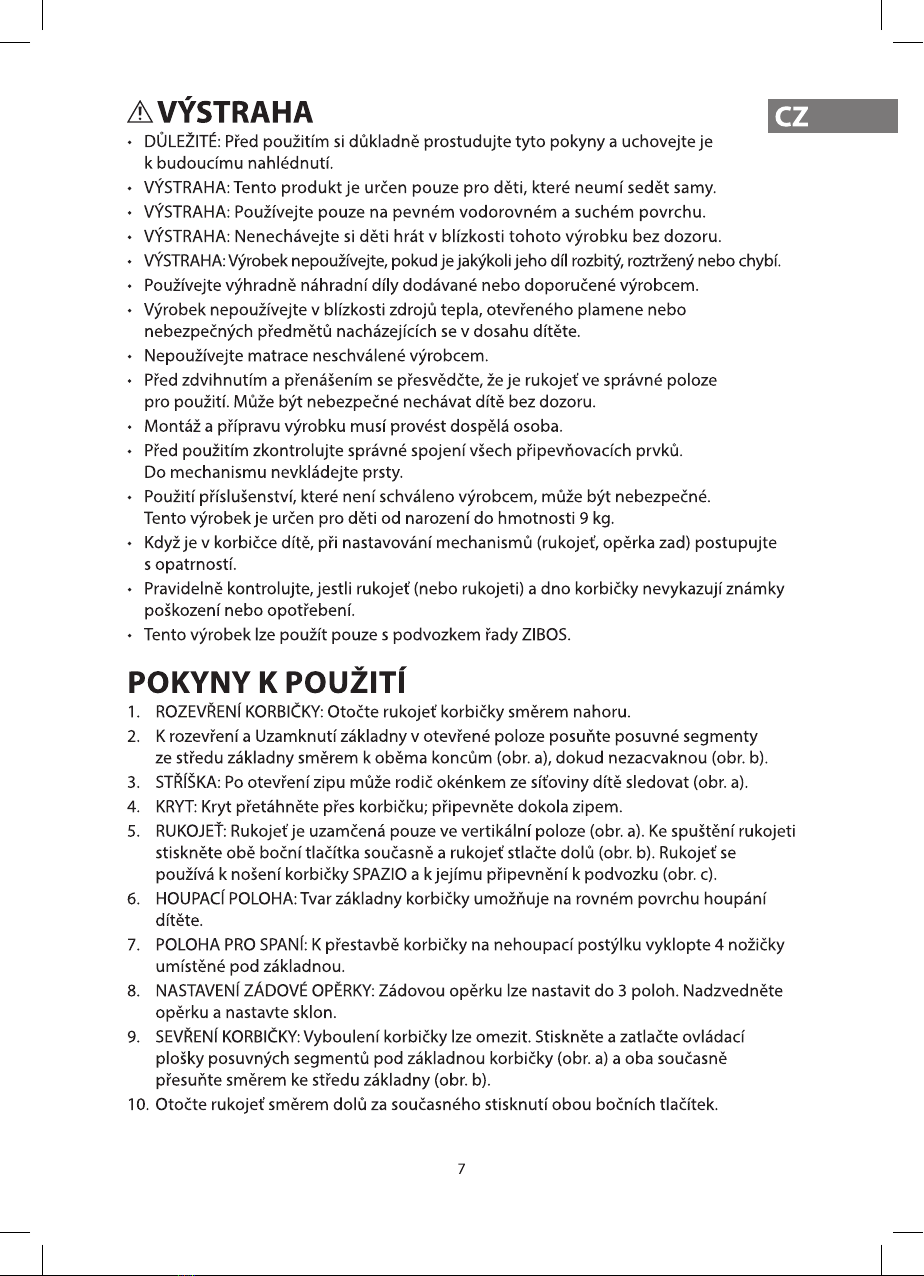
11.The carrycot can be fixed on the stroller or chassis.
To fasten the carrycot, position it on the chassis and press down with both hands until it clicks.
Always enable the brake on the chassis before fastening and unfastening the carry cot.
Ensure the carrycot is properly fastened.
To release it, pull the lever out (arrow _a) and lift the carrycot.
Removing the padding
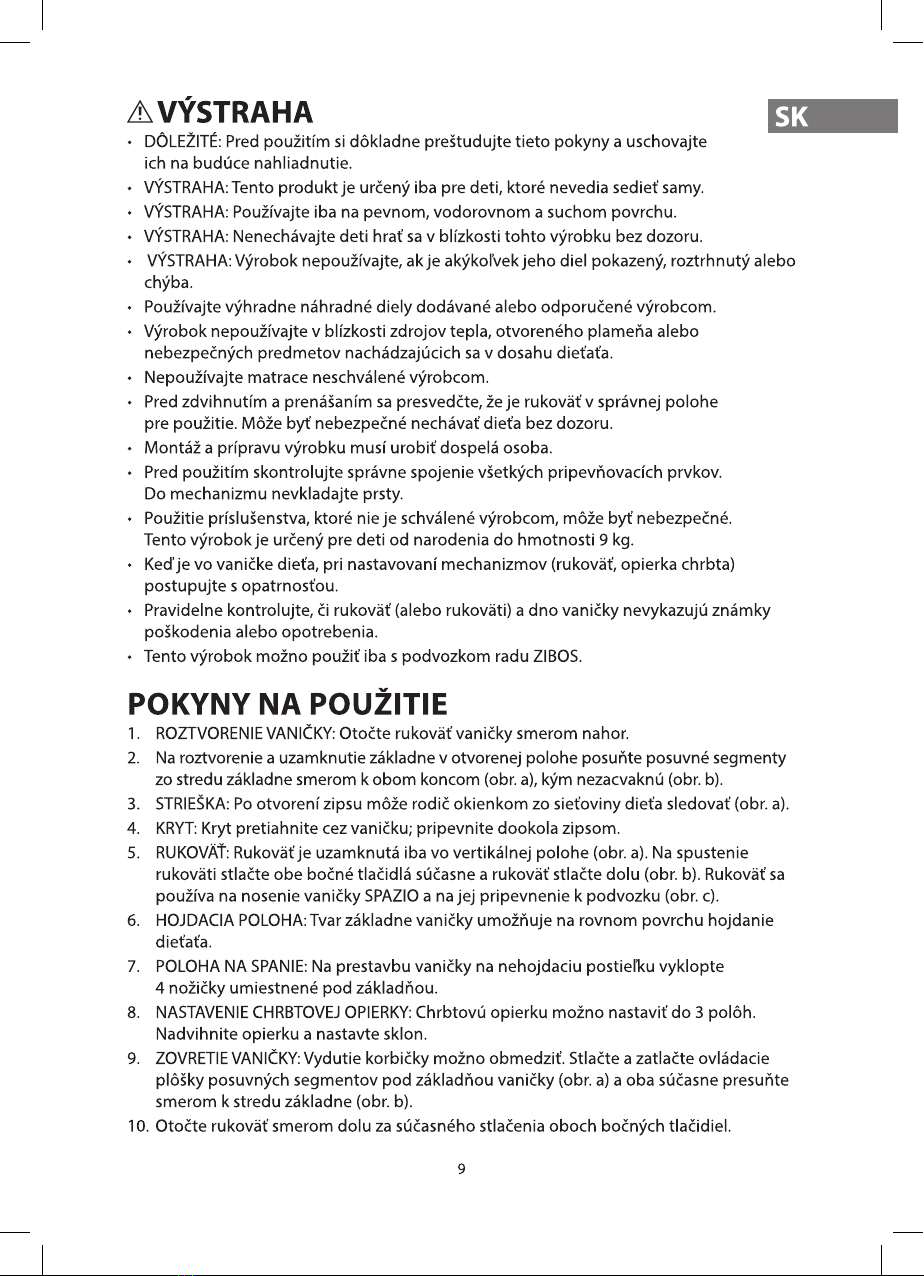
12. To remove the padding of the carrycot:
- Release the cover and remove it
- Inside the carrycot, open the zip all around (fig.a) and open the two zips as shown in figure b
and c, in order to remove the padding.
Padding cleaning instructions
Brush the fabric parts to remove dust and hand wash at a maximum temperature of 30° without
wringing.
Do not use chlorine bleach.
Do not iron.
Do not dry clean
Do not remove stains with solvents and do not tumble dry.
There are five symbols at the end of the manual.
Product cleaning
This product requires a small amount of maintenance.
Cleaning and maintenance must only be carried out by adults.
Keep all moving parts clean and if necessary lubricate them with light oil.
Clean the plastic parts periodically with a damp cloth. Do not use solvents or similar substances.
Brush the fabric parts to remove dust.
Protect the product from atmospheric agents: humidity, rain or snow. Extended exposure to
sunshine can cause color changes in many materials.
Store the product in a dry environment.
Accessories
BAG: Satchel with pad for changing baby’s diaper. Fasten to the chassis.
Serial number
Referr to the ZIBOS silver patch.
! AVVERTENZA
IMPORTANTE: Leggere attentamente le istruzioni prima dell'uso e conservarle per riferimento futuro.
ATTENZIONE: Questo prodotto è adatto solo per bambino che non possono sedersi senza aiuto.
ATTENZIONE: utilizzare solo al coperto, su superficie orizzontale e asciutta.
AVVERTENZA: non lasciate che altri bambini giochino incustoditi attorno al prodotto.
ATTENZIONE: Non usarlo, se una parte è rotta, strappata o mancante.
Utilizzare solo parti di ricambio fornite o approvato dal costruttore.
Non utilizzare il prodotto in prossimità di fonti di calore, fiamme o oggetti pericolosi alla portata del
bambino.
Non aggiungere materassi non sono approvati dal produttore.
Assicurarsi che la maniglia si trovi nella posizione corretta di impiego, prima di effettuare il
sollevamento della carrozzina.
Potrebbe essere pericoloso lasciare il bambino incustodito.
Montaggio e preparazione del prodotto devono essere effettuate da adulti.
Prima dell'uso, assicurarsi che tutti i meccanismi di attacco siano collegati in modo corretto.
Non inserire le dita nei meccanismi.
Potrebbe essere pericoloso utilizzare accessori non omologati dal costruttore.
Questo prodotto è stato progettato per i bambini dalla nascita fino a un peso di 9 kg.
Fare attenzione quando si regolano i meccanismi (maniglia, schienale) con il bambino presente.
Controllare regolarmente la maniglia (o le maniglie) e la parte inferiore del carrello per assicurarsi
che non vi siano segni di rottura o danneggiamento.
Questo prodotto può essere utilizzato con i telai ZIBOS.
Istruzioni per l'uso
1.APRIRE LA CARROZZINA: Ruotare la maniglia della carrozzina verso l'alto.
2. Aperire e bloccare la base in posizione aperta, spostare i cursori dal centro della base verso le
due estremità (fig. A) fino allo scatto in posizione (fig. B).
3.CAPPOTTA: Dietro la zip di apertura, un inserto in rete permette al genitore di monitorare il
bambino (Fig. A).
4.COPERCHIO: posizionare il coperchio sulla carrozzina; fissare la zip.
5.MANIGLIA: La maniglia è bloccata solo in posizione verticale (Fig. A). Per abbassare la maniglia,
premere i due pulsanti laterali contemporaneamente e spingerlo verso il basso (fig. B). La maniglia
è utile per trasportare la carrozzina e fissarla sul telaio (fig. C).
6.POSIZIONE DONDOLO: La base della carrozzina ha una forma che permette di cullare il suo
bambino, quando è adagiata sulla superficie piana.
7.POSIZIONE di RIPOSO: Per stabilizzare la carrozzina, estrarre i 4 piedini posizionati sotto la base.
8.REGOLAZIONE dello schienale: Lo schienale può essere regolabile in 3 posizioni. Basta agire sotto
lo schienale.
9.CHIUSURA: la carrozzina può essere chiusa per ridurre il suo ingombro. Premere e spingere le
linguette dei cursori sotto la base della carrozzina (Fig. A) e spostarli contemporaneamente verso il
centro della (b fig.) Base.
10.Ruotate la maniglia verso il basso, premendo contemporaneamente i due pulsanti laterali.
Carrozzina su Telaio
11.La carrozzina può essere fissato sul telaio del passeggino.
Per fissare la carrozzina, posizionarla sul telaio e premere con entrambe le mani finché non scatta.
Attivare sempre il freno sul telaio prima di fissare e sganciare la carrozzina.
Assicurarsi che la carrozzina sia ben fissata.
Per rilasciarla, tirare la leva su (freccia _a) e sollevare la carrozzina.
Rimozione della imbottitura
12. Per rimuovere l'imbottitura della carrozzina:
- Rilasciare il coperchio e rimuoverlo
- All'interno della carrozzina, aprire la cerniera tutt'intorno (Fig.A) e aprire le due cerniere come
mostrato in figura b, c, al fine di rimuovere l'imbottitura.
Istruzioni di pulizia imbottitura
Spazzolare le parti in tessuto per rimuovere la polvere e lavare a mano, ad una temperatura
massima di 30 °, senza strizzare.
Non usare candeggina.
Non stirare.
Non lavare a secco
Non rimuovere le macchie con solventi e non utilizzare l'asciugatrice.
Ci sono cinque simboli alla fine del manuale.
Pulizia del prodotto
Questo prodotto richiede una piccola manutenzione.
Pulizia e manutenzione devono essere eseguiti solo da adulti.
Tenere tutte le parti in movimento pulite e se necessario lubrificare con olio leggero.
Pulire le parti in plastica periodicamente con un panno umido. Non utilizzare solventi o sostanze
simili.
Spazzolare le parti in tessuto per rimuovere la polvere.
Proteggere il prodotto da agenti atmosferici: l'umidità, pioggia o neve. L'esposizione prolungata al
sole può causare cambiamenti di colore in molti materiali.
Conservare il prodotto in un ambiente secco.
Accessori
BORSA: Corredata di piano fasciatoio per cambiare i pannolini del bambino. Fissare al telaio.
Numero di serie
Far riferimento al distintico argentato ZIBOS.