ZOSI C309 User manual

Wire-Free Baery
Camera System
Please read the Quick Start Guide carefully before using the product and keep it properly.
Scan the QR code on the device via ZOSI Cloud App.
Please set a device password and keep it in mind (the original device password is blank):
Password is required for logging in to the device and remote viewing. It is recommended to write
down the password on the QSG for safekeeping.
V6.I.01.Z

Contents
EN 1 - 12
ES 13 - 24
FR 25 - 36
DE 37 - 48
IT 49 - 60
NL 61 - 72

01/What’s in the Box
1.1 Packing List of Base Staon Kit
2-cam:
Camera*2 Baery Pack *1
5V-2A Power Supply of Base Staon*15V -1A USB Charger+Cable*1
Quick Start Guide*1
Mounng Screw Bag*2 Mounng Base*2 Reset Needle*1 Screwdriver*1
1m Network Cable*1
Base Staon*1
4-cam:
Quick Start Guide
Baery Pack *1
5V-2A Power Supply of Base Staon*1
Quick Start Guide*1
Reset Needle*1 Screwdriver*1
1m Network Cable*1
Quick Start Guide
Camera*4
5V -1A USB Charger+Cable*1
Mounng Screw Bag*4Mounng Base*4
Base Staon*1
1

1m Network Cable*1Baery Pack *1
1.2 Packing List of NVR Kit
4-cam:
Camera*4
12V-2A Power
Supply of NVR*1
5V -1A USB
Charger+Cable*1
Quick Start Guide*1
Mounng Screw Bag*4 Mounng Base*4 Reset Needle*1 Screwdriver*1
USB Mouse
NVR*1
8-cam:
Quick Start Guide
1m Network Cable*1
Baery Pack *1
Camera*8
12V-2A Power
Supply of NVR*1
5V -1A USB
Charger+Cable*1
Quick Start Guide*1
Mounng Screw Bag*8Mounng Base*8 Reset Needle*1 Screwdriver*1
USB Mouse
NVR*1
Quick Start Guide
2

2.1 Camera
Camera`s network indicator status:
Blue light and red lights on: The camera is being previewed remotely
Blue light on: The camera is paired or woken up
Blue light flashes connuously: Upgrading
Red light flashes slowly: Waing to pair with base staon
Red light on: Low baery
Blue light and red lights off: In Standby
Camera Buons:
Long press power switch for 3 seconds: Power-on/Power-off
Long press reset buon for 3 seconds: Reset to enter pairing state (The red light flashed
slowly aer the voice prompt)
02/Specificaon & Interface Descripon
①Antenna
②HD Lens
③Infrared LEDs
④Microphone
⑤Network Indicator
⑥PIR Sensor
⑦White LED Spotlight
⑧Adjusng Screw
⑨Release Buon
⑩Power Switch
⑪Loudspeaker
⑫Charge Indicator
⑬Micro SD Card Slot
⑭Retaining Screw
⑮Reset Buon
⑯Micro USB Port
3

2.2 Base Staon
2.3 NVR
①Antenna
②Micro SD Card Slot
③Pairing Buon
①Antenna
②3.5mm Audio Output
③VGA
④HDMI
⑤RJ45 Ethernet Port
⑥USB Port
⑦Power Port
④Reset
⑤RJ45 Ethernet Port
⑥Power Port
⑦Loudspeaker
⑧Network Indicator
⑨Camera Status Indicator
4
RESET DC 5V
LAN
Micro SD SYNC
NET
1
2
3
4

03/Download ZOSI CLOUD App
3.1 Search “ZOSI CLOUD” in App Store or Android Market, or scan the
QR code below to download on your smartphone (please grant the App
to obtain the corresponding permission for the first me use,
otherwise, it will cause the device fails to add, or when the camera
triggers moon detecon or alarm, the mobile phone cannot receive
the alarm push.)
Note: iOS Version required iOS 9.0 or above. Android Version requires
5.0 or above.
3.2 Register an Account
New user need to sign up by email or phone number, tap “Sign Up” and
follow the instrucons to sign up and log in.
5

04/Add Device
●4.1 Add Base Staon to APP
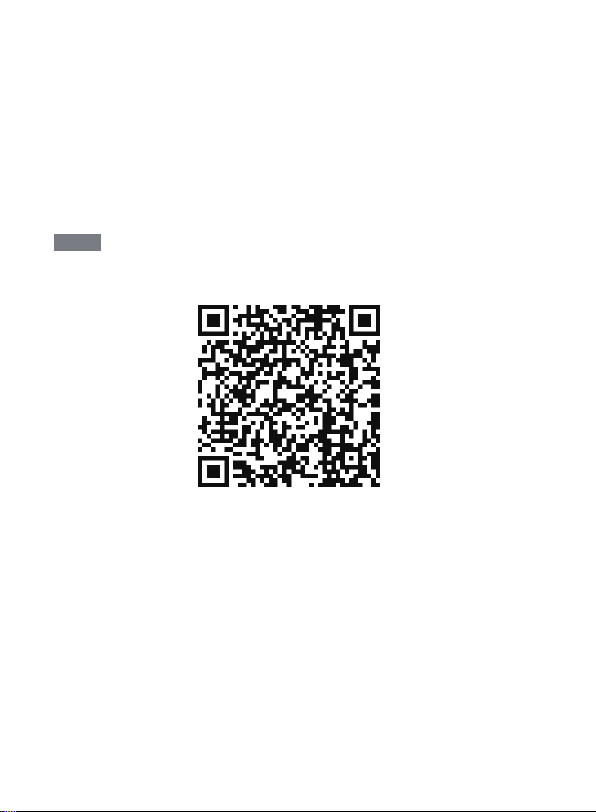
●4.1.1 Plug in base staon, connect the base staon to the router
connected to WAN with a Ethernet cable. And then scan QR code on
the base staon with your mobile phone and follow the prompt to add
devices. You can also scan and add in LAN (please ensure your mobile
phone and base staon are in a same LAN). Cameras paired with the
base staon will directly display on the device list aer the base staon
is successfully added.
Note: Please insert Micro SD card into the base staon before power-
ing on, otherwise the device cannot correctly read the memory card.
●4.1.2 Pair Cameras with Base Staon
Note: Baery cameras have been paired with the base staon, no
pairing is required. But if the pairing informaon between the camera
and base staon is cleared, you need to re-pair the devices, and follow
the steps below:
1) Place the cameras near the base staon at a distance of 30~100cm.
2) When the baery camera is turned on, press and hold the reset
buon for 3-5 seconds and you will hear a voice prompt from the
camera “Reset succeed, start pairing.” And then press and hold the
base staon pairing buon for 3-5 seconds and you will also hear a
voice prompt from base staon and start pairing. Aer that, both of the
cameras and the base staon will give out a voice prompt to indicate
that pairing succeed.
●4.2 Add the NVR to APP
●4.2.1 Connect NVR to Internet with an Ethernet cable aer plugging
in NVR, and then scan the QR code on NVR with your mobile phone and
follow the prompts to add devices. You can also scan and add in LAN
(please ensure your mobile phone and NVR are in a same LAN). Camer-
as paired with NVR will directly display on the device list aer NVR is
successfully added.
Note: Please install hard disk into NVR before powering on, otherwise
the device cannot correctly read the hard disk.
6

●4.2.2 Pair Cameras with NVR
Note: Baery cameras have been paired with the NVR, no pairing is
required. But if the pairing informaon between the camera and NVR
is cleaned, you need to re-pair the devices, and follow the steps below:
1) Place the camera near the NVR at a distance of 30~100cm.
2) When the baery camera is turned on, press and hold the reset
buon for 3-5 seconds and you will hear a voice prompt from the
camera “Reset succeed, start pairing.” And then turn on pairing
funcon of the NVR to add cameras. Aer that, the cameras will give
out a voice prompt to indicate that pairing succeed.
●4.3 Alarm, Preview, Playback and Device Sharing
●4.3.1 Click the App pushed or the Message icon in the App to check
the details of alarms.
●4.3.2 Click the Play icon on the device list and enter the preview
interface to enjoy live view and 2-way audio, etc.
●4.3.3 Click Playback or Cloud icon to view the recorded video on
device or on Cloud. NOTE: Cloud services need subscripon before use.
●4.3.4 Click Share icon to share cameras with others.
7

8
05/Camera Installaon
●5.1 You can place it on any flat surface: table, chair, floor etc..
●5.2 Install with Wall Mount
●5.2.1 Drill 5 holes according to the posion of mounng base,
and mount the base on the wall with the included pack of screws.
●5.2.2 Lock the two slots on the camera base to the hooks on
mounng base.
Install Mounng Base
Aach the Camera

●5.2.3 Screw your camera to the mounng base.
9
●5.2.4 Screw the baery pack at boom.
Screw the Camera
●5.2.5 Use the included screwdriver to adjust the camera to a proper
angle and ghten the adjustment screw.
Adjust camera angle

10
6.1 To reduce false alarms, please note:
-Do not install the camera in a place facing bright light, including
sunshine, bright lamp light, etc.
-Do not place the camera too close to a place where there are
frequently moving vehicles. Based on a series of tests, the recommend-
ed distance between the camera and vehicle is 15 meters (55).
-Stay away from air outlets, including air condioner, humidifier,
temperature converters, etc.
-Keep the camera at least 1 meter away from other wireless devices,
included WiFi routers and phones, in order to avoid wireless interfer-
ence.
6.2 Covering the Monitoring Area:
It is not recommended that the PIR sensor face the moving object
vercally when installing the camera, otherwise it may not be able to
detect the moon event.
It is suggested to adjust the angle between PIR sensor and detected
object larger than 10°.
06/Important Notes for Reducing
False Alarms

11
It is not recommended that the
PIR sensor face the moving object
vercally.
The path of the moving object
angle >10°
Ideal range of visibility:
2-10m (7-33)

12
07/Troubleshoong
1.Fail to Connect Internet
Please ensure that the mobile phone, camera and router are placed
close enough.
Please note that camera do not support connecng to a 5G router.
Check if the name and password of the router were correct.
Check the network seng of wireless NVR and base staon.
2.Device Offline
Check the Internet connecon of the router.
Check the connecon of NVR/base staon with router and the connec-
on of the NVR/base staon with cameras. If the router and the WiFi
password are changed, you need to reconfigure the network.
Check whether the camera baery has run out and you can plug it in
and try again.
3.No Preview
The server may be congested, try restarng the App and try again.
4.No App Push
Please make sure that the App has noficaon permissions.
Please confirm that the “Alert Push Noficaon” opon has been
turned on in the App sengs.
Please confirm that the “Alert Push Noficaon” opon has been
turned on in the camera sengs.
5.No recording
Please insert Micro SD Card before powering on.
Please make sure the camera PIR is turned on.
Please confirm the “Record” opon is turned on.
Please check the record sengs of NVR.
Please check whether the SD card status is normal in the App.

01/Lista del envío
13
1.1 Lista del envío del kit de estación base
Kit con 2 cámaras:
2* Cámara 1* Batería
1* Transformador 5V-1A para estación base1* 5V-1A Cargador
1* Manual
2* Bolsa de tornillos2* Base de montaje 1* Aguja pin 1* Destornillador
1* 1m Cable de red
1* Estación base
Kit con 4 cámaras:
Quick Start Guide
4* Cámara 1* Batería
1* Transformador 5V-1A para estación base1* 5V-1A Cargador
1* Manual
4* Bolsa de tornillos4* Base de montaje 1* Aguja pin 1* Destornillador
1* 1m Cable de red
1* Estación base
Quick Start Guide

1* 1m Cable de red1*Batería
1.2 Lista del envío del kit NVR
Kit NVR con 4 cámaras:
Kit NVR con 8 cámaras:
4* Cámara
1* Transformador
12V-2A para NVR1* 5V-1A Cargador
1* Manual
4* Bolsa de tornillos4* Base de montaje 1* Aguja pin 1* Destornillador
1* Ratón
1* NVR
Quick Start Guide
1* 1m Cable de red
1*Batería
8* Cámara
1* Transformador
12V-2A para NVR1* 5V-1A Cargador
1* Manual
8* Bolsa de tornillos8* Base de montaje 1* Aguja pin 1* Destornillador
1* Ratón
1* NVR
Quick Start Guide
14

15
2.1 Cámara:
Descripción de luz indicadora de red:
Luz azul y luz roja siempre encendida: la cámara se está viendo de forma remota
Luz azul siempre encendida: la cámara se emparejó o acvó correctamente
Luz azul parpadea connuamente: actualizando
Luz roja parpadea de forma connua y lenta: esperando el emparejamiento con la estación base
Luz roja siempre encendida: batería baja
Luz azul y luz roja siempre apagada: en espera
Descripción del botón de la cámara:
Mantenga presionado el botón de encendido durante 3 segundos: encendido o apagado
Mantenga presionado el botón de reinicio durante 3 segundos: reinicie e ingrese al estado de
emparejamiento (la luz roja parpadea de forma connua y lenta después del tono de aviso)
02/Detalles del producto y descripción de puertos
①Antena
②Lente
③LED IR
④Micrófono
⑤Luz indicadora de red
⑥PIR
⑦Luz blanca de alarma
⑧Tornillo de ajuste de ángulo
⑨Posición de extracción de la batería
⑩Botón de encendido
⑪Altavoz
⑫Luz indicadora de carga
⑬Ranura para tarjeta micro SD
⑭Tornillo de fijación de la batería
⑮Botón de reinicio
⑯Puerto de carga de la batería

16
2.2 Estación base
2.3 NVR
①Antena
②Ranura para tarjeta SD
③Botón de emparejamiento
④Botón de reinicio
⑤Puerto del cable de red RJ45
⑥Puerto de alimentación
⑦Altavoz
⑧Luz indicadora de red
⑨Luz indicadora de estado de cámaras
RESET DC 5V
LAN
Micro SD SYNC
NET
1
2
3
4
①Antena
②Puerto 3,5 mm de salida de audio
③VGA
④HDMI
⑤Puerto del cable de red RJ45
⑥Puerto USB
⑦Puerto de alimentación

17
03/Instalar la aplicación ZOSI CLOUD
3.1 Busque "ZOSI CLOUD" en la App Store o en el mercado de aplicaciones
de Android para descargarla, o escanee el código QR a connuación para
descargar. (Para el primer uso, por favor permita que la aplicación obtenga
los permisos correspondientes. Si no está permido, hará que el disposi-
vo no se añada, o cuando la cámara acve la detección de movimiento o la
alarma, el móvil no puede recibir la noficación de alarma.)
Nota: el sistema de móvil de Apple requiere iOS 9.0 o superior, y el sistema
de móvil Android requiere Android 5.0 o superior.
3.2 Registro de cuenta
Los nuevos usuarios deben registrarse por correo electrónico. Haga clic
en el botón "Registrarse", y siga los pasos para completar el registro de
la cuenta e iniciar sesión.
ZOSI CLOUD

4.1 Añadir la estación base a la aplicación
4.1.1 Después de alimentar la estación base, conecte la estación base al
enrutador con un cable de red, luego escanee el código QR en la estación base
con el móvil, y siga las instrucciones de la aplicación para añadir el disposivo.
También puede añadir el disposivo con la función Búsqueda LAN (este
método debe garanzar que el móvil y la estación base estén en la misma red
de área local), después de que la adición sea exitosa, las cámaras que se han
emparejado con la estación base se mostrarán directamente en la lista de
disposivos.
Nota: inserte la tarjeta de memoria en la estación base antes de encenderla;
de lo contrario, el disposivo no podrá leer la tarjeta de memoria con
normalidad.
4.1.2 Emparejamiento de cámara y estación base
Nota: la cámara con batería en el kit se ha emparejado con la estación base de
antemano, no se requiere el emparejamiento. Si se borra la información de
emparejamiento entre la cámara y la estación base, es necesario volver a
emparejar el código, los pasos son los siguientes:
1) Coloque la cámara cerca de la estación base, a una distancia de 30 ~ 100
cm.
2) Cuando la cámara esté encendida, presione y mantenga presionado el
botón de reinicio durante 3-5 segundos. Después de escuchar el mensaje de
voz de la cámara, presione y mantenga presionado el botón de emparejamien-
to de la estación base durante 3-5 segundos. En este momento, la estación
base también emirá un tono y comenzará el emparejamiento. Después de
que se haya emparejado correctamente, tanto la cámara como la estación
base emirán indicaciones de voz para indicar que el emparejamiento del
código se ha realizado correctamente.
4.2 Añadir el NVR a la aplicación
4.2.1 Después de alimentar el NVR, conecte el NVR al enrutador con un
cable de red, luego escanee el código QR en el NVR con el móvil, y siga las
instrucciones de la aplicación para añadir el disposivo. También puede
añadir el disposivo con la función Búsqueda LAN (este método debe
garanzar que el móvil y el NVR estén en la misma red de área local),
después de que la adición sea exitosa, las cámaras que se han empareja-
do con el NVR se mostrarán directamente en la lista de disposivos.
18
04/Añadir el disposivo a la aplicación
Other manuals for C309
1
Table of contents
Languages:
Other ZOSI Digital Camera manuals