Zublin Swiss Garde 360 Presence DALI Master A-Comfort... User manual

User manual
360° sensor.
Art.-Nr. 26001, 26002, 26003, 26004
Swiss Garde 360 Presence
DALI Master 16m
Swiss Garde 360 Presence
DALI Master RA 16m
Swiss Garde 360 Presence
DALI Master RA 30m
Swiss Garde 360 Presence
DALI Master 30m
available
accessories:
DALI remote

Important informations
- Work on the mains may only be carried out by specialists.
-The installation must be carried out in accordance with the national standards.
- Disconnect the 230 volt power supply each time before starting to install!
-The detector is always supplied with a fuse (250VAC, 10A)
Type C, to be provided as a protective measure in accordance with EN60898-1.
-The device must not be installed on conductive surfaces.
-The detector is only suitable for indoor use
-To ensure the functioning of the detector bulbs installed at the same height are a
minimum distance of 1m.
-Lights which are below the detector and in the detection area
positioned can lead to malfunctions (light never torn off, or on/off .
-Should malfunctions such as steady light, independent on and
turn off occur, see page 7 ‘’ Troubleshooting ’’.
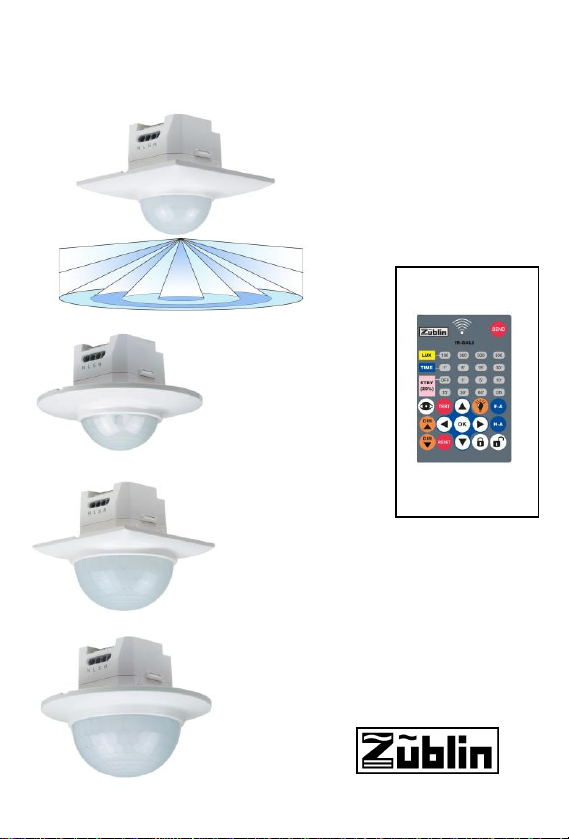
Function
The detector reacts to heat misplacement (positive or negative in relation to the
environment). If a person approaches the monitored area, the connected lamp is
automatically switched on.
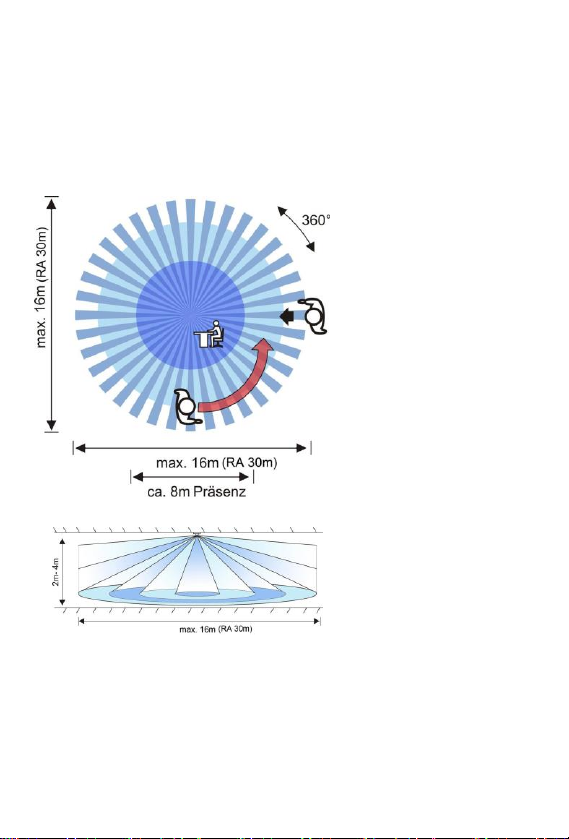
If it leaves the area, it is switched off again after an adjustable time of 10 seconds
to 20 minutes.
The connected light is only switched on when the natural brightness falls below
the value set on the device, the artificial light is regulated and thus the mixed light
lighting is kept constant.
The artificial light is automatically switched off again as soon as the natural
brightness value is exceeded. This activates the additional power saving function
when there is enough natural light.
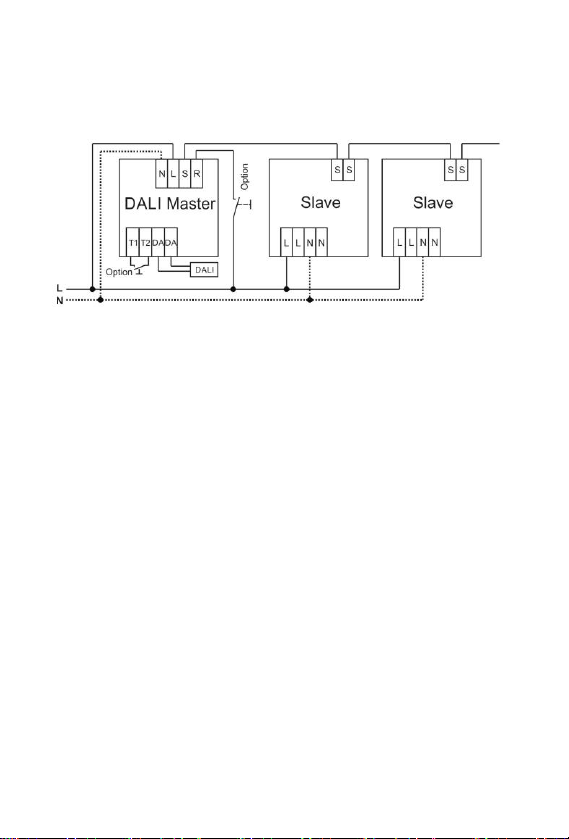
Installation
Phase / outer conductor (L); Neutral / neutral (N);
Switching output DALI 2-pole broadcast, constant light control (DA / DA)
Optional terminals:
S: Connection of slave detectors (max. 10 pieces)
R: by means of (supplying the phase) pulse button (use without glow lamp!), Or
by means of a potential-free button between T1 / T2, the light can be switched on
or off and dimmed. Keep the cable short!
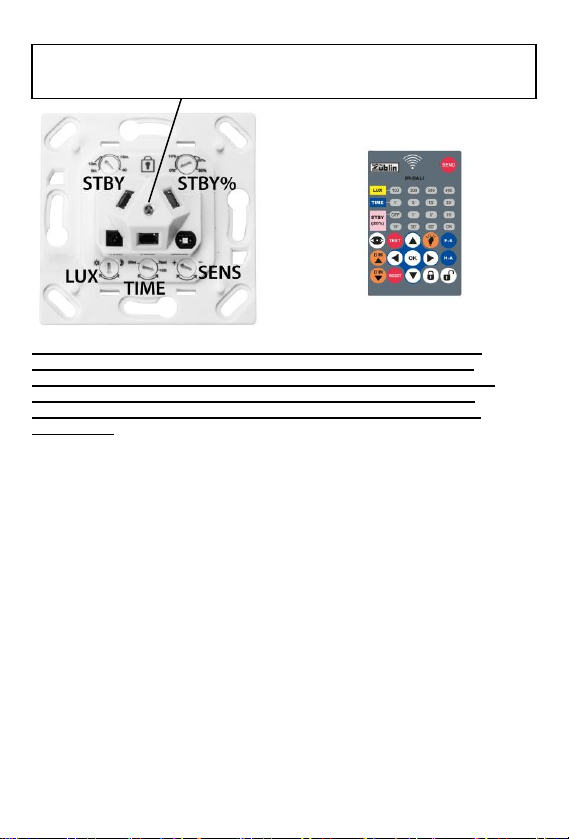
Screw the device into the inlet socket. The detector is ready for use approx. 1
minute after connection to the mains. Then set the controls or use the handheld
transmitter.
Mechanical changes in controller values are only accepted by the detector during
operation. Then put the lens on (lens must be installed otherwise the device will
not switch off).
2

Wiring
Standard installation;
Optional "S" connection for connecting slave detectors; Optional button
connection "R" or T1 / T2 for manual switching on or off or dimming of
the light
Push button function
Light on / off: press button for approx. 1 second
(On / off duration = last acquisition + set time)
Dimming: Press and hold the button for> 2 seconds, the lighting is
dimmed up or down or vice versa when the button is pressed again.
The newly set artificial brightness value of the luminaire remains
constant, but is not saved. When the luminaire is switched on again,
the originally set mixed light brightness value is restored.
If a new mixed light value is required, the LUX (or via hand transmitter)
must be set/readjusted on the device.
Description of semi-automatic operation:
(Operation selection via hand transmitter, see instructions for use of
the DALI hand transmitter)
In semi-automatic mode, the detector or the light is only activated /
switched on by pressing the wall button (power supply at terminal R, or
potential-free contact between T1 / T2) or the light ON / OFF button on
the hand transmitter.
After the light has been switched off, the detector can only be activated
/ switched on again by pressing the button (or the lamp button on the
handheld transmitter).
3

VR’s
SENS (sensitivity / range)
Range controller Max = approx.16m (30m RA) diameter
If the detector is too sensitive (occasional switch-on even though
"nobody" is in the detection area, e.g. in stairwells / chimney effect), the
sensitivity of the detector can be adjusted with this controller.
TIME
The timer can be used to determine how long the light stays on after
the last movement in the detection area. Min. Delay approx. 10
seconds to max. approx. 20 min.). Recommended setting: approx. 10
min in offices.
Test = Check the detection area with a short
Follow-up time (3s on, 6s off)
4
LED, flashes 1x when it is detected, 3x when a command has been
received from the handheld transmitter.
Caution! The values can be set on the detector using a controller or
DALI handheld transmitter. If a detector has been set using a hand
transmitter, each controller can be activated individually by re-setting
the respective controller, or all controllers together using the reset
button on the hand transmitter (see instructions for use of the hand
transmitter).
Zubehör: DALI Handsender.

LUX (twilight sensor)
The twilight sensor regulates the response threshold (light value) of the
detector, from which the detection is activated, and specifies the mixed
light value for constant light control. Turning towards the moon
(approx. 5 lux) means that the sensor only switches on the light when it
is dark (max, 2000 lux, maximum lighting, daylight control over the
whole range!).
Recommended setting: in the office area approx. 500 lux.
STBY (orientation light run-on time)
After the run-on time (set with the TIME controller), basic lighting /
orientation light can be switched on for 5, 10, 15min, or permanently.
(selectable via hand transmitter 1, 5, 10, 15, 30, 60min, or permanent
basic lighting at 20% intensity)
STBY% (orientation light intensity)
The orientation light brightness can be selected as 10%, 20%, 30%
(0% = no orientation light)
The effective lighting brightness depends on the lamp and ballast and
can vary depending on the make and type.
5

Detection range
The 360 ° all-round detection area and the dense detection network
guarantee optimal function. The range depends on the mounting height
and walking direction.
As the detector detects the temperature difference between
If the heat source and the ambient temperature react, the range can
vary depending on the situation at the installation site (floor heating,
etc.).
Top view
Side view
6
Detektion frontal
Not sensitive
Distanz = ca. -50%
Detection tangential
= SENSITIVE

Troubleshooting
Problem Cause / Redemption
Lamp does not turn on: - Twilight value set too low
- Check the lamp from the lamp
- Check mains voltage / fuse
Turns on without reason -Check the detection area for sources
or does not turn off: which may causes detections: (draft,
animals, heating, etc.) can cause
incorrect switching
-The detector is too sensitive,
reduce the range with the
Range regulator and / or glue
the interference area on the lens with
adhesive tape.
-Check the distance to the lamp
(Heat reflection or more direct
Exposure to light)
Turns on at power- -Install a varistor between L-N
surges:
Light turns off although -Increase timer-value
Someone is in the detection
area:
Although lamps are set by By wall-switch, the artificial light can
wallswitch higher, light only be set once to a fixed value.
Is again after turning off-on If the mixed light-value has to be set
too dark to a new level, the LUX-value has to be
readjusted by VR or remote.
Switches on during the day: - Twilight value set too high
(Set lux potentiometer against the moon)
With the lux controller, the constant
Mixed light value set
After connection to the network:
The electronics take approx. 1 minute to be ready for operation!
7

Technische Daten
Nominal voltage: 230 volts / 50Hz
Switching output: DALI 2-pole broadcast, constant light control
Max. 50 ballasts
Slave connection: max. 10 slave devices, 100m total cable
Time setting: approx. 10 seconds to 20 minutes
Twilight controller: 5-2000 lux, mixed light measurement
Push button connection: control light on / off and dimming
Orientation light: 5, 10, 15min, permanent at 10%, 20%, 30%
via hand transmitter 1, 5, 10, 15, 30, 60min,
permanent at 20%
Detection area: ceiling mounting
(at mounting height): 2.5m = max. 5m (12m version RA30m) radius
3.0m = max. 6m (13m version RA30m) radius
3.5m = max. 7m (14m version RA30m) radius
4.0m = max. 8m (15m version RA30m) radius
Installation height: 2 to 6m (presence det. at inst. height 2-4m)
(30m version) 2 to 8m (presence det. at inst. height 2-4m)
Dimensions
(visible dimensions): 86x86x 35mm (50mm: 30m version)
RA design: Ø 105 x 35mm (50mm: 30m version)
Protection: IP 20, class II
Do not dispose of electrical equipment in
the household waste, use the community
collection points, or return the old device
to the seller.
Niko Schweiz AG, Leutschenbachstrasse 95, CH-8050 Zürich
Niko Deutschland GmbH, Warmbacher Strasse 80, DE-79618 Rheinfelden
Niko nv, Industriepark West 40, BE-9100 Sint-Niklaas
www.niko.eu/zublin
8Art.-Nr. 26001, 26002, 26003, 26004
Other manuals for Swiss Garde 360 Presence DALI Master A-Comfort...
2
This manual suits for next models
7
Other Zublin Accessories manuals
Popular Accessories manuals by other brands

unotec
unotec 10H quick start guide

Benchcrafted
Benchcrafted Drawnknife Hone-O-Matic Drawsharp manual

Belkin
Belkin SPORTCOMMAND FOR IPOD user manual

VAF instruments
VAF instruments Viscosense 3 Instructions for installation, operation care and maintenance

NuAire
NuAire DRI-ECO-CO2 installation manual

Zte
Zte RSU82 S1900 Hardware installation