ZupAir ZULU User manual

1
ZupAir
ZULU
OWNER’S MANUAL

2
Introduction
Thank you for purchasing the ZupAir Zulu. This glider has excellent
performance, a terrific speed-range, responsive handling and great aerobatic
capability. A true multi-use glider that can fly well at almost any site with almost
any skill level. The wings can easily detach after flying, making this 1. Meter ( 9
inch) model easy to transport. If you don’t have your Zulu flying already, final
assembly is a breeze, thanks to the molded airframe and pre-assembled
components. We think you will
enjoy whatever you do, with your Zulu!
Specifications
Wingspan 1.5 meters 59 inches
Wing area 36.0 dm2 556 in2
Flying weight 510 gm 18.0 oz
Wing loading 14.1 gm/dm2 4.6 oz/ t2
Aspect ratio 6.35
Air oils Zup1060 and Zup1065
Control sur aces elevons and drooperons
Servos required 2
Skill level Any
Assembly time Less than an hour
Recommended radio gear
Transmitter elevon mixing capability & dual
rates
Receiver standard, 2+ channels
Two Servos Emax ES09MD, ES3352
Hitec HS-65 or similar
(2kg/cm or more torque)
Battery NiMH, 900 mAh square-pack
Other Two 12-in servo extension wires
Contents (Kit and ARF versions)
Wing halves with carbon spars embedded
Fuselage with motor-mount and nosecone
Tail in
Fiberglass joiner rod
Installed control horns
pushrods and clevises
ARF version only: ES09MD servos with
extended wires

3
Construction
The Zulu is made of Expanded Polyolefin (EPO), which is a combination of EPP
(Expanded Polypropylene) and EPS(Expanded Polystyrene), giving it structural
rigidity with enough flexibility to resist permanent dents. The Carbon spars have
already been installed and glued in place.
Controls
The Zulu uses four control surfaces that are driven by only two servos. The aft
surfaces are elevons (elevator and aileron), and the forward surfaces are
drooperons (leading-edge droop and aileron). The drooperons give the Zulu a
lower stall-speed, allowing for improved minimum sink-rate and tighter turns.
When inverted, the surfaces deflect the opposite directions, automatically giving
this same benefit. The drooperons also increase roll-rate, prevent tip-stalls and
open up a wider range of aerobatic maneuvers. Tight outside loops, a stable
deep-stall maneuver and an impressive continuous tumble are in the inventory of
crowd pleasers.
Recommended Building Materials
• Glue for servo installation: Beacon's Foam Tac, Beacon's Quick Grip, hot glue
(with glue gun), Homax Welder, UHUpor, -minue epoxy, or other EPO safe
glues
• Glue for fin installation and general EPO repairs: Beacon's Foam Tac
• Small and medium-size Phillips screwdrivers
• Razor blades
• Sand paper
• Small weights for balancing
Warning: This radio-controlled model is not a toy. It is capable of causing bodily injury and property
damage. It is the buyer’s responsibility to build this kit correctly and use it in a responsible manner. Initial test
flights should be made with the assistance of an experienced /C flyer. The model must always be operated
and flown in accordance with the safety standards of the Academy of Model Aeronautics and the Federal
Aviation Administration.

4
Assembly
1. Sand the join area to remove mold release agent, then bond the fin to the
fuselage with Foam Tac or other foam glue.
2. The servo pockets were sized for
ES09MD servos, and measure 23 x 12 x
24. mm. If your servos are larger, use
a hobby knife to increase the pocket
size. For smaller servos, fill the gaps
with spare foam, balsa wood, etc.
3. Hook up your servos to your receiver and set the trims on your transmitter to
neutral. Attach the servo arm so that it points away from the wing surface at
roughly 90°, as shown below.
4. Connect the elevon pushrod near the middle of the servo arm, and the
drooperon pushrod one hole above (more travel). Attach the other end of the
linkages to the control horns, using the outer-most holes.
Front
elevon
pushrod
drooperon
pushrod

5
. Bend the wire on the pushrods to give clearance between the clevises and
EPO. Remove EPO with a hobby knife if there are clearance issues. Bending
the wire for the drooperons is worthwhile even if there are no clearance issues,
as the bend provides some protection for the servo from drooperon impacts.
6. Twist the plastic clevises so that the elevon and drooperon are approximately
in their neutral positions (0° for level flight). Once the wing is joined with the pod,
you will be able to do this more precisely by aligning the control surfaces with the
pod’s continuation of these surfaces.
7. Using your transmitter, check the deflection of the control surfaces. Typical
pitch inputs should only be ±1 °, and roll deflections of ±30°. The drooperon
should deflect approximately the same angle (but opposite direction) as the
elevon. If this isn’t the case, use different holes on the servo arm or control
horns.
b
end up
trim away
EPO
foam if needed

6
8. Once you are satisfied with your
control setup, bond the servos in place.
9. Using the black decals and tape,
secure the servo-wire in the slot.
10. Using a hobby knife or sand paper, file down the ends of the carbon joiners
to make for an easier fit.
11. Thread the servo extension wires from the wing junctions to the canopy.
Insert the 6mm carbon joiner tube and slide the wings into the pod.
12. Lock the wing in place with a screwdriver. If you plan on doing discus
launches, tape may also be necessary to keep the wings from sliding apart.

7
13. Install the battery and receiver.
To prevent ejecting the battery in
flight, either put an extra security
strap around the canopy, or lock the
battery in place with glue or Velcro.
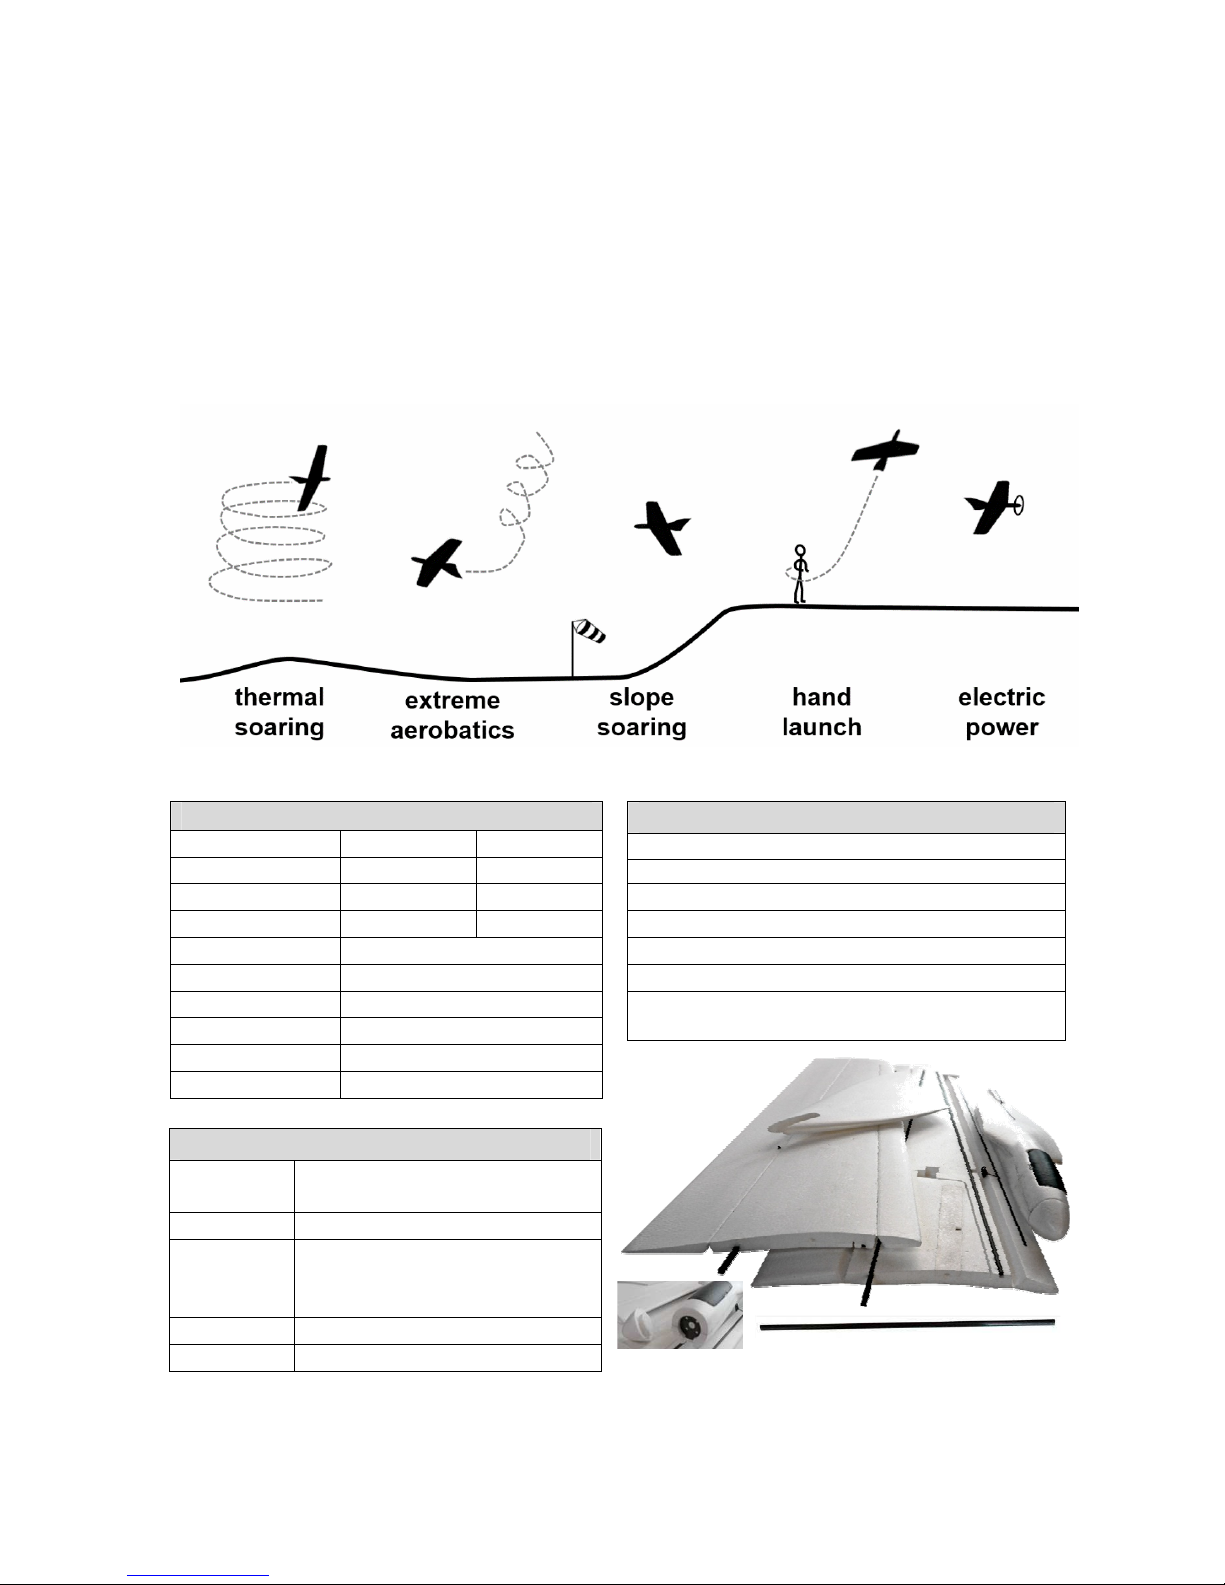
14. A good starting-point for the CG
is at the end of the center-rib, as
shown to the right. Advanced flyers
may want the CG 3- mm behind
this point. Add weights to the nose
or tail to balance.
Radio Setup
Small adjustments on your transmitter can significantly improve the handling of
your Zulu. Here are some recommendations to get started with:
Exponential, or Expo” makes small stick inputs less sensitive than large inputs.
The Zulu has large control surfaces that make it easy to over-control the aircraft.
0% expo for pitch and roll is a good starting-point.
Dual rates, will swap control deflections from full throw and some reduced travel
setting. On the Zulu, it works nicely to have a “regular flying mode”, where pitch
inputs are limited to ±1 °, and an unlimited setting for deep-stalls and aerobatic
maneuvers.
Aileron Differential is typically used on conventional aircraft to make the "up"
moving aileron move more than the "down" moving aileron. The Zulu rolls best if
the “up” and “down” moving elevons move about the same amount. You can
use the differential setting to tune this, and it typically requires a negative
differential value. If this option isn’t available on your transmitter, you can create
this effect mechanically:
1. Remove your servo arms and rotate them so they are angled back about 15°.
2. Reattach the servo arms and adjust the clevises (shorter in the rear, longer in the
front) to bring the control surfaces back to the trim settings.
Trimming
With the controls set to neutral, and rates set low, give the Zulu a toss on a lawn.
After trimming pitch and roll with your transmitter, adjust the drooperons back to
neutral (aligned with the fixed wing-tip) by twisting the clevises or bending the
pushrods.
CG

8
Soaring
Keeping the Zulu aloft only by the power of natural rising air
can be very rewarding. Slope lift is the easiest form of
soaring, but not everyone is fortunate enough to live near a
ridge with consistent wind. The Zulu can also use thermals,
or columns of warm rising air to gain altitude.
Deep Stall
The Zulu needs around 20° (just past stall) of upward deflection to enter the
deep-stall mode (very nice for top-landings). Higher descent rates can be
reached with more deflection. If you encounter wing-rock during deep stall,
higher deflections may help.
High Control Deflection Aerobatics
Setting the elevons up for higher deflections opens up some
additional aerobatic maneuvers: rapid deep-stall (+4 ° to +90°),
tumble (+90°to +100°), and tail-slide (+100° to +120°). While
these maneuvers can be spectacular to perform, there are some
drawbacks:
- reduced control resolution during regular flying
- extra force on the servos
- potential for servo-slop to initiate flutter at high speeds
- non-optimal ratio between drooperon and elevon travel OR a spring
mechanism between the drooperon horn and servo OR two additional
servos
Tips for a quick +90° setup using ES09MD servos:
1. With a programmable radio, maximize the servo travel limits (± 786us)
2. Adjust the sub-trim by about 30% on both servos, so that the neutral
position gives the elevons more up and less down travel.
3. Position the servo arm so that it is angled forward, and adjust the linkages
so the control surfaces are neutral at this position.
4. Put the elevon pushrod in the outermost servo-arm hole, and the
drooperon a hole or two below.
. Power up your servos and transmitter, and pull the stick back. Fine-tune
the sub-trim and pushrods to get the full 90°+ deflection. (8 ° is not
enough)

9
Change servo-arm holes for the drooperon if this pushrod is limiting the
elevon’s travel.
6. Use significant negative differential to get proportional up/down deflections
on the elevons.
Performing the Tumble
1. Gain some altitude, then enter a shallow dive, around 20° from horizontal.
2. Wait a couple of seconds to gain speed.
3. Pull the stick all the way back fairly quickly.
Ideally, the Zulu will pitch upwards past vertical after you pull the stick back, then
transition into rapid rotations. Recover by releasing the stick.
If the approach above doesn’t work, your servos may be too weak or your
elevon pushrods might be bending and limiting the deflection. If this is the case,
here’s an alternate approach:
1. Gain some altitude, then enter a moderate dive, around 30° from
horizontal.
2. Wait a couple of seconds to gain speed.
3. Gently pull back on the stick as you would to make a loop, but stop pulling
back just after the Zulu is traveling vertically.
4. Wait for the Zulu to enter a tail-slide, then quickly pull the stick back all the
way.
The 2nd approach takes some timing to get it to work, so don’t be disappointed if
it doesn’t happen on the first few tries.
Other manuals for ZULU
1
Popular Toy manuals by other brands

NASCAR
NASCAR Shake N' Steer AF-155NR quick start guide

minicopter
minicopter Diabolo Black manual

Eduard
Eduard Su-24M Fencer D interior S.A. manual

KidKraft
KidKraft My Precious Pastel Kitchen Assembly instructions

Eduard
Eduard LAV AD quick start guide

ThinkFun
ThinkFun Laser Maze Jr. Instructions & Solutions