1 BY ONE Beautural User manual

1byone Products Inc.
1230 E Belmont Street, Ontario, CA, USA 91761
Customer Service: +1 909-391-3888
www.1byonebros.com
Fabric Shaver
Instruction Manual

1
Introduction
Thank you for purchasing BEAUTURAL Fabric Shaver.
This instruction manual contains important information
about safety, usage, and disposal. Use the product as
described and keep this manual for future reference. If
you sell this shaver or pass it on, also give this manual to
the new owner.
Appliance Description
5
6
3
4
1
2
7
8
1. ON/OFF/Speed Switch
2. Battery Compartment Cover
3. Flu Collector
4. Cutting Blades
5. Shaver Foil
6. Adjustable Spacer
7. Cleaning Brush
8. Protection Cap

2 3
Safety Instructions
Intended Use
This product is only authorized for domestic use and not
for commercial or industrial purposes. It is only intended
for applications described in these instructions.
Safety Information
• Children should not use, clean, or perform maintenance
on the fabric shaver without adult supervision.
• Do not expose or submerge the shaver in water. Do
not use the fabric shaver on moist fabrics.
• Make sure no foreign objects penetrate the shaver.
• Do not attempt to open the shaver’s housing, except
the battery compartment to replace batteries and
shaver foil to clean cutting blades.
• Do not oil or grease the cutting blades! This will smear
your clothes.
• Remove the batteries if you do not intend to use the
shaver for a long period of time.
• If the batteries leak, remove them immediately and
clean the battery compartment with a dry cloth.
• Use ONLY the type of battery as indicated in the
"Specications" section of this manual.
• Do not throw the batteries into re. Do not recharge
the batteries to avoid explosion.
• Always keep batteries out of the reach of infants
and young children to prevent them from being
swallowed. If swallowed, take immediate action and
contact medical authorities for help.
Included Items
1 x Fabric Shaver
1 x Protection Cap
2 x Replaceable Cutting Blades
1 x Cleaning Brush
1 x Storage Bag
1 x Instructional Manual
Before using the fabric shaver for the rst time, check
the package contents to ensure all parts are free of
visible damage.
Handling and Operation
Inserting Batteries
Press the tabs on the battery compartment cover and
push down. Insert 2 AA batteries (not included), paying
attention to the polarity. Put the battery compartment
cover back on and the shaver will be ready for use.
Testing
• The fabric shaver can damage delicate fabrics and
very soft materials such as angora. Before removing
u, always test on a small area of the fabric that
is not publicly visible to conrm the speed level is
appropriate for the fabric.
• Turn the transparent adjustable spacer to the level
“Thick” and then push the On/O/Speed Switch to
Speed Level 1. To test the most suitable speed for
your fabrics and avoid damaging the garment, it is
recommended to use Speed Level 1 rst, then switch
up to Speed Level 2.
4 5
Shaving O Flu
1. Put the garment on a at surface, such as an ironing
board. Make sure the surface has no wrinkles.
Otherwise, the garment may be damaged.
2. Turn the spacer to the desired level or remove it
completely (see the "Removing/Attaching the Spacer"
section of this manual).
• “Thick” is for large bobbles and coarse textiles; 5mm-
length distance from the cutting blades.
• “Thin” is for small lint/bobbles and ne textiles; 3mm-
length distance from the cutting blades.
• Removing the spacer is only for very ne lint; virtually
no spacing to the cutting blades.
3. Push the On/O/Speed Switch to the required speed
level.
4. Guide the shaver foil lightly over the material. The u
and bobbles will be shaved o and collected in the
u collector.
5. To turn o the shaver, push the On/O/Speed Switch
back to Speed Level 0.
Note:
• Empty the u collector regularly. The u collector
should never be more than 3/4 full. An overlled
u collector will slow the cutting blades no matter
the amount of battery power left.
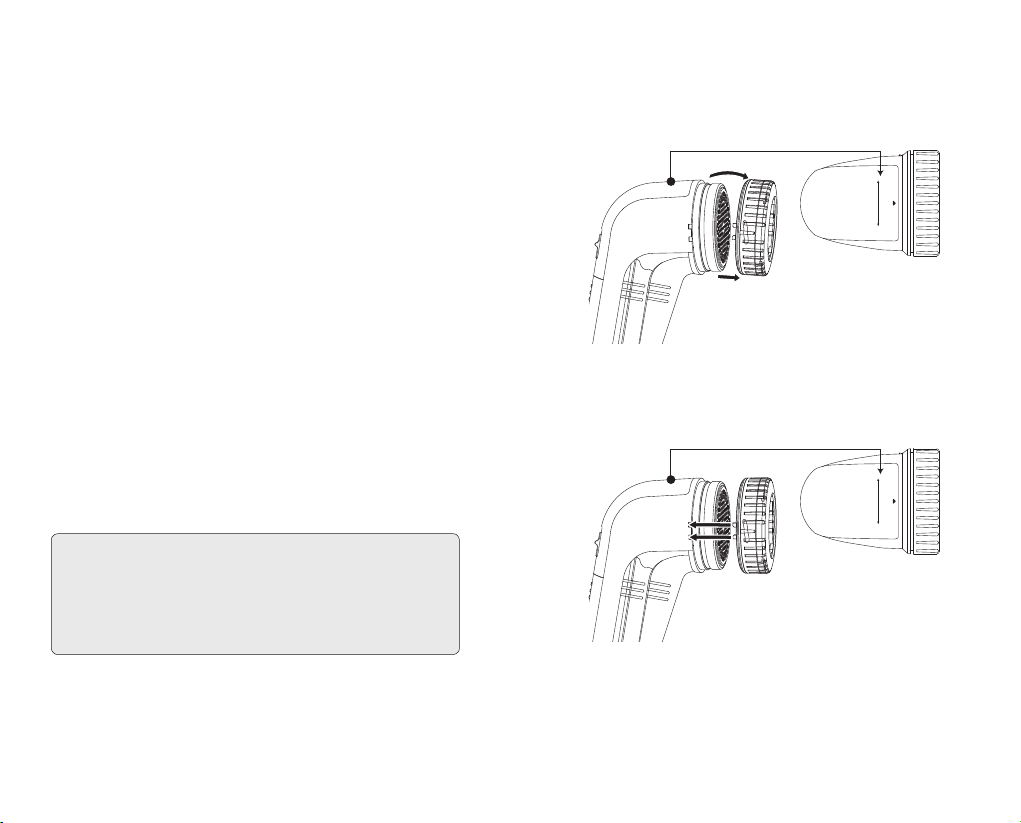
Removing/Attaching the Spacer
• To remove the spacer, hold the shaver with one hand,
grab the spacer, put your thumb on the edge of the
spacer, pull the spacer forward, and remove it.
Pull to open
Thick Thin
Regulator
• To attach the spacer, place it on the cutting head and
press it rmly. Make sure the two small tabs on the
spacer grip into the two recesses on the shaver.
Pull to open
Thick Thin
Regulator
• To protect the shaver foil, you should remove the
spacer and place the protective cap on the shaver foil
when not using the fabric shaver.

6 7
Replacing the Cutting Blades
1. To remove the cutting blades - Unscrew the shaver
foil, carefully grasp the cutting blades’edge and pull
them out, avoiding damage to the blades.
2. To attach the cutting blades - Grasp the cutting blades’
edge and rmly insert the cutting blades into shaver
body. Finally, screw the shaver foil back into place.
Warning: Keep the protective cap in place when
the shaver is not in use to prevent children from
accidentally injuring themselves.
Emptying the Flu Collector
1) Pull the u collector a little way down and lift it o.
2) Empty the textile u.
3) Place the u collector back on the shaver.
Cleaning the Housing and Cutting Blades
1) Unscrew the shaver foil, spacer, and protective cap,
cleaning those parts with a slightly damp cloth.
2) Use the ocially provided cleaning brush to remove
u and lint remnants from the cutting blades.
3) Screw the shaver foil back on when all parts are
completely dry.
4) Place the spacer back on the shaver.
Note:
• Never use any corrosive liquids. These may damage
the surface of the shaver.
• Be careful when handling the cutting blades. They
are very sharp and can easily be damaged.
Specications
Power Supply: 2 x 1.5V type AA batteries
Voltage: 3V

8
Disposal
Disposal of the appliance
Under no circumstances should you dispose
of the appliance in normal domestic waste.
This product is subject to the provisions of
European Directive 2012/19/EU.
Dispose of the appliance via an approved disposal
company or your municipal waste facility. Please
observe currently applicable regulations. Please contact
your waste disposal center if you need any further
informatioz.
Disposal of batteries
Used batteries may not be disposed of in
household waste.
All consumers are statutorily required to dispose
of batteries at a collection point provided by their
local municipality or retail store. The purpose of this
obligation is to ensure batteries are disposed of in a
non-polluting manner. Only dispose of batteries when
they are fully discharged.
The appliance’s packaging is made from
environmentally friendly material and can be
disposed of at your local recycling plant.
Customer Service/Kundenservice
Service Clients/Atención al cliente/Assistenza Clienti
US
To ensure speedy handling of
your issue, please call or email us
for assistance.
Phone: +1 909-391-3888
(Mon-Fri 9:00am - 6:00pm PST)
Email: ushelp@1byonebros.com
CA
To ensure speedy handling of
your issue, please email us for
assistance.
Email: cahelp@1byonebros.com
UK
To ensure speedy handling of
your issue, please call or email us
for assistance.
Phone: +44 158 241 2681
(Mon-Fri 9:00am - 6:00pm UTC)
Email: [email protected]om
DE
Für eine zügige Bearbeitung
ihres Problems, melden Sie sich
bei uns wie folgt.
Email: euhelp@1byonebros.com
FR
Pour vous assurez une assistance
rapide en cas de problème,
veuillez envoyer un e-mail.
Email: euhelp@1byonebros.com
ES
Para garantizar una rápida
atención de su problema, favor
envíenos un email para ayudarle.
Email: euhelp@1byonebros.com
IT
Per supporto immediato in
caso di bisogno, la invitiamo a
contattarci via email.
Email: euhelp@1byonebros.com
Other manuals for Beautural
2
Table of contents
Other 1 BY ONE Household Appliance manuals


