12 Survivors Trace 5X50 User manual

DIGITAL NV RECORDING MONOCULAR
English / Francais / Español
TRACE5x50

I will never give up, no matter what the situation.
I will give value in return for value.
I will provide for those who are dependent upon me.
I will not be a burden to others or expect others to provide for me.
I will exchange strong, moral values openly and freely.
I will work hard and encourage hard work in others.
I will develop my mind, body and spirit to realize my full potential and assist others
in the same quest.
I will continue to learn and be willing to teach others what I know without restraint.
I will not judge people by their appearance, but by the content of their character,
usefulness of their intellect and rightness of their actions.
I will protect freedom, property and liberty.
I will treat others the way I want to be treated.
I will not live in fear, nor will I be afraid.

Digital NV Recording Monocular TRACE 5x50...............................................................1-10
Vision nocturne digitale avec enregistreur video TRACE 5x50........................................11-20
Dispositivo digital de vision nocturna con grabador de video TRACE 5x50........................21-30

1
ENGLISH
Generation Digital
Magnication 5
Objective Lens diameter 50mm
Resolution, lines/mm 34
Angular eld of view (horizontal) 3.5º
Close-up range 1m
Camera resolution, pixel (CCIR/EIA) 500x582 / 510x492
Sensor type (CCIR/EIA) Sony ICX405AL/SonyICX404AL (1/3”)
Max. detection range 140m
Diopter adjustment ±5
Operating voltage 3 (2xAA)
IR wavelength, nm 805
Tripod mount 1/4”
Operating temperature -10ºC ~ 45)C
Operating time (IR illuminator OFF/ON/
recording)
10/6/3hr.
Dimensions 188x86x59mm
Weight (with batteries) 13.4oz
Recording resolution 800x600 pixles
Frame frequency 25 frames/sec
Type of memory card (max capacity) SD (4Gb)
INCLUDED
• Carrying case
• Wrist strap
• SD memory card
• USB cable
• Lens cleaning cloth

2
• Carrying case
• Wrist strap
• SD memory card
• USB cable
• Lens cleaning cloth
DESCRIPTION
The Trace 5x50 monocular is equipped with a built-in video recorder which enables high quality
recording with a resolution of 800x600 pixles. Files can be recorded either on the SD memory
card or directly on the hard disc of your PC. The monocular can be mounted on a tripod for a
comfortable long-time usage.
The Trace can be connected to the PC with a USB cable to transfer and process recorded
information. The Trace monocular employs a high sensitive CCD array with a wide range of
working illuminance. The monocular is outtted with a built-in IR illuminator which signicantly
improves device’s efciency in lowlight conditions and in the dark. The Trace operates on two
AA batteries up to ten hours.
The Trace is perfectly suited to a wide range of applications including:
• Outdoor observation • Video recording
• Hunting and tourism • Sports and night navigation
• Commercial and personal shing and boating • Search and rescue
• Equipment maintenance • Control of manufacturingequipment
BATTERY INSTALLATION
• Slide and open the battery compartment cover (pic.1).
• Insert two AA batteries (or rechargeable NiMH type AA batteries) into the battery compartment.
Please observe polarity shown on the inner side of the battery compartment cover.

3
• Slide back and close the cover
Please observe polarity shown on the inner side of the battery cover. If the batteries are low, the
left light diode (8) will blink green (or yellow - if the IR illuminator is turned on).
OPERATION
• Remove the lens cap from the objective lens (1)
• Activate the device by turning the button “ON” (2) - a stable green indicator (8) will light up.
• Locate an object within 20 to 30 meters.
• Rotate the eyepiece (3) until you clearly see the frame of the display and a ne black grid on it.
• To turn on the IR illuminator (4) push the “IR” button (5). The green indicator changes its color to yellow.
• Rotate the objective lens (1) until you see a sharp image of the object.
• When changing the viewing distance, try and see a sharp and high quality image by rotating the
objective lens (1).
• Do not rotate the eyepiece (3) - the device has already been individually adjusted.
• Having nished operation, turn the unit off with the “ON” (2) button - the green indicator goes out.
PECULIARITIES OF OPERATION
• The device can be operated in normal light conditions.
• After using the device in cold temperatures, please wait up to 2-3 hours before using in warmer temperatures.
This helps prevent condensation on the lenses.
• Do not submerge the device in water; do not leave the device in direct sunlight or rain.
• Do not subject the digital NV device to shock or impact. Do not drop.
• When focusing on the display, seven bright or dark spots on the field of veiw in the image plane are accept-
able
• Design of the unit does not provide for adjustment of the IR-illuminator (4).

4
COMPONENTS AND CONTROLS
1. Objective lens 2. “ON” botton 3. Eyepiece
4. IR illuminator 5. “IR” button 6. SD memory card slot
7. “REC” button 8. Left light diode 9. Right light diode
10. Tripod mount 1/4” 11. USB port

5
USING THE BUILT-IN VIEDO RECORDER
TURNING ON AND VIDEO RECORDING
• Open the plug and insert the SD memory card as shown in Pic. 2.
• Activate the device by pressing the button “ON” (2).
• Adjust the device following the instructions in the section “OPERATION”.
• Turn on the video recorder by pressing the button “REC” (7)-the blue LED indicator (9) will light
up. The video recorder will be ready to record in about ve seconds. To start recording, press the
“REC” button (7)-the blue LED indicator will start blinking. The indicators can also be seen in the
eld of view.
• Push the “REC” button (7) to stop recording. The blue LED indicator (9) will stop blinking. Press
and hold the “REC” button to turn off the recorder, the blue LED indicator will go off.
OPERATION OF LED INDICATORS
The left LED (8) shows operational status of the unit.
The right LED (9) shows operational status of the video recorder
LEFT LED Lights green The unit is “ON”
Lights yellow The unit is “ON” with IR
Blinking green or yellow Low batteries
Right LED Lights blue The video recorder is “ON”
Blinking blue The recorder is active
Blinking red (when video recorder is
started, blue LED indicator lights up,
but 3-5 sec starts blinking red) Memory card is full
Lights red Memory card is not installed

6
LEFT LED Lights green The unit is “ON”
Lights yellow The unit is “ON” with IR
Blinking green or yellow Low batteries
Right LED Lights blue The video recorder is “ON”
Blinking blue The recorder is active
Blinking red (when video recorder is
started, blue LED indicator lights up,
but 3-5 sec starts blinking red) Memory card is full
Lights red Memory card is not installed
SOFTWARE
The delivered memory card contains useful software, which includes les as follows:
• “Trace_driver” - driver software for the video recorder which serves to connect the unit to your
PC. Install this driver before connection.
• “Trace_converter” - software for work in the mode of video recording to a PC hard disk.
• “Trace_date_time setup” - software which enables setup of running the time/date.
The built-in video recorder is compatible with operation systems Windows XP, Windows Vista and
Windows 7. Note: It is recommened that before use of the video recorder you should save the sup-
CONNECTION TO PC
• Turn on the NV device.
• Start the video recorder.
• Connect the video recorder with the supplied USB cable to your PC - it will be detected as remov-
able disk. The NV device can be turned off now - it will be powered via the USB.
• With the help of Total Commander or similar le manager you can handle the SD card as a
removable disk.
NOTE: Transmission speed from the memory card to the PC will not exceed 1Mb/sec.
VIDEO RECORDING TO A PC HARD DISC
• The video recorder should be powered off. Use a USB cable to connect it to the PC.
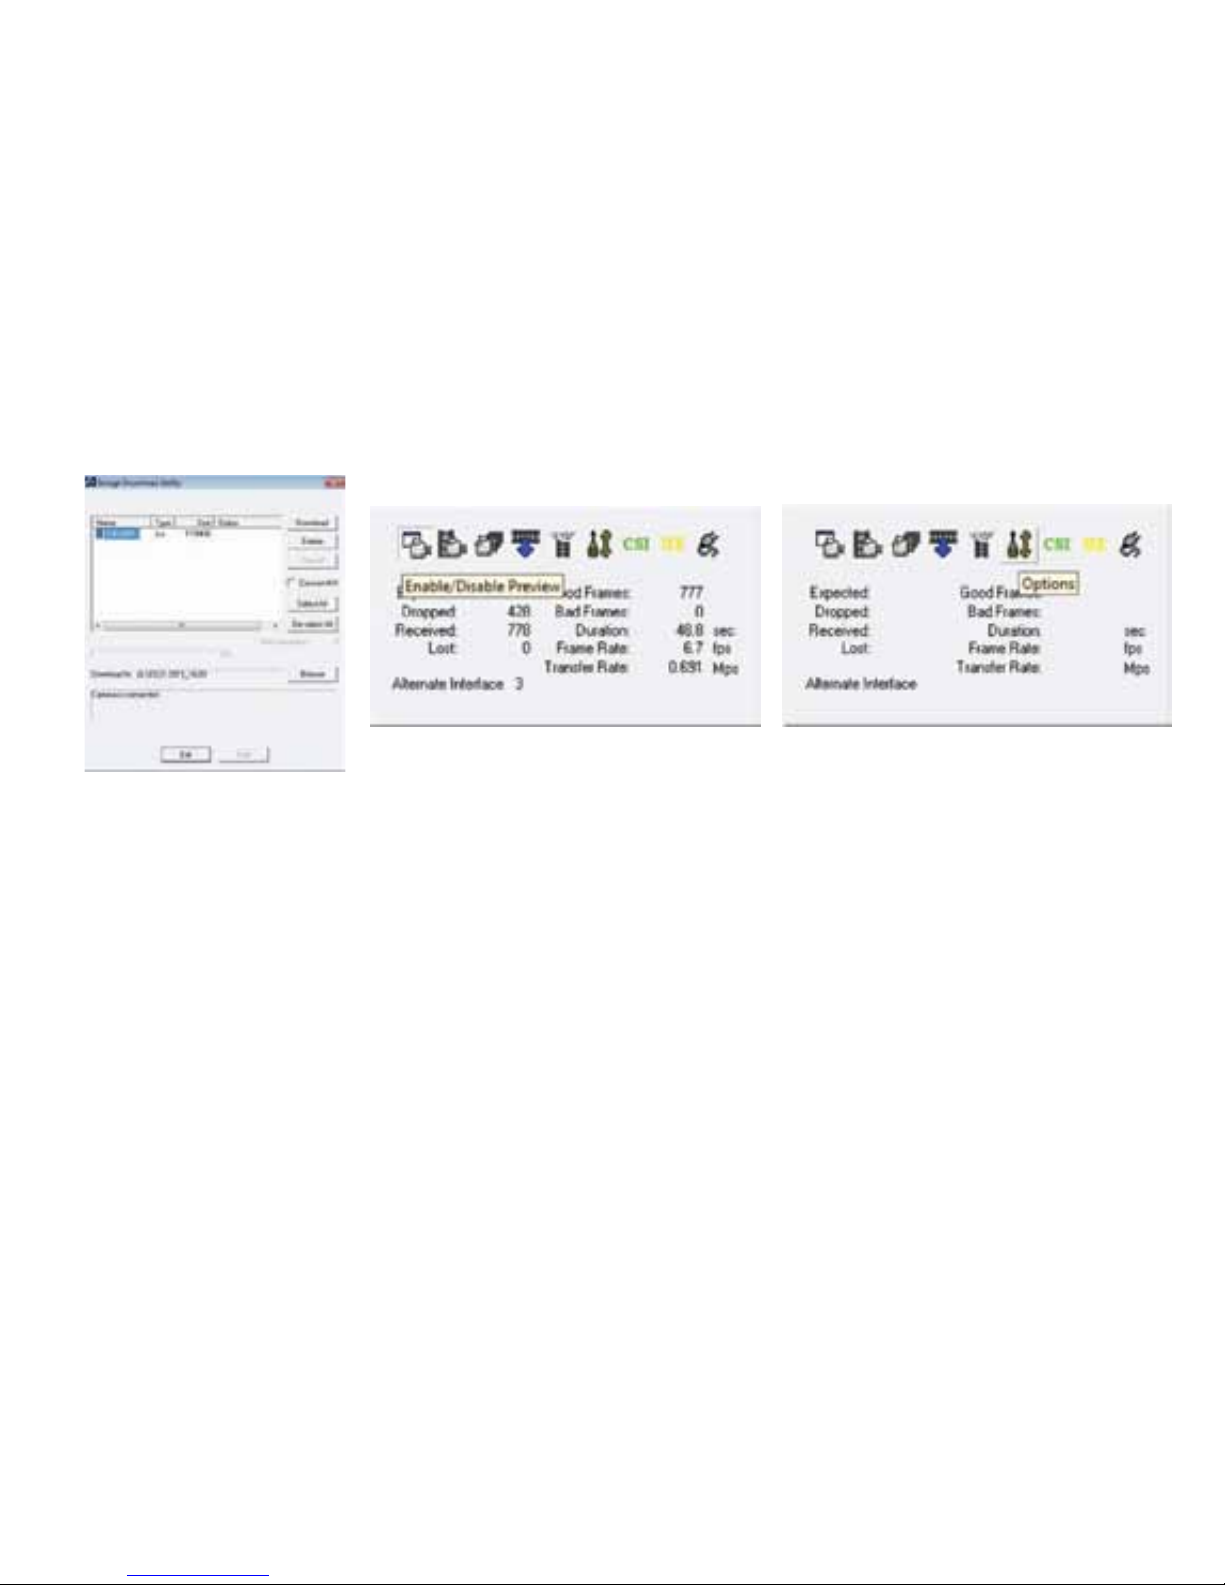
• A window as shown in Pic. 3 comes up. Now you will be able to handle the les recorded on this
unit’s memory card. Press the “EXIT” button when nished.

7
NOTE: when the unit is attached to the PC in this mode, the SD memory card will not be available
via an explorer!
• To download les to your PC, click on one or several les, choose with the “Browse” button a
folder where you want to save the les to, and press “Download”.
• Launch the le “Trace_Video Converter”. Program window will show up (see pic 4).
• It is recommended that you choose “Resolution” and “Frame rate” settings in the tab “Options” for
recording on a hard disc. In the tab “Capture” choose the directory for saving les to a hard disc.
• Chose the tab “Enable/Disable Preview” (pic. 5) and turn on the NV device-now the image seen
through the NV device is transmitted to the PC monitor.
• Push the “Stop/Start Capture” button to start/stop video recording.
• This mode allows immediate recording to PC hard disc.
NOTE: the le video converter should be used for OS Windows Vista and Windows 7. If you run
OS Windows XP you can use a default program like MovieMaker or similar.
Pic. 5Pic. 4
Pic. 3

8
SETTING DATE/TIME
• Turn on the NV device and video recorder to have it detected as a removable disc.
• Launch the “Trace_Date_timesetup” le.
• Choose the SD card as the directory for le saving.
• Press “OK”. A le named “Time.txt” will be created on the SD card, showing date and time set on
your computer.
• Turn off the video recorder.
• Start the video recorder again. Information of the date/time and video format will be added to the
unit and the le “Time.txt” will be deleted. If you mark the box “Do not print date and time” recorded
les will not contain information on date/time.
Pic. 6
MAINTENANCE
• Keep the unit in a dry, well-ventilated room at a temperature exceeding +10ºC and humidity lower
than 70%
• Remove the batteries if the device will not be used for a long time.
• Clean optical parts only if necessary. Use soft cotton clean cloth moistened with special treatment
for multicoated lenses. Clean plastic surfaces with a clean, soft cloth and a petroleum-based jelly
and dry thoroughly.

9
Remove the batteries and dry the device if it will not be used for a long time. Keep the unit in a dry,
well-ventilated room at a temperature exceeding +10ºC and humidity lower than 70%.
STORAGE
If the problem and the corrective actions are not listed do not correct the issue. Please notify the
manufacturer.
The device will not start:
Install batteries correctly or install new batteries
Poor image quality:
Follow the instructions to adjust the device. Clean the device’s optical parts with a soft cotton cloth
that is slightly moistened.
There are several light or black dots (pixles) on the display device:
This is not a defect. It is cause my CCD array production technology
The device is on but recording will not start when the “REC” button is pushed:
Insert a SD memory card.
TROUBLESHOOTING
PECULIARITIES OF CCD ARRAY
Sony CCD arrays employed in the Trace digital night vision device, feature high quality imaging.
However, certain white and black defective dots and variable amplitude spots are allowed. These
defects can be easily detected when conducting observation both in the day and in the nighttime.
Presence of white and black dots, spots and other minor defects of a CCD array (up to 4%) are
acceptable in accordance with regulations of the company SONY. Visibility on the screen of a

10
white defect of equal defect level depends on the type of CCD array, camera type and temperature
increase after the unit switches on.
WARRANTY
Please visit www.12survivors.com to view warranty details and information. Warranty varies by
country.
WWW.12 .COM

11
FRANÇAIS
Génération Digital
Grossissement 5
Diamétre de la lentille 50mm
La résolution, linges/mm 34
Champs de vision (horizontal), degrés 3.5º
Distance de mise au point minimale 1m
Résolution vidéo, pixel (CCIR/EIA) 500x582 / 510x492
Type de matrice CCD (CCIR/EIA) Sony ICX405AL/SonyICX404AL (1/3”)
Distance max.de détection 140m
Adjustment dioptrique ±5
La tension de fonctionnement 3 (2xAA)
Longueur d’onde de I’IR, nm 805
Taille du le tage d’un nid de xation 1/4”
Température d’emploi -10ºC ~ 45)C
Temps max d’utilisation avec une pile (IR ar-
rêt/marche/enreg)
10/6/3hr.
Dimensions 188x86x59mm
Poids (sans batteries) 13.4oz
Dénition vidéo 800x600 pixles
Vitesse de trames 25 frames/sec
Carte mémoire, type (volume maxi) SD (4Gb)
CONTENU DE L’EMBALLAGE
• Étui
• Bretelle
• Carte mémorie SD
• Câble USB
• Serviette de néttoyage
des lentilles

12
• Étui
• Bretelle
• Carte mémorie SD
• Câble USB
• Serviette de néttoyage
des lentilles
DESCRIPTION
Le Trace 5x50 dispositif sont équipés d’un vidéorécorder incorporé, permettant de réaliser
l’enregistrement d’images á une dénition de 800x600 picles tant sur la carte mémoire, que sur le
disque dur de l’ordinateur directement. An de faciliter l’enregistrement des images pendant une
période de temps durable, il est possible de monter les dispositifs sur un pied. Pour le raccorde-
ment des dispositifs á l’ordinateur, utilisez le câble USB, permettant de transférer et de traiter les
images enregistrés. Les dispositifs Trace sont munis d’une matrice de communication á charge de
haute sensibilité permettant d’pbtenir une large gamme d’intensité lumineuse. Un iluminateur infra-
rouge incorporé est prévu dans tous les dispositifs, an d’améliorer l’observation et la rendre plus
efcace aux conditions de faible éclairage pendant la nuit. Le mode de fonctionnement autonome
du dispositif, pendant une durée de dix heures á peu prés, est graanti grâce á deux batteries de
type AA. Les monoculaire Trace sont parfaits pour une large variété utilisations incluant:
• Observation et enregistrement vidéo • L’observation de la nature
• La randonnée • Chasse et tourisme
• Jeux sportifs et orientation nocturne • Peche industrielle et amateur, canotage
INSTALLATION DES PILES
• Glissez et ouvrez le couvercle du compartiment á piles (voir Fig.1).
• Inserez les 2 piles AA/LR6 (ou rechargeables) dans le compartiment á piles. Veuillez respecter la
polarité afchée á l’intérieur du couvercle du compartiment. An de garantir une performance durable
il est recommandé que vous utilisiez des piles alcalines.

13
• Remetez en place et fermez le couvercle.
Attention! Ne pas utiliser des piles de différents types ou des piles avec des niveaux de charge
différents. Le clignotement vert du LED gauche (8) indique la décharge des batteries.
utilisation de l’appareil
• Enlevez le couvercle de la lentille objective (1).
• Mettez en fonction l’appareil en appuyant le bouton “ON” (2) - un indicateur LED gauche vert (8) stable
s’allumera.
• Visez l’appareil sur l’objet se trouvant éloigné de 20-30 métres.
• En tournant l’oculaire (3), vous pourrez obtenir l’image net du cadre de l’afcheur et de la petite noire en
nes bandes sur le dernier
• Pour allumer la torche IR (4) appuyez sur le bouton “IR” (5). La couleur de l’indicateur deviendra jaune.
• Lors du changement e la distance d’observation, faites tourner la lentille objective (1) jusqu’á ce
que l’image de l’objet soit nette.
• Ne pas effectuer de rotation de l’oculaire (3) l’appareil est déjá ajusté individuellement.
• Poue éteindre l’appareil, appuyez sur le bouton “ON” (2) - l’indicateur LED (8) s’éteint.
PARTICULARITES D’UTILISATION
• L’appareil peut être utilisé en lumiére de jour comme en conditions de nuit.
• Aprés avoir utiliser l’appareil dans températures froides, veuillez attendre 2-3 heures avant d’utilixer l’appareil
dans des températures chaudes. Cela permet d’éviter la condensation sur les lentilles.
• Ne pas laisser l’appareil en lumiére directe. Ne submergez pas dans l’eau.
• Ne pas donner de choc ou d’impact á l’appareil digital NV. Ne pas faire tomber.
• Le sable, la poussiére, et le sel peuvent endommager l’appareil.
• Lorsque vous effectuez une mise au point sur l’écran un maximum de sept lumiéres ou de points sombres
sur tout le champ de vision de l’image est acceptable
• La conception de l’appareil n’est pas prévu pour un ajustement e la torche IR.

14
ELements et organes de commande:
1. L’objectif 2. Bouton “ON” 3. L’oculaire
4. Torche IR 5. Bouton “IR” 6. Emplacement pour carte mémorie SD
7. Bouton “REC” 8. Indicateur LED gauche 9. Indicateur LED droite
10. Taille du letage d’un nid de xation 1/4” 11. Mini connecteur USB

15
UTILISATION DU VIDEORECORER
BRANCHEMENT ET ENRGISTREMENT VIDÉO
• Ouvrez le capot de l’emplacement pour carte mémoire SD (6) (voir Fig.2).
• Mettex en fonction l’appareil en appuyant le bouton “ON” (2).
• Pour le réglage de l’appareil se référer aux instructions du chapitre “Utilisation de l’appareil”.
• Mettex en marche le vidéorecorder, en appuyant sur le bouton “REC” (7) - le LED droite bleu (9)
s’allume. Le vidéorecordersera prêt á enregistrer á peu prés dans cinq secondes. Appuyez sur le bouton
“REC” (7) pour lancer l’enregistrement vidéo. Le LED droite bleu clignote. On peut aussi voir les indica-
teurs dans le champ de vision.
• Pour arrêter l’enregistrement vidéo, appuyez sur le bouton “REC” (7). Alors le LED bleu cesse de
clgnoter.
• Appuyez sur le bouton “REC” et maintenez la pour arrêter le vidéorecorder. Le LED droite bleu s’éteint.
INDICATION DES LEDS
Le diode LED gauche (8) est un indicateur e fonctionnement de l’appareil.
Le diode LED driote (9) est un indicateur de fonctionnement du vidéorecorder.
Diode LED gauche Allumé feu vert Dispositif enclenché
Feu jaune allumé Dispositif enclenché avec infra-rouge
Clignotement vert Afchage de la décharge des batteries
Diode LED droite Allumé feu bleu Vidéorecorder mis en marche
Clignotement bleu Enregistrement en cours
Clignotement rouge (une fois le
récorder enclenché, le LED blue
aprés le feu rouge se met á clignoter Carte mémoire insufsante
Feu rouge allumé Absence de carte mémoire

16
Diode LED gauche Allumé feu vert Dispositif enclenché
Feu jaune allumé Dispositif enclenché avec infra-rouge
Clignotement vert Afchage de la décharge des batteries
Diode LED droite Allumé feu bleu Vidéorecorder mis en marche
Clignotement bleu Enregistrement en cours
Clignotement rouge (une fois le
récorder enclenché, le LED blue
aprés le feu rouge se met á clignoter Carte mémoire insufsante
Feu rouge allumé Absence de carte mémoire
LOGICIEL
La carte mémoire, livrée avec l’appareil, est munie d’un logiciel comrenant les chiers suivants:
• “Trace_driver” - driver du recorder pour son branchement au PC. II est á installer avant le
branchement de l’appareil au PC.
• “Trace_converter” - programme pour le fonctionnement en mode d’enregistrement du signal
vidéo sur le disque dur du PC.
• “Trace_date_time setup” - programme permettant d’installer la date et l’herure.
L’appareil est compatible avec les systéms d’exploitation Windows XP, Windows Vista et Windows 7. Re-
marque: avant l’utilisation de l’appareil, il est conseillé de sauvagarder le logiciel sur le PC. En case de parte de
chiers, veuillez consulter l’aide: [email protected]
BRANCHEMENT AU PC
• Démarrez l’appareil et le videorecorder.
• Connectez l’appareil á l’aide du câble USB au PC, le videorecorder sera reconnu entant que
disque amovible. Alors il est possible de couper l’alimentation du vidéorecorder-il est alimenté USB.
• Le programme total commander ou les autres gestionnaires de chiers permettent de travailler
avec la carte SR comme avec un disque amovible.
Remarque: La vitesse de transfert de données de la carte mémoire du vidéorecorder ver le PC ne dépasse pas
1Mb/sec.
MODE D’ENREGISTREMENT DU SIGNAL VIDÉO SUR LE DISQUE DUR DE PC
• Coupez l’alimentation du recorder. Branchez l’appareil au PC en utilisant le câble USB.
• L’écran de la fenêtre s’afche comme indiqué sur la g. 3 - dés lors il est possible de travailler
avec les chiers enregistrés sur la carte SD du recorder. Le travail terminé, appuyez sur EXIT.
17
Attention: ce type de branchement au PC ne permet pas l’accés á la carte SD du recorder pa le
conducteur!
• Sélectionnez un ou plusieurs chiers pour le chargement sur le PC, á l’aide du bouton “browse”
choisis sez le dossier voulu pour la sauvegarde sur votre PC et cliquez sur “Download”
• Lancez le chier “Trace Video Converter”. La fenêtre u programme s’afche (voir la g.4)
• Dans le menu “Options” choisissez le ajustement recommandés suivants pour l’enregistrement
sur le digque dur: Resolution et Frame Rate. En activant la case “Capture” chosissez le chemin e
sauvegarde des chiers sur le disque dur du PC.
• Cliquez sur “Enable/Disable Preview” (g.5) et mettez en marche l’appareil de vision nocturne -
alors l’image qui se trouve dans l’objectif de AVN, sera transféré sur le moniteur du PC.
• En appuyant sur le bouton “Start/Stop Capture”, vous pouvez démarrer ou arrêter
l’enregistrement vidéo.
• Ce mode permet d’enregistrer les informations vidéo directement sur le disque sur du PC.
Pic. 5Pic. 4
Pic. 3
This manual suits for next models
1
Table of contents
Languages:


