23zero SABER User manual

TM
SABER
USER MANUAL

TM
SABER USER MANUAL
Thank you for purchasing a 23 ZERO Roof Top Tent
Congratulations on the purchase of 23ZERO’s SABER Hardshell Roof Top Tent. We strive to
provide you with the ultimate camping experience. The SABER Tent mounts directly to a roof
rack or aftermarket roof bars. It opens and is fully setup in seconds. As well as our innovative
LST fabric, this hardshell tent is made with durable materials and high-quality fabrics that provide
excellent water and wind protection.
Most of the components have been pre-assembled with the exception of ladder brackets, awning
stay pole brackets and roof bars. Depending on vehicle set up and choice of entry points, these
components can be repositioned to suit.
Note: During set up and rst use, some aluminium swarf may be present inside the roof top tent.
We make every possible attempt to expel all aluminium swarf, however, with vibrations caused
by logistics some residual may dislodge and reappear. It is advised to remove and clean these
during rst set up.
1
CONTENTS
Hardware & Accessories
Safety & Warnings 2
3
Fitting to roof rack 4
Ladder adjustment
Warranty
Roof bars
7
6
9
Fitting hardware 5
Before installing your 23Zero Roof Top Tent please ensure you are aware and understand the
following:
• Your vehicle’s maximum roof load rating.
• Your roof rack’s maximum load rating including off-road capacity.
The maximum amount of weight you can safely add to a vehicle’s roof / cargo area differs according
to make and type of vehicle including aftermarket additions such as roof racks / bars.
Note: Roof rack off-road limits are immensely different to normal road use load ratings. If
in doubt, please contact your vehicle manufacturer and roof rack manufacturer / supplier
for specied loading capacity of your vehicle and roof rack.
Not all factory roof racks or aftermarket roof bars can safely accommodate roof top tent models.
The responsibility of tting this roof top tent to rated roof racks or roof bars lays with the purchaser.
PLEASE READ ALL INSTRUCTIONS PRIOR TO INSTALLING
IMPORTANT
Opening & Set up 8
Closing & Storage 8
Mounting rail dimensions 10

2
Safety & Warnings
Improper installation or use of the Saber roof top tent may result in serious injury or death. Follow
these installation instructions carefully to ensure proper installation to vehicle and safe use of the
roof top tent.
Note: Alterations and / or inclusions such as roof racks and roof top tents applied to the vehicle
roof may affect vehicle handling and characteristics.
The manufacturer (23ZERO) disclaims all responsibility in case of accidents and / or damage due
to installation of a roof top tent to an underrated roof rack, improper use, improper maintenance
or checking the tightness of the brackets regarding the installation of the roof rack system.
Inspections: Roof top tents have many moving parts, so maintenance checks are always advised.
During trips regularly check that all nuts and bolts attaching the roof top tent to the vehicle as well
as hinges and locks are tight and in good repair.
Note: The Saber Roof top tent must be key locked when vehicle is in motion.
Ladder: For your safety and protection, ensure correct placement and angle of ladder.
Recommended ladder placement is a 4:1 ratio or approx. 75°.
Ladder height may need to be adjusted depending on vehicle height, see “Ladder Adjustment”
DO NOT CLIMB ON LADDER UNTIL CORRECT ANGLE IS ACHIEVED
23Zero - The wholesaler / manufacturer shall not be liable for special, indirect incidental or
consequential damages.
TM
SABER USER MANUAL

3
Hardware & Accessories
TM
SABER USER MANUAL
The Saber Hardshell roof top tent includes a mounting kit with everything required to mount the
roof top tent to most roof racks.
Note: Some platform style roof racks have platforms which are wider than the supplied
mounting plate. 23ZERO have wider mounting plates available for this scenario.
Please visit www.23zero.com.au.

4
Fitting to roof rack
The Saber roof top tent must be tted to roof racks with the hinges facing forward (front of vehicle).
It must be clamped on 4 corners using the 8 x 55mm M8 bolts & mounting plates supplied. To do
this, place the roof top tent on top of the vehicle’s roof rack (minimum 4-person lift).
Important: Ensure the Saber is key locked during installation to avoid accidental opening.
The pre tted mounting rails have 2 channels facing downward, either channel can be used to
mount the Saber roof top tent to the roof rack. Slide 4 x 55mm M8 bolts into either rail. Position
these so there are 2 bolts toward the front of the tent and 2 bolts toward the rear of the tent on
each rail. Lift / tilt the roof top tent to allow the inner bolts to cross over onto the inside of the roof
bars.
TM
SABER USER MANUAL
Inspect the position of the roof top tent to ensure it will open in the desired position.
Note: It is recommended the rear of the tent is ush with the back of the vehicle to allow correct
ladder angle. Place a mounting plate under the roof bar whilst locating the bolts, insert washer
and hand tighten Nylok nut. Repeat for all 4 corners. Double check the tent’s position as desired
and tighten all nuts securely with 13mm spanner. Insert end caps into the ends of the mounting
rails, this may require light taps from a hammer.
Inspections: Roof top tents have many moving parts so maintenance checks are always advised.
During trips regularly check that all the above xings are tight and in good repair.

5
TM
SABER USER MANUAL
Fitting hardware
Out of the box, some hardware must be tted to the Saber tent. Hinges, gas struts and locks
are all pre tted. Hardware is tted to the Saber via the channels on the edges of the roof lid
and baseboard. Insert 1 x square slide nut per hex bolt in the channel and slide to the required
position. Insert hex bolts through the mounting holes on the hardware and line these up with the
square slide nuts. Rotate hex bolt clockwise to locate thread. Once located slide the hardware to
the desired position and tighten with a 5mm Allen or Hex key.
Stay pole brackets: (Baseboard)
These are to be tted at the rear 115mm in from the corners of the bottom baseboard.
Ladder brackets: (Baseboard)
Locate desired entry point as this will determine the position of the ladder brackets. Position the
ladder brackets approx.. 430mm apart in the centre of the desired entry point.
Tip: Temporarily remove the horizontal bar on the ladder bracket to better access the hex bolts.
Note: If using a side entry, the bottom half of the lock mechanism will need to be temporarily
removed to allow the ladder brackets to slide past.
Handle: (Roof lid)
The handle should be tted centred at the rear of the Saber (non hinge side)
Safety pole: (Inside - when tent is in use)
This is a twist lock pole which must be tted when tent is in use. Position this right hand side of
high end (inside tent looking out).

6
The Saber roof top tent has 3 x optional roof bars included. These are tted to the side channels
on the roof lid. Slide the heads of 2 x 20mm M8 bolts into the channel of the roof lid near desired
location. Locate the holes on the bottom of the bracket (long side) and place over the bolts. Fit
washer and Nylok nut and tighten. Repeat for opposite side.
Note: Some hardware may need to be removed to allow bracket bolts to slide to desired position.
To t roof rail to brackets, slide 2 x 20mm M8 bolts into each channel on the at edge of the rail
and place over the holes of mounted bracket. Fit washer and Nylok nut and hand tighten. Repeat
for opposite side. Position roof bar so it is centred on the Saber and tighten all nuts. Repeat this
process for remaining roof bars. Fit all rubbers and end caps.
Roof bars
TM
SABER USER MANUAL
Note: The roof bars supplied with the Saber roof top tent are not designed to carry signicant
loads. A maximum of 20kg can be carried on top of the Saber providing this weight is spread
evenly amongst all three bars. Load weights greater than 20kg will void any warranty.
When adding additional weight to the top of the Saber consideration must be given to the overall
weight rating capacity of your vehicle’s roof and roof rack.
Please ensure you are aware and understand the following:
• Your vehicle’s maximum roof load rating.
• Your roof rack’s maximum load rating including off-road capacity.
The maximum amount of weight you can safely add to a vehicle’s roof / cargo area differs according
to make and type of vehicle including aftermarket additions such as roof racks / bars.
Important: Before each trip please check that all roof bar and bracket xings are tight and
in good order before adding load.

7
For your safety and protection, ensure correct placement and angle of ladder. See diagrams
below. Recommended ladder placement is a 4:1 ratio or approx. 70° to 75°.
NOTE: Under no circumstances should anyone be inside the roof top tent if the ladder is
not locked and secured at the correct angle.
The ladder may need to be adjusted to achieve the correct angle depending on the height of your
setup. If shortening is required, the adjustment must be done from the top.
Ensure the ladder is fully extended and all rungs are locked in place. Press the rst set of locking
buttons (second rung from the top) and allow the ladder to compress until a gap of approx. 85mm
is achieved between rung 1 & 2.
Note: The ladder will only lock in the downward position.
Swing in the bottom of the ladder until it supports the weight of the roof top tent. If the angle of the
ladder is between 70° and 75°, the adjustment is complete.
Ladder adjustment
NOTE: When height adjusted, the ladder will only lock in the downward position.
If further adjustment is required, repeat the above steps by continuing the sequence by depressing
the next set of locking buttons.
If further shortening is required press the second set of locking buttons (third rung from the top).
This will close the 85mm gap until rung 1 & 2 are now touching. Swing in the bottom of the ladder
until it supports the weight of the roof top tent. If the angle of the ladder is between 70° and 75°,
this adjustment is complete.
TM
SABER USER MANUAL

Closing & Storage
Sleeping bags or blankets can be stored in the Saber if laid out at. If tent has the 100mm inner
spring mattress tted, thicker objects such as pillows are not recommended to be stowed inside.
Not only do these make closing the tent difcult but they will put excessive pressure on hinges
which may lead to failures and damage. This damage is distinguishable and is not covered by
warranty.
Tip: If stowing pillows inside the Saber, move them toward the hinge end before closing the tent.
An internal bunji cord as well as an external perimeter shock cord is included with your Saber
hardshell roof top tent. These assist in reducing the canvas from billowing during pack up. Attach
the internal bunji cord to either side of the Saber via the tted plastic loops inside the tent beside
the windows. Exit the tent, remove the canopy tension poles and lift the perimeter shock cord
halfway up the canvas ensuring it goes over the canopy canvas as well. The tent is now ready to
close.
Tip: Leave the side windows open halfway open to allow internal air to escape while closing the
tent.
As the Saber is closing, tuck the canvas inside so none is caught between the sealing rubbers on
the roof lid and baseboard. Engage the locks. Unhook the ladder, retract and stow in carry bag.
Caution: Avoid closing / storing tent wet. If conditions dictate that you do, open and dry out as
soon as possible to avoid moisture damage.
8
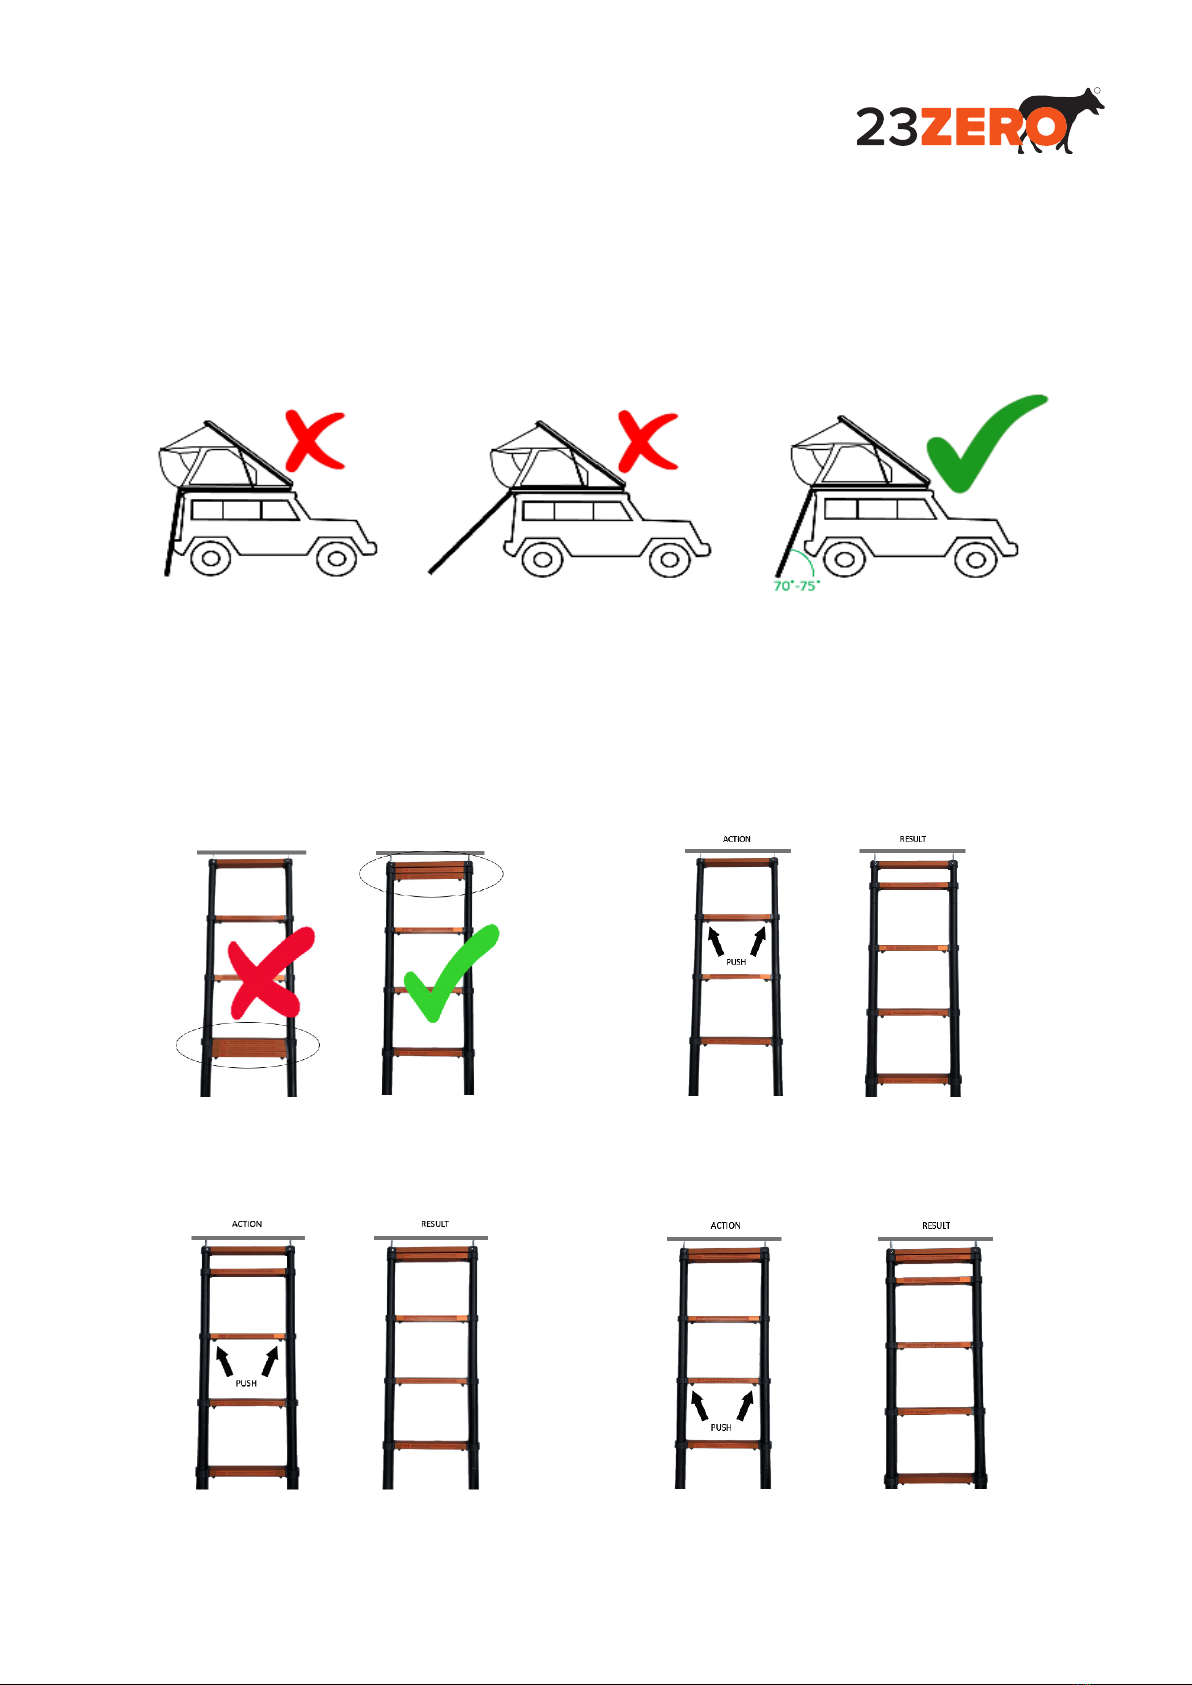
Once the Saber is xed securely to the vehicle’s roof rack and the ladder is locked and angled
correctly, climb the ladder, release the locks on either side of the tent and lift until the gas struts
take over. Once open, lower the perimeter shock cord and hook this to both front corners of the
baseboard. Locate the canopy stay poles and t each of these into their brackets with the hook
end facing outward. Flex each pole and insert the hook ends into the eyelets on the corners of
the canopy. Unzip entry door and enter the roof top tent. Once inside. locate the twist lock safety
pole and position this tightly in the right hand side corner of the tent (RHS - inside tent looking
out) Twist lock tight in postion. The tent is now ready for use.
Caution: Safety pole must be tted at all times when Saber roof top tent is open and in use.
Opening & Set up
TM
SABER USER MANUAL

9
2 Year Warranty
23ZERO will replace or repair any product at its discretion that is subject to faulty manufacturing
or workmanship including materials.
Exclusions
The above warranty is limited to manufacturing and materials defects. Not including damage
caused by misuse or abuse, wear and tear, condensation, extreme weather, accidents, incorrect
set up, damage caused by mould, insects, animals or children. This also excludes broken poles
and damage caused by a jammed, snagged zipper or excessive force applied to zipper causing
failure.
Consumer rights
Our goods come with guarantees that cannot be excluded under Australian law. You are entitled
to a replacement or refund for a major failure and for compensation for any other reasonably
foreseeable loss or damage. You are also entitled to have goods repaired or replaced if the
goods fail to be of acceptable quality and failure does not amount to a major failure.
* Due to our policy of continual product development, the specications, colours and features
may vary.
Making a claim
To make a claim in relation to the above manufacturers warranty please ensure you retain your
sales receipt of purchase. Please contact us stating the nature of your claim and we will be in
touch with you shortly. If you require additional assistance, please phone 03 9547 4691 to dis-
cuss and arrange your claim. Product subject to warranty will be sent to 23ZERO Australia, 32b
Eileen Rd. Clayton South, Victoria 3169. All freight costs associated with return of product for
assessment is payable by consumer.
TM
SABER USER MANUAL

10
Mounting rail dimensions
TM
SABER USER MANUAL
The diagrams and dimensions below will assist in preparing roof racks and roof bars for tment.

Other 23zero Tent manuals

23zero
23zero OSPREY 270 User manual

23zero
23zero ABS HARDSHELL User manual

23zero
23zero DUKE SWAG User manual

23zero
23zero PANTHER User manual

23zero
23zero PANTHER User manual

23zero
23zero WOOF-DEN User manual

23zero
23zero RAPID SHOWER TENT User manual

23zero
23zero DUKE ANNEX User guide

23zero
23zero OUTBREAK User manual

23zero
23zero Dakota 1400 User manual