23zero Dakota 1400 User manual

TM
ROOF TOP TENT
USER MANUAL
This manual applies to the following
23 Zero Roof Top Tents:
Stealth
Dakota 1400
Dakota 1600
Dakota 1800
Dakota 2200

TM
ROOF TOP TENT USER MANUAL
Thank you for purchasing a 23 ZERO Roof Top Tent
Congratulations on your purchase of a 23ZERO Roof Top Tent. We strive to provide you with the
ultimate camping experience. Your Roof Top Tent mounts directly to your roof rack or aftermarket
roof bars. It opens and is fully setup in just a few minutes. As well as our innovative LST fabric,
your roof top tent is made with durable materials and high-quality fabrics that provide excellent
water and wind protection.
Most of the components have been pre-assembled with the exception of attaching the ladder
brackets and ladder to the base of the tent. The 1400 wide and 1600 wide tents also require the
mounting channels be attached. The orientation of these channels is dependent on your setup
preference, see “Attaching Mounting Channels”
Tent setup is composed of unpacking, attaching mounting channels to the base of the tent,
attaching the ladder, sliding and zipping the tent cover, and then mounting your tent onto the roof
rack or roof bars.
Note: During set up and rst use, some aluminium swarf may be present inside your roof top
tent. We make every possible attempt to expel and vacuum all aluminium swarf, however, with
vibrations caused by logistics some residual may dislodge and reappear. It is advised to remove
and clean these during rst set up.
PLEASE READ ALL INSTRUCTIONS PRIOR TO INSTALLING
1
CONTENTS
Hardware & Accessories
Safety & Warnings 2
3
Tent orientation
Attaching ladder
Attaching mounting channels
Fitting to roof rack
5
6
6
7
Hardware identication chart 4
Ladder adjustment
Warranty
Attaching optional annex
Closing and storage
9
10
11
12
Fitting transit cover 11
Using the roof top tent 7-8

2
Safety & Warnings
Improper installation or use of your Roof Top Tent may result in serious injury or death. You
will need to follow these installation instructions carefully to ensure proper installation on your
vehicle and safe use of your roof top tent. Please contact your vehicle manufacturer for specied
loading capacity of your roof rack. Not all factory roof racks or aftermarket roof bars can safely
accommodate tent models.
Note: Alterations and/or inclusions such as roof racks and roof top tents applied to the vehicle
roof may affect vehicle handling and characteristics.
The manufacturer (23ZERO) disclaims all responsibility in case of accidents due to improper use,
improper maintenance or checking the tightness of the brackets regarding the installation of the
roof rack system.
Inspections: Roof top tents have many moving parts so maintenance checks are always advised.
During trips regularly check that all nuts and bolts attaching the roof top tent to your vehicle as
well as hinge and lug bolts are tight and in good repair.
For your safety and protection, ensure correct placement and angle of ladder. Recommended
ladder placement is a 4:1 ratio or approx. 75°.
Ladder height may need to be adjusted depending on vehicle height, see “Ladder Adjustment”
DO NOT CLIMB ON LADDER UNTIL CORRECT ANGLE IS ACHIEVED
23Zero - The wholesaler / manufacturer shall not be liable for special, indirect incidental or
consequential damages.
TM
ROOF TOP TENT USER MANUAL

3
Hardware & Accessories
All roof top tents include a mounting kit with a convenient carry bag. Everything required to
mount your roof top tent to most roof racks is included in this kit.
Note: Some platform style roof racks have platforms which are wider than the supplied
mounting plate. 23ZERO have wider mounting plates available for this scenario. Please visit
www.23zero.com.au.
Also included:
- Mounting rails with end caps.
- 2 pegs
- 3 hooked elastic pack up cords
- 10mm/13mm open end spanner & 13mm ratchet spanner
- Window stay poles
The Stealth, Dakota 1400 & Dakota 1600 have 2 mounting rails included. These are not
attached to the baseboard to allow you to determine the appropriate orientation for your
setup, see “Tent Orientation”
The Dakota 1800 & Dakota 2200 have 3 mounting rails included. These are factory tted
to the baseboard. The 3rd rail (closest to the hinge side) has been added to provide
additional support to the join of the baseboard when the tent is operational. Although it can
be, this rail is not required as a mounting option.
Stealth, Dakota 1400 & Dakota 1600, 6pcs
Dakota 1800 & Dakota 2200, 7pcs
TM
ROOF TOP TENT USER MANUAL

4
Hardware identication chart
TM
ROOF TOP TENT USER MANUAL

5
Tent Orientation
These orientations depend on the size of the roof top tent. The Dakota 1400 can be mounted in
either orientation. 23ZERO recommends the Dakota 1600, Dakota 1800 and Dakota 2200 to be
side mounted.
The conguration of the bars on your roof rack will determine the tment of the mounting channels
to your roof top tent.
Whether adopting a rear mount or side mount orientation, ensure the mounting channels run in
the opposite direction to the bars of your roof rack.
Note: If required to t the mounting channels along the short side of the RTT (1200mm side)
these channels will need to be cut ush with the outer edge of the baseboard.
There are two mounting options for the orientation of Roof Top Tents.
Rear Mounted – The ladder extends from the back of the vehicle.
Side Mounted – The ladder extends from the side of the vehicle.
*Mounting rail position for roof bars left to right
*Mounting rail position for roof bars front to back
REAR SIDE
TM
ROOF TOP TENT USER MANUAL

Attaching mounting rails
Remove the roof top tent from the carton and place on a clean surface. Observe the face of the
baseboard which has four holes in the centre area of the base, face this side upwards. Open the
tent and remove contents from inside.
Once you have determined the orientation of your roof top tent and mounting rails, prepare the
mounting rails by sliding 2 x M6 Nyloc nuts and lining them up with each hole in each rail. Using
the four supplied 40mm Steel M6 bolt with 50mm M6 washers, slide your hand inside the tent
between the base and mattress, and insert the bolts with washers into the pre-drilled holes. The
bolt threads should be facing outward. Place mounting channels on exposed bolts and hand
tighten once located into the Nyloc nut.
Once all bolts and nuts have located, tighten rmly from inside the tent using the supplied 10mm
spanner.
Note: If you chose an orientation which requires you to t the mounting rails along the 1200mm
edge of the baseboard, these will extend 100mm past each edge. Cut these ush with the edge
of the baseboard.
Attaching Ladder
6
Now that the mounting rails have been tted, turn the roof top tent around allowing 2 pairs of
holes on the outer edge of the baseboard to face upward, (4 pairs of holes for the Dakota 2200).
Using the 40mm M6 bolts and 1 washer per bolt, insert these through the holes via the inside of
the tent. With the bolt threads facing outward, locate the holes on the ladder brackets and place
these over the bolt threads. Add the second washer and twist Nyloc nut hand tight. Once all
located, tighten all nuts with 10mm spanner.
Line up the holes on the ladder with the holes on the ladder brackets and insert the 2 x 16mm
M6 bolts ensuring a nylon washer is placed between the ladder and the ladder bracket. Once all
Nyloc nuts are located, tighten with 10mm spanner.
Note: DO NOT DRILL HOLES INTO THE BASEBOARD.
TM
ROOF TOP TENT USER MANUAL

7
Fitting to roof rack
Before tting the roof top tent to your roof rack, ensure all the side tie down straps are secured.
You may even choose to t the transit cover before installation, see “Fitting transit cover”. To
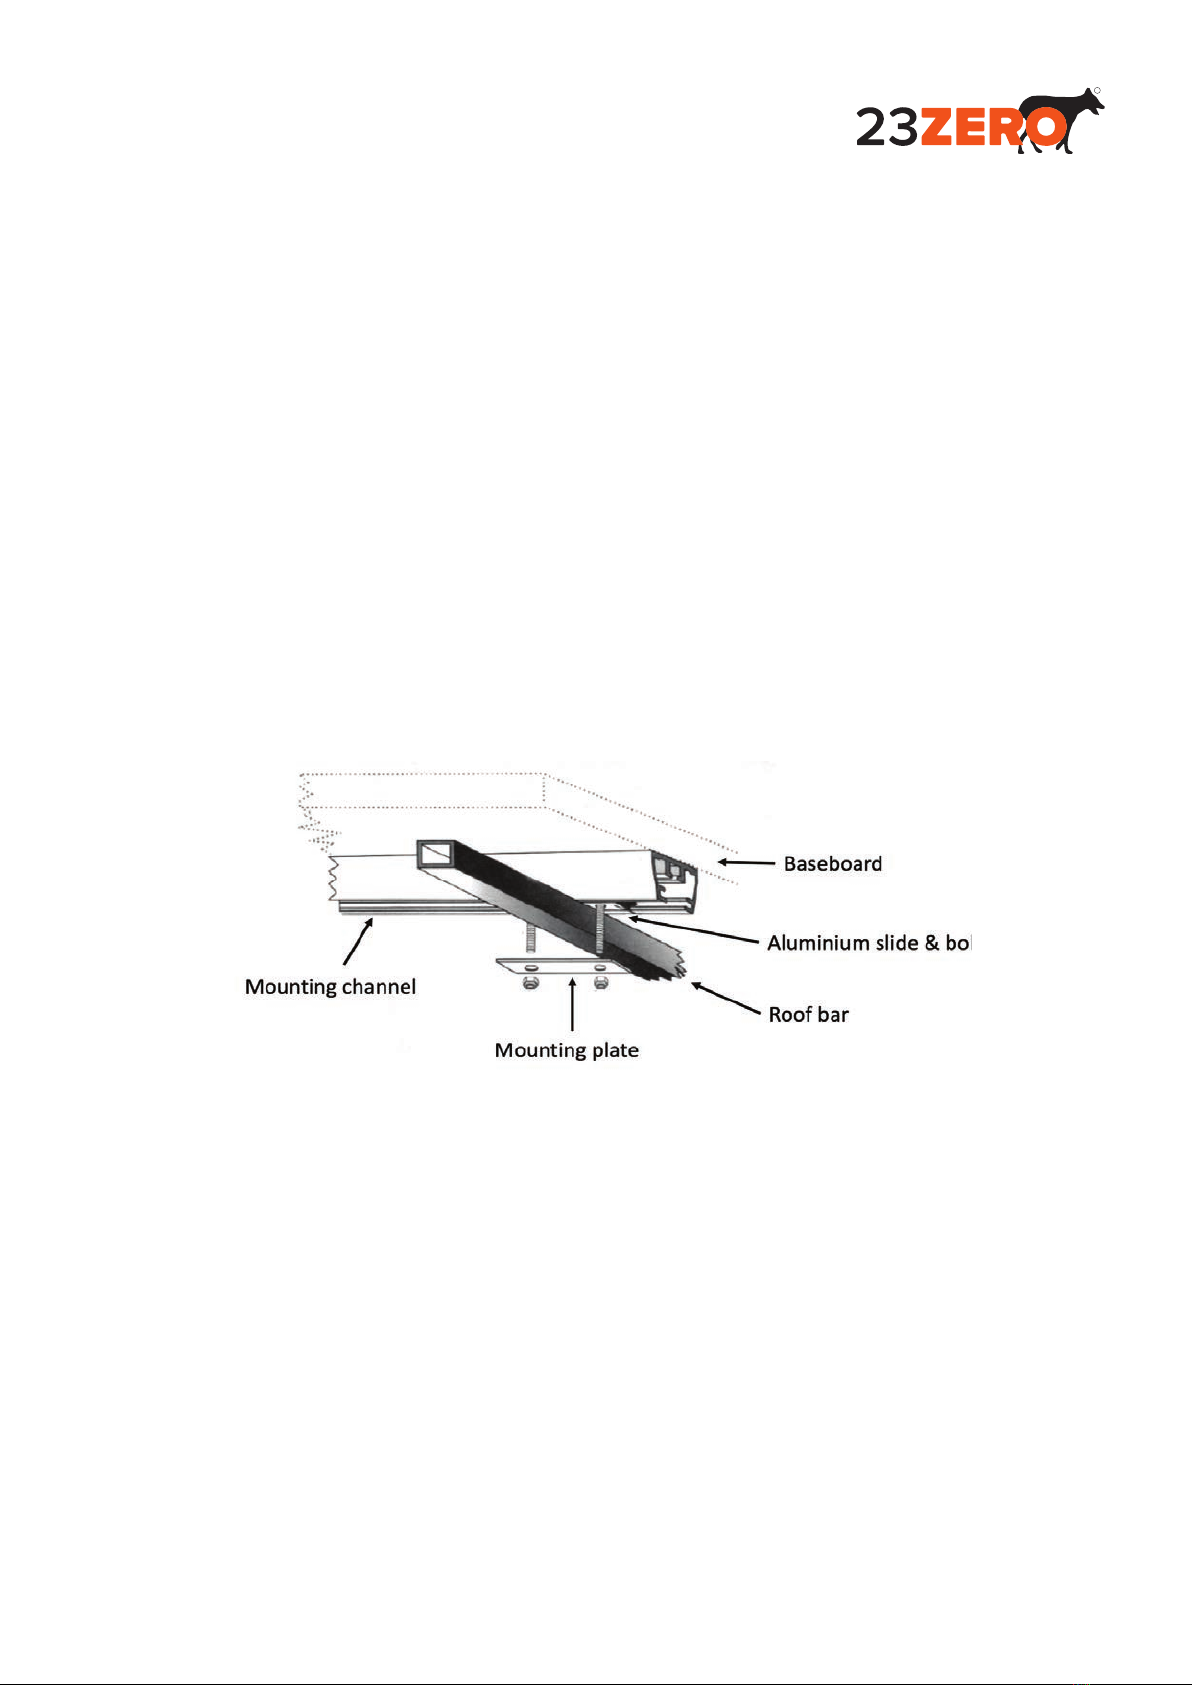
secure the roof top tent to the roof rack, it must be clamped on 4 corners using the aluminium
slides and mounting plates supplied. To do this, place the roof top tent on top of the vehicle’s roof
rack (minimum 2-person lift).
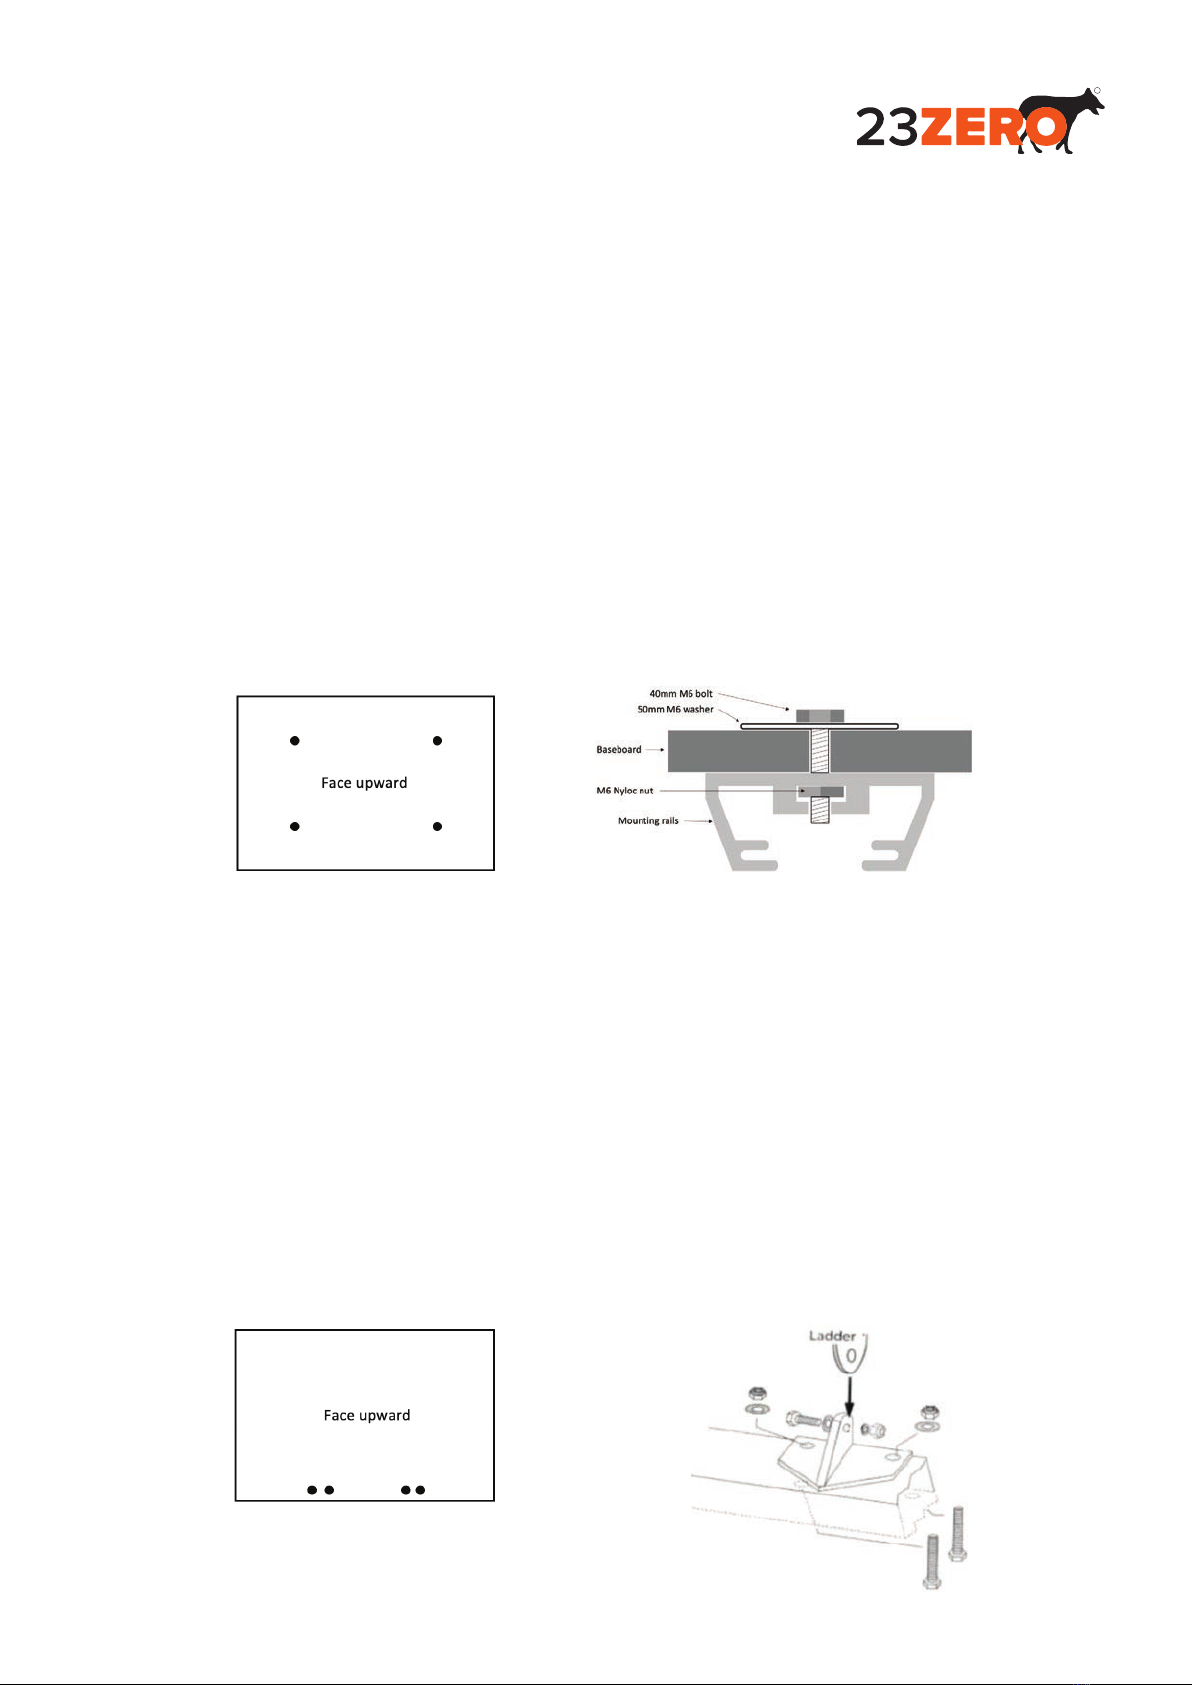
Insert the 55mm M8 bolts into the slide plates and slide the plates and bolts into the mounting
channels. You will need to tilt the roof top tent to allow the inner bolts to cross over onto the inside
of the roof bars.
Inspect the position of the roof top tent to ensure it will open to the desired side. Place mounting
plate under roof bar whilst locating the bolts. Insert washer and hand tighten Nyloc nut. Repeat for
all 4 corners. Double check the tents position as desired and tighten all nuts securely with 13mm
spanner. Insert rubber end caps into the ends of the mounting channels, this may require light
taps from a hammer.
Inspections: Roof top tents have many moving parts so maintenance checks are always advised.
During trips regularly check that all nuts and bolts attaching the roof top tent to your vehicle as
well as hinge and lug bolts are tight and in good repair.
Using the Roof top tent
To open the roof top tent, rstly remove the transit cover, see “Fitting transit cover” and release
the side tie down straps. Undo the ladder strap and extend the ladder fully by pulling on the
bottom rung until all rungs are locked in place. Using the ladder as a lever, pull down on the
ladder to start unfolding the tent. As the tent begins to open and the ladder starts to support the
tent’s weight, step backwards gradually until the baseboard is laying at. It is very important to
always support the weight of the roof top tent via the ladder until it is fully unfolded. Allowing the
tent to unfold without supporting the weight will put undue pressure on hinges, baseboard and
canvas potentially damaging the roof top tent.
The ladder should now be height adjusted and secured at the correct angle under the
baseboard, see “Ladder adjustment”
NOTE: Under no circumstances should anyone climb or be inside the roof top tent if the
ladder is not locked and secured at the correct angle.
TM
ROOF TOP TENT USER MANUAL

Extend the canopy over the ladder by releasing the trigger locks on each side of the canopy
hoops and extending these until the canopy is taut. Push down on the trigger to lock into
position. If not using an annex with your tent, anchor the canopy with supplied guy ropes and
pegs.
Insert the hook end of the window stay poles into the eyelets of the window canopies and the
other end into the corresponding holes in the baseboard. The tropical y also requires stay
poles. Insert the hook end of the window stay poles into the eyelets of the tropical y and the
other end into the corresponding holes in the baseboard.
All 23ZERO roof top tents have sky windows with zippered y mesh tted. These can be used
with or without the tropical ysheet attached. The ysheet may be removed from the roof top
tent to promote sky views while laying down or ventilation can be improved during inclement
weather by having the sky window open and tropical y sheet attached.
Caution: In rainy conditions, the tropical ysheet must cover the sky window even if the
canvas is zipped up.
To attach optional annex, see “attaching optional annex”
8
TM
ROOF TOP TENT USER MANUAL

9
For your safety and protection, ensure correct placement and angle of ladder. See diagrams
below. Recommended ladder placement is a 4:1 ratio or approx. 70° to 75°.
The ladder placed in correct position also acts as a brace for the suspended base of your tent.
NOTE: Under no circumstances should anyone be inside the roof top tent if the ladder is
not locked and secured at the correct angle.
The ladder may need to be adjusted to achieve the correct angle depending on the height of your
setup. If shortening is required, the adjustment must be done from the top.
Ensure the ladder is fully extended and all rungs are locked in place. Press the rst set of locking
buttons (second rung from the top) and allow the ladder to compress until a gap of approx. 85mm
is achieved between rung 1 & 2. Note: The ladder will only lock in the downward position.
Swing in the bottom of the ladder until it supports the weight of the roof top tent. If the angle of the
ladder is between 70° and 75°, the adjustment is complete.
Ladder adjustment
NOTE: When height adjusted, the ladder will only lock in the downward position.
If further adjustment is required, repeat the above steps by continuing the sequence by depressing
the next set of locking buttons.
If further shortening is required press the second set of locking buttons (third rung from the top).
This will close the 85mm gap until rung 1 & 2 are now touching. Swing in the bottom of the ladder
until it supports the weight of the roof top tent. If the angle of the ladder is between 70° and 75°,
this adjustment is complete.
TM
ROOF TOP TENT USER MANUAL

10
23ZERO annexes are available in a range of sizes to suit all 23Zero roof top tents. The correct
size annex must be used on your roof top tent.
Before attaching the annex ensure nobody is in the roof top tent. Retract the ladder and secure
it with the ladder retaining strap. Remove window stay poles from the baseboard.
The 23ZERO optional annex has 4 top edges, three of which have a continuous zip and one
which has a Kedar sail rope.
Feed the sail rope edge of the annex into the sail track that was occupied by the transit cover
(centre of baseboard when tent is open). Assistance may be required to do this. Locate the zip
puller which is on the bottom edge of the roof top tent and slide it to the start of the zip. Insert
the end of the zip on the annex through the zip slide until the pin is seated into the zip box.
Begin to slide the zip. It is important to lift the weight of the annex with your opposite hand while
zipping to avoid damaging the zip.
Insert the window stay poles through the allocated openings on the annex and then into the
designated holes in the baseboard. Enter the annex and reposition the ladder at the correct
angle. Starting at the back closest to the vehicle, angle the rear wall of the annex approximately
300mm outward past the centre of the RTT’s baseboard and anchor down with pegs on each
corner. Pull the base of the front of the annex and anchor down with pegs. Final adjustments
can be made using the adjustment straps.
Caution: The ladder may have moved during annex adjustment. Check the ladder and
ensure it is locked and at correct angle before climbing into roof top tent.
Attaching optional annex
TM
ROOF TOP TENT USER MANUAL

Closing & Storage
Most roof top tents allow minimal storage inside such as sleeping bags or blankets laid out at.
Thicker objects such as pillows are not recommended to be stowed inside your roof top tent as
these put excessive pressure on baseboard and hinges which may lead to failures and damage.
This damage is distinguishable and is not covered by warranty.
Bunji cords are included with your roof top tent. These assist in reducing the canvas from
billowing during roof top tent pack up. Attach these to the 3 round plastic loops located around
the windows inside the rtt. Bring them across to the opposite side and attach to the plastic
loops.
Release the trigger locks on the canopy hoop and retract. Use the Velcro straps to fasten the
canopy hoop against the tent.
Extend the ladder until it is fully locked in the open position and use this as a lever to fold the
tent closed. Tuck in all excess canvas and fasten the side D ring straps. Retract the ladder
closed and secure with retaining straps. Fit transit cover, see “Fitting transit cover” .
Caution: Do not pull down on Velcro straps when closing the tent. Excessive force on Velcro
straps will cause damage to your tent.
Caution: Avoid storing your tent wet. If conditions dictate that you do, open and dry out as soon
as possible to avoid moisture damage.
11
Transit covers are a crucial accessory for any roof top tent as they keep your roof top tent clean
and dry whilst traveling to your destination. Correct tment is vital to ensuring it performs as
intended and prolongs it’s lifespan.
The 23ZERO PVC transit cover has 4 edges, three of which have a continuous zip and one
which has a Kedar sail rope.
Once the tent is packed up, billowing canvas tucked in, side retaining straps fastened and
ladder straps secured, slide the sail rope edge of the transit cover into the sail track on the
hinge side of the roof top tent. Once centred, lift the cover over the roof top tent and guide the
opposite corners carefully by pulling down on them gently over the tent corners. Some further
adjustment may be required to centre the transit cover.
Locate the zip puller which is on the baseboard skirt and slide it to the start of the zip. Insert the
end of the zip on the cover through the zip slide until the pin is seated into the zip box. Begin to
slide the zip.
Zip the cover completely and fold around the Velcro tabs covering the exposed corners. Position
the transit cover straps over the cover avoiding any twists and fastened them through the D
rings to reduce the transit cover ballooning when traveling.
To remove the cover, follow the above sequence in reverse.
Caution: Damage to the zip may occur if the zip is forced when not seated correctly.
Caution: Pulling on the zip on a downward angle and sliding (diagonally) will damage the zip
teeth. Always slide the zip vertically.
Fitting transit cover
TM
ROOF TOP TENT USER MANUAL

12
2 Year Warranty
23ZERO will replace or repair any product at its discretion that is subject to faulty manufacturing
or workmanship including materials.
Exclusions
The above warranty is limited to manufacturing and materials defects. Not including damage
caused by misuse or abuse, wear and tear, condensation, extreme weather, accidents, incorrect
set up, damage caused by mould, insects, animals or children. This also excludes broken poles
and damage caused by a jammed, snagged zipper or excessive force applied to zipper causing
failure.
Consumer rights
Our goods come with guarantees that cannot be excluded under Australian law. You are entitled
to a replacement or refund for a major failure and for compensation for any other reasonably
foreseeable loss or damage. You are also entitled to have goods repaired or replaced if the
goods fail to be of acceptable quality and failure does not amount to a major failure.
* Due to our policy of continual product development, the specications, colours and features
may vary.
Making a claim
To make a claim in relation to the above manufacturers warranty please ensure you retain your
sales receipt of purchase. Please contact us stating the nature of your claim and we will be
in touch with you shortly. If you require additional assistance, please phone 03 9547 4691 to
discuss and arrange your claim. Product subject to warranty will be sent to 23ZERO Australia,
32b Eileen St Clayton South, Victoria 3169. All freight costs associated with return of product for
assessment is payable by consumer.
TM
ROOF TOP TENT USER MANUAL

This manual suits for next models
3
Table of contents
Other 23zero Tent manuals

23zero
23zero DUKE ANNEX User guide

23zero
23zero PANTHER User manual

23zero
23zero PANTHER User manual

23zero
23zero RAPID SHOWER TENT User manual

23zero
23zero OUTBREAK User manual

23zero
23zero SABER User manual

23zero
23zero DUKE SWAG User manual

23zero
23zero ABS HARDSHELL User manual

23zero
23zero OSPREY 270 User manual

23zero
23zero WOOF-DEN User manual
Popular Tent manuals by other brands

DREMCOR
DREMCOR Select Series Instructions and owner's manual

qeedo
qeedo Quick Pine 3 instructions

Eureka
Eureka Apex XT Assembly instructions

skandika outdoor
skandika outdoor HARSTAD Setup Instruction

DARCHE
DARCHE DIRTY DEE instruction manual

Tentandtable.com
Tentandtable.com HIGH PEAK FRAME TENT 20 x 20 Assembly instructions