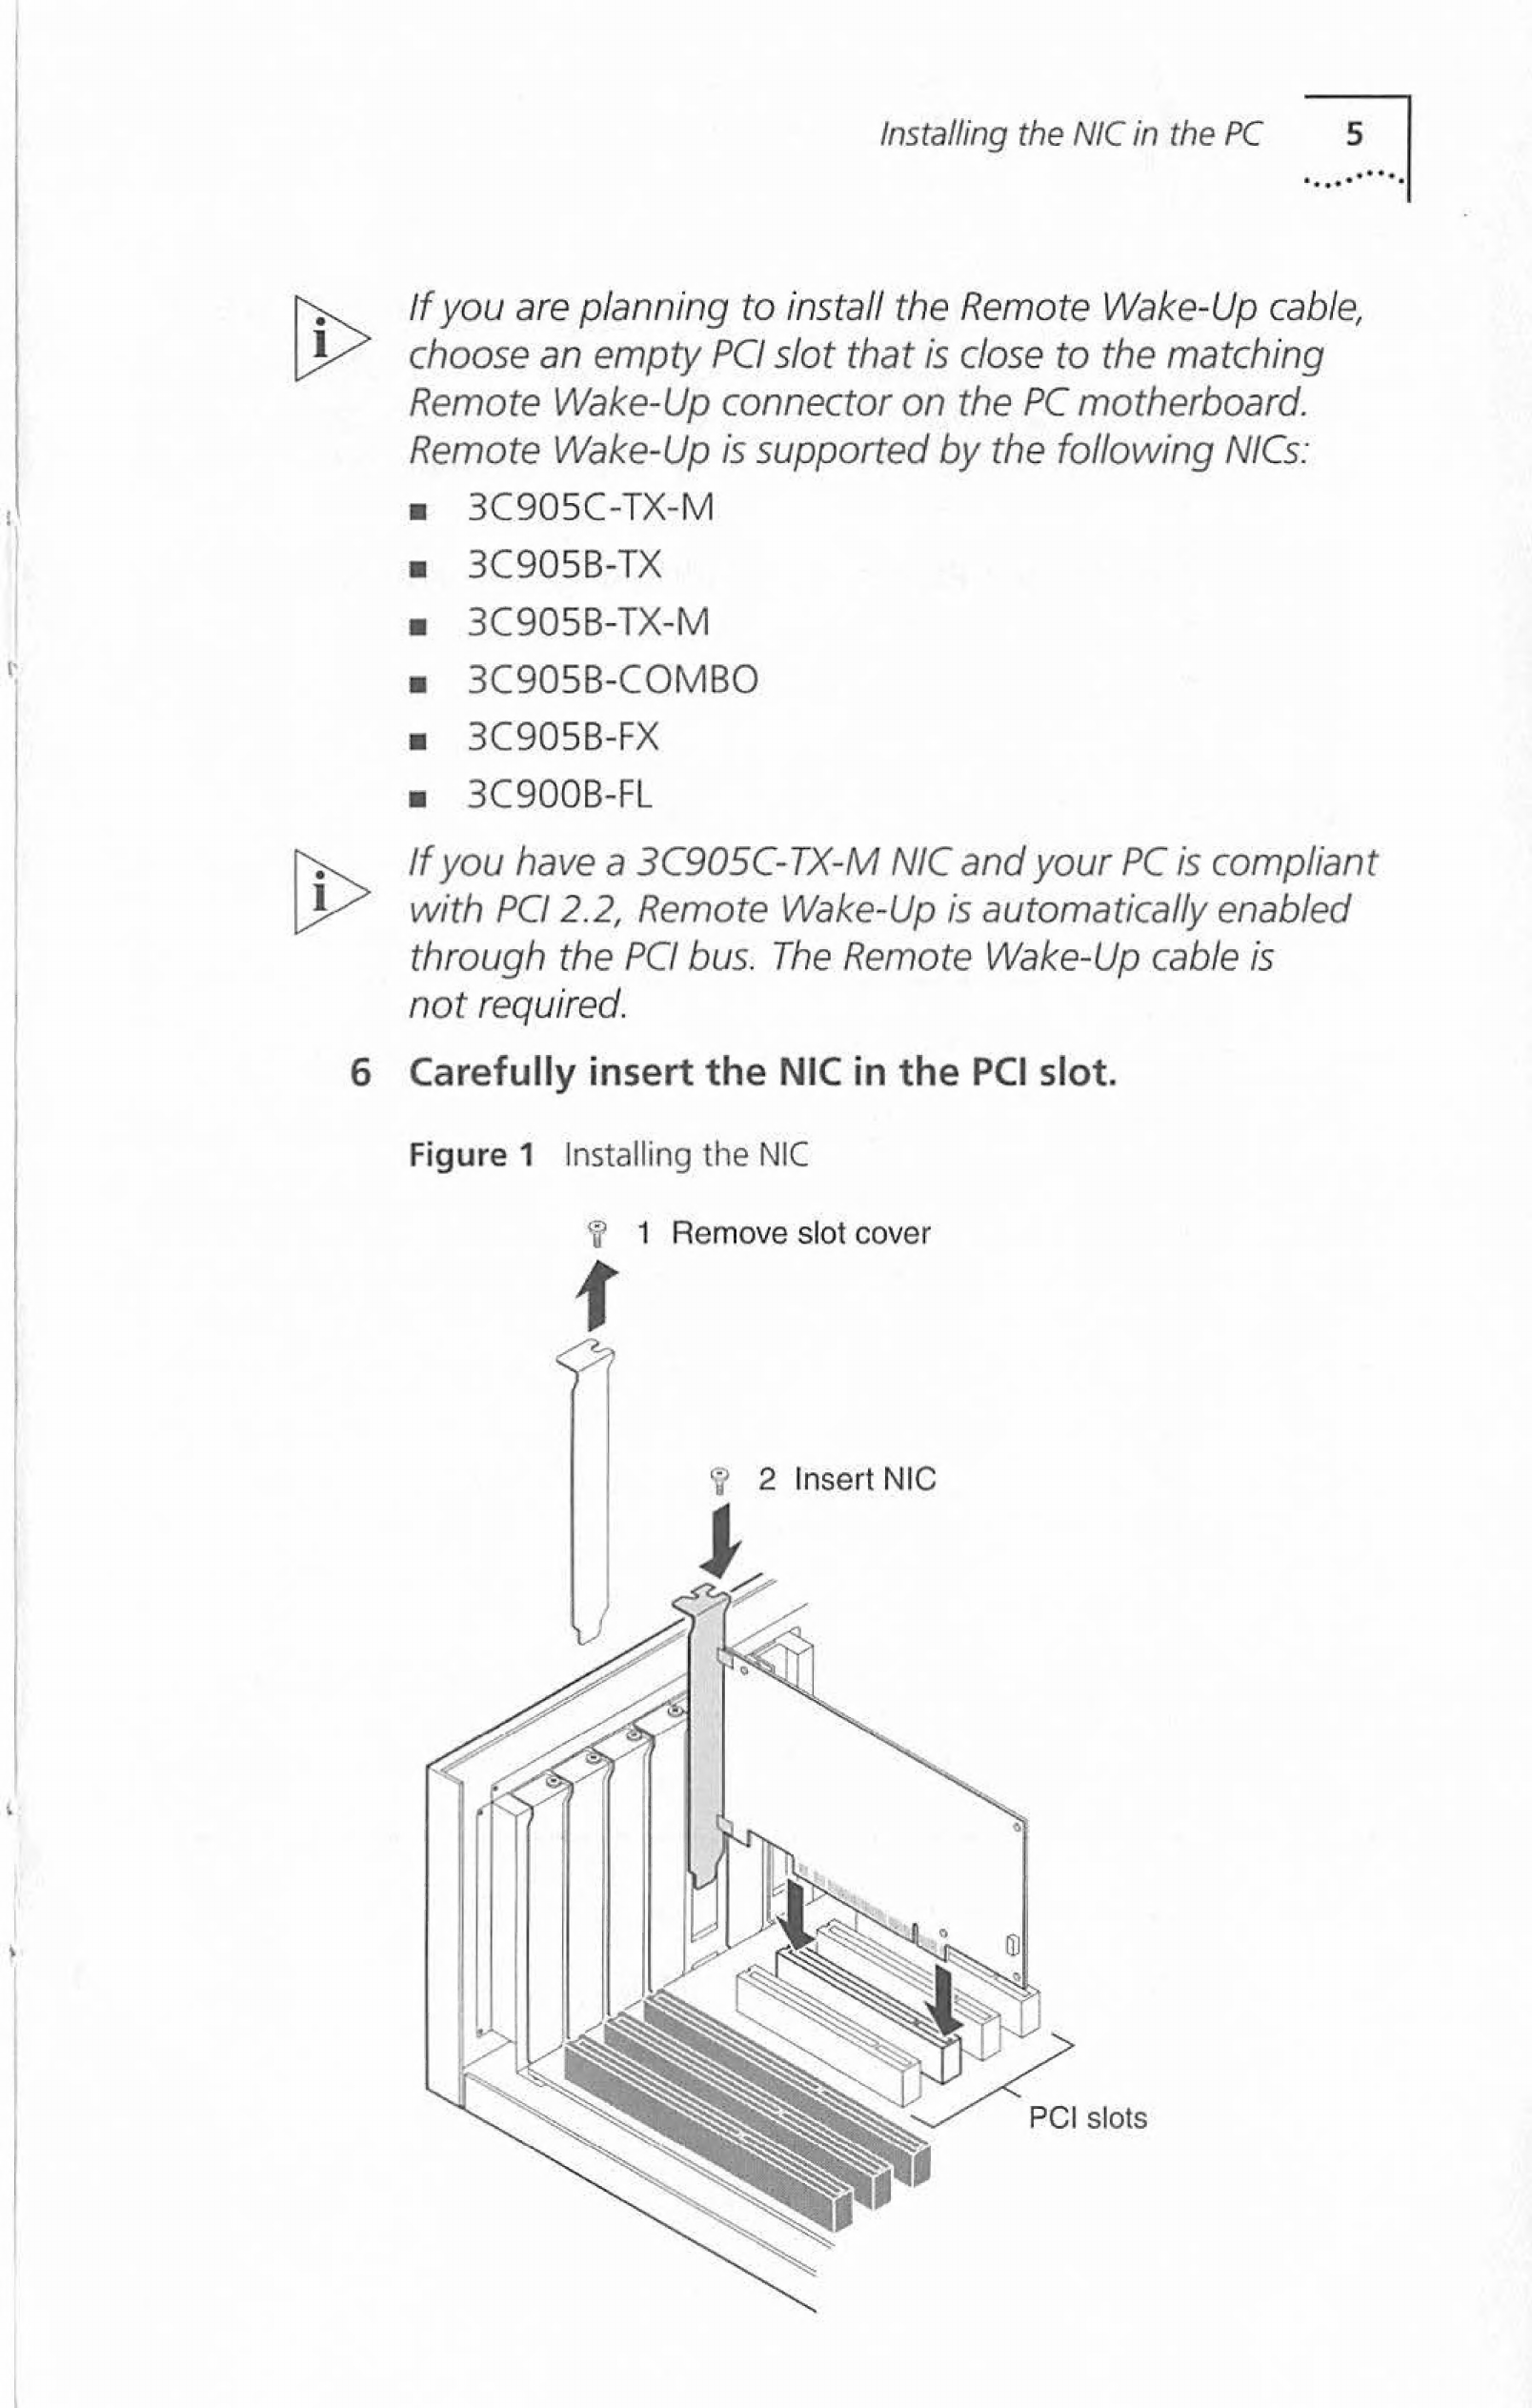
3Com 3C900B-FL User manual

.
ere
-
ETHERLINK®
PCI
NETWORK
INTERFACE
CARDS
QUICK
GUIDE
Introduction
This
guide
explains
how
to
use
EtherCD
5.x
to
install
the
following
3Com®
EtherLink®
PCI
network
interface
cards
(NICs)
in
a
PC
running
Microsoft
Windows
95,
Windows
98,
or
Windows
NT
4.0:
NIC
Model
Number(s)
EtherLink
10/100
PCI
3C905C-TX-M
For
Complete
PC
Management
EtherLink
10/100
PCI
3C905B-TX
3C905B-TX-M
3C905B-TX-NM
3C905B-COMBO
EtherLink
100
PCI
Fiber
3C905B-FX
EtherLink
10
PCI
Fiber
3C900B-FL
EtherLink
10
PCI
3C900B-TPO
3C900B-COMBO
For
other
operating
systems,
or
for
more
information
on
the
NICs,
see
the
user
guide
located
on
the
EtherCD.
If
you
are
installing
a
3C900
or
3C905
NIC
in
a
Windows
98
i>
PC,
follow
the
instructions
in
the
WIN98.
TXT
file
located
in
Help
directory
on
the
EtherCD.
Do
not
follow
the
instructions
in
this
quick
guide.
Part
No.
09-1700-000
Published
June
1999

Obtaining
Installation
Diskettes
If
your
PC
does
not
have
a
CD-ROM
drive,
you
can
obtain
installation
diskettes
one
of
two
ways:
m
Access
a
PC
that
has
a
CD-ROM
drive
and
create
driver
installation
diskettes
from
the
EtherCD.
See
the
user
guide
on
the
EtherCD
for
instructions.
=
Contact
3Com
to
order
installation
diskettes
for
EtherCD
version
5.1:
s
‘Toll-free
number
from
the
United
States
and
Canada:
1-877-226-4604
s
Toll
number
for
international
calls:
1-510-226-4604
Accessing
Help
lf
you
experience
problems
installing
or
using
the
NIC,
access
one
of
the
following
help
resources:
a
3Com
Knowledgebase:
http:
//knowledgebase.3com.com
mw
E&therLink
PCI
Network
Interface
Cards
User
Guide
(located
on
the
EtherCD)
mw
3ComNIC
Help
system
(installed
with
the
3Com
NIC
Diagnostics
program
for
Windows)
mw
Help
text
files
(located
in
the
HELP
sini:
on
the
EtherCD)
installation
Overview
2
3
4
There
are
four
steps
to
the
NIC
installation:
Run
the
preinstallation
program
before
installing
the
NIC
in
the
PC.
The
preinstallation
program
prevents
conflicts
with
the
NIC
and
your
operating
system.
It
guides
you
through
the
NIC
installation
and
must
be
run
before
you
physically
install
the
NIC
in
the
PC.
Install
the
NIC
in
the
PC.
Connect
the
NIC
to
the
network.
Install
the
network
driver.

Running
the
Preinstallation
Program
3
|
Installing
Multiple
NICs
If
you
are
installing
multiple
EtherLink
PCI
NICs
in
a
PC
or
server,
follow
the
instructions
in
“Installing
Multiple
NICs”
in
the
user
guide.
Do
not
follow
the
instructions
in
this
quick
guide.
Upgrading
Windows
95
to
Windows
98
If
you
are
upgrading
a
PC
from
Windows
95
to
Windows
98
that
already
has
an
EtherLink
PCI
NIC
installed,
follow
the
instructions
in
the
WIN98.TXT
file
located
in
the
HELP
directory
on
the
EtherCD.
Updating
the
Network
Driver
If
you
already
have
an
EtherLink
PCI
NIC
installed
and
want
to
update
the
network
driver,
use
the
Update
NIC
Driver
option
on
the
EtherCD.
See
the
user
guide
on
the
EtherCD
for
instructions.
Running
the
Preinstallation
Program
Before
you
physically
install
the
NIC
in
a
PC,
run
the
NIC
preinstallation
program
to
properly
set
up
your
system
environment.
To
run
the
preinstallation
program:
Do
not
install
the
NIC
in
the
PC.
Turn
on
the
power
to
the
PC
and
start
Windows.
Quit
any
open
applications
and
disable
the
automatic
protection
feature
of
any
anti-virus
software
that
may
be
running.
4
Insert
the
EtherCD
in
the
CD-ROM
drive.
The
EtherCD
Welcome
screen
appears.
If
the
EtherCD
Welcome
screen
does
not
appear,
enter
the
following
command
from
the
Run
option
of
the
Windows
Start
menu:
d:\installs\setup.exe
where
d:\
represents
the
letter
name
of
your
CD-ROM
drive.
Click
NIC
Software.
Click
NIC
Drivers
and
Diagnostics.

|
4
ETHERLINK®
PCI
NETWORK
INTERFACE
CARDS
QUICK
GUIDE
oe
Chae
PD
7
Click
Install
NIC
Driver.
=
To
install
the
network
driver
and
the
3Com
NIC
Diagnostics
program,
click
Install
with
Diagnostic
Program.
a
To
install
the
network
driver
only,
click
Install
without
Diagnostic
Program.
Files
are
copied.
A
message
box
appears
when
the
installation
is
complete.
8
Click
OK.
Select
your
operating
system
to
continue
the
installation.
The
Completing
NIC
Installation
screen
appears.
10
Click
Done.
11
Exit
the
EtherCD,
and
then
shut
down
Windows.
12
Turn
off
the
power
to
the
PC.
Do
not
remove
the
EtherCD
from
the
CD-ROM
drive.
The
next
step
is
to
install
the
NIC
in
the
PC.
Installing
the
NIC
in
the
PC
To
install
the
NIC
in
the
PC:
1
Make
sure
that
you
have
run
the
preinstallation
program,
as
described
in
the
previous
section.
2
Remove
all
jewelry
from
your
hands
and
wrists.
Use
only
insulated
or
nonconducting
tools.
3
Turn
off
the
power
to
the
PC
and
unplug
the
power
cord.
Remove
the
cover
from
the
PC.
5
Locate
an
empty,
nonshared
bus-mastering
PCI
slot
and
remove
its
slot
cover.
Save
the
screw.
Do
not
install
the
NIC
in
a
shared
PCI
slot.
Avoid
any
PCI
slot
next
to
an
ISA
slot.
This
is
often
a
shared
slot
and
does
not
support
bus
mastering.

Installing
the
NIC
in
the
PC
5
et
te
If
you
are
planning
to
install
the
Remote
Wake-Up
cable
choose
an
empty
PCI
slot
that
is
close
to
the
matching
Remote
Wake-Up
connector
on
the
PC
motherboard.
Remote
Wake-Up
is
supported
by
the
following
NICs:
3C905C-TX-M
3C905B-TX
3C905B-TX-M
3C905B-COMBO
3C905B-FX
3C900B-FL
If
you
have
a
3C905C-TX-M
NIC
and
your
PC
is
compliant
with
PCI
2.2,
Remote
Wake-Up
is
automatically
enabled
through
the
PCI
bus.
The
Remote
Wake-Up
cable
is
not
required.
Carefully
insert
the
NIC
in
the
PCI
slot.
Figure
1
Installing
the
NIC
1
Remove
slot
cover
i
7
2
Insert
NIC
y
er
-
PCI
slots

aats
er
Fee?
7
Secure
the
NIC
with
the
screw
you
removed
in
step
5.
lf
you
want
to
connect
the
Remote
Wake-Up
cable,
see
“Connecting
the
Remote
Wake-Up
Cable”
in
the
user
guide
to
continue
the
installation.
If
you
do
not
want
to
connect
the
cable,
continue
with
step
8.
8
Replace
the
PC
cover
and
plug
in
the
power
cord.
Do
not
turn
on
the
power
to
the
PC.
The
next
step
is
to
connect
the
NIC
to
the
network.
Connecting
the
NIC
to
the
Network
Port
RJ-45
AUl
BNC
SC
ST
Connect
the
appropriate
network
cable
to
the
port
on
the
NIC,
following
the
specifications
in
the
table
below.
Network
Maximum
Environment
Cable
Required
Cable
Length
100
Mbps
Category
5
unshielded
100
m
(328
ft)
(100BASE-TX)
__
twisted-pair
10
Mbps
Category
3,
4,
or
5
100
m
(328
ft)
(10BASE-T)
unshielded
twisted-pair
10
Mbps
10BASES
thick
Ethernet
500
m
(1,640
ft)
(10BASE5)
coaxial
(10
Mbps
only)
10
Mbps
1OBASE2
thin
Ethernet
coaxial
185
m
(607
ft)
(10BASE2)
(10
Mbps
only)
100
Mbps
Long-wavelength
fiber-optic
Full-duplex:
2,000
m
(1OOBASE-FX)
=
(1300
nm):
50
p/125
u
or
(6,560
ft
)
62.5
p/125
w
multimode
fiber
Half-duplex:
412
m
(1,351
ft)
10
Mbps
Short-wavelength
fiber-optic
Full-duplex:
2,000
m
(JOBASE-FL)
=
(850nm):50y/125por
—-
(6,560
ft)
62.5
w/125
»
multimode
fiber
Half-duplex:
412
m
(1,351
ft)
For
detailed
instructions,
see
the
user
guide.
The
next
step
is
to
install
the
network
driver.

Installing
the
Network
Driver
This
section
describes
how
to
install
the
network
driver
on
a
PC
running
Windows
95,
Windows
98,
or
Windows
NT
4.0.
For
other
operating
systems,
see
the
user
guide
on
the
EtherCD.
Before
installing
the
network
driver:
=m
Make
sure
that
you
have
run
the
preinstallation
program.
mw
Make
sure
that
the
NIC
is
installed
in
the
PC
and
that
it
is
connected
to
the
network.
=»
Make
sure
you
have
the
Windows
installation
files
(Windows
95/98
only).
These
files
may
be
on
a
CD
or
they
may
have
been
copied
to
your
hard
drive
when
Windows
was
installed
on
the
PC.
Windows
95
To
install
the
network
driver:
1
Turn
on
the
power
to
the
PC.
Windows
95
detects
the
NIC.
The
Insert
Disk
dialog
box
appears,
prompting
you
to
insert
the
EtherCD.
If
the
New
Hardware
Found
screen
appears
or
the
i>
Update
Device
Driver
Wizard
starts,
the
NIC
preinstallation
program
was
not
run
on
the
PC.
Follow
the
instructions
in
the
W95NDIS.TXT
file
located
in
the
Help
directory
on
the
EtherCD
to
continue
the
installation.
2
Make
sure
that
the
EtherCD
is
inserted
in
the
CD-ROM
drive.
3
Click
OK.
The
Copying
Files
dialog
box
appears.
4
Open
the
pull-down
menu
and
select:
c:\windows\options\cabs
5
Click
OK.
Files
are
copied.
w
If
this
is
the
first
time
that
networking
is
being
installed
on
your
PC,
the
Identification
tab
of
the
Network
screen
appears.
Go
to
step
6.
a
If
networking
has
already
been
installed,
you
are
prompted
for
the
Windows
95
CD.
Go
to
step
7.

ETHERLINK®
PC]
NETWORK
INTERFACE
CARDS
QUICK
GUIDE
6
In
the
specified
fields
of
the
Identification
tab
screen,
enter
the
following
information,
and
then
click
OK:
s
Computer
Name—tdentities
the
PC
on
the
network
for
other
users.
This
entry
must
be
a
unique
name
of
15
characters
or
fewer,
containing
no
spaces.
a
Workgroup—ldentifies
the
group
(for
example,
your
department
name)
to
which
your
PC
belongs.
If
your
PC
is
connected
to
a
peer-to-peer
network,
this
entry
must
be
exactly
the
same
for
all
the
PCs
in
your
network.
=»
Computer
Description—Displays
additional
details
to
other
users
on
the
network
about
this
PC.
For
example,
you
could
specity
that
the
PC
has
a
printer
attached.
Filling
in
this
field
is
optional.
7
Remove
the
EtherCD
from
the
CD-ROM
drive,
insert
the
Windows
95
CD,
and
then
click
OK.
Files
are
copied.
You
are
prompted
to
restart
the
PC.
8
Remove
the
Windows
95
CD,
and
then
click
Yes
to
restart
the
PC.
You
must
restart
the
PC
to
complete
the
installation.
The
installation
is
complete.
Go
to
“Veritying
Successful
Installation”
later
in
this
guide
to
contirm
that
the
NIC
is
properly
installed.
_
After
Windows
restarts,
double-click
the
Network
icon
fe
—
in
the
Windows
Control
Panel
and
make
sure
that
the
correct
configuration
settings
are
selected
for
your
network
environment.
Contact
your
system
administrator
for
assistance.
Windows
98
To
install
the
network
driver:
1
Turn
on
the
power
to
the
PC.
Windows
98
detects
the
NIC.
The
Insert
Disk
dialog
box
appears,
prompting
you
to
insert
the
EtherCD.
__
If
the
Add
New
Hardware
Wizard
starts,
the
NIC
preinstallation
program
was
not
run
on
the
PC.
Follow
the
instructions
in
the
WIN98.
TXT
file
located
in
the
Help
directory
on
the
EtherCD
to
continue
the
installation.
2
Make
sure
that
the
EtherCD
is
inserted
in
the
CD-ROM
drive.

3
Click
OK.
The
Insert
Disk
dialog
box
appears.
4
Open
the
pull-down
menu
and
select:
c:
\windows\options\cabs
5
Click
OK.
Files
are
copied.
if
you
are
prompted
for
the
EtherCD,
click
OK,
make
sure
that
the
drive
letter
of
the
CD-ROM
drive
(for
example,
d.)
appears
in
the
dialog
box,
and
then
click
OK.
You
are
prompted
for
the
Windows
98
CD.
6
Remove
the
EtherCD,
insert
the
Windows
98
CD,
and
then
click
OK.
Files
are
copied.
You
are
prompted
to
restart
the
PC.
7
Remove
the
Windows
98
CD,
and
then
click
Yes
to
restart
the
PC.
i>
You
must
restart
the
PC
to
complete
the
installation.
The
installation
is
complete.
Go
to
the
next
section,
"Verifying
Successful
Installation,”
to
confirm
that
the
NIC
is
properly
installed.
After
Windows
restarts,
double-click
the
Network
icon
>
in
the
Windows
Control
Panel
and
make
sure
that
the
correct
configuration
settings
are
selected
for
your
network
environment.
Contact
your
system
administrator
for
assistance.
Windows
NT
4.0
To
install
the
network
driver:
Turn
on
the
power
to
the
PC.
2
Double-click
the
My
Computer
icon,
then
the
Control
Panel
icon,
and
then
the
Network
icon.
The
Network
window
appears.
3
Click
the
Adapters
tab.
If
networking
has
not
been
installed
on
your
PC
before,
Windows
NT
asks
you
if
you
want
to
install
networking.
Click
Yes.
See
the
WINNT.TXT
file
located
on
the
EtherCD
or
your
Windows
NT
documentation
for
instructions.

10
ETHERLINK®
PC]
NETWORK
INTERFACE
CARDS
QUICK
GUIDE
oe
ee
4
Click
Add.
The
Select
Network
Adapter
dialog
box
appears.
5
Click
Have
Disk.
The
Insert
Disk
dialog
box
appears.
Insert
the
EtherCD
in
the
CD-ROM
drive.
Make
sure
that
the
letter
name
of
your
CD-ROM
drive
(for
example,
d:\)
appears
in
the
entry
box,
and
then
click
OK.
The
Select
OEM
Option
dialog
box
appears.
8
Make
sure
that
the
3Com
EtherLink
PCI
NIC
is
selected,
and
then
click
OK.
The
Adapters
tab
of
the
Network
screen
appears.
9
Click
Close.
a
If
the
Microsoft
TCP/IP
Properties
screen
appears,
enter
the
requested
information
for
your
network
environment.
Refer
to
your
system
administrator
or
the
Windows
NT
documentation
for
assistance.
ws
|f
the
Microsoft
TCP/IP
Properties
screen
does
not
appear,
the
installation
is
complete.
10
Click
Yes
to
restart
the
PC.
The
network
driver
installation
is
complete.
Go
to
the
next
section,
“Verifying
Successful
Installation,”
to
confirm
that
the
NIC
is
properly
installed.
Verifying
Successful
Installation
Follow
the
steps
for
your
operating
system.
Windows
95
and
Windows
98
To
verify
successful
NIC
installation:
1
Open
the
Windows
Start
menu,
select
Settings,
and
then
select
Control
Panel.
2
Double-click
the
System
icon,
and
then
select
the
Device
Manager
tab.
3
Double-click
Network
adapters
and
make
sure
that
the
name
of
the
3Com
EtherLink
NIC
appears.
If
a
red
X
or
a
yellow
exclamation
point
(!)
appears
next
to
the
name
of
the
NIC,
the
installation
was
not
successful.
See
the
next
section
for
troubleshooting
help.

Windows
NT
4.0
Troubleshooting
the
Installation
11
atts
®aeno®
8
To
verify
successful
NIC
installation:
1
Double-click
the
My
Computer
icon,
then
the
Control
Panel
icon,
and
then
the
Network
icon.
Select
the
Adapters
tab.
3
Make
sure
that
the
name
of
the
NIC
appears
in
the
list
of
network
adapters.
lf
the
name
of
the
NIC
does
not
appear
in
the
list
of
network
adapters,
the
installation
was
not
successful.
See
the
next
section
for
troubleshooting
help.
Troubleshooting
the
Installation
If
you
encounter
any
of
the
problems
or
error
messages
in
the
table
below,
follow
the
steps
under
the
Solution
column
to
resolve
the
problem.
For
additional
troubleshooting
help,
see
the
user
guide
on
the
EtherCD
or
go
to
the
3Com
Knowledgebase:
http:
//knowledgebase.3com.com
Problem/Error
Message
A
red
X
or
a
yellow
exclamation
point
(!)
appears
next
to
the
name
of
the
NIC
in
the
Windows
Device
Manager.
The
Network
Neighborhood
icon
does
not
appear
on
the
Windows
desktop.
The
NIC
does
not
appear
in
the
Network
Configuration
or
Properties
window.
Error:
“This
device
is
not
present,
not
working
properly,
or
does
not
have
all
of
the
driver
installed.
Code
22"
Error:
“Windows
was
unable
to
locate
a
driver
for
this
device.”
Error:
“You
have
selected
a
plug
and
play
adapter.
Please
turn
off
your
machine
and
install
the
adapter.
Then
turn
on
your
machine
and
reinstall.”
Solution
1
Open
the
Windows
Network
screen
and
write
down
your
network
settings.
2
Insert
the
EtherCD
in
the
CD-ROM
drive.
3
Select
NIC
Software
on
the
EtherCD
Welcome
screen.
4
Select
NIC
Drivers
and
Diagnostics,
and
then
Installation
Utilities.
5
Select
Clean
Up
Failed
Installation,
and
then
click
Proceed.
6
Click
OK
when
the
Update
dialog
boxes
appear.
7
Exit
the
EtherCD,
shut
down
Windows,
and
restart
the
PC.
8
Install
the
network
driver,
following
the
instructions
for
your
operating
system
under
“Installing
the
Network
Driver”
earlier
in
this
quick
guide.

12
ETHERLINK®
PCI
NETWORK
INTERFACE
CARDS
QUICK
GUIDE
e
Sh
ail
PS
Copyright
©
1999,
3Com
Corporation.
All
rights
reserved.
Untess
otherwise
indicated,
3Com
registered
trademarks
are
registered
in
the
United
States
and
may
or
may
not
be
registered
in
other
countries.
3Com,
the
3Com
logo,
and
EtherLink
are
registered
trademarks
of
3Com
Corporation.
EtherCD
is
a
trademark
of
3Com
Corporation.
Microsoft
and
Windows
are
trademarks
of
Microsoft
Corporation.
Other
brand
and
product
names
may
be
registered
trademarks
or
trademarks
of
their
respective
holders.
This manual suits for next models
8
Table of contents
Other 3Com PCI Card manuals

3Com
3Com 3CRDAG675 Reference guide

3Com
3Com 3CRPAG175 - Corp WIRELESS 802.11A/B/G LAN PC Reference guide

3Com
3Com AirConnect User manual

3Com
3Com 3C905-TX User manual

3Com
3Com 3CRPCIG75 User manual

3Com
3Com WL-464 User manual

3Com
3Com 3CRDW696 User manual

3Com
3Com 3CRPCIG75-LAT User manual

3Com
3Com SL-3055 User manual

3Com
3Com WL-305 User manual

3Com
3Com EtherLink 3C980C-TXM User manual

3Com
3Com ATMLINK 155 PCI User manual

3Com
3Com 3CRPCIN175 User manual

3Com
3Com SL-3055 User manual

3Com
3Com WL-549 User manual

3Com
3Com AirConnect 3CRWE777A User manual

3Com
3Com 3CRDAG675 User manual

3Com
3Com 3C507 User manual

3Com
3Com TokenLink Velocity XL 3C359B User manual