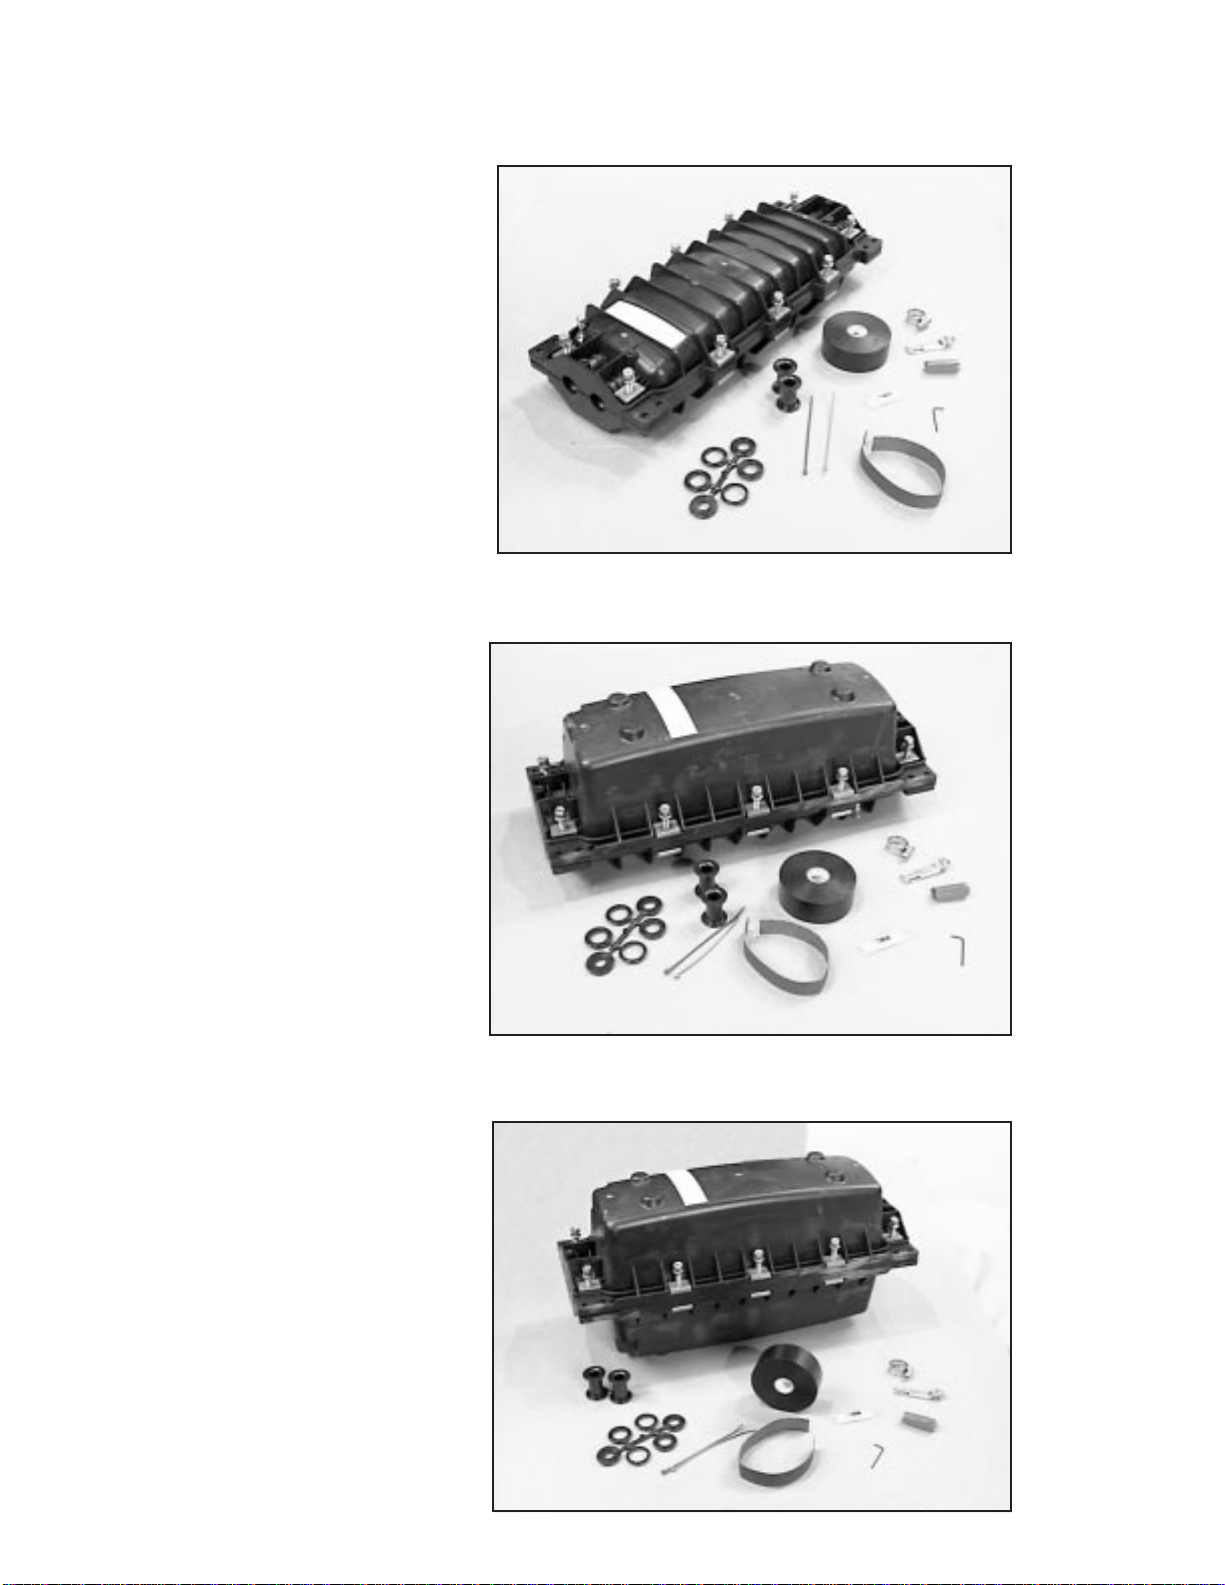
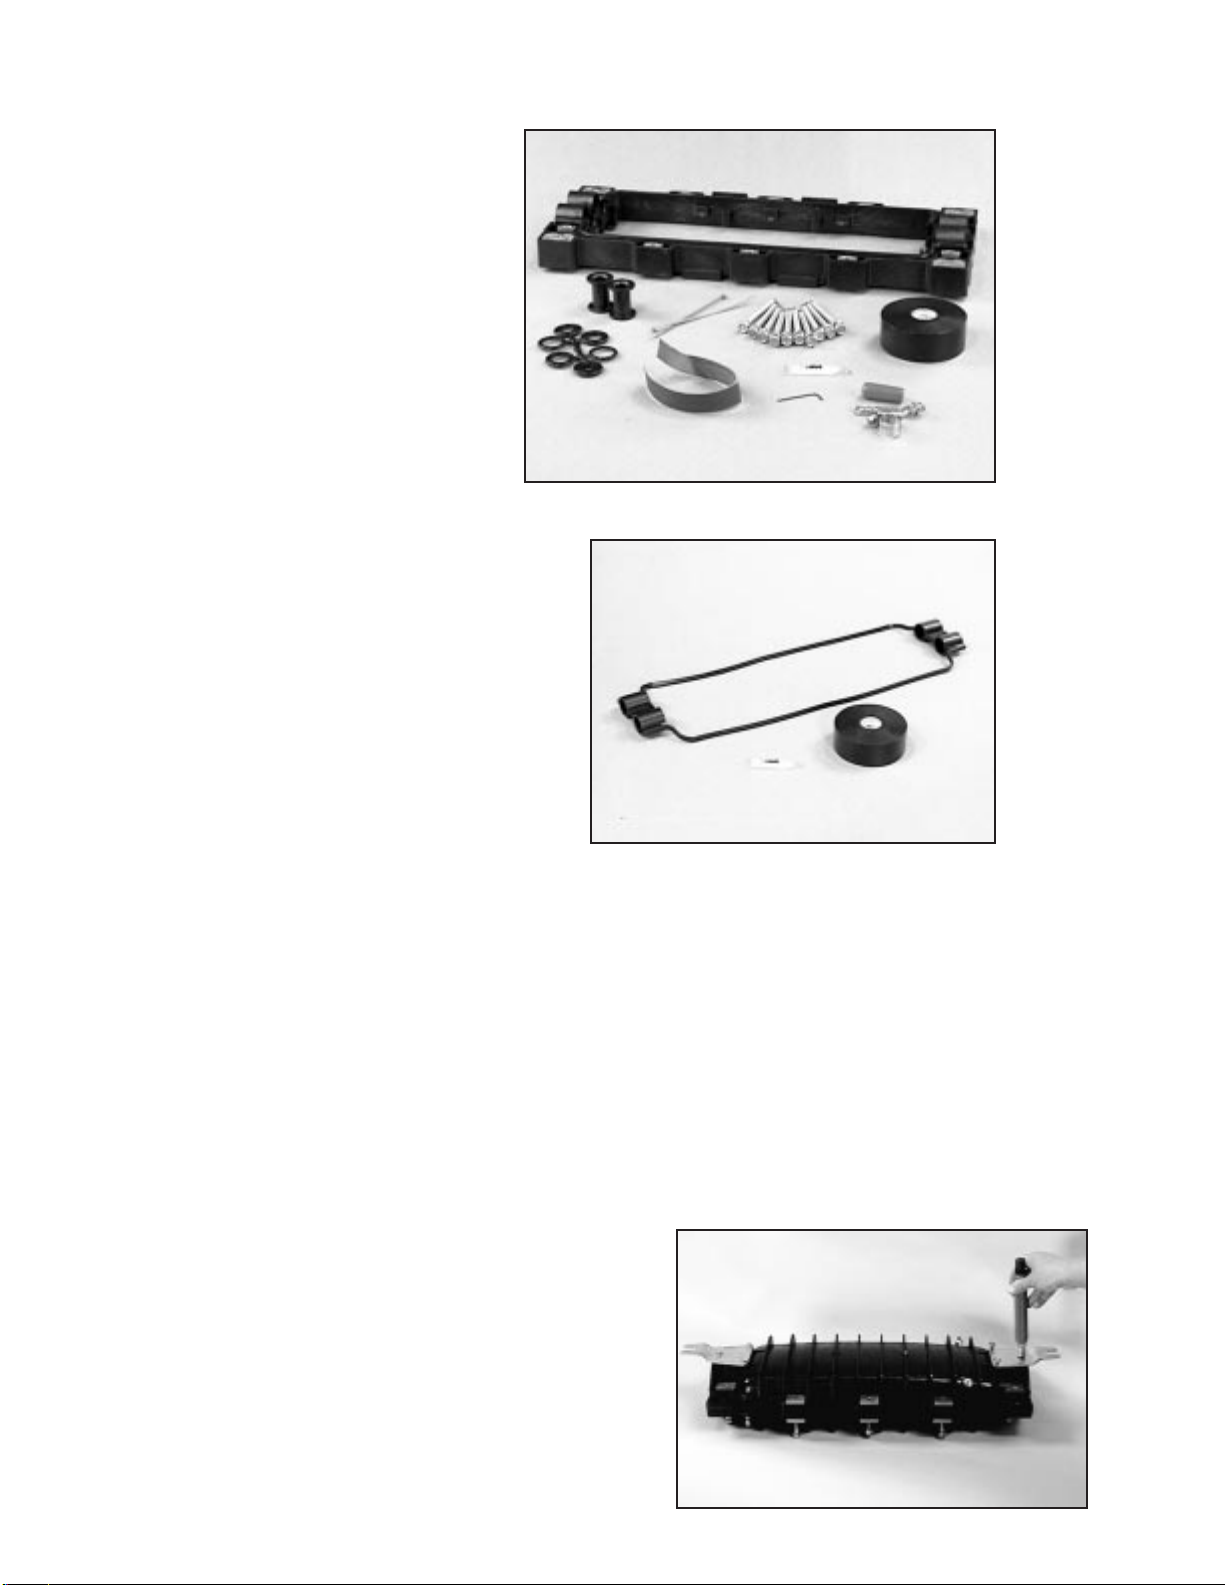
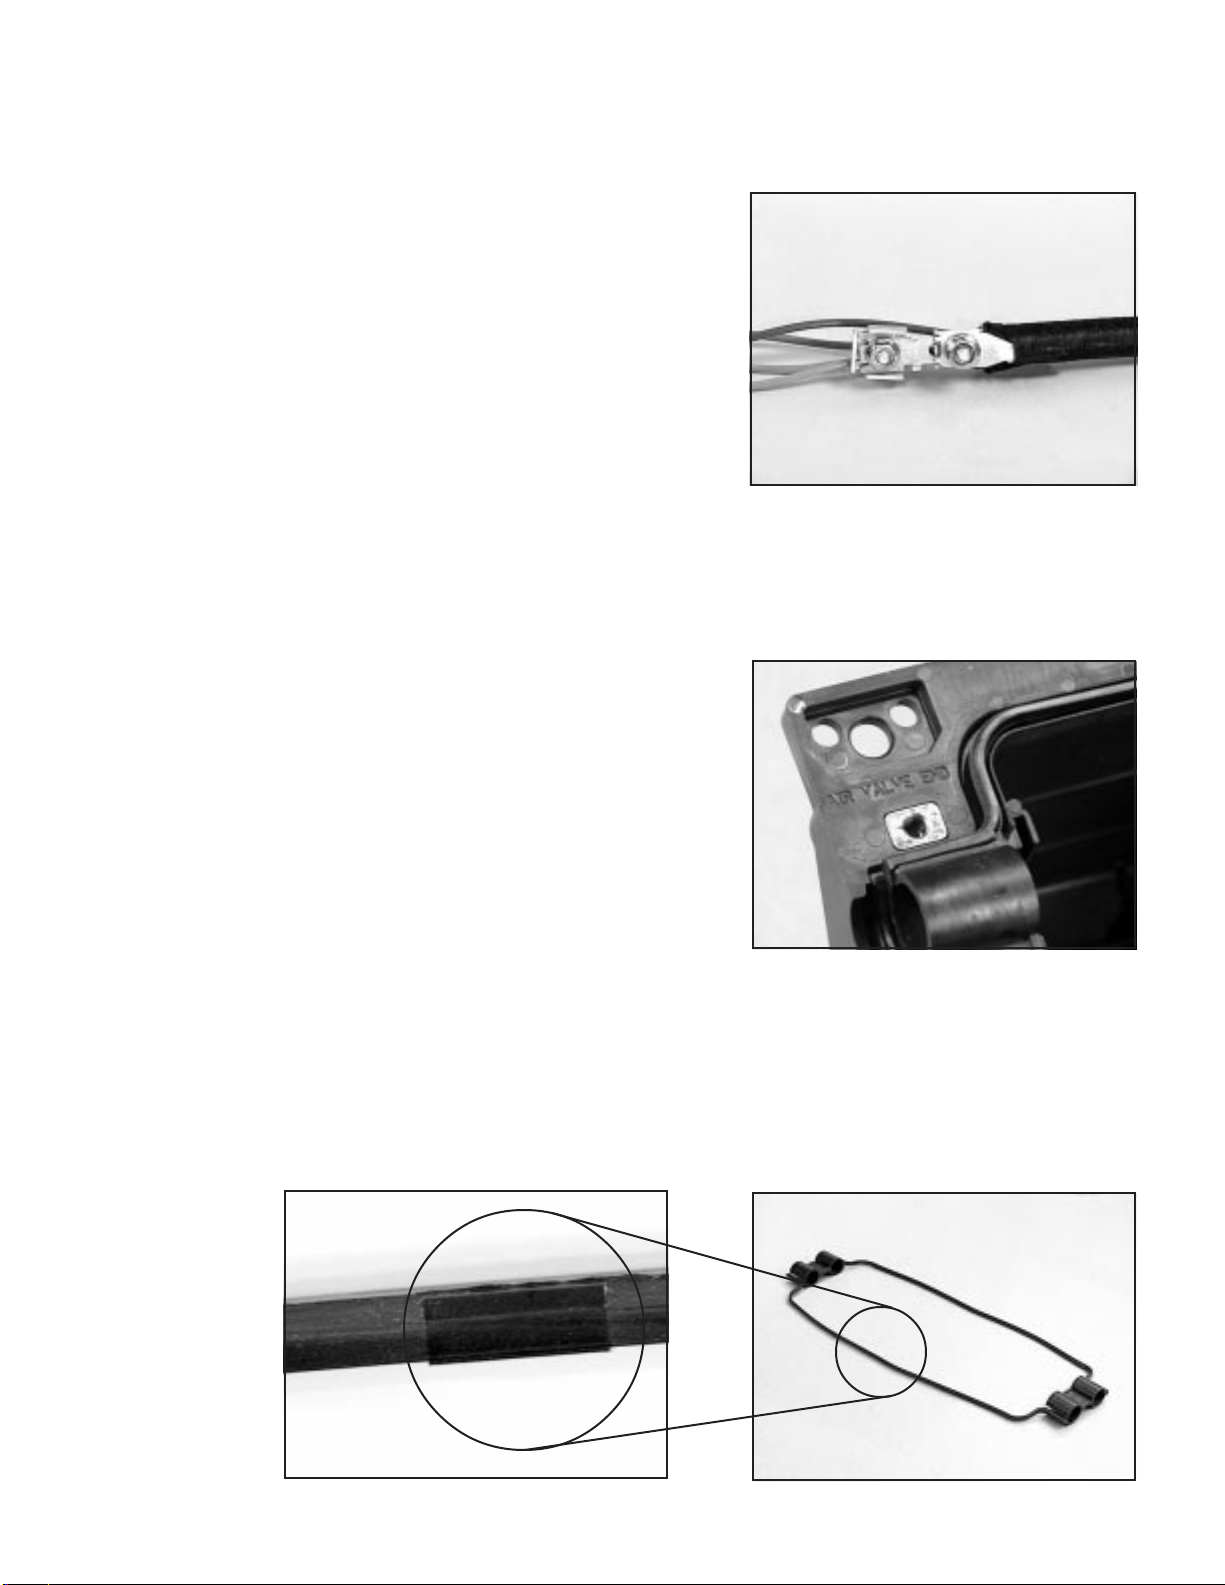
3M 2178-L Series User manual

1
2178-L/S Series Fiber Optic Splice
Case
with Gasket
Instructions for:
2178-S Splice Case
2178-LS Splice Case
2178-LL Splice Case
2181-LS Cable Addition Kit
May 1997
34-7041-9949-5-A

2
Table of Contents
1.0 General ...............................................................................................................................................3
2.0 Specifications .....................................................................................................................................3
3.0 Kit Contents........................................................................................................................................5
4.0 Cable Preparation ...............................................................................................................................7
5.0 Strength Member Termination............................................................................................................8
6.0 Gasket Installation ..............................................................................................................................9
7.0 Cable Installation................................................................................................................................11
8.0 Primary Tube Preparation...................................................................................................................13
9.0 Splice CaseAssembly ........................................................................................................................13
10.0 Splice Case Reentry............................................................................................................................13
11.0 2181-LS CableAdditionAdapter Installation ....................................................................................14

3
3M™2178-L/S Series Fiber Optic Splice Case Description
1.0 General
1.1 The 3M
™
2178-L/S Series Fiber Optic Splice Cases are closures that can be used in buried, underground,
aerial, and pedestal applications. These closures are suitable for short term pressurization during flash
testing. Please refer to your company's approved applications. Each splice case has two cable
entrance ports on each end. Port plugs allow the cases to be used for butt or inline splices. The rigid
non-encapsulated case provides moisture protection. A gasket is used to seal the closure and provide
easy reentry.
1.2 The 3M™2181-LS Cable Addition Kit expands the case to provide more cable entries. It can be used on
the 3M™2178-S, 3M™2178-LS or 3M™2178-LL Splice Cases. The cable addition kit can also be added
to increase splice capacity.
2.0 Specifications
Capacity of 2524 Splice Tray ........................... 24 3M™Fibrlok™Splices
.......................................................................... 24 Fusion Splices
Capacity of 2523 Splice Tray ........................... 24 Fibrlok Splices
.......................................................................... 12 3M™Fibrlok™Multi-Fiber Splices* (12 fibers each)
.......................................................................... 48 Discrete Fusion Splices
.......................................................................... 12 Fusion Splices (12 fibers each)
Capacity of 2522 Splice Tray ........................... 12 Fibrlok Splices
.......................................................................... 8 3M Fibrlok Multi-Fiber Splices* (12 fibers each)
.......................................................................... 24 Discrete Fusion Splices
.......................................................................... 10 Fusion Splices (12 fibers each)
*Varies with ribbon size
2.1 Splice Tray Capacity:
Maximum cable diameter:.......................................1.0" (25 mm)
Minimum cable diameter: .......................................0.4" (10 mm)
Closure length: ........................................................21.9" (55.7 cm)
Closure width: .........................................................8.5" (21.5 cm)
2178-S closure height:.............................................4.7" (11.9 cm)
2178-LS closure height: ..........................................8.0" (20.3 cm)
2178-LL closure height: ..........................................11.3" (28.7 cm)
Available splice chamber space:
length:........................................................16.4" (41.6 cm)
width:.........................................................5.5" (14 cm)
2178-S height: ...........................................1.2" (3 cm)
2178-LS and 2178-LL height: ...................3.7" (9.4 cm)
2181-LS (1) height: ..................................1.5" (3.8 cm)
2181-LS (2) height: ..................................3.0" (7.6 cm)
2181-LS (3) height: ..................................4.5" (11.4 cm)

4
Number of 2181 Cable Addition Kits ADDED
000111111
Number of Cables INSTALLED 2-4 2-4 2-4 2-4 2-4 2-4 5-8 5-8 5-8
C
APACITY
(Max Number of 2524 Splice Trays)
27741010277
C
APACITY
(Max Number of 2523 Splice Trays)
255488255
C
APACITY
(Max Number of 2522 Splice Trays)
255488255
2178-LS
2178-LL
2178-LS*
2178-LL*
2178-S*
2178-LS
2178-LL
2178-S
2178-S
Number of 2181 Cable Addition Kits ADDED
222222222
Number of Cables INSTALLED 2-4 2-4 2-4 5-8 5-8 5-8 9-12 9-12 9-12
C
APACITY
(Max Number of 2524 Splice Trays)
6 13 13 4 10 10 2 7 7
C
APACITY
(Max Number of 2523 Splice Trays)
61010477255
C
APACITY
(Max Number of 2522 Splice Trays)
61010477255
Number of 2181 Cable Addition Kits ADDED
333333333
Number of Cables INSTALLED 2-4 2-4 2-4 5-8 5-8 5-8 9-12 9-12 9-12
C
APACITY
(Max Number of 2524 Splice Trays)
8 16 16 6 13 13 4 10 10
C
APACITY
(Max Number of 2523 Splice Trays)
81212699477
C
APACITY
(Max Number of 2522 Splice Trays)
81212699477
2.2 Splice Case Capacities
*Note: The 3M™2181-LS CableAddition is added for additional tray capacity.
Note: The 3M™2178-S Splice Case will accommodate up to four 1.0" (25 mm) diameter cables inline when
using 3M™2522 trays. When using 3M™2523 or 3M™2524 trays it is limited to four .5" (12.5 mm)
diameter cables inline. Butt applications will accommodate up to 1.0" (25 mm) diameter cables.

5
3.0 Kit Contents
3.1 3M™2178-S Splice Case Kit
Contents:
3.2 3M™2178-LS Splice Case Kit
Contents:
3.3 3M™2178-LL Splice Case Kit
Contents:
a
b
c
d
f
h
a
b
c
d
f
g
h
e
a
b
c
d
f
g
e
h
a) Case assembly includes tray support,
gasket, air valve, bolts, and cable strain
relief
b) sealing washer trees.......................6 ea
c) plugs ..............................................2 ea
d) cable ties, blue and green ..............4 ea
e) sheathscuff....................................1
f) 3M™2172 strength member clamps
w/ rubber boot and hose clamp .....3 ea
g) 3M™130C tape..............................1 roll
h) silicone grease (5 cc tube) .............2 ea
i) small allen wrench .........................1
a) Case assembly includes tray support,
gasket, air valve, bolts, and cable strain
relief
b) sealing washer trees.......................6 ea
c) plugs ..............................................2 ea
d) cable ties, blue and green ..............4 ea
e) sheathscuff....................................1
f) 2172 strength member clamps
w/ rubber boot and hose clamp .....4 ea
g) 130C tape ...................................... 1 roll
h) silicone grease (5 cc tube) .............2 ea
i) small allen wrench .........................1
g
e
i
i
i

6
3.4 3M™2181-LS Cable Addition Kit Contents:
a) adapter with gasket ........................ 1
b) sealing washer trees....................... 8 ea
c) plugs ..............................................4 ea
d) cable ties, blue and green ..............4 ea
e) sheathscuff....................................1
f) 3M™2172 strength member clamps
w/ rubber boot and hose clamp ..... 4 ea
g) 3M™130C tape..............................1 roll
h) silicone grease (5 cc tube) ............. 2 ea
i) small allen wrench......................... 1
j) bolts ............................................... 10 ea
b
cd
hg
f
e
3.5 3M™2178-LS Gasket Kit Contents:
a) gasket............................................. 1
b) 130C tape ...................................... 1 roll
c) silicone grease (5 cc tube) ............. 2 ea
3M™2178-S, 2178-LS, 2178-LL Fiber Optic Splice Case Instructions
Note: If wall mount bracket is required for the 2178-S
Splice Case or the 2178-LS Splice Case, use the
3M™2198 Mounting Bracket Kit. Attach
brackets to base (as shown) prior to cable
preparation.
Torque bolts to 25 in-lbs ±5 in-lbs
(2.8 N•m ±0.6 N•m).
3.6 Additional Materials Required:
• Cable Cleaner
• #6AWG Ground Wire or equivalent
• Splice Tray / Organizer
•3M
™
Scotchlok™4460 D/FO Shield
Bond Connector, if using shielded
cables
• Cable Splicer Knife
• Tape Measure
• Wire Cutter for Steel Strength Members
• Electrician's Scissors
• Screwdriver
3.7 Tools Required:
• 3/8" (10 mm) Hex Driver
• 1/2" (13 mm) Hex Driver
• 7/16" (12 mm) Hex Driver
• Side Cutting Pliers
• Needle Nose Pliers
• Cable Stripper
b
a
a
i
j
c

7
4.0 Cable Preparation
Note: When removing cable sheathing, do not cut, kink, or damage underlying layers. If damage occurs,
cut back sheath to adequately inspect and repair.
4.1 Remove 96" (244 cm) of outer cable sheath (and shield or armor, if present). Remove successive sheath
layers and wrapping to expose primary tubes protecting fibers. Stagger layers as recommended by cable
manufacturer or per standard practice.
4.2 Remove all cable grease. Clean all primary tubes and dielectric strands with approved cleaner. Cover all
sharp edges with vinyl tape.
Note: Carefully follow health, safety and environmental instructions as given on Material Safety Data
Sheet or container label for cable cleaner solvent being used.
4.3 Trim any solid filler tubes and discard.
Note: Do not trim strength members at this time.
4.4 Scuff 5" (127 mm) of each cable end using supplied sheath scuff.
Note: Do not use a carding brush to scuff sheaths.
Note: If wall mount bracket is required for the
3M™2178-LL Splice Case, use the 3M™2199
Mounting Bracket Kit. Attach brackets to base
(as shown) prior to cable preparation.
Torque bolts to 25 in-lbs ±5
in-lbs (2.8 N•m ±0.6 N•m).
Note: Proper sealing of the 3M™2178-L/S Series Fiber Optic Splice Case depends on strict adherence to
these instructions and the use of specified materials. Deviations can cause leakage or case damage.
Maintain clean sealing surfaces to ensure proper sealing. DO NOT USE any release agents or other
unspecified materials. These types of materials may lead to loss of sealing effectiveness.
Note: Installation procedures are the same for all combinations of the 2178-S, 2178-LS, and 2178-LL Splice
Cases.

8
5.0 Strength Member Termination
5.1 Slide two sealing washers down each cable. Use sealing washers with smallest inside diameter which
will slide on cable.
Note: If necessary, sealing washers can be split and placed on the cable.
5.2 Locate cables in appropriate entrance ports, as shown.
5.3 Strength Member Termination for Non-Shielded Cable
a. Cut strength member 1.75" (44.5 mm) from cable
sheath end.
1.75" (44.5 mm)
b. Install strength members into 3M™ 2172 Strength Member Clamp by loosening screw and placing
strength member under screw assembly. Insure strength member is flush with end of clamp prior to
tightening the screw. Install rubber boot onto clamp.
Note: To insure proper fit, remove coating on strength member.
Distribution
Feeder
Distribution Distribution
Feeder
Feeder Distribution

9
In this position, the stabilizing pads should be facing down.
6.2 The gasket is factory installed in the 3M
™
2178-L/S
Series Fiber Optic Splice Case. For replacement of
the gasket, place the gasket into the sealing channel
with the gasket ports opening from the top. Match
"AIR VALVE END" note on gasket with air valve
end on closure.
6.1 Inspect closure base and ensure the surface is clean
and free from any debris.
6.0 Gasket Installation
Note: Gasket cannot be used as a replacement for the
original mastic sealant in a reentry.
5.4 Bonding and grounding for shielded cable.
Note: Use care when installing shield bond connectors so underlying layers of cable are not damaged.
a. Install 3M™Scotchlok™4460-D/FO Shield Bond Connector following instructions provided with
connector.
Note: To insure proper fit, remove coating on central strength
member.
b. If separate external grounding is required, bond
"Feeder Cable" and "Distribution Cable"
directly to separate ground studs.
Note: Torque ground stud nut to 35 in-lbs ±5 in-lbs
(4 N•m ±0.6 N•m).
c. If separate external grounding is not required,
bond across splice to either ground stud.
stabilizing pad

10
6.3 Use the 1.5" (38 mm) rubber tape included with the gasket
to build the cable seals. Check the placement of the tape
by positioning the strength member clamp where it will be
anchored to the cable tie down bracket.
Wrap the supplied rubber tape between sealing washers
2" (51 mm) from cable sheath end.
The tape should be wrapped to 1" (25 mm) outside
diameter. Use the Tape Collar Gauge to determine tape
wrap. Tape wrap should not be smaller than the left side
of the gauge, and not larger than the right side of the
gauge.
Note: Stretch tape slightly to ensure better fit between
washers.
Note: If using 1" (25 mm) cables, the supplied 1.5" (38
mm) rubber tape is not required.
6.4 If using sealing plug(s), apply the supplied 1.5" (38 mm)
rubber tape to the plug(s).
Wrap tape to 1" (25 mm)
outside diameter, approximately 2 1/2 wraps. Tape collar
gauge can be used to determine tape wrap.
6.5 Apply the supplied silicone grease to the inside and
outside of the port area on the gasket. Apply the grease
to the gasket area between the ports, and to the top of the
gasket along the sides of the closure.
Note: Carefully follow health, safety and environmental
instructions as given on Material Safety Data Sheet
for the silicone grease.

11
7.0 Cable Installation
7.1 The set screws which hold the cable tie down brackets
are factory installed. One or both of the set screws can
be removed. If removal is necessary, use the allen
wrench included in the kit. It is recommended to tape the
allen wrench to the inside of the closure for later use.
6.7 Apply the supplied grease onto the cable area between
the washers and to the outside of the wrapped sealing
plugs, if any.
Plugs should be placed inside gasket at the unused entry
ports.
Note: The grease allows the cables and gasket to slide into
place and helps seal the cable port area.
Note: SET SCREW MUST NOT EXTEND ABOVE
PLASTIC "U" CHANNEL.
INSTALL ONLY TILL FLUSH WITH "U"
CHANNEL.
set screw
cable tie
down bracket
6.6 Apply the grease to the gasket in the split or cut edge
that allows for cable placement.
6.8 Place cables inside the port area on the gasket. Ensure
that the rubber tape seals are inside the gasket ports.
The two washers should be placed in the port grooves on
the closure with one washer on each side of the gasket.
grease

12
3M™Scotchlok™4460-D/FO Shield Bond Connector:
Attach each cable to closure base by installing a hose
clamp around the cable and under the cable tie down
bracket and tighten clamp.
7.2 Attach cables to closure base, using one of the two
methods below:
3M™2172 Strength Member Clamp:
Attach each cable to the closure base by installing a hose
clamp through the slot on the strength member clamp,
then around the cable tie down bracket, and tighten the
clamp.
7.3 Install one green cable tie on the "Feeder Cable" and
trim. Install one blue cable tie on each "Distribution
Cable" and trim.
Note: Cable ties may also be placed inside case per
company standard practice.
cable tie
downbracket

13
8.0 Primary Tube Preparation
8.1 Gather all primary tubes from "Feeder Cable" and install one green cable tie approximately 36" (914
mm) from sheath end. Install one blue cable tie on the "Distribution Cable" primary tubes. Install two
blue cable ties on "Branch Cable" primary tubes.
8.2 Remove tray support by lifting straight up from closure
base.
8.3 Coil primary tube bundles inside closure base per company
standard or organizer installation instructions.
8.4 Install tray support into slots on closure base and tighten
screws until snug.
8.5 Install organizers and splices per company standard or
organizer installation instructions.
9.0 Splice Case Assembly
Note: If 3M
™
2183 Universal Aerial Hanger Bracket is to be used, follow its practice prior to splice case
assembly.
9.1 Before placing the closure cover on the closure base or the
3M™2181-LS Cable Addition Kit (top adapter), ensure that
the air valve matches up with "
AIR VALVE END
"
note on the base or top adapter.
9.2 Screw all bolts until they have been threaded several
complete turns into nut inserts.
9.3 Tighten ten bolts half way down in the sequence shown.
Then tighten ten bolts in sequence shown until there is
metal to metal contact.
Note: See label and numbers on cover of splice case.
Final tightening should be done with a hand wrench to 20
ft-lbs (27.12 N•m) torque. Case leakage may occur if
procedure is not followed.
9.4 To check for leaks, flash test the splice case by applying air
to 10 psi (0.67 bar) MAXIMUM,THEN RELEASE
PRESSURE.
10.0 Splice Case Reentry
10.1 Remove the ten bolts holding the splice case halves together. The cover can easily be removed by hand.
96248
315 710

14
11.0 3M™2181-LS Cable Addition KitAdapter Installation
11.1 Installation procedures for the 2181-LS Adapters are the same as the 3M™2178-L/S Series Splice Cases
(Sections 4.0 - 9.0) with the following exceptions:
For SINGLE Adapter Installation, replace all ten bolts inserted in the closure cover with the ten bolts
supplied with the 2181-LS Cable Addition Kit.
For DOUBLE Adapter Installation, replace all ten bolts inserted in the closure cover with the ten longer
bolts supplied with the 3M™2181-B Cable Addition Kit.
For TRIPLE Adapter Installation, replace all ten bolts inserted in the closure cover with the ten longer
bolts supplied with the 3M™2181-C Cable Addition Kit.
Note: The 2181-B and the 2181-C CableAddition Kits contain only the longer bolts. The 2181-LS Cable
Addition Kit is needed to add an adapter.
11.2 The tray support can be installed in the closure base or any of the adapters. Install the tray support onto
the desired level by placing it into the slots on the closure base or adapter, and tightening the screws until
snug.
11.3 If needed, two tray supports can be used. Tray supports may be ordered separately as the 3M™2178-STS
(for the 3M™2178-S Splice Case), and 3M™2178-LTS (for the 3M™2178-LS Splice Case and the 3M™
2178-LL Splice Case). Install the lower level tray support first. Install organizers and splices per
company standard or organizer installation instructions. Then install the next level tray support with the
next level of organizers and splices.
11.4 The following steps are forall adapters installed:
a. To prevent cables from being damaged or pinched
between adapters and the closure, the adapters can be
pulled down into place before the closure cover is
installed. If using more than one adapter, remove all
corner inserts on the lower level adapter(s). A
screwdriver can be used to take out the corner
inserts.
b. The threaded inserts should be in the four corners on
the top portion of the top adapter only. The raised
threads should be facing down so that the insert
surface is flush with the adapter.
c. Prior to placing an adapter on the closure base,
ensure that the note "AIR VALVE END" on the
adapter is aligned with the "AIR VALVE END" note
on the gaskets and the closure base.

15
d. If placing one adapter on another adapter, make
certain the note "AIR VALVE END" lines up for all
adapters, gaskets, and the closure base.
e. Set adapter, with the word "BOTTOM" facing down,
on top of the closure.
Note: It is important to orient the gaskets correctly on
each level of the assembly (see Section 6.2 and 6.3).
f. Continue assembly for each level, following the
instructions from Section 4.0 to 8.0.
g. After cables have been installed on the lower levels
and top adapter is in place, insert the bolts from
underneath into the four corner inserts. Screw the
four bolts until they have been threaded several
complete turns into the corner inserts.
Slowly bring adapters down by working from corner
to corner (as shown) until snug. Ensure no cables
have been pinched between the adapters and the
closure base.
11.5 After assembly is complete, follow the instructions in
9.0 except only tighten bolts 1 to 6 in the sequence
shown. After cover has been installed with six bolts,
remove the four corner bolts. Use these four bolts
for the remaining cover bolts, using the sequence
shown. Final tightening should be done with a hand
wrench to 20 ft-lbs (27.12 N
.
m) torque. Case
leakage may occur if procedure is not followed.
To check for leaks, flash test splice case by applying air to
10 psi (0.67 bar) MAXIMUM,THEN RELEASE
PRESSURE.
96248
315 710
13
2
4

16
Important Notice
All statements, technical information and recommendations related to the Seller's products are based on information believed to be
reliable, but the accuracy or completeness thereof is not guaranteed. Before utilizing the product, the user should determine the suitability
of the product for its intended use. The user assumes all risks and liability whatsoever in connection with such use.
Any statements or recommendations of the Seller which are not contained in the Seller's current publications shall have no force or effect
unless contained in an agreement signed by an authorized officer of the Seller. The statements contained herein are made in lieu of all
warranties, expressed or implied, including but not limited to the implied warranties of merchantability and fitness for a particular purpose
which warranties are hereby expressly disclaimed.
SELLER SHALL NOT BE LIABLE TO THE USER OR ANY OTHER PERSON UNDER ANY LEGAL THEORY, INCLUDING BUT NOT
LIMITED TO NEGLIGENCE OR STRICT LIABILITY, FOR ANY INJURY OR FOR ANY DIRECT OR CONSEQUENTIAL DAMAGES
SUSTAINED OR INCURRED BY REASON OF THE USE OF ANY OF THE SELLER'S PRODUCTS THAT WERE DEFECTIVE.
TelecomSystemsDivision
6801 River Place Blvd.
Austin,TX 78726-9000
800/426-8688
http://www.mmm.com/telecom Printed in USA
© 3M 1997 34-7041-9949-5-A
Printed on 50% recycled paper
with 10% post-consumer
This manual suits for next models
4
Table of contents
Other 3M Industrial Electrical manuals
Popular Industrial Electrical manuals by other brands

Murata
Murata GRM216R71H103KA01 Series Reference sheet

Murata
Murata GRM1885C2A390JA01 Series Reference sheet

Murata
Murata GRM155R61C225ME44 Series Reference sheet

Murata
Murata GJM0335C1E7R9CB01 Series Reference sheet

Murata
Murata GJM0335C1E8R9DB01 Series Reference sheet

Murata
Murata GRM31MR71H684KA88 Series Reference sheet

Murata
Murata GRM3195C1H223JA01 Series Reference sheet

Crossbow Technology
Crossbow Technology AHRS500GA Series Operator's manual

Murata
Murata GRM1885C1H8R2DA01 Series Reference sheet

Bticino
Bticino LN4572 manual

Murata
Murata GRM0225C1E8R0BA03 Series Reference sheet

Graco
Graco InSite 24T278 Instructions - parts