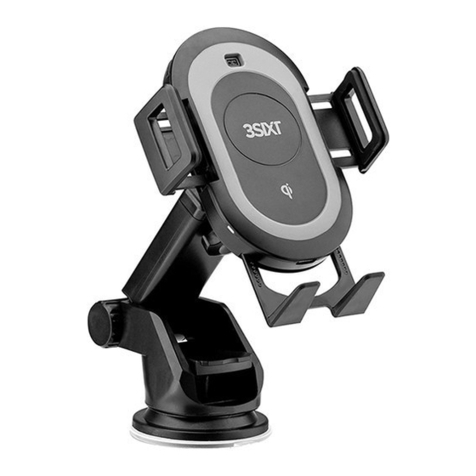
3SIXT 3S-1802 User manual

www.3sixtgear.com
or visit www.3sixtgear.com/support
1
Operating Instructions
EN | 3S-1802 – 3SIXT Prime Motorised Mount – 15W
INCLUSIONS:
3SIXT Prime Mount
Charging Cable
Window Suction Mount
Crocodile Vent Mount
Standard Vent Mount
3SIXT Global Warranty Document
WARNINGS
• Read all instructions and warnings before using this product. Improper use of this product may result in
product damage, excessive heat, toxic fumes, fire or explosion, for which damages you (“Purchaser”) and
not 3SIXT (“Manufacturer”) are responsible.
• Do not store the accessory in a high-temperature environment, including heat caused by intense
sunlight or other forms of heat (heaters etc.).
• Do not place the device in fire or other extremely hot environments.
• Do not disassemble or modify this accessory in any manner.
• Do not attempt to power this device using any other method than as instructed explicitly in this user
guide.
• Be sure to unplug cables from the battery when finished departing your vehicle. Failure not to follow
this warning is the sole responsibility of the purchaser, who agrees to indemnify the Manufacturer
(”3SIXT”).
• This accessory is intended for adults and not minors. Failure not to follow these warnings is the sole
responsibility of the purchaser, who agrees to indemnify the Manufacturer (”3SIXT”) for any unintended
use/misuse by a minor.
• All products must pass through a thorough quality inspection at the time of manufacture. However, if
you find that your device is excessively hot, is found to be deformed outside its regular appearance or is
emitting smoke, immediately stop using the device and contact 3SIXT.
© 2020 3SIXT. All rights reserved.
This product may be covered by one or more patents or pending patent applications. Designed in
Australia by 3SIXT. 23/136 Keys Road, Cheltenham VIC 3192 Australia.
Qualcomm Quick Charge is a trademark of Qualcomm Incorporated.
The ‘Qi’ symbol is a trademark of the Wireless Power Consortium.
Apple is a trademark of Apple Inc. registered in the U.S. and other countries.
Samsung is a trademark of Samsung Electronics Co., Ltd
MADE IN CHINA

www.3sixtgear.com
or visit www.3sixtgear.com/support
2
NAME PARTS
1. Motorised Arm Clamps
2. Power on/Off
3. Power Indicator
4. IR Sensor
5. Adjustable (Up & Down) Feet
6. Type-C Input
7. Open/Close Button
8. Qi Wireless Pad Face
9. Feet Length Adjuster
10. Wireless Charging Indicator

www.3sixtgear.com
or visit www.3sixtgear.com/support
3
OPERATION
Attaching the mount - Suction Mount
1. Locate a suitable clear, clean and dry area on your dashboard/window screen.
2. Loop the nut through the Suction mount ball, making sure it is the correct way around (larger opening
facing toward the Prime mount).
3. Together, push the ball end onto the female joint housing of the Prime mount and push until it clicks
into place.
4. Once in position thread the nut on the female joint housing by screwing it in a clockwise direction.
5. Make sure the nut is screwed in hand tight, to a point where the ball joint/window mount is difficult to
move.
6. Place the mount into position and firmly push the suction mounting cup against the
dashboard/window.
3. Activate the locking lever by pushing it down into the second position to secure it in place and create
a stable hold.
Removing the mount
1. Push the locking lever upwards to release.
2. Lift the tab at the edge of the suction mounting cup.
3. Remove the mount. (Residual marks can be easily cleaned off with a slightly wet cloth).
Attaching the mount – Crocodile/Standard Vent Mounts
1. Locate a suitable vent location within your car.
2. Loop the nut through the vent mount ball, making sure it is the correct way around (larger opening
facing toward the Prime mount).
3. Together, push the ball end onto the female joint housing of the Prime mount and push until it clicks
into place.
4. Once in position thread the nut on the female joint housing by screwing it in a clockwise direction.
5. Make sure the nut is screwed in hand tight, to a point where the ball joint/vent mount is difficult to
move.
Connecting the Prime mount to a power source
The mount requires a Qualcomm® Quick Charge™ 3.0 charge port to be able to work at optimum fast
charging speeds. If an incorrect charger is used, the wireless charging function may not charge at its
intended speed and/or may not work correctly or at all. See the 3SIXT website for compatible products
here: https://www.3sixtgear.com/product/power/car-chargers/quick-charge-car-chargers/dualusb-qc3-
carcharger-54a-black/
1. Connect the USB-C connector to the device mount USB-C input (6).
2. Plug the Qualcomm 3.0 car charger into the car’s cigarette lighter socket.
3. Connect the included cable USB-A end into the Quick Charge 3.0 port on the car charger.
Wireless Charging a device
Charging takes place upon full contact of the smartphone on the face of the mount itself (8).
1. Press the open/close button (7) to activate the arm clamps (1) into the open position.
2. Quickly place your Qi enabled smartphone onto the face of the mount (8). Once within range (between
6-8mm) the wireless charger will automatically activate via Qi wireless technology.
3. Depending on the size of your device you will need to adjust the feet up or down to get a centrally
position of your device on the mounting system (5 & 9).
5. By covering the centrally positioned IR sensor (4), the clamp arms (1) will automatically close to the
size of the device for a firm and secure hold.

www.3sixtgear.com
or visit www.3sixtgear.com/support
4
6. If positioned correctly charging will automatically take place. If unmuted your device will sound an
audible sound to indicate this has occurred and visually indicate charging has been initiated. The 3SIXT
Prime Mount charging LED indicator will also activate (3).
7. The 3SIXT Prime Mount is fitted with a back-up battery backup to enable you to activate the clamp
arms via the touch pad/power button (open button override (7) once the engine of your vehicle has been
switched off for unhindered retrieval.
Understanding the LED Indicators - Wireless Charging Indicator (10)
Red - Standby
Blue – Charging underway
Blue/Red Flashing – Foreign object detected
Off – Device fully charged
Understanding the LED Indicators – Power Indicator (3)
Solid Blue - On
Blinking Blue – Low Battery
Red/Off - Error
Note
3SIXT strongly advises customers to utilise the included vent mounts to ensure seamless operation
during peak summer periods/temperatures. Not following this direction could lead to your device
overheating, slowing of operation or even shutting down into a safe mode.
Do not manually pry open the Prime mount arms when retrieving your device. Instead, please press the
open/close button and the arms will open automatically. Not following this instruction may affect
operation of cause malfunction.
SPECIFICATIONS
Item:
3S-1802
Input:
Type-C 12V/1.67A 9V/2A 5V/2A
Output:
9V/1.67A / 9V/1.12A / 9V/0.83A / 5V/1A
Charging Power:
5W / 7.5W / 10W / 15W
Operating Temp:
-10 to 60 °C
Charging Distance:
≤6mm
Charging Efficiency:
75%
Input type:
USB-C
Internal Battery:
250mAh
Electric Brush Motor:
Up to 50,000 times
FOD:
Yes
OTP/OCP/OVP:
Yes
Licenced Qi Technology:
Yes
Dimensions:
Height – 11.4cm x Width – 6.6cm x Depth – 2.1cm
Weight:
145g (without mounts attached)
Table of contents
Other 3SIXT Automobile Accessories manuals
Popular Automobile Accessories manuals by other brands

enphase
enphase HCS-40 user manual
Metra Electronics
Metra Electronics 99-3103 installation instructions

Southwing
Southwing SC310 user guide
Thule
Thule 1159 instructions
Over Armour Offroad
Over Armour Offroad KU-X900-FC04 Instructions for Installation and Care

Minimizer
Minimizer LONG HAUL Series Service manual
