manuals.online logo
Brands
  1. Home
  2. •
  3. Brands
  4. •
  5. Diamondback
  6. •
  7. Automobile Accessories
  8. •
  9. Diamondback 270 User manual

Diamondback 270 User manual

Important installation information
PARTS INCLUDED:
IMPORTANT!
Keep an eye out for these icons:
Normal Install Time
75 minutes
Tips to assist installation
Helpful Hints
PREPARE THE CARGO BED & POSITION THE COVER
G-913 Cap Clamps
(2) for ‘16-up
Gas Springs (6)Tailgate Panel
Cab & T Panels Assembly
TOOLS REQUIRED:
PRE-INSTALLATION NOTES:
2. If you are installing a Cross Bin, you
should start that before you install the
DiamondBack 270 (but, if you have a
2016–up Tacoma, after you affix the
rubber gasket to the bulkhead ). Refer
to page 2 of the Cross Bin Installation
Guide for details.
3. It’s possible for one person to install a
DiamondBack solo, but the whole
process, especially positioning the
panels and adjusting the lock rods, is
much easier with two people.
1. If you have a 2016–up Tacoma, you
should affix the included rubber
gasket to your bulkhead prior to
installing your cover. Refer to the
Bulkhead Prep Kit Installation Guide
for details.
G-200 Cap Clamps
(4) for ‘16-up
(6) for ‘05-15
Lock-Rod
Striker Brackets (2)
INSTALLATION GUIDE
(800) 935-4002 | DIAMONDBACKCOVERS.COM
9/16" Socket 7/16" Socket 1/8" Hex Key
T30 Torx/Star
Wrench Ratchet Wrench
CONTINUED ON REVERSE →
2005UP TOYOTA TACOMAS
with the 60" Bed
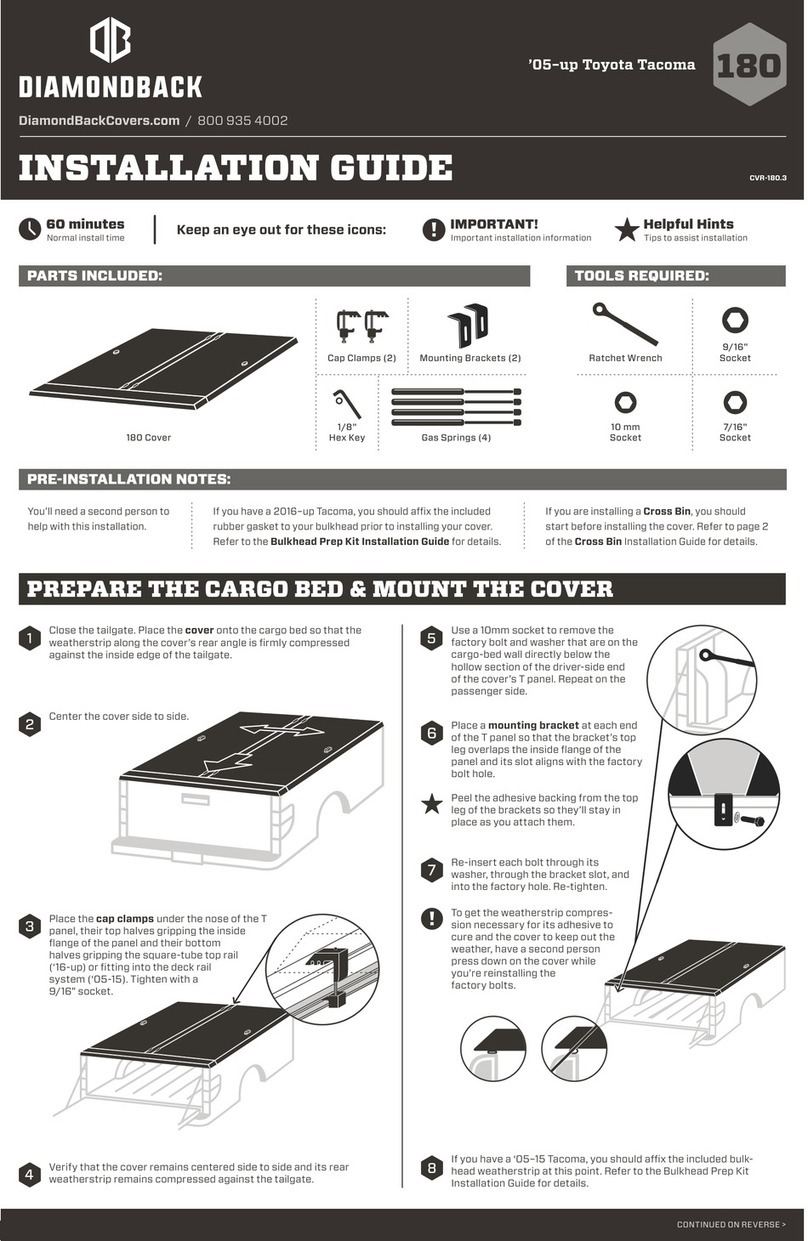
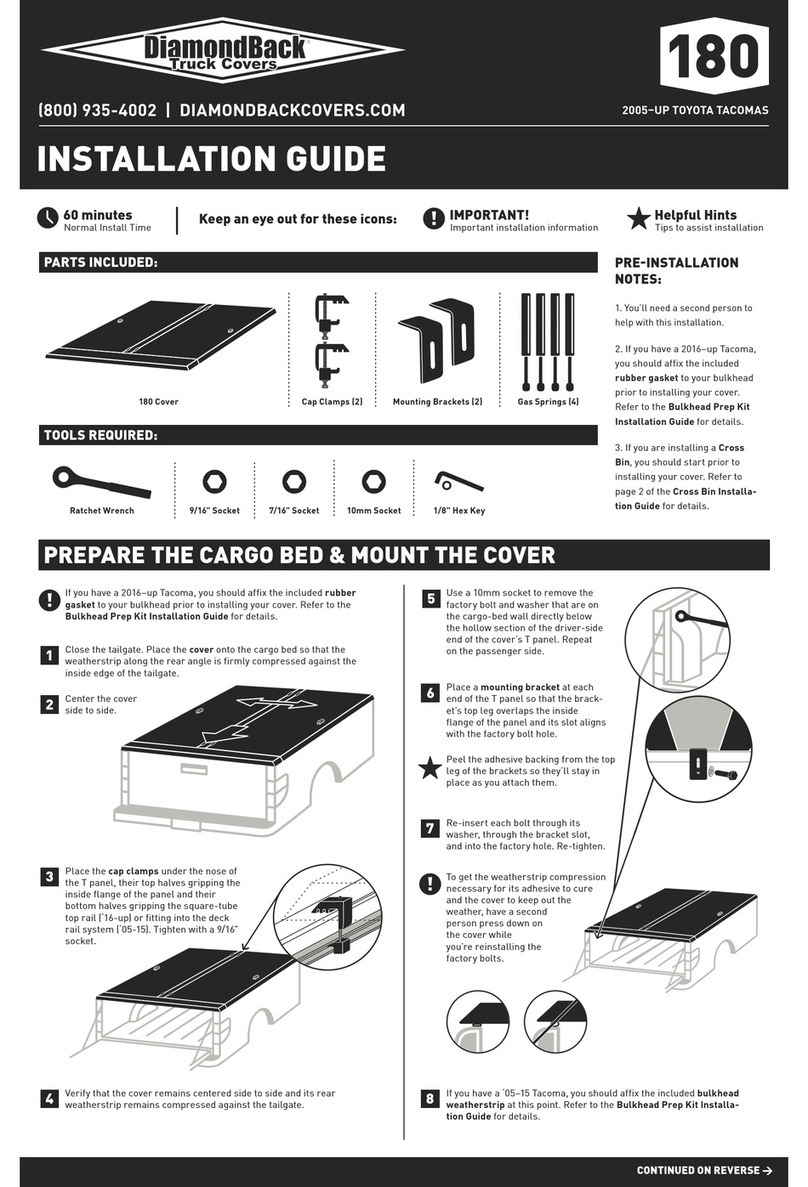
Place the cab & T panels assembly on the front half of the bed so
its leading edge lines up with the leading edge of the bulkhead.
6
If you have a 2005–2015 Tacoma, you should affix the
included bulkhead weatherstrip at this point. Refer to
the Bulkhead Prep Kit Installation Guide for details.
5
Center the DiamondBack
side to side.
To avoid hinge damage, do not close the
panel until the hinges are fully mated: Tilt
the panel past 90° and push to the left until
the hinge locking tabs interlock and the
hinge barrels are aligned with the leaves.
Mating hinges is
easiest when you
line up the longer,
left hinge pin first.
Slide the tailgate panel onto the T panel by mating their hinges.
Close the tailgate panel slowly while holding the lock handle in the
open position.
7
8
9
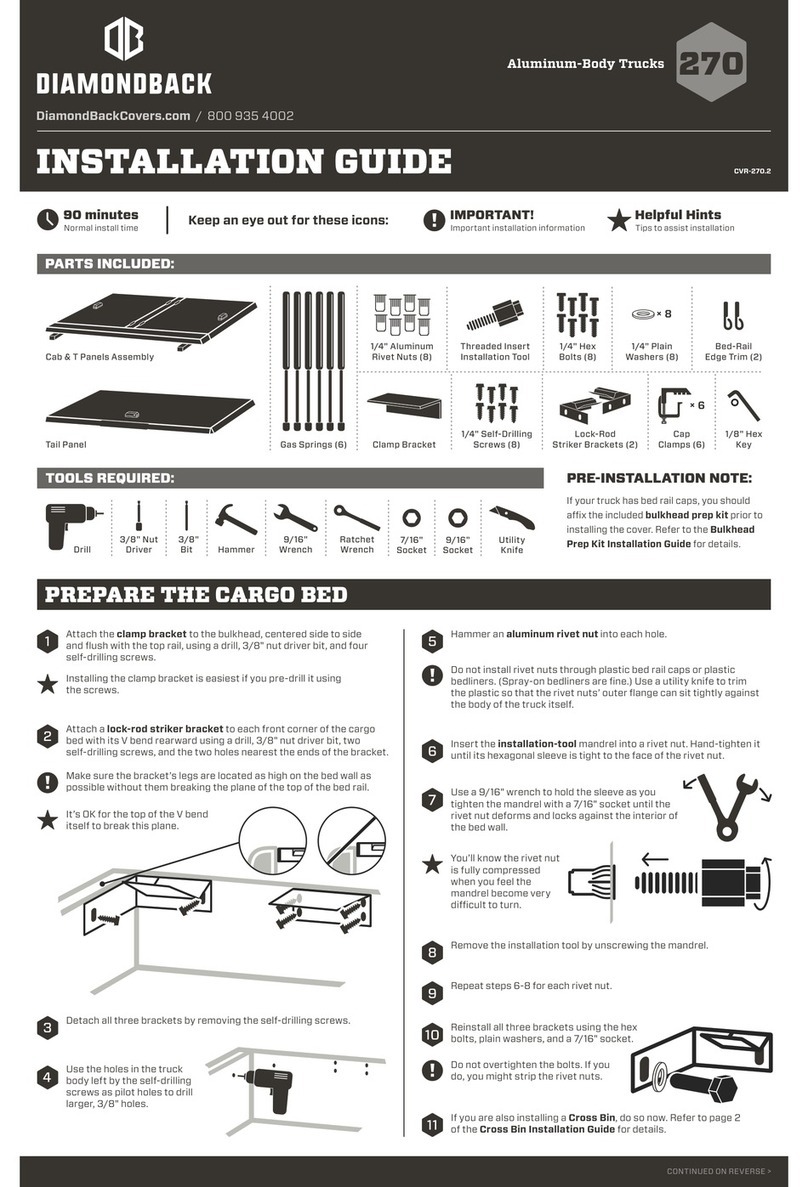
1Remove the plastic cap from the tailgate end of the driver-side
deck rail by pressing its tab.
2Use a T30 Torx wrench to remove the factory bolt near the tailgate
end of the deck rail.
3Slide the driver-side lock-rod
striker bracket into the deck rail
until its second hole aligns with
the factory bolt hole.
4Reinsert the factory bolt and
retighten it with the Torx wrench.
5Repeat steps 1–4 on the passenger side.
If you have a 2016–up Tacoma, you should affix the included rubber
gasket to your bulkhead prior to installing your cover. Refer to the
Bulkhead Prep Kit Installation Guide for details.
ATTACH THE GAS SPRINGS
ATTACH THE COVER & ADJUST THE LOCK RODS
Double-check all three panels to ensure they open, close, lock & seal
correctly. If at any point the weatherstrip does not touch the bed rails,
adjust the position of the lock rods.
16
Your panels should be difficult to operate at first. Leave
them closed as much as possible for 3–4 days to break in
the weatherstrip. After that period, you should find that
the panels open and close without difficulty.
If you are also installing a Single-Side Bin, do so now. Refer
to the Single-Side Bin Installation Guide for details.
12
Attach the 60-lb. gas springs to the cab-panel ball studs and
the two stronger gas springs to the tailgate-panel ball studs.
17
Leave the cover closed and
locked for 24 hours to allow
the weatherstrip adhesive,
which is pressure-sensitive,
to fully cure.
18
To avoid premature failure of your gas springs, attach
them barrel up, shaft down.
You’ll find the strength of the gas springs printed on the
sides of the barrels.
14 With the lock handle in the
closed position, position the
lock rods tight against the
underside of the striker brack-
ets so that they’ll draw the
panels down and compress the
weatherstrip. Tighten the rod
guide brackets with a 7/16"
socket.
Adjust the length of the lock rods and retighten the set screws so that:
A. with the lock handle in the open position, the rod tips clear the
striker brackets,
B. with the handle in the closed position, the rod tips do not strike
the bed walls, and
C. the rods point downward.
13
7/16" socket
Repeat steps 12 through 14 for the cab-panel lock rods so that:
A. with the lock handles in the open position, the rod tips clear
the deck rail system or square-tube top rail (forward) and
T-panel gutter (rearward),
B. with the handles in the closed position, the forward rod tips do
not strike the bulkhead,
C. the rods point downward, and
D. closing them draws the panels down & compresses the
weatherstrip.
15
To ensure the best weatherstrip adhesion, leave your cover and tailgate
closed and locked for 24 hours after you’ve made your final adjustments.
WWW.DIAMONDBACKCOVERS.COM
Close the tailgate panel. Loosen the set screws on the
tailgate-panel lock-rod linkages with an 1/8" hex key.
JANUARY 2016
Place two G-200 cap clamps under the cover at both side ends of
the T panel, their bottom halves fitting into the deck rail system.
Tighten with a 9/16" socket.
10
Place the remaining two clamps under the cover at the nose of the T
panel, their bottom halves gripping the square-tube top rail (‘16-up) or
fitting into the deck rail system (‘05-15). Tighten.
11
Retighten your clamps after 100 miles. Check
them every time you haul on top.
Other Diamondback Automobile Accessories manuals

Diamondback 270 User manual

Diamondback

Diamondback 270 User manual

Diamondback 270 User manual

Diamondback

Diamondback 270 User manual

Diamondback 180 User manual

Diamondback

Diamondback 180 User manual

Diamondback HD User manual

Diamondback

Diamondback HD User manual

Diamondback HD User manual

Diamondback

Diamondback HD User manual

Diamondback HD User manual

Diamondback

Diamondback HD User manual

Diamondback 180 User manual

Diamondback

Diamondback 180 User manual

Diamondback 270 User manual

Diamondback

Diamondback 270 User manual

Diamondback HD User manual

Diamondback

Diamondback HD User manual

Diamondback 180 User manual

Diamondback

Diamondback 180 User manual

Diamondback 270 User manual

Diamondback

Diamondback 270 User manual

Diamondback 270 User manual

Diamondback

Diamondback 270 User manual

Diamondback 180 User manual

Diamondback

Diamondback 180 User manual

Diamondback 270 User manual

Diamondback

Diamondback 270 User manual

Diamondback 270 User manual

Diamondback

Diamondback 270 User manual

Diamondback HD User manual

Diamondback

Diamondback HD User manual

Popular Automobile Accessories manuals by other brands

Hyundai CWF21 AU100 manual

Hyundai

Hyundai CWF21 AU100 manual

Metra Electronics 99-3106 installation instructions

Metra Electronics

Metra Electronics 99-3106 installation instructions

Jaeger 21500616 Fitting instructions

Jaeger

Jaeger 21500616 Fitting instructions

USB-Nachruesten 2010045 Installation guide and user's manual

USB-Nachruesten

USB-Nachruesten 2010045 Installation guide and user's manual

Cruz Optiplus Assembly instructions

Cruz

Cruz Optiplus Assembly instructions

Vitebo VTB-88 user manual

Vitebo

Vitebo VTB-88 user manual

Prorack K114 Fitting instructions

Prorack

Prorack K114 Fitting instructions

Davis Instruments 8127 installation instructions

Davis Instruments

Davis Instruments 8127 installation instructions

Thule Kit 1416 instructions

Thule

Thule Kit 1416 instructions

Thule 278 manual

Thule

Thule 278 manual

Directed Directechs DB3 installation guide

Directed

Directed Directechs DB3 installation guide

SuperATV 3 inch Lift Kit installation instructions

SuperATV

SuperATV 3 inch Lift Kit installation instructions

Crux RVCAD-81M Integration manual

Crux

Crux RVCAD-81M Integration manual

mft Aluline FA0132 manual

mft

mft Aluline FA0132 manual

Thule 1687 instructions

Thule

Thule 1687 instructions

Whispbar K619 Fitting Instructions for Basic Carrier

Whispbar

Whispbar K619 Fitting Instructions for Basic Carrier

Eaton Green Motion DC 22 user manual

Eaton

Eaton Green Motion DC 22 user manual

Kuda-Phonebase 095570 Installation instruction

Kuda-Phonebase

Kuda-Phonebase 095570 Installation instruction

manuals.online logo
manuals.online logoBrands
  • About & Mission
  • Contact us
  • Privacy Policy
  • Terms and Conditions

Copyright 2025 Manuals.Online. All Rights Reserved.