4-acoustic Unison User manual

User Guide
www.
4-acoustic.com

3 Indroduction
4 Features
5 Unison
6 Sonata
7 Harmonie
8 Symphonie
9 Euphonie
10 Melodie
11-16 Important Safety Instructions
17-20 Getting Started
21 EQ Setting Symphonie and Euphonie
22 EU DECLARATION OF CONFORMITY
Contents

Page: 3
Introduction
4-Acoustic has been known for excellent stage and club sound
for more than 15 years. Every day 4-Acoustic Sound Systems are
used all over the world.
4-Acoustic sound systems are used for large concerts, but also
for countless smaller events.
Ground-breaking innovations and constant further development
characterize our high-quality audio systems.
With our PIEM InEar Monitor series we bring the unique sound of
4-Acoustic directly into your ear.
www.
4-acoustic.com

Page: 4
Features
Perfect Shape
The ergonomically shaped housing oers a maximum sound
insulation of 26db and excellent bass reproduction.
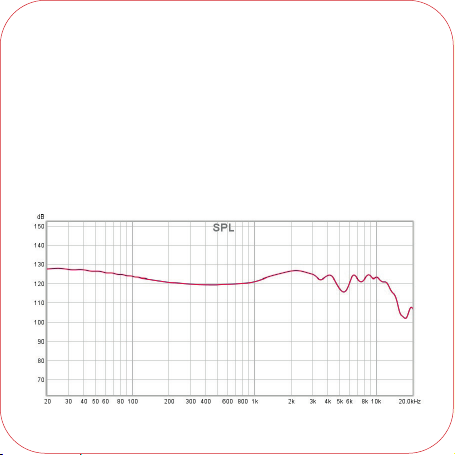
Custom Drivers
Crystal clear sound with breath-taking speech reproduction and
highest detail resolution. Sucient headroom for distortion-free
performance even at high volumes. Precisely calculated crosso-
vers ensure a balanced sound across the entire frequency range.
High End Cable
The high-quality shielded and braided cable has been developed
for extreme durability and sound properties. Equipped with a re-
movable connector that is angled for convenience. The over-ear
design guarantees a secure hold of the monitors in your ears and
ensures undisturbed performance.
Perfect Fit
Exact t thanks to exchangeable ear adapters. For maximum
comfort, accuracy of t and loss-free bass reproduction, 3
dierent sized ear adapters are included in the scope of delivery.
Choose the appropriate adapter that ts your ears.

Page: 5
Unison
Driving Unit: 1 Independent Knowles high frequency
balanced armature driver
1 Customized RAB mid low frequency
balanced armature driver
Crossover: 2-Way with 1 frequency divider
Impedance: 16Ω
Input Sensitivity: 120dB
Frequency Response: 5Hz-20KHz
Noise Reduction: 26dB

Page: 6
Sonata
Driving Unit: 1 Customized 8mm bio-lm
Dynamic driver
1 Knowles high frequency
balanced armature driver
Crossover: 2-Way with 2 frequency dividers
Impedance: 10Ω
Input Sensitivity: 110dB
Frequency Response: 5Hz-20KHz
Noise Reduction: 26dB

Page: 7
Harmonie
Driving Unit: 1 Customized 9mm bio-lm
Dynamic driver.
1 Knowles high frequency driver.
1 Customized BFK series ultra-high
frequency balanced armature driver.
Crossover: 3-Way with 3 frequency dividers
Impedance: 9Ω
Input Sensitivity: 114dB
Frequency Response: 5Hz-20KHz
Noise Reduction: 26dB

Page: 8
Symphonie
Driving Unit: 1 Customized 10mm bio-lm
Dynamic driver
2 Knowles high frequency balanced
armature driver
2 Customized BFK series ultra-high
frequency balanced armature driver
Crossover: 3-Way with 3 frequency dividers
EQ settings: 3 DIP Switches for dierent EQ settings
Impedance: 8Ω
Input Sensitivity: 128dB
Frequency Response: 5Hz-20KHz
Noise Reduction: 26dB

Page: 9
Euphonie
Driving Unit: 1 Customized 9mm bio-lm dyn. driver
4 Professionally customized mid
frequency balanced armature driver
2 Customized RAB series mid high
frequency balanced armature driver
2 Customized WBFK series ultra-high
frequency balanced armature driver
Crossover: 4-Way with 4 frequency dividers
EQ settings: 2 DIP Switches for dierent EQ settings
Impedance: 18Ω
Input Sensitivity: 128dB
Frequency Response: 5HZ-40KHZ
Noise Reduction: 26dB

Page: 10
Melodie
Driving Unit: 1 Customized 9mm bio-lm dyn. driver
4 professionally customized mid
frequency balanced armature driver
2 Customized WBFK series ultra-high
frequency balanced armature driver
2 SONION EST series electrostatic driver
Crossover: 4-Way with 4 frequency dividers
Impedance: 16Ω
Input Sensitivity: 128dB
Frequency Response: 5HZ-40KHZ
Noise Reduction: 26dB

Page: 11
Important Safety Instructions
1. Read the instruction manual and the safety guide completely
and carefully before using the product. Heed all warnings.
2. Make sure that the operating and safety instructions are easily
accessible to all users at all times.
3. Make sure that the operating and safety instructions are availa-
ble if you pass the product on to third parties.
4. Only use accessories and spare parts that are approved by the
manufacturer.
5. Do not try to open the product or its accessories yourself.
The guarantee expires for products opened by the customer.
6. All repairs must be carried out by qualied service person-
nel only. A repair is required if the product has been damaged,
exposed to liquid, rain or excessive humidity, or if there is a
malfunction.
7. Do not use the product if it has been damaged.

Page: 12
8. Keep the product and its connections away from liquids and
electrically conductive devices that are not necessary for the
operation of the product.
9. The in-ear monitors generate stronger, constant
magnetic elds that can interfere with pacemakers,
implanted debrillators (ICDs) and other implants. Always keep
a distance of at least 10 cm between the components of the
product that contain the magnet and the pacemaker, implanted
debrillator or other implant.
10. Because of the high sound isolation do not use the product in
an environment that requires your special attention. Do not use
in or near dangerous environments. This includes driving, cycling,
walking, jogging and other areas where trac is present and
accidents could occur.
11. Keep this product and its accessories out of reach of children
and pets. The product contains small parts and cords that may
pose a risk of chocking or strangulation. Handling or use by child-
ren may pose a risk of serious injury.
12. Install the InEar monitors rmly. If an ear tip accidently deta-
ches and is left in your ear, it may cause injury.

Page: 13
13. Incorrect handling, cleaning or maintenance of the earplugs
can increase the risk that the earplugs will detach from the sound
outlet socket and get stuck in your ear.
14. Before inserting the in-ear monitors, always check that the
earplugs are rmly attached to the sound outlet socket and that
they are not damaged.
15. If an ear tip becomes lodged in your ear, seek skilled medical
assistance to remove it. Damage to the ear may be caused by
non-professionals attempting to remove the ear tip.
16. Keep your in-ear monitors clean. Use a mild detergent solu-
tion to clean of the outside housing. Make sure that no cleaning
uid gets into the housing. Do not use any solvents or aggressive
cleaning agents to clean the product.
17. Do not attempt to modify this product. Doing so could result
in personal injury and/or product failure.
18. Do not immerse your in-ear monitors in water, such as while
taking a shower, bath, or washing. Otherwise, sound deteriorati-
on or failures may result.
19. Do not use while sleeping as accidents may result.

Page: 14
20. Use a slow twisting motion to remove the earphones. Never
pull on the ear phone cords.
21. Stop using the earphones immediately if they cause severe
discomfort such as irritation, rashes, discharge or other unplea-
sant reactions.
22. If you are currently receiving ear treatment, consult your
physician before using these earphones.
23. Set the volume level of the audio device to a minimum,
and then, after connecting the earphones, adjust the
volume gradually. Sudden exposure to loud noises could cause
hearing damage.

Page: 15
24. Excessive volume consumption through in-ear
headphones can lead to permanent hearing loss. The eects
and susceptibility to noise-related hearing loss vary greatly
from person to person. However, it is considered certain that
everyone suers more or less severe permanent damage to the
ear if certain time intervals and volume levels are exceeded. The
US Government Occupational Safety and Health Agency (OSHA)
has established the permissible noise levels shown in the table.
According to OSHA, consumption above the limits in the table
can lead to permanent hearing loss.
Sound Level Duration per day
90dB 8h
92dB 6h
96dB 4h
97dB 3h
100dB 2h
102dB 1,5h
105dB 1h
110dB 0,5h
115dB ≤0,25h

Page: 16
Usage
4-Acoustic InEar Monitors are closed, dynamic InEar headpho-
nes designed for professional, commercial use. The main area of
application is the use for musicians on stages, in radio, lm and
TV, as well as in studio and theater operations. The extremely
high sound pressure that can be achieved requires special care.
Operation on mobile playback devices or in Airplanes is not
permitted. Improper use is when this product is used for applica-
tions that are not listed in these safety instructions. 4-Acoustic
assumes no liability for damage resulting from improper use or
misuse of this product and its accessories.

Page: 17
S M L
Getting Started
Correct
STEP 1 – SELECTING THE EARTIPS
Dierent sized ear adapters are included in the scope of delivery
for maximum comfort, accuracy of t and loss-free bass repro-
duction. Select the appropriate tting to ensure maximum bass
reproduction and sound isolation. Carefully attach the adapter as
shown in the drawing. Be careful not to damage the tting piece.
Try dierent sizes to see which size is right for you.
4
acoustic
Eartip to small!
Wrong

Page: 18
Step 2 - Connect the audio cable
Connect the supplied connection cable to the earphones as
shown. Make sure to connect the cable connector marked “R” to
the right earcup and the connector marked “L” to the left earcup.
Attach the cord by aligning the plugs with the earcups and pushing
them in. Slightly pull back on each connector to make sure it is
securely in place. To disconnect the cable, grasp the earcup and cable
connector rmly and pull them straight apart. Do not pull on the cable
to avoid damaging it or detaching it from the plug.
4
acoustic
R

Page: 19
STEP 3 – Insert the Earphones
To insert the earbuds into your ears, do the following:
Grasp the earbuds with your thumb and forenger and insert
them into your ear canal as shown. Turn the earphones backwards
with a slight pressure towards the body until they are completely
seated in the auricle. If the size of the selected ear tip does not
t, test dierent sizes of the enclosed ear tips until you achieve
a comfortable t and seal of the ear canal. With an optimal t in
the ear, almost complete sound insulation of 26dBA is achieved.
You can practice using it in front of a mirror and check that it ts
perfectly.

Page: 20
STEP 4 – Remove the Earphones
To remove the earbuds, do the following:
Grasp the earbuds with your thumb and forenger and pull them
out of your ear canal as shown. Rotate the earbuds forward with
a gentle pull.
This manual suits for next models
5
Table of contents