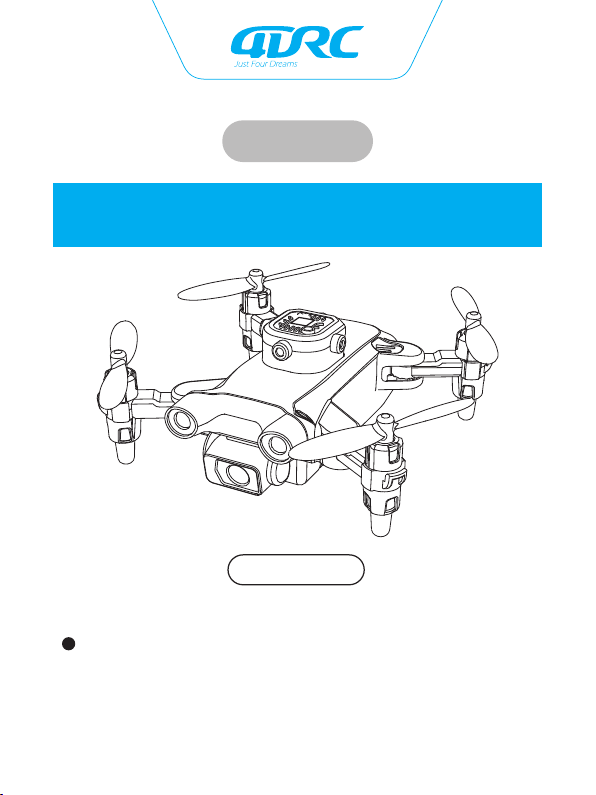
manuals.online logo
Brands
  1. Home
  2. •
  3. Brands
  4. •
  5. 4DRC
  6. •
  7. Quadcopter
  8. •
  9. 4DRC 4D-V30 User manual

4DRC 4D-V30 User manual

Other 4DRC Quadcopter manuals

4DRC 4D-V25 User manual

4DRC

4DRC 4D-V25 User manual

4DRC 4D-M1 User manual

4DRC

4DRC 4D-M1 User manual

4DRC 4D-F9 User manual

4DRC

4DRC 4D-F9 User manual

4DRC 4D-V20 User manual

4DRC

4DRC 4D-V20 User manual

4DRC 4D-F10 User manual

4DRC

4DRC 4D-F10 User manual

Popular Quadcopter manuals by other brands

Alias 6608 owner's manual

Alias

Alias 6608 owner's manual

Autel Robotics EVO II Dual 640T quick guide

Autel Robotics

Autel Robotics EVO II Dual 640T quick guide

Carson X4 NANO instruction manual

Carson

Carson X4 NANO instruction manual

Kaiser Baas KBA15007 user guide

Kaiser Baas

Kaiser Baas KBA15007 user guide

Denver Electronics DCH-261 instructions

Denver Electronics

Denver Electronics DCH-261 instructions

Craig INTERCEPTOR owner's manual

Craig

Craig INTERCEPTOR owner's manual

IMAGINARIUM droni stream instructions

IMAGINARIUM

IMAGINARIUM droni stream instructions

dji MAVIC 2 PRO quick start guide

dji

dji MAVIC 2 PRO quick start guide

Walkera QR X900 quick start guide

Walkera

Walkera QR X900 quick start guide

dji PHANTOM 3 4K user manual

dji

dji PHANTOM 3 4K user manual

Attop W80 Instructions for use

Attop

Attop W80 Instructions for use

Ares RECON FPV owner's manual

Ares

Ares RECON FPV owner's manual

Skycat XS user manual

Skycat

Skycat XS user manual

Falcon S2-210 quick start guide

Falcon

Falcon S2-210 quick start guide

MJX X300C instruction manual

MJX

MJX X300C instruction manual

dji NAZA-F45 Assembling and parameters setup

dji

dji NAZA-F45 Assembling and parameters setup

Propel Trampolines HD VIDEO DRONE Setup guide

Propel Trampolines

Propel Trampolines HD VIDEO DRONE Setup guide

HobbyZone Zugo instruction manual

HobbyZone

HobbyZone Zugo instruction manual

manuals.online logo
manuals.online logoBrands
  • About & Mission
  • Contact us
  • Privacy Policy
  • Terms and Conditions

Copyright 2025 Manuals.Online. All Rights Reserved.

4D-V30
Suitable for ages over 14
Quadcopter operating instructions
WIFI version
In order to meet the requirements of the aeronautical radio station's electromagnetic
environment (various of aero models and UAV are not allowed to fly within the range of
10 km on each side of center line and 20km on both ends of the airport runway and in
the) and civil aviation routes and airlines. Using various models and drones in the
no-fly zone issued by the relevant state departments is prohibited.
English
Warning
1. The packaging and instructions contain important information and should be kept.
2. With this aircraft, you are responsible for ensuring that no harm will be caused to the personal and
property of others.
3. Commissioning and installing of aircraft must be strictly in accordance with the operating
instructions, and attention shall be paid to the distance between the aircraft and the user or other
people shall be 2 to 3m to prevent the aircraft from bumping into the head, face and body of people
and causing injury in flying and landing, etc.
4. Our company and distributors are not responsible for any loss and damage, as well as injury to
people caused by improper use or operation.
5. Children should be guided by adults when operating the aircraft. This product is prohibited to be
operated by children under 14 years old.
6. Please follow the instructions or packaging instructions to install and use correctly, and some parts
should be assembled by adults.
7. The product contains small parts, please place it out of the reach of children to prevent the risk of
accidental eating or suffocation.
8. It is strictly forbidden to play on the road or in the place where water is accumulated to avoid
accidents.
9. Please put away the packing materials in time to avoid harm to children.
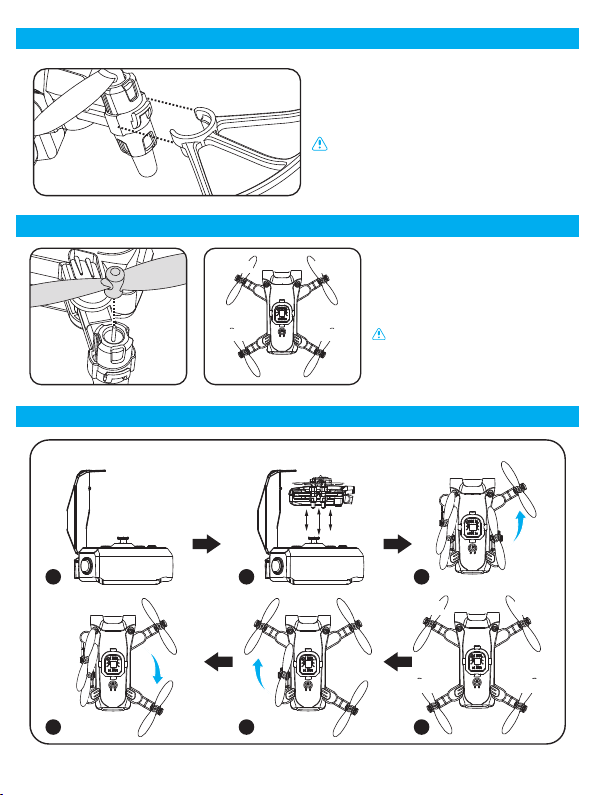
10. Do not disassemble or modify the aircraft. Disassembly or modification may cause malfunction to
the aircraft.
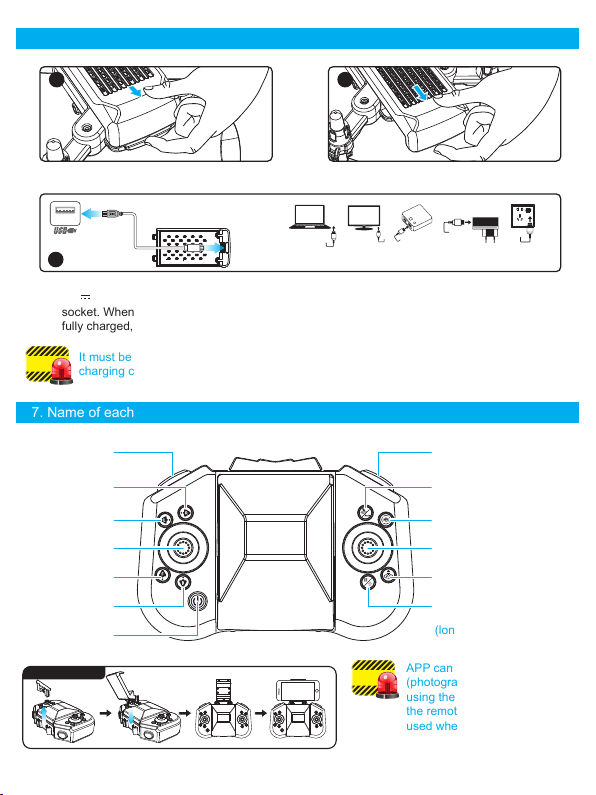
11. The charging cable needs to be inserted into the designated power supply 5V 2A that is the same
as the product label.
12. The use of other charging cables will cause damage to the battery and may cause unexpected
dangers.
13. The charging cable is not a toy.
14. When charging the rechargeable battery, it must be under the supervision of an adult. When
charging, it must be far away from flammable materials. During charging, the guardian should not
leave the monitoring range.
15. Please do not short circuit or squeeze the battery to avoid explosion.
16. Do not mix different types of lithium batteries.
17. The aircraft uses a rechargeable lithium battery, which needs to be pulled out for charging.
18. Do not short-circuit, decompose or throw the battery into fire; do not put the battery in a place with
high temperature and heat (such as in fire or near electric heating device).
19. The aircraft should be used as far away from other electrical equipment and magnetic objects as
possible, they may cause mutual interference.
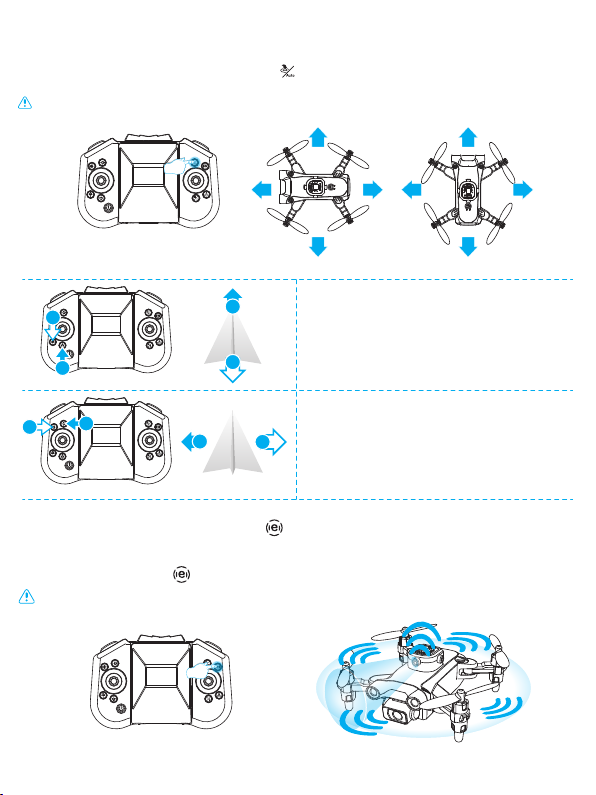
20. Please keep a safe distance from the high-speed rotating propeller to avoid the risk of scalp or cut
21. The motor is a hot part; please do not touch it to avoid burns.
22. LED has laser radiation; please do not give direct light beam to others.
23. Do not use the model near your ears! Misuse may cause hearing damage.
24. The USB charging cable must use the data cable provided by our company to charge the battery,
otherwise it will cause serious damage to the battery and will lead to unexpected danger.
25. To meet the magnetic environment requirements of aeronautical radio stations. During the radio
control order issued by the relevant state departments, the model remote control should be stopped
within the city area as required.
26. Turn off the switch and unplug the battery when the battery of the aircraft is used up, and charge
after 30 minutes of rest, otherwise the battery will be easily damaged.
01
1. List of accessories included:
2. Name of each part of aircraft:
Aircraft ×1
360 ° four-way obstacle avoidance (the obstacle avoidance switch is turned off by default, and the
obstacle avoidance function can be turned on by briefly pressing the obstacle avoidance key, and then
turned off by pressing it).During flight, when the aircraft is close to the wall or other obstacles in the
front/back/left/right directions, it will automatically avoid to the safe area, because the aircraft has turned
on the obstacle avoidance function.
Obstacle
Avoidance
Radar
Fan blade
LED lights
Battery
Power
switch
Shell
Motor
Bottom camera
Camera
USB charging
cable ×1
Fan blade ×4 Protection frame×4 Lithium battery ×1 Screwdriver ×1 Operating
Instructions ×1
02
B1/B2B1/B2
B1/B2B1/B2 A1/A2
A1/A2
1 2
5
3
6
4
B1/B2B1/B2
B1/B2B1/B2 A1/A2
A1/A2
3. Installation figure of aircraft protection ring:
4. Wind blade installation diagram:
5. Unfolding steps of the aircraft: (It is in the storage state when it leaves the factory)
Align the parts of the frame with the socket of the
arm according to the figure.Make sure the
installation is in place before flying to avoid falling
during the flight.
Remove the fan blade.(If A1/A2 blade
is broken, replace A1/A2. If B1/B2
blade is broken, replace B1/B2. If
replace the wrong parts, the aircraft
will not take off.)
1. Flip open the cover 2. Press the arrow indicating button to remove the aircraft
3. Unfold the aircraft according to the steps
Note: Please be sure to install the protective
ring before flying!
Note: The fan blade is printed with
A1/A2 B1/B2. Please install it
correctly according to the
instruction, otherwise it cannot
take off
03
1 2
3
6. Lithium battery charging instructions:
7. Name of each part of the remote control:
6.1 Buckle the battery lock of the aircraft.
6.3 Charging: Insert the USB port of the USB charging cable into the computer USB port (or use
5V 2A power adapter), and connect the other end of the USB charging cable to the battery
socket. When charging, the red indicator on the module battery is on, and when the battery is
fully charged, the red indicator light goes out, which means that the charging is complete.
6.2 Remove the battery.
Laptop Desktop
PC
Mobile
power USB adapter USB power
socket
It must be charged with the aircraft charging cable provided by the factory, and other
charging cables cannot be used. Be sure to remember to avoid accidents.
Accelerate
Right fine-tuning
Left fine-tuning
Throttle/left and
right lever
Advance
fine-tuning
Reverse
fine-tuning
Switch
360° roll
Headless mode (short
press)/one key return
(long press)
Obstacle avoidance mode
Advance/reverse/left/right
control lever
One-key take-off/one-key
landing
Emergency stop (short
press)/one-key calibration
(long press)
Warning
APP can only be viewed
(photographed/recorded) when
using the remote controller, and
the remote controller cannot be
used when using APP.
Warning
Steps for installing a
remote control
04
1
2
3
10.1 Aircraft frequency matching: Turn on the power of the
aircraft and place it on a horizontal surface. At this
time, the aircraft placed on the horizontal surface will
automatically enter the frequency matching state, and
the front white light and the rear red light will flash.
10.2 Turn on the remote control (default mode): long press
the power switch button (step 1), turn on the power
and the indicator flashes; push the throttle lever up to
the top (step 2) and then to the bottom (step 3), and
thus the frequency matching is successful, the UAV
lights change from flashing to being permanently on.
Please choose an outdoor and open environment with no rain and snow and low wind. Please stay
away from crowds, trees, wires, tall buildings, airports, and signal transmission towers when flying. Do
not fly in a too small indoor environment with lots of things.
The aircraft/remote controller must ensure sufficient power or it cannot take off!
Note: Set the aircraft in a correct direction, and the nose
shall face forward. It must be placed on the horizontal
plane.
Warning
8. Remote control battery installation:
9. Environmental requirements before flight:
10. Preparation instructions before flight(using remote control):
Battery cover
AAA battery
Battery installation:
8.1 Remove the battery cover.
8.2 According to the polarity instructions on
the battery compartment, remove the
battery cover on the back and insert a
2X “AAA” battery (not included).
Instructions in charging:
● Do not put the charged battery in a place with high temperature
and heat, such as an open flame or an electric heating device,
otherwise damage or explosion may occur.
● Do not hit or beat the surface of hard objects with the battery.
● Do not disassemble the battery.
● Do not immerse the battery in water, and please store the battery
in a dry place. ● Do not leave battery alone when charging.
Warning
When not flying, please do not install
the battery in the aircraft to avoid
battery damage.
Note
1. The positive and negative poles and the positive and
negative poles of the battery box must be identified when
inserting the battery, and error is not allowed.
2. Do not mix old and new batteries.
3. Do not mix different types of batteries.
05
Figure 1
Figure 2 Figure 3
Figure 4
Note: The calibration must be completed only when the aircraft is placed on a horizontal plane.
Note: This function operation is only suitable for the aircraft in an uncontrolled state. Under normal
circumstances, it is recommended to use the one-key takeoff/one-key landing key.
10.3 Horizontal calibration operation:
Long press the calibration key on the remote controller, and the LED lights on the aircraft will flash.
When the LED lights on, calibration of the aircraft is completed, the remote controller emits "beep"
(Figure 1).
10.4 Start/stop
Push the left control lever on the remote control upward (Figure 2). At this time, the aircraft can take off
normally. After taking off, all the indicator lights of the aircraft will always be on. During the flight, whether
you short press the key, the aircraft will stop flying (Figure 3).
10.5 One-key take-off and landing
When unlocking is complete, gently press the “One Key Takeoff/Landing” key on the remote control
(Figure 4), the aircraft will automatically rise to a height of about 1 meter to maintain a stable flight; when
you press this function key gently again, the aircraft will automatically land slowly.
Operate the aircraft with the remote control. Before taking off, please operate according to the
above sequence: Turn on (refer to 10.1)→ frequency matching of the remote control starts
(refer to 10.2)→horizontal alignment (refer to 10.3)→ start/stop (refer to 10.4)→ one-button
taking off and landing (refer to 10.5)
Warning
06
11.1 Remote control method:
When the left joystick (throttle) is pushed up, the
rotation rate of the main blade increases and the
aircraft rises.
When the left joystick (throttle) is pushed down, the
rotation rate of the main blade slows down and the
aircraft descends.
When the right joystick (rudder) is pushed up, the
aircraft moves forward.
When the right joystick (rudder) is pushed down, the
aircraft moves backward.
When the left joystick (rudder) is pushed to the left,
the aircraft nose turns to the left. When the left
joystick (rudder) is pushed to the right and the nose
of the aircraft will turn to the right.
When the right joystick (rudder) is pushed to the
right, the aircraft fuselage deviates to the right.
When the right joystick (rudder) is pushed to the left,
the aircraft fuselage deviates to the left.
360° roll on the left
Short press the 360° roll button, then push the right
joystick to the left, and the aircraft will flip 360° to the
left accordingly.
360° roll on the right
Short press the 360° roll button, then push the right
joystick to the right, and the aircraft will flip 360° to
the right accordingly.
11.2. 360° roll
The aircraft can achieve 360-degree flight by the following joystick operation. In order to better perform
the roll function, a height of about 1.5 meters shall be ensured between the aircraft and the ground. It is
best to operate the aircraft to roll during the ascent stage, so that the aircraft can maintain the height
more easily after rolling.
11. Introduction of remote control function and operation:
07
Roll Forward 360°
Press the 360° tumble button for a short time, then
push the right joystick upward, and the aircraft will
turn forward 360°correspondingly.
360° roll backward
Short press the 360° roll button, then push the right
joystick down, and the aircraft will flip 360° backward
accordingly.
11.3 Speed switching
When the aircraft takes off, it is by default in the low-speed mode (3-geared switching); gently press the
remote control by a "beep" sound for low-speed gear, two "beep" sounds for medium-speed gear, and
three "beep" sounds for high-speed gear (Figure 7).
11.4 One key return
When the flying distance of the aircraft is too far, the aircraft can be recalled with the return function.
When turning on the code-matching, the remote control must be directly facing the tail of the aircraft.
During flight, press and hold the one-key home button (Figure 6). When the remote control emits a
"beep" sound, the aircraft will enter the one-key home function, and will automatically return to our side;
when the joystick is operated in any form, the aircraft will be released from the home function.
Figure 5
Figure 6
08
1
2
43
34
1
2
Special prompt: Please make sure the aircraft is aligned with the straight line and let the gyroscope
automatically detect the straight line, and the headless mode of straight line flight can be realized.
Note: Under sunlight or strong light, under transparent and reflective objects such as glass, and
under black objects, the obstacle avoidance effect will become weak, or even lose its effect.
11.5 Headless mode
The front of the aircraft when the code-matching is turned on is by default the front in headless mode; if
it is necessary to adjust the direction, please turn on the code-matching again, and short press the
remote controller "headless mode" function key (Figure 5). When exiting, please tap gently press
this function key again.
11.7 Obstacle avoidance mode
During flight, short press Obstacle Avoidance to turn on obstacle avoidance mode (Figure 6). Thus,
when the aircraft is close to wall or other obstacles in front/left/right direction, it will automatically move
to a safe area it is in the obstacle avoidance function. If you want to switch to the normal fixed height
mode, lightly press this key to turn off the obstacle avoidance function.
Figure 7
11.6 Fine tuning function
1. Fine tuning of aircraft moving forward/backward
When the aircraft leaves the ground and the
aircraft deviates to the rear, press and hold ①
forward fine-tuning key to fine-tune; when the
aircraft deviates to the front, press and hold ②
backward fine-tuning key to fine-tune.
2. Fine tuning of aircraft deviates to the left/right
When the aircraft leaves the ground and the
aircraft deviates to the right, press and hold ③
left fly fine-tuning key to adjust, and when the
aircraft deviates to the left, press and hold ④
right fly fine-tuning key to adjust.
Figure 8
Front
Rear
Left Right
Front
Rear
Left Right
09