70mai Midrive TP01 User manual

70mai Air Compressor
User Manual
Please read this manual carefully and keep
it in a safe location before using the product

Contents
简体中文 .................................................................................. 1
English ................................................................................... 10
Русский................................................................................. 17
Español.................................................................................. 24
Português.............................................................................. 31
日本語 .................................................................................... 38
한국어 ................................................................................... 44
繁體中文 ................................................................................ 50

产品外观
产品使用
1.开关机
压力表显示屏
1
- 键
2
R 键
3
充气启动键
4
+ 键
5
6盖子
7快拔式接头
8车充头
9气嘴(3个)
拆开捆扎电源线的魔术贴,将车充头接入汽车点烟器后,车
辆启动,点烟器口获得车辆供电时,设备自动开机。
拔出车充头,或者汽车熄火停止给点烟器口供电时, 设备会
自动关机。
R
1
2
3 4
5
6 7 8
9
感谢您使用70迈汽车轮胎充气泵。使用本产品之前请仔细
阅读说明书,并保存好本说明书,以备查阅。
1

2. 连接气管
连接橡皮艇、充气玩具、气垫床及球类等:
本产品配置3个气嘴,适用于大部份可填充物品。
1. 将空气管快拔式接
头直接扣在轮胎气门,
听到轮胎泄气声时,表
示空气已经流通。
连接Jeep、SUV、汽车、摩托车等车类的轮胎:
2. 将相应的气嘴连接到充气的物体上(如下图)。
2. 立即将快拔式接头
压板向内90˚压 紧 ,此
时空气不再泄出,气管
连接成功。
1. 将合适的气嘴安装
在空气管的快拔式接
头,将压板向内90˚压
紧。
注意:
当被充物无气压时,不适用
以上检测方式
2

球针,用于篮球、足球、排球
等球类品。
短气嘴,用于充气床。
长气嘴,用于沙滩球、游泳圈
等充气玩具及除尘、清洁用
途。
3. 检测气压
连接气管后,开机状态下,压力表显示屏显示的数字为当前
压力。
R
KPA BAR PSI
3

4. 预设充气胎压
5. 充气
请按照如下步骤预设充气胎压:
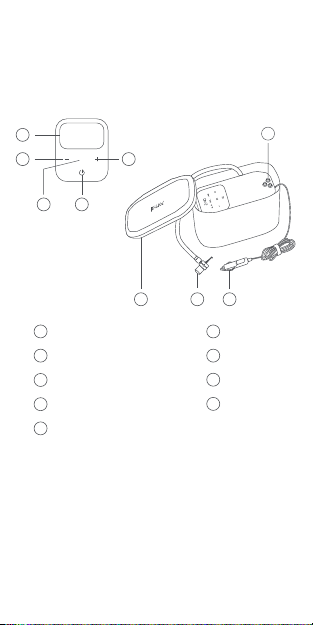
1. 设备开机后,点按“R”键可将单位转换为bar、psi或者kPa。
2. 按“+”或“-”按钮至数字闪动 ,再按“+”或“-”按钮调至所需
数值 。数字闪动停止,胎压设置完毕。
6. 查询充气压力
为确保安全,充气前请先查询被充气物品所需要的充气压
力,避免因过度充气引起的爆裂造成人身伤害。
轮胎
汽车自行车和摩托车的轮胎可承受气压范围标注在轮胎的
侧壁;汽车轮胎指导气压标注在司机侧车门的内壁附近。
充气压力高低与负载重量有关,更详细的气压建议,请查询
汽车说明书。
1. 连接气管后,开机状态下,按下充气启动键即可开始充气。
2. 充气到预设胎压后,充气泵停止工作,充气完成。
3. 拔下车充头,设备自动关机。
当充气泵停止工作后,压力表的读数将稍微下降后稳定下来,这是正常的
“回压”现象。
注意:
如果短时间充气泵压力表指针迅速上升(3秒上升超80psi),
表示空气气压受阻,请立即关闭电源,从轮胎气嘴 上取下快
拔式接头,重新连接气管。
4

规格参数
产品名称: 70迈汽车轮胎充气泵
产品型号: Midrive TP01
工作电压: DC 12V
最大工作电流: 10A
最大充气压力: 7 bar(100 psi)
尺寸: 235 × 110 × 172.9 mm
存储温度: -30℃~80℃
工作温度: -20℃~70℃
球类
足球、篮球、排球等球类的充气压力在气嘴周围处标注。
常见产品建议充气压力表
充气
类型 具体分类
汽车
摩托车
建议压力
范围(bar)
摩托车、电动摩托车、电动自行车
2.2~3.5
1.8~3.0
轿车、SUV、商务车、越野车
注意:
1kg/cm ≈1bar≈100kPa≈14.5psi
2
5

注意事项
为避免充气泵损坏,请遵守以下指导:
1. 本产品机身已固定在铁盒中,请不要尝试取出。
2. 请在充气泵指定的压力下进行充气,请勿过充以免发生
危险。
3. 请勿让充气泵在无人监控下工作,本设备在不用时须切
断开关。
4. 请勿在汽油等易燃易爆物附近使用。
5. 本机可连续工作,但在环境温度较高时,请适当缩短连
续使用的时间,可延长整机的使用寿命。
6. 请勿让气流朝着自己或他人,高气压流将会导致危险。
7. 请勿使用铁盒来站立,蹲坐;请勿重压铁盒以免设备损
坏;请勿使用铁盒储存放置其他物品。
8. 使用充气泵时请务必拆开捆扎电源线的魔术贴,将电源
线展开,以免电源线过热引起安全隐患。
包装清单
70迈汽车轮胎充气泵 × 1
说明书(内含三包凭证) × 1
6

三包凭证
2. 维修记录
受理日期 故障现象 处理方案 维修员签字
姓 名: 电 话:
电子邮件 : 邮政编码:
联系地 址:
1. 用户信息
7

产品中有害物质的名称及含量
部件名称
有害物质
铅
(Pb)(Hg)
汞
(Cd)
镉
(Cr(VI))
六价铬
(PBB)
多溴联苯
(PBDE)
多溴二苯醚
主机内部电
子组件
本表格依据SJ/T 11364的规定编制。
: 表示该有害物质在该部件所有均质材料中的含量均在GB/T
26572规定的限量要求以下。
X: 表示该有害物质至少在该部件的某一均质材料中的含量超
出了GB/T 26572规定的限量要求。
主机外壳及
组件 X
X X
8

联系我们
官 网:www.70mai.com
电 话:
400-015-2399
制造商:上海新案数字科技有限公司
地 址 :上海市闵行区紫星路588号
2幢2220室
扫描右侧二维码关注70迈微信公众号
服务政策
本公司严格依据《中华人民共和国消费者权益保护法》、
《中华人民共和国产品质量法》为购买本公司产品的消费
者提供三包服务。
详细的服务政策,请参考70迈官网售后服务政策栏内容:
http://www.70mai.com/service/mainland
9

Product Overview
Using the Product
1.Turning on/off the device
Pressure Gauge
1
- Button
2
R Button
3
Start Button
4
+ Button
5
6 Cover
7Quick Release
Pump Head
8Car Charger
9Nozzle
(3 pieces)
Release the velcro around the power cable. Insert the car
charger into the cigarette lighter receptacle. Turn on the
engine. The device will automatically turn on once it
draws power from the engine.
R
1
2
3 4
5
6 7 8
9
Thank you for choosing 70mai Air Compressor. Please
read this manual carefully and keep it in a safe location
before using the product.
10

The device will automatically turn off when the car
charger is removed or when it stops receiving power
from the cigarette lighter receptacle after the engine is
being turned off.
2. Connecting the gas tube
Connecting the device to an inflatable boat, inflatable
toy, inflatable mattress, ball or other kinds of objects:
The device comes with three different nozzles that can
be used for most inflatable objects.
1. Connect the quick
release pump head
directly to the Tyre's
gas valve. Watch out
for the hiss sound
which suggests the
air is flowing through
the tube.
Connecting the device to a jeep, SUV, sedan,
motorcycle or other kinds of tyres:
2. Secure the quick
release pump head by
pushing the locking
handle 90° inwards. The
air should stop leaking
and the gas tube is
connected successfully.
Note:
The above detection method is not applicable if the Tyre is fully
deflated.
11

2. Connect the nozzle to the inflatable object (as shown
below).
1. Attached a
suitable nozzle to
the quick release
pump head and
push the locking
handle 90
°
inwards.
The needle is suitable
for basketballs,
footballs, volleyballs
and other kinds of
balls.
The short nozzle is
suitable for
inflatable beds.
The long nozzle is
suitable for beach balls,
floats and other
inflatable toys, as well as
for dust removal and
cleaning.
12

3. Detecting gas pressure
After connecting the gas tube and while the device is
turned on, the pressure gauge will show the current
pressure in numeric value.
R
KPA BAR PSI
4. Presetting the Tyre pressure
5. Pumping
Follow these steps to preset the Tyre pressure:
1. After the device is turned on, press the "R" button to
switch the unit of measurement between bar, psi or kPa.
2. Press the "+" or "-" button until the numbers start to
flash. Press the "+" or "-" button again to adjust the value.
When the numbers stop flashing, presetting of the Tyre
pressure is complete.
1. After connecting the gas tube and while the device is
turned on, press the "Start" button to start pumping.
If the pressure of the gas valve increases rapidly within a
short interval (80 psi in 3 seconds), the air way is
obstructed. Turn off the power, detach the quick release
pump head and reconnect the gas tube.
13

2. When the air pressure reaches the preset Tyre
pressure, the pump will stop working. The pumping
operation is complete.
6. Checking the gas pressure
For safety, please check the gas pressure of the object to
be inflated first. This will prevent the risk of personal
injuries caused by over-inflating of the object.
Tyres
The working pressure range is stated on the inside of a
bicycle or motorcycle tyre. A tyre pressure guide can be
found inside the door of the driver seat.
The gas pressure value is linked to the load. For more
information on Tyre pressure, please refer to the car's
user manual.
When the pump stops working, the reading on the pressure gauge
will drop gradually before stabilizing. This is normal.
Note:
3. Remove the car charger and the device will
automatically turn off.
14

Specifications
Product name: 70mai Air Compressor
Product name: Midrive TP01
Model: DC 12V
Max Working Current: 10A
Max Gas Pressure: 7 bar(100 psi)
Dimensions: 235 × 110 × 172.9 mm
Storage Temperature: -30℃~80℃
Operating temperature: -20℃~70℃
Balls
The working pressure is stated near the nozzle hole of a
football, basketball, volleyball or other balls.
Common Recommended Gas Pressure
Inflatable
Object Classification
Cars
Motorcy-
cles
Recommended
Pressure (bar)
Motorcycles, electric
motorcycles, electric bicycles
2.2~3.5
1.8~3.0
Sedans, SUVs, commercial cars,
off-road vehicles
Note:
1kg/cm ≈1bar≈100kPa≈14.5psi
2
15

Precautions
To avoid damage to the device, please follow the
instructions below:
1. The device body is secured in the metal box. Do not
attempt to remove it from the box.
2. Please follow the gas pressure guide when pumping.
Do not over-inflate to prevent accidents.
3. Do not allow the device to operate without
supervision. Cut off the power when the device is not
in use.
4. Do not use the product near explosive substances
such as gasoline.
5. This device can be operated continuously. However,
at high ambient temperatures, please shorten the
operation time to extend the device's service life.
6. Do not point the gas nozzle at yourself or someone
as the high pressure gas flow will cause injuries.
7. Do not stand, sit or squat on the metal box. Do not
place any heavy object on the metal box to prevent
damage. Do not store other objects inside the metal
box.
8. Please remove the velcro and uncoil the power cable
when using the device to prevent potential safety
hazards caused by overheating of the power cable.
Packing List
70mai Air Compressor × 1
User manual × 1
16

Общий вид устройства
Использование устройства
1.Включение/выключение устройства
Манометр
1
Кнопка -
2
Кнопка R
3
Кнопка «Пуск»
4
Кнопка +
5
6 Крышка
7Быстросъемная
головка насоса
8Автомобильное
зарядное
устройство
9Насадка (3 шт.)
Расстегните застежку-липучку, фиксирующую кабель
питания. Вставьте автомобильное зарядное
устройство в гнездо прикуривателя. Включите
двигатель. Устройство автоматически включится,
как только начнет получать питание от двигателя.
R
1
2
3 4
5
6 7 8
9
Благодарим вас за выбор 70mai Air Compressor.
Внимательно прочитайте данное руководство
перед использованием устройства и храните его в
надежном месте.
17

Устройство автоматически выключается при
извлечении автомобильного зарядного устройства
или при прекращении подачи питания от
прикуривателя после выключения двигателя.
2. Подсоединение воздушной трубки
1. Подсоедините
быстросъемную
головку насоса
непосредственно к
воздушному клапану
шины. Проследите за
«свистящим» звуком,
означающим, что
через трубку выходит
воздух. for the hiss
sound which suggests
the air is flowing through
the tube.
Подсоединение устройства к шине джипа,
кроссовера, седана, мотоцикла и к другим видам шин:
2. Закрепите
быстросъемную
головку насоса, нажав
фиксирующую ручку на
90˚ внутрь. Воздух
должен перестать
выходить, а это
означает, что
воздушная трубка
подключена успешно.
Примечание.
Указанный метод обнаружения не работает, если шина
полностью спущена.
18
Table of contents
Languages:
Other 70mai Air Compressor manuals
Popular Air Compressor manuals by other brands

MGF
MGF ASPIR 1 Operating & maintenance instruction manual

Atlas Copco
Atlas Copco XRHS 527 Cd C3 WUX instruction manual

Truper
Truper COMP-POR-2.5 manual

Scheppach
Scheppach HC25o Translation from the original instruction manual

Paramina
Paramina MISTRAL CLASSIC M6-ET user manual

Streetwize
Streetwize SWAC17 quick start guide