BESTIMMUNGSGEMÄSSER GEBRAUCH
Die Freesolo und Oval Guide Keenführungen sind für den Einsatz an Mountainbikes oder
E-Mountainbikes gemäß Kategorie 5 / ASTM F2043 vorgesehen.
Kategorie 5 steht für den Einsatz von Fahrrädern und dessen Komponenten in anspruchsvollem,
stark verblocktem und extrem steilen Gelände, welches nur von technisch geübten und sehr gut
trainierten Fahrern bewälgt werden kann. Größere Sprünge bei sehr hohen Geschwindigkeiten
sowie die intensive Nutzung von ausgewiesenen Bikeparks oder Downhillstrecken sind typisch für
diese Kategorie. Bei diesen Bikes ist unbedingt darauf zu achten, dass nach jeder Fahrt eine intensive
Prüfung auf mögliche Beschädigungen staindet. Vorschädigungen können bei deutlich geringeren
weiteren Beanspruchungen zu einem Versagen führen. Auch sollte ein regelmäßiger Austausch von
sicherheitsrelevanten Bauteilen berücksichgt werden. Das Tragen von speziellen Protektoren wird
unbedingt empfohlen. Vollgefederte Bikes mit langen Federwegen, aber auch Dirtbikes zeichnen diese
Kategorie aus.
Die Auistung aller Kategorien ndest du unter 77designz.com
KOMPATIBILITÄT
Keenbläer: runde Keenbläer 28-38 Zähne, ovale Keenbläer 26 - 36 Zähne
Keenlinie: 48-53 mm
6 Nm
6 Nm
2 Nm
2 Nm
40 Nm
X = 7.0
none
X = 7.5
0.5
X = 8.0
1
X = 8.5
1 + 0.5
X = 9.0
2
X = 9.5
2 + 0.5
X = 10.0
2 + 1
X = 10.5
3.5
X = 11.0
3.5 + 0.5
X = 11.5
3.5 + 1
X = 12.0
3.5 + 1 + 0.5
A
B
B
A
A
34 oval / 36 round
36 oval / 38 round
32 oval / 34 round
30 oval / 32 round
28 oval / 30 round
26 oval / 28 round
B
1
1
2
2
3
4
5
6
4
5
6
FREESOLO | OVAL GUIDE
BEDIENUNGSANLEITUNG
USER MANUAL
77DESIGNZ UG (HAFTUNGSBESCHRÄNKT)
AN DER KOLVENBURG 8
48727 BILLERBECK - GERMANY
TELEFON +49 2543/2184395
E-MAIL: INFO@77DESIGNZ.COM
CEO: GIACOMO GROSSEHAGENBROCK
VAT ID: DE275535522
DISTRICT COURT: COESFELD
COMMERCIAL REGISTER: HRB 16096
V2021.11
WEITERFÜHRENDE INFORMATIONEN
Weiterführende Informaonen, wie technische Daten, erweiterte
Produknformaonen und ausführliche Informaonen zur Montage und
Kompabilität ndest du auf der 77designz Webseite.
Klicke auf den QR Code oder scanne den Code mit deinem Smartphone.
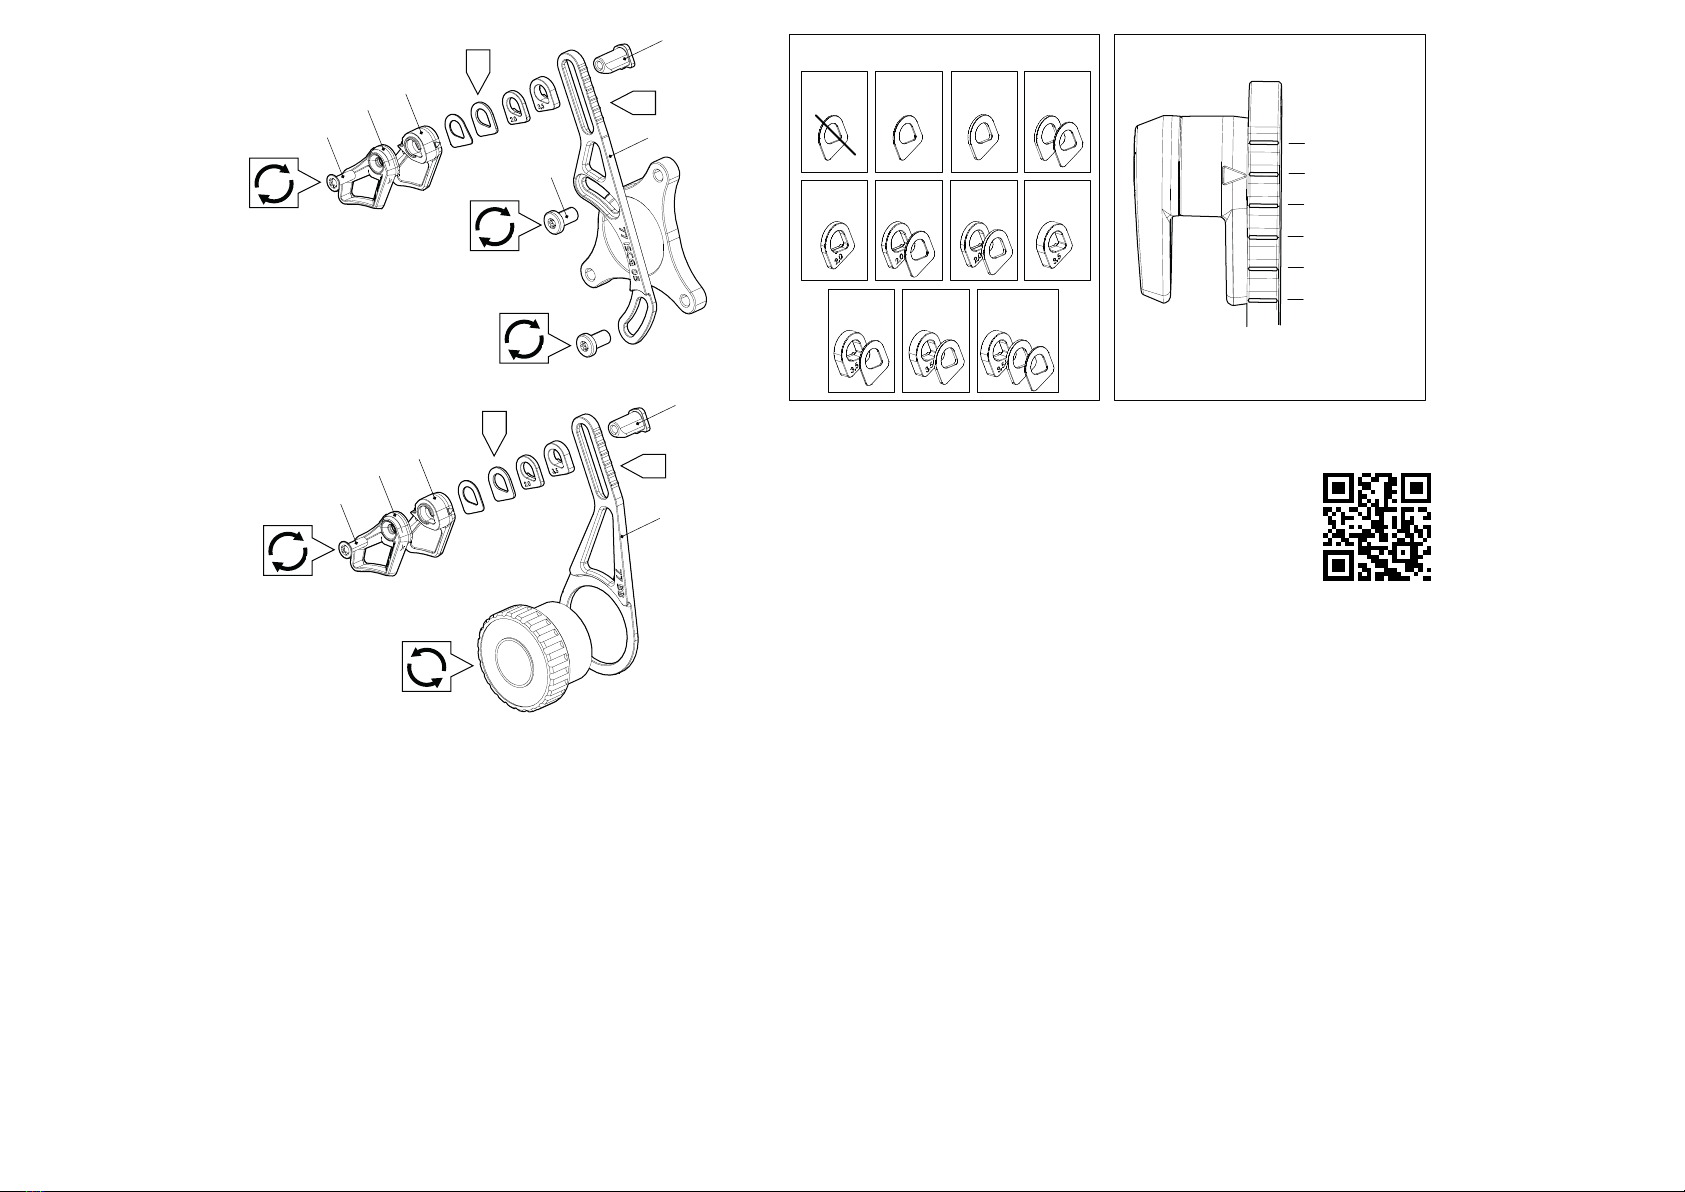
MONTAGE DER KETTENFÜHRUNG
1. Bringe die Grundplae (1) am Rahmen an. Der gerade Teil der Grundplae sollte verkal nach
oben zeigen.
• Montage an ISCG Aufnahme: Drehe die Befesgungsschrauben hinein und ziehe sie mit
einem Anzugsdrehmoment von 6 Nm an.
• Montage am Innenlager: Drehe das Innenlager gegen den Uhrzeigersinn hinein und ziehe
es mit einem Drehmoment von 40 Nm an. Prüfe die Angaben des Herstellers auf spezische
Besmmungen.
2. Messe den Abstand zwischen Grundplae (1) und der Mie des Keenblas (= Wert X).
3. Schiebe die CNC Nut (2) von innen durch die Grundplae (1).
4. Bringe Spacer (A) nach Bedarf in Abhängigkeit vom gemessenen Wert X an.
5. Bringe die innere (4) und die äußere Führung (5) an.
6. Drehe die Schraube (6) hinein und jusere den Slider auf die passende Keenblagröße
(siehe B).
7. Ziehe die Schraube (6) mit einem Anzugsdrehmoment von 2 Nm an.
8. Stelle sicher, dass kein Teil des Antriebs an der Keenführung schlei oder in seiner Funkon
eingeschränkt wird.
PFLEGE UND WARTUNG
Um eine lange Lebensdauer und uneingeschränkte Funkon zu gewährleisten, empfehlen wir
folgende Tägkeiten:
• Anzugsdrehmoment der Schraubverbindungen regelmäßig prüfen und bei Bedarf mit dem
spezischen Drehmoment nachziehen.
• Keenführung regelmäßig mit klarem Wasser oder mildem Reinigungsmiel reinigen.
Anwendungsempfehlungen des verwendeten Reinigers beachten.
• Keenführung regelmäßig auf Anzeichen von Beschädigungen prüfen und bei Bedarf
ersetzen. Im Zweifelsfall muss die Hilfe eines ausgebildeten Zweiradmechatronikers in
Anspruch genommen werden.