7inova 7R300 User manual

3G Wireless Travel Router 150M
Quick Installation Guide
MODEL: 7R300

7R300 Quick Installation Guide
Warning
Before you start to use this device, please check if there’s anything missing in the package, and contact your
dealer of purchase to claim for missing items:
Package Contents:
1x 7R300 3G Wireless Travel Router
1x 1m Ethernet cable with RJ45 connector
1x Quick Installation Guide
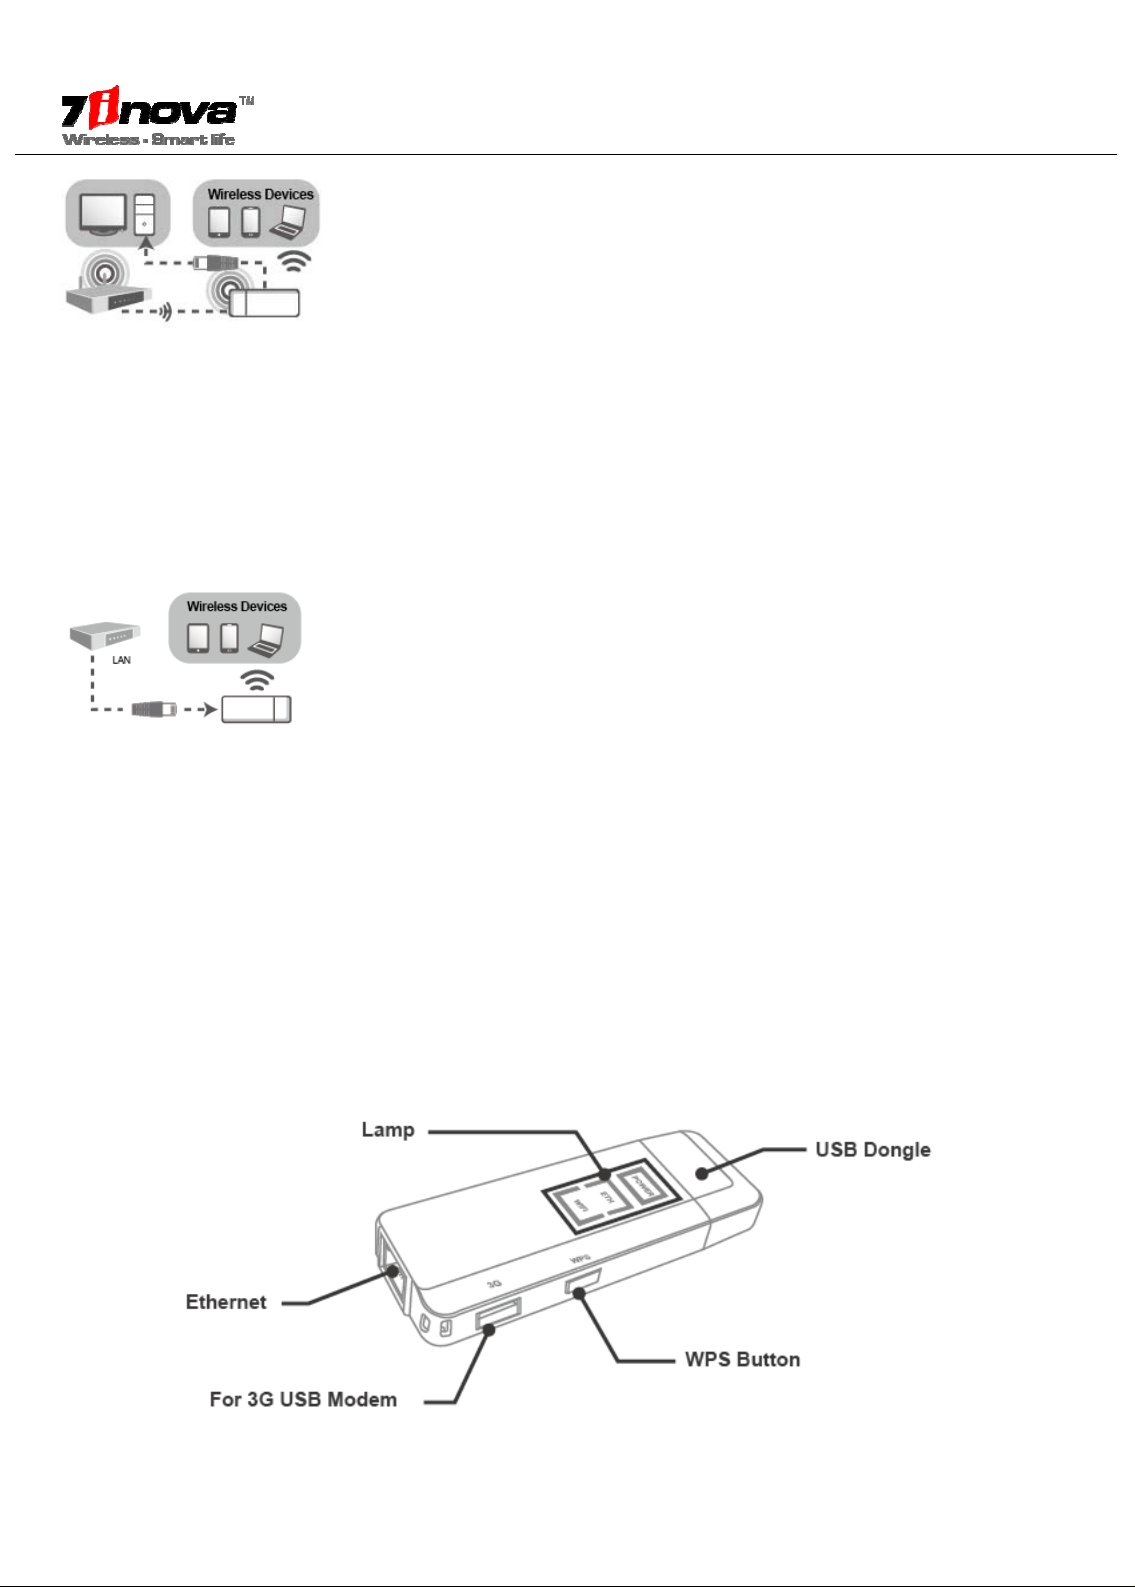
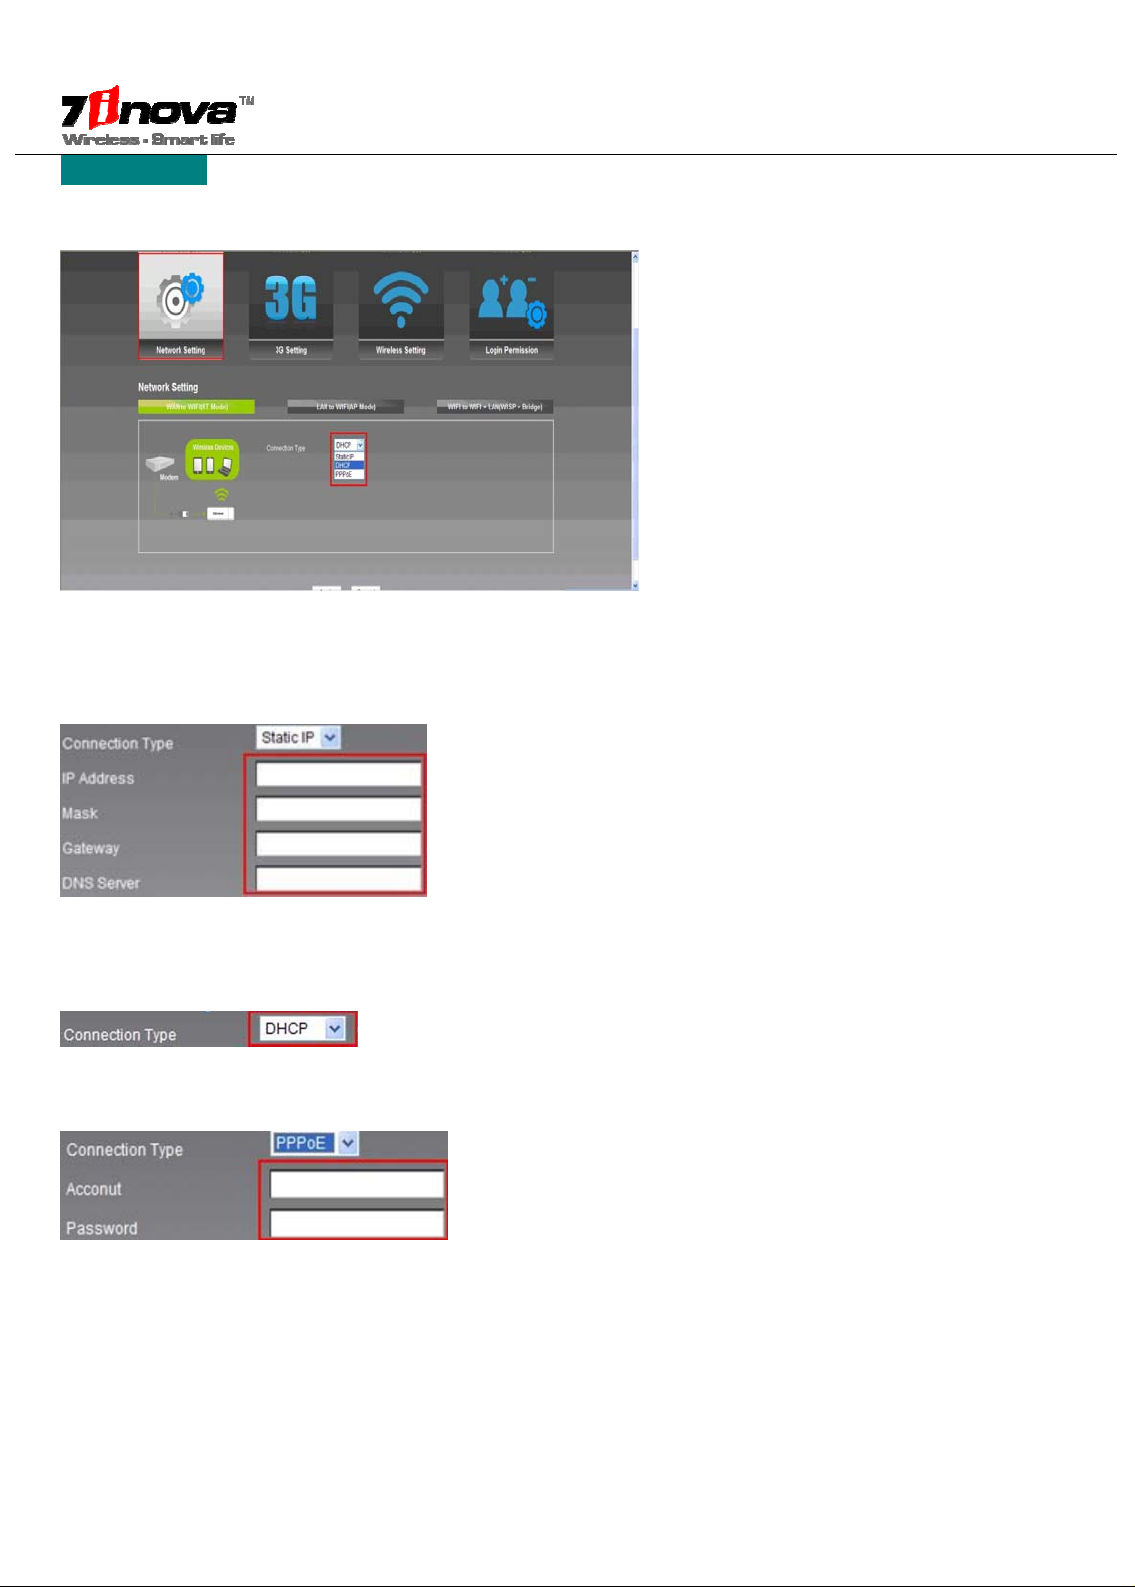
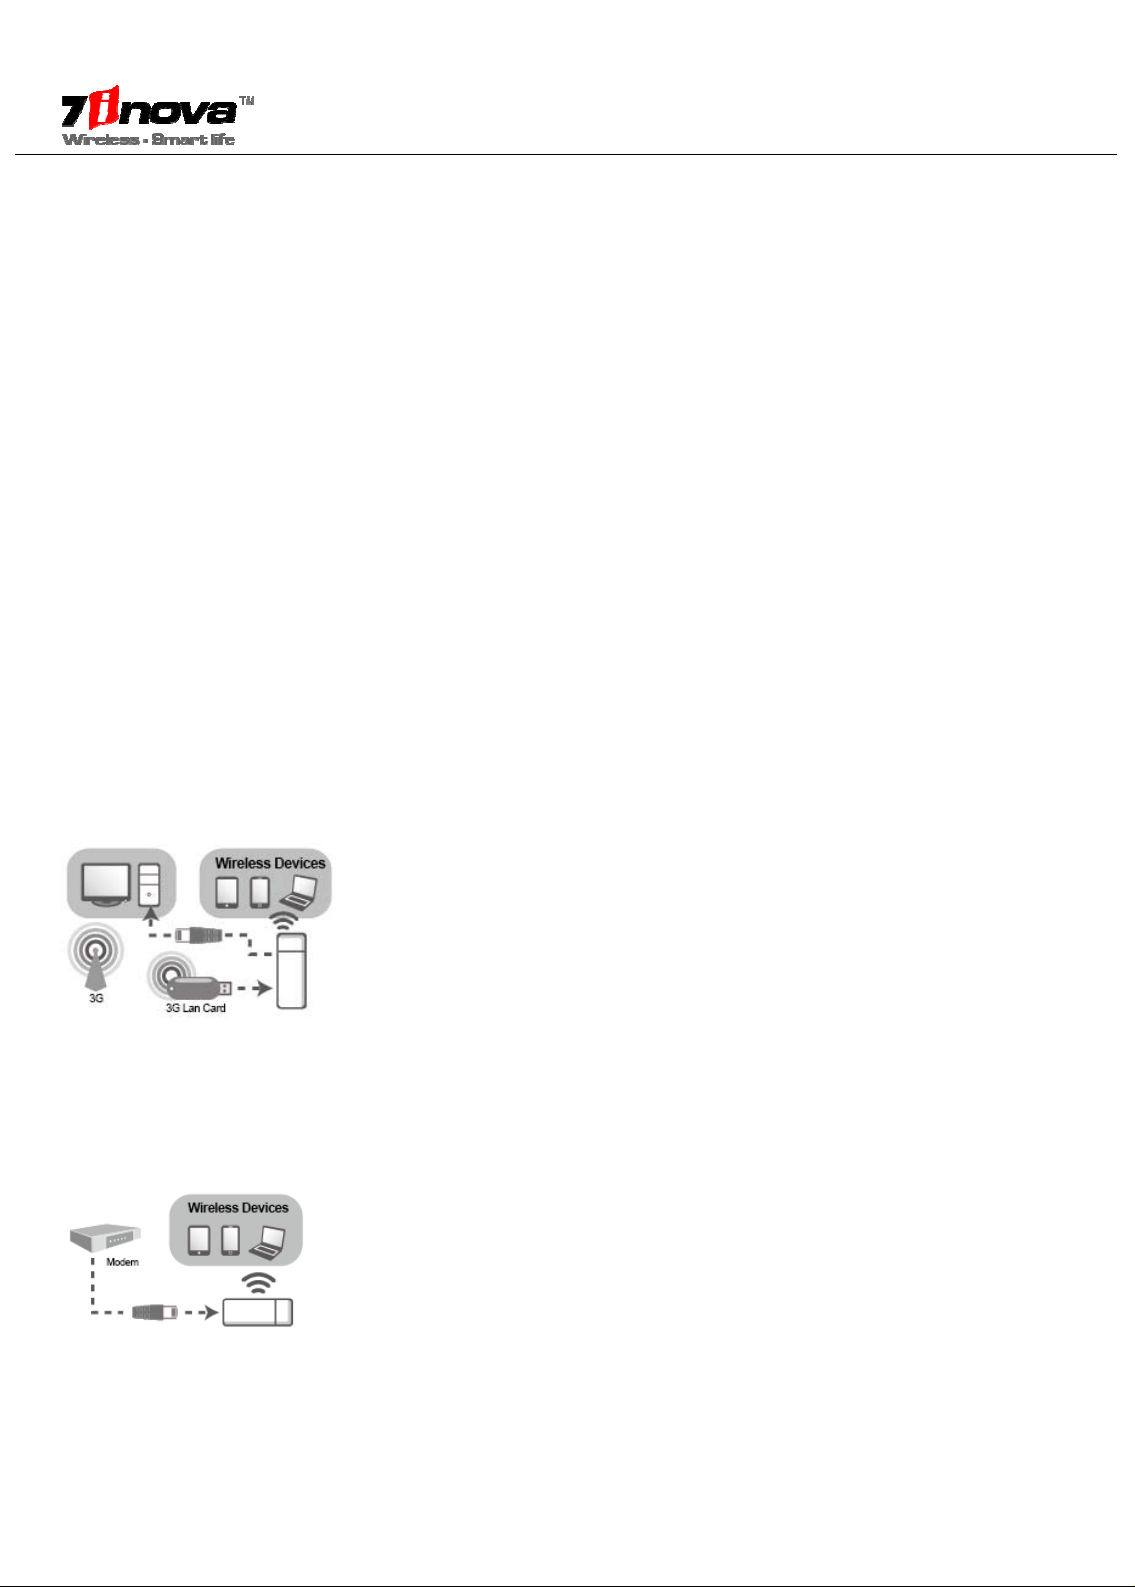
■4 Application Modes Introduction
(3G Mode is Default mode. For wireless encryption or change to Wireless Router/AP/WISP+Bridge Mode, please login
and setup on web browser with followed steps)
3G Mode
Plug 3G modem into the router’s USB port, configure accordingly, computer/WI-FI phone/Tablet can connect
the router wired/wireless and share 3G internet. Under 3G Mode, the Ethernet port is used as LAN port.
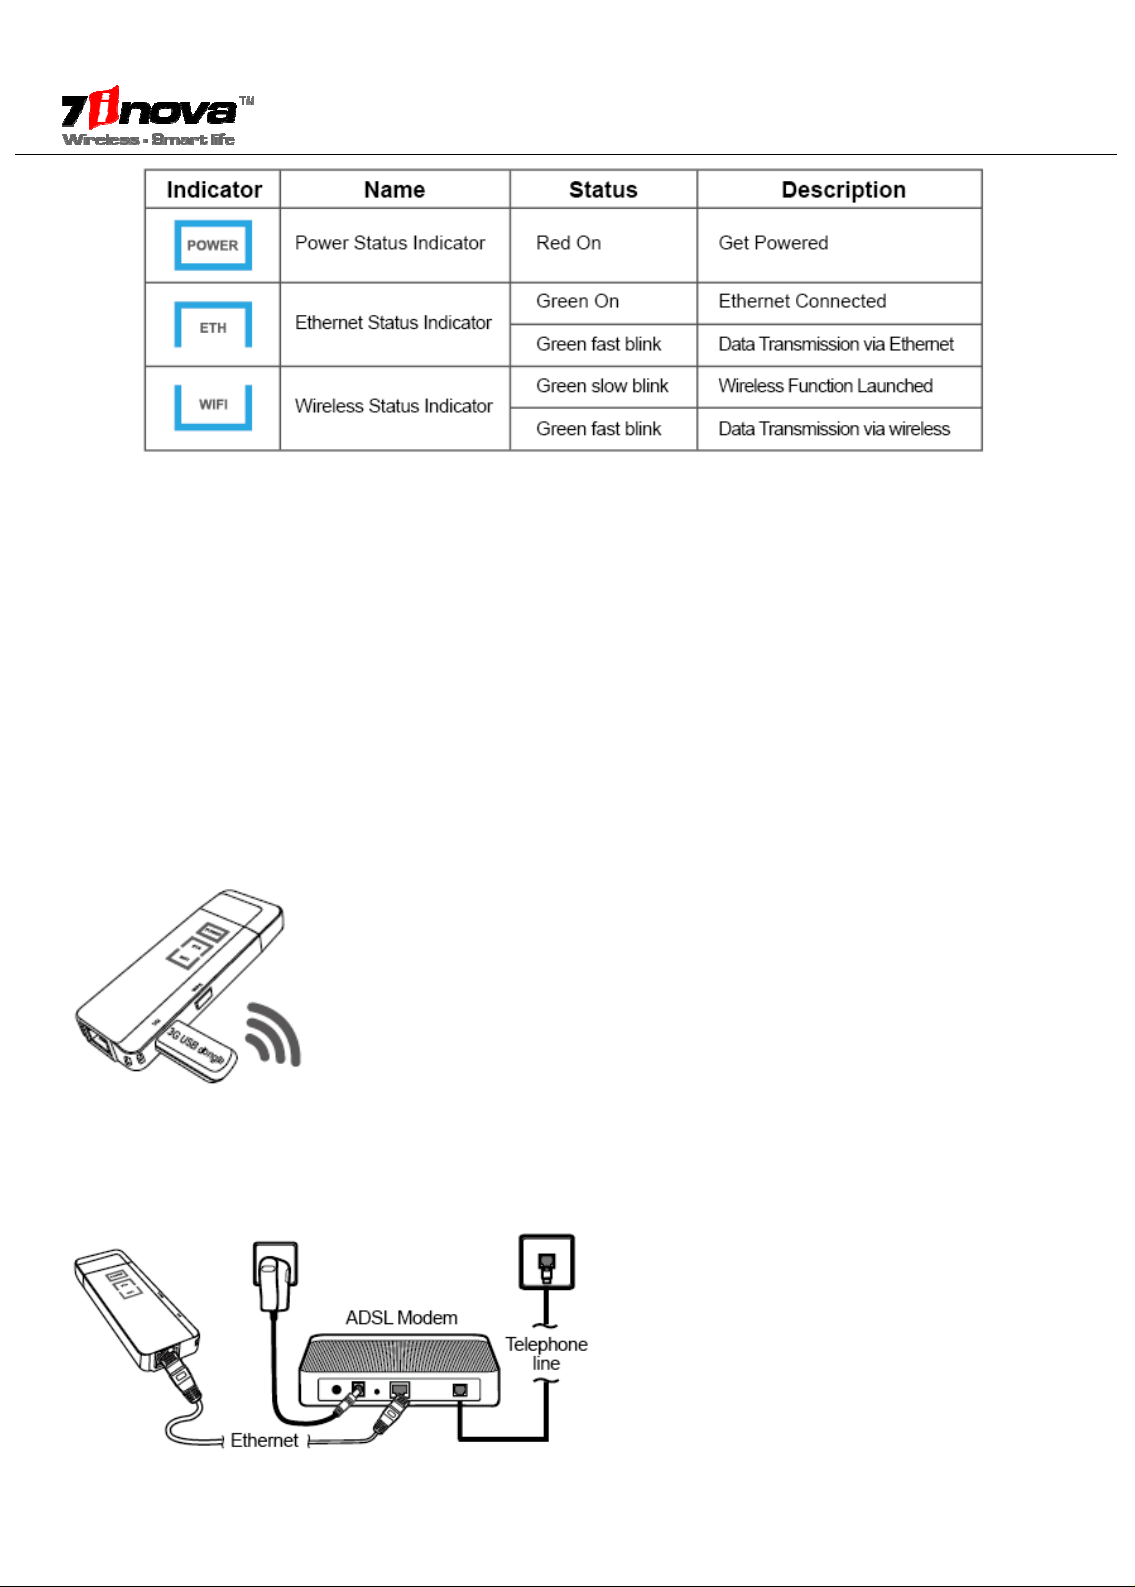
Router Mode
Under Router Mode, the Ethernet port is used as WAN port. Connect 7R300 with ADSL Modem port using
RJ45 cable. Computer/WI-FI phone/Tablet can connect the router wirelessly and share internet.
- 1 -

7R300 Quick Installation Guide
WISP+Bridge Mode
Under WISP+Bridge Mode, the router can connect Wireless hotspot or wireless router, make wired device
is used as LAN port. To avoid same IP address as front-end router,
sers need to set different IP address.
wireless ready, and bridge wireless signal, extend wireless signal range,
Create a new SSID. The Ethernet port
u
AP Mode
Under AP Mode, the router can convert wired network into wireless network: connect the router wired, and
en the computer/WI-FI phone/Tablet can connect the router and access internet wirelessly.
ED indicators’ Status Description
th
oduction■Appearance Intr
L
- 2 -

7R300 Quick Installation Guide
Reset: If need to reset the router, press and hold WPS/RESET button for 8-10 seconds, all indicators will be
on, release until all other LED are off except Power LED.
Cautions:
1. Disconnect the device in thunderstorms in case of lightning damage.
2. Keep far from heat source and ensure ventilation.
3. Keep waterproof in the storage, transportation and operating environment.
■1. Device Connection
1. To use 3G Mode, plug 3G modem into USB port of 7R300.
2. To use Wireless Router Mode, plug one side of RJ45 cable into 7R300’s Ethernet port, plug the other side
into Modem’s LAN port
- 3 -

7R300 Quick Installation Guide
3. To use WISP+Bridge Mode, connect 7R300 and device (Such as desktop computers) via RJ45 cable as
following show
4. To use AP Mode, connect 7R300’s Ethernet port and network router’s LAN Port via RJ45 cable as
following show
■2 Computer Configuration
(Before configuring, first ensure your PC has installed wireless LAN card)
Please click on the steps to set up Windows 7 system
1. Click “Start→Control Panel→Network and Internet→Network and Sharing Center→Change adapter
settings→Wi-Fi (right click) →Properties”
2. Double click “Internet Protocol Version 4(TCP/IPv4)”
3. Select “Obtain an IP address automatically” and “Obtain DSN server address automatically”. Click “OK”.
Back to the last interface and click “OK”
- 4 -

7R300 Quick Installation Guide
■3 Connect To Wireless Network
(Note: You have to get device connected wirelessly firstly then can login Web browser)
Windows 7 Please click on the steps to set up Windows 7 system
1. After Wireless LAN card installed successfully, click icon on the lower right corner of desktop
2. Select the SSID of your target network from the displayed list and click“Connect”
3. When shows: “Connect to a Network”, please click “Connect to the network without setting it up”
- 5 -

7R300 Quick Installation Guide
4. When shows: “Connected”, means your computer has connected to wireless network successfully.
■4 Router Configurations
Easy Mode
1. Open a web browser, type 192.168.2.1, and press Enter, type the password(default is admin). Click “login”
- 6 -

7R300 Quick Installation Guide
2. Open web browser, default into “Easy Mode” interface, select your wanted mode and do some simple
configuration, or click “Advanced Mode”
3. According to the choice of mode for wireless parameters Settings
3G Router Mode
Fill your 3G Account Info provided by network operator →Click “Apply”, Reboot router →After reboot, follow“5
reconnect router” step and set up, then you can connect Internet
- 7 -

7R300 Quick Installation Guide
Router Mode
1. Choice model.
2. Static IP / DHCP / PPPOE
2.1 Static IP:Fill basic Info provided by network operator →Click “Apply”, reboot router
2.2 DHCP: Not set up →Click “Apply”, reboot router
2.3 PPPoE: Fill your Account and Password provided by network operator →Click “Apply”, reboot router
3. After reboot, follow“5 reconnect router” step and set up, then you can connect Internet.
- 8 -

7R300 Quick Installation Guide
WISP+Bridge Mode
1. Click “Scan”.
2.1 Input same info as your connected Router’s →Click “Apply”, reboot router
2.2 Select you wanted connected router’s SSID, click “Connect” →Click “Apply”, reboot router
3. After reboot, follow “5 reconnect router” step and set up, then you can connect Internet.
- 9 -

7R300 Quick Installation Guide
AP Mode
1. Setup your info, easy to remember.
2. Click “Apply”, reboot router
3. After reboot, follow“5 reconnect router” step and set up, then you can connect Internet.
Advanced Mode
1. Open a web browser, type 192.168.2.1, and press Enter, type the password(default is admin). Click “login”
- 10 -

7R300 Quick Installation Guide
2. Click “Advanced Mode” upper-right corner
3. Click “Setup Wizard” in the left list, select your wanted mode, click“Enter the fast set”
4. According to the choice of mode for wireless parameters Settings
3G Router Mode
1. Fill your 3G Account Info provided by network operator.
- 11 -

7R300 Quick Installation Guide
2. Setup your info, easy to remember.
3. Click “Save”, reboot router
4. After reboot, follow“5 reconnect router” step and set up, then you can connect Internet.
Router Mode
1. Setup your info, easy to remember
- 12 -

7R300 Quick Installation Guide
2. Choice model
2.1 Static IP:Fill basic Info provided by network operator →Click “Save”, reboot router
2.2 DHCP: Not set up →Click “Save”, reboot router
2.3 PPPoE: Fill your Account and Password provided by network operator →Click “Save”, reboot router
3. After reboot, follow“5 reconnect router” step and set up, then you can connect Internet.
- 13 -

7R300 Quick Installation Guide
WISP+Bridge Mode
1. Input same info as your connected Router’s
2. Click “Scan”, select you wanted connected router’s SSID, click “Connect”
3. Setup your info, easy to remember
4. Static IP / DHCP / PPPOE
- 14 -

7R300 Quick Installation Guide
4.1 Static IP:Fill basic Info provided by network operator →Click “Save”, reboot router
4.2 DHCP: Not set up →Click “Save”, reboot router
4.3 PPPoE: Fill your Account and Password provided by network operator →Click “Save”, reboot router
5. After reboot, follow“5 reconnect router” step and set up, then you can connect Internet.
AP Mode
1. Setup your info, easy to remember
2. Click “Save”, reboot router
3. After reboot, follow“5 reconnect router” step and set up, then you can connect Internet
- 15 -

7R300 Quick Installation Guide
■5 Reconnect to Router
Windows 7
1. Select the wireless network name configured in step 4, click “Connect” button.
2. If you encrypted wireless network in step 4, the following message will be displayed on web browser, fill in
password, click “OK”
- 16 -

7R300 Quick Installation Guide
Appendix:Troubleshooting
What can I do if I forgot my password?
1) Restore the 7R300’s configuration to its factory default settings. (With 7R300 powered on, press and hold
the Reset button for about 10 seconds before releasing it).
2)To log in the Web Management page, use the default user name and password: admin, admin. To connect
to the Wireless Network, use the default password on the label.
3)Try to configure 7R300 once again by following the instructions in the previous steps of the QIG.
Declaration
ShenZhen 7inova Technology Limited All rights reserved.
Without ShenZhen 7inova Technology Limited’s permission, any unit or individual should not be allowed to
imitate, copy, reproduce or translate this manual some or all of the content, should not transmit or use in any
form (electronic, mechanical, photocopying, recording, or other possible means)for any commercial,
profitable purposes.
is ShenZhen 7inova Technology Limited’s registered trademark. All other trademarks or
registered trademarks mentioned in this document are owned by their respective holders. Specifications and
information referred in this manual are for reference only, its content might be updated without prior notice.
This manual uses as only a guide, all statements and information in this manual does not constitute a
warranty of any kind.
- 17 -
Table of contents
Other 7inova Network Router manuals
Popular Network Router manuals by other brands

Patton electronics
Patton electronics Patton IPLink 2603 quick start guide

Observa Telecom
Observa Telecom BHS-RTA S user manual

MikroTik
MikroTik RB911G-5HPnD Quick setup guide and warranty information

Linksys
Linksys Instant Broadband Series user guide

CTRLink
CTRLink EIPR installation guide

TRENDnet
TRENDnet TE100-S50g Quick installation guide