A/DA Suite 7.1 HD User manual

602-610 Mamaroneck Avenue, White Plains, NY, 10605, www.ada-usa.com, 1-800-HD-AUDIO, Fax (914) 946-9620
Suite 7.1 HD
Home Theater Controller
In s t a l l a t i o n Ma n u a l
Ve r s i o n 4.0 - Ju n e 2010

Page 2
Dolby and the double-D symbol are trademarks of Dolby Laboratories Licensing Corporation. Condential Unpublished Works. © Copyright 1992-2002,
Dolby Laboratories, Inc. All Rights Reserved. Lucaslm and THX are trademarks or registered trademarks of Lucaslm, Ltd. ©Lucaslm Ltd. & TM.
Surround EX is a jointly developed technology of THX and Dolby Laboratories, Inc. and is a trademark of Dolby Laboratories, Inc. All rights reserved.
used under authorization. Manufactured under license from DTS Technology, LLC. DTS Digital Surround is a trademark of DTS Technology LLC.
©2010, Audio Design Associates, Inc. All rights reserved. Technical data and information contained in this manual is subject to change without notice.
Contents
Safety Instructions & Electrical Warning ........................................................................................3
AC Connections.................................................................................................................................4
Power Amplier (& Powered Subwoofer) Connections.................................................................5
Introduction - Front Panel Controls & Displays .............................................................................6
Power On, Mute, Off, & Master Volume Control .............................................................................7
Input Selector.....................................................................................................................................8
Mode Selector & Mode Descriptions ...............................................................................................9
Rear Panel Connections .................................................................................................................11
Out of the Box Input Conguration ...............................................................................................11
Custom Input Conguration...........................................................................................................12
Setup - Entering & Navigation........................................................................................................13
Customizing Virtual Inputs.............................................................................................................14
Inputs Labels ...................................................................................................................................15
Audio Input Jack Assignment ........................................................................................................16
Video Input Jack Assignment.........................................................................................................17
Input Presets....................................................................................................................................18
Default Modes..................................................................................................................................19
Loading Custom Input Congurations..........................................................................................20
Final Input ........................................................................................................................................21
Setup 1 - Speaker Size & Crossover Frequency...........................................................................22
Subwoofer Crossover Point Setup ................................................................................................22
Setup 2 - Speaker Level ..................................................................................................................24
Setup 3 - Delay Settings..................................................................................................................26
Delay Level Setup 3.........................................................................................................................26
Setup 4 - Bass Limiter.....................................................................................................................28
Setup 5 - THX ...................................................................................................................................29
Modes, DTS Enhancements & THX Options.................................................................................30
Simulated Surround & Dynamic Range Settings .........................................................................31
Dolby Pro Logic II Music & Custom Settings................................................................................32
Reverb Mode Settings.....................................................................................................................33
Maximum & Turn-On Volume Settings ..........................................................................................34
Tone Settings ...................................................................................................................................35
Parametric EQ (PEQ) Setup............................................................................................................36
HDMI Equalizer Settings .................................................................................................................37
Solo Test...........................................................................................................................................38
Saving (& Loading) Input Conguration & PROM Files...............................................................39
Recalling Factory & Storing/Recalling Installer Defaults ............................................................40
ADA Bus Address, Baud Rate, IR & Display Blanking.................................................................41
View HEX Commands & Feedback ................................................................................................42
HEX Codes for System Integration................................................................................................43

Page 3
Safety Instructions & Electrical Warning
READ INSTRUCTIONS - All the safety and operating instructions should be read before the appliance
is operated.
RETAIN INSTRUCTIONS - The operating instructions should be retained for future reference.
HEED WARNING - All warnings on the appliance and in the operating instructions should be adhered to.
FOLLOW INSTRUCTIONS - All operating and use instructions should be followed.
WATER AND MOISTURE - The appliance should not be used near water - for example, near a bathtub,
washbowl, kitchen sink, laundry tub, in a wet basement, or near a swimming pool, etc.
LOCATION - The appliance should be installed in a stable location.
WALL OR CEILING MOUNT - The appliance should not be mounted to a wall or ceiling.
VENTILATION - The appliance should be situated so that its location or position does not interfere with its
proper ventilation. For example, the appliance should not be situated on a bed, sofa, rug or similar
surface that may block the ventilation openings.
HEAT - The appliance should be situated away from heat sources such as radiators, heat registers, stoves,
or other appliances that produce heat.
POWER SOURCES - The appliance should be connected to a power supply only of the type described in
the operating instructions or as marked on the appliance.
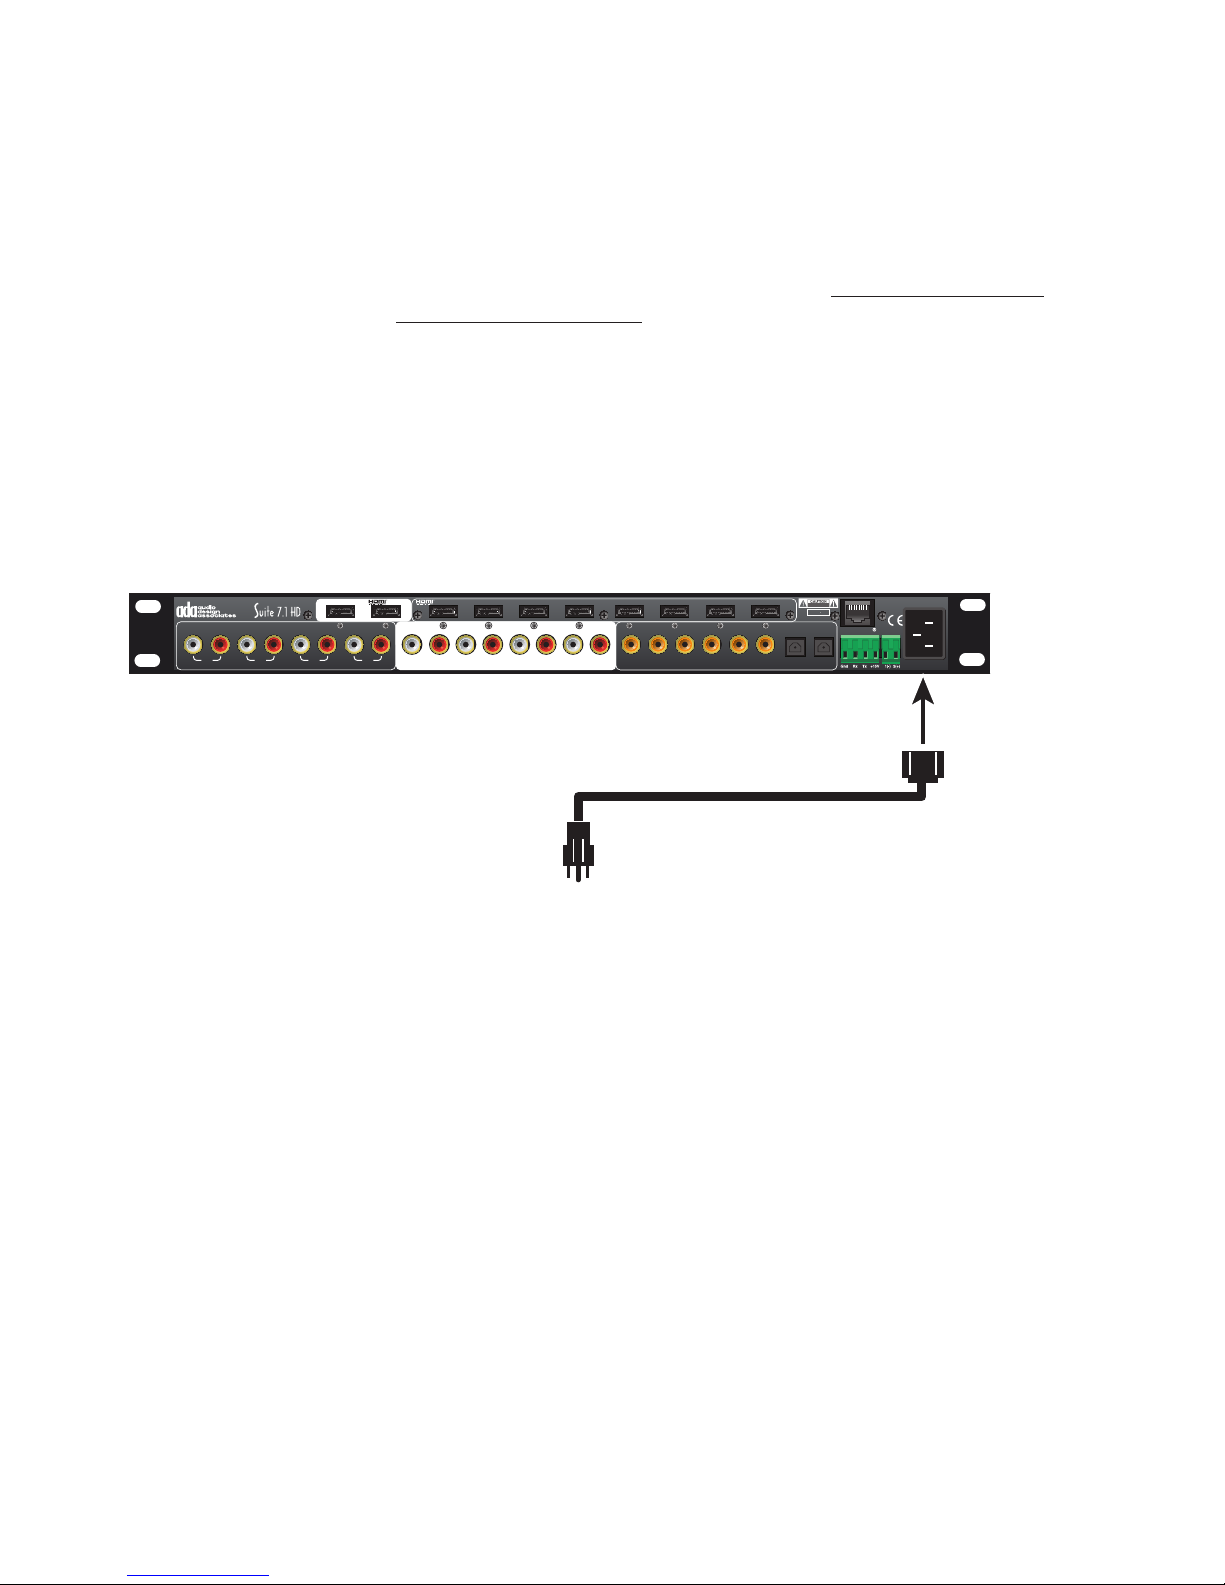
GROUNDING - Make sure that this unit is always connected to a standard three-prong grounded outlet
(the circular pin is ground). When operating this unit at a higher voltage with a different power cord
conguration, consult your dealer for the proper power cord/outlet combination to use before operat-
ing this unit.
POWER CORD PROTECTION - Power supply cords should be routed so that they are not likely to be
walked on or pinched by items placed upon or against them, paying particular attention to cords at
plugs, convenience receptacles, and the point where they exit from the appliance.
CLEANING - The appliance should be cleaned only with a polishing cloth or a soft dry cloth. Never clean with
furniture wax, benzine, insecticides or other volatile liquids since they may corrode the face plate.
POWER LINES - An outdoor antenna should be located away from power lines.
NONUSE PERIODS - The power cord of the appliance should be unplugged from the outlet when left
unused for a long period of time.
OBJECT AND LIQUID ENTRY - Care should be taken so that objects do not fall and liquids are not spilled
into the enclosure through openings.
DAMAGE REQUIRING SERVICE - The appliance should be serviced by an authorized service center or
qualied service personnel when:
• The power supply cord or plug has been damaged; or
• Objects have fallen, or liquid has been spilled into the appliance; or
• The appliance has been exposed to rain; or
• The appliance does not appear to operate normally or exhibits a marked
change in performance; or
• The appliance has been dropped; or the enclosure has been damaged.
SERVICING - The user should not attempt to service the appliance beyond that described in the operat-
ing instructions. For all other service requirements, the user should contact an Authorized Dealer or
Service Center.
IMPORTANT
The lightning ash with the ar-
rowhead, within an equilateral
triangle, is intended to alert the
user of the presence of uninsu-
lated “dangerous voltage” within
the product’s enclosure that may
be of sufcient magnitude to con-
stitute a risk of electrical shock to
persons.
The exclamation point within the
equilateral triangle is intended to
alert the user of the presence of
important operating and mainte-
nance (servicing) instruction in
the literature accompanying the
appliance.
CAUTION: TO PREVENT RISK
OF ELECTRICAL SHOCK, DO
NOT REMOVE COVER (OR
BACK). NO USER-SERVICE-
ABLE PARTS INSIDE. REFER
SERVICING TO QUALIFIED
SERVICE PERSONNEL.
CAUTION
RISK OF ELECTRIC SHOCK
DO NOT OPEN
WARNING:
TO REDUCE THE RISK OF FIRE OR ELECTRICAL SHOCK, DO NOT EXPOSE THIS APPLIANCE TO
RAIN OR MOISTURE. REPLACE FUSE ONLY AS MARKED.
CAUTION:
TO PREVENT ELECTRIC SHOCK, DO NOT PLUG THIS UNIT INTO ANY OUTLET OR EXTENSION
CORD WITHOUT THE STANDARD THREE-PRONG CONFIGURATION, WHERE THE CIRCULAR HOLE
IS USED FOR THE GROUND PLUG. ANY UNITS NOT SOLD IN THE UNITED STATES OR CANADA
ARE NOT SUPPLIED WITH A POWER CORD. THEREFORE, AN AUDIO DESIGN ASSOCIATES DEALER
SHOULD BE CONSULTED BEFORE CONNECTING THIS UNIT TO ANY POWER SOURCE.
LINE VOLTAGE SELECTOR SWITCH AND REMOVABLE POWER CORD:
THIS UNIT IS EQUIPPED WITH A VOLTAGE SELECTOR SWITCH. IN MOST CASES, THIS SWITCH
WILL REMAIN IN THE 115V POSITION (SEE PICTURE BELOW), WHICH IS HOW THE UNIT LEAVES
THE FACTORY. HOWEVER, IF YOU WANT TO OPERATE THE UNIT IN AN AREATHAT USES THE 230V
SETTING, CONSULT YOUR DEALER BEFORE PLUGGING THE UNIT IN. IN A CASE WHERE THE
230V SETTING WOULD BE NEEDED, AUDIO DESIGN ASSOCIATES WILL NOT PROVIDE A POWER
CORD FOR THE UNIT. THEREFORE, THE USER MUST CONSULT AN AUTHORIZED DEALER OR ADA
TO OBTAIN THE PROPER POWER CORD, AS WELL. MAKE SURE THAT THE VOLTAGE SELEC-
TOR SWITCH IS IN THE PROPER POSITION AND THAT YOU HAVE THE CORRECT POWER CORD
BEFORE THIS UNIT IS PLUGGED IN AND OPERATED!
115 V

Page 4
AC Connections
AC Connection
The Suite 7.1 HD features
a dual-primary type of
power supply that operates
on 115V~/60Hz as well as
230V~/50Hz.
When using the Suite 7.1
HD with non-US Standard
AC power cords, the
user must supply the
appropriate EIC Female to
Male AC power cord.
Before You Begin
As you remove the Suite 7.1 HD from its packaging, inspect the
condition of the component prior to proceeding with the following
steps for AC connection. In the event that the Suite 7.1 HD appears
to have suffered cosmetic damage due to shipping, please contact
your Authorized ADA Dealer immediately and do not proceed to plug
the unit into an AC outlet.
AC Connection
For customers who are using the U.S. standard AC receptacle, you
will use the EIC AC Power Cord provided with the Suite 7.1 HD.
Simply plug this AC cord into an operative AC outlet. For customers
who are using a non-U.S. standard AC receptacle, you will need to
acquire an EIC AC Power Cord with the appropriate receptacle con-
nector. ADA only provides AC Power Cords with the U.S. standard
AC prongs.
ANALOG AUDIO INPUTS
1
L R
234
L R L R L R
7.1 CHANNEL OUTPUTS
L R LS RS LBS RBS C SUB
876 5 4 3 21
Inputs
Outputs
AB
ADA BUS 12VDC
AC 50/60Hz
90-260VAC~
ATTENTION!
MADE IN U.S.A.
OPTICAL DIGITAL
INPUTS
12
DIGITAL INPUTS
123456
LAN 10/100
Plug into an AC Outlet
Plug into Cinema Rhapsody

Page 5
Power Amplier (& Powered Subwoofer) Connections
ANALOG AUDIO INPUTS
1
L R
234
L R L R L R
7.1 CHANNEL OUTPUTS
L R LS RS LBS RBS C SUB
876 5 4 3 21
Inputs
Outputs
AB
ADA BUS 12VDC
AC 50/60Hz
90-260VAC~
ATTENTION!
MADE IN U.S.A.
OPTICAL DIGITAL
INPUTS
12
DIGITAL INPUTS
123456
LAN 10/100
S
R
S
C
L
BS
R
BS
RS
R
LS
L
CL
LS
RS
L
BS
S
BR
Low Volatge Trigger
Pin 1 (-) to Gnd on 9-Pin D
Pin 2 (+) to Zn 1 on 9 Pin D
(Set PTM-8150 PAC Module
so all channels trigger with
Zone 1 and Normal Turn On)
Sub Output To
Power Amplifier
For Passive Subs
Or Sub Output To
Powered Subwoofer
Audio Connections
The Suite 7.1 HD’s Audio Outputs are clearly marked in a white eld on the back of the unit. ADA
strongly suggests not using directional interconnects that lift the grounds. This diagram includes ADA’s
PTM-8150 Eight Channel Power Amplier. While you may decide to vary the input arrangement if
you are using a PTM-8150, the following input arrangement will cause the amplier’s front panel LED
display to spread outward from Channel 4, the center channel speaker. If you are using a self-powered
subwoofer, you will connect the Suite 7.1 HD’s SUB Output directly to the subwoofer and you may opt
to “Y” split the SUB output to illuminate channel eight of the PTM-8150.
ANALOG AUDIO INPUTS
1
L R
234
L R L R L R
7.1 CHANNEL OUTPUTS
L R LS RS LBS RBS C SUB
876 5 4 3 21
Inputs
Outputs
AB
ADA BUS 12VDC
AC 50/60Hz
90-260VAC~
ATTENTION!
MADE IN U.S.A.
OPTICAL DIGITAL
INPUTS
12
DIGITAL INPUTS
123456
LAN 10/100
S
R
S
C
L
BS
R
BS
RSRLSL
CL
LS
RS
L
BS
S
BR
Low Volatge Trigger
Pin 1 (-) to Gnd on 9-Pin D
Pin 2 (+) to Zn 1 on 9 Pin D
(Set PTM-8150 PAC Module
so all channels trigger with
Zone 1 and Normal Turn On)
Sub Output To
Power Amplifier
For Passive Subs
Or Sub Output To
Powered Subwoofer
Low Voltage Power Amplier Trigger
The Suite 7.1 HD features two low voltage triggers that can be used among other
things, to turn ADA power ampliers on and off. Unlike the switched AC outlet,
which turns on and off with the Suite 7.1 HD, the low-voltage triggers are set to
track inputs on the preamplier. In the setup mode, you can determine if either
trigger one or trigger two (or both) engage with that input or not. When triggering
a power amplier using the low voltage triggers, ADA’s out of the box setup has
Trigger 1 engaging with all inputs.
ADA power with a PAC Module (Programmable Amplier Controller) permit ampli-
er channel pairs to be assigned to track independent zone triggers (for use in
multi-room systems). The ampliers can also be set to “Fast Turn On” so that the
amplier can be used for paging (amplier remains on and charged even when
the trigger is off). In a home theater system, zone triggering and fast turn on are
not required. If an ADA PAC amplier is ordered with an ADA home theater pre-
amplier, the unit will ship with all channel pairs set to trigger with Zn 1. Also, the
amplier will be set to “Normal Turn On” so that when the trigger is removed, the
amplier will turn off completely. Here, the Mach III will also ship with a 9-pin D
to two-wire cable that can be terminated to Low Voltage Trigger 1 on the Mach III
as shown in the adjacent diagram. Make certain that Low Voltage Trigger Button
on the back of the PAC amplier is in the outward “LV Trigger” position.

Page 6
MADE IN U.S.A.
OFF
DISPLAYPOWER
ON
M
O
D
E
I
N
P
U
T
V
O
L
U
M
E
VOL -17.0
DVD PLAYER 1
VOL -17.0
DVD PLAYER 1
IDLE 0.0.0.0
OUT IDLE 0.0.0.0
DNRM 0.0.0.0
Input
Selector
Knob
Master
Power
Switch
Mode
Selector
Knob
Display
Power
Switch
Volume
Control
& On/Off
Introduction - Front Panel Controls & Displays
Overview
The Suite 7.1 HD is factory
set for optimum operation.
This section details the
front panel features of
the Suite 7.1 HD. All
component functions can
be operated through the
three control knobs located
on the units front panel.
The front panel displays
are also explained in this
section.
Welcome
The Suite 7.1 HD is the world’s most advanced audio video surround
sound preamplier. It is also congured “Out Of The Box” for
optimum operation. While it is designed to be easy to setup and
operate, ADA strongly recommends spending some time familiarizing
yourself with the units many functions and features. For those who
wish to customize their home theater system, the Suite 7.1 HD is
also equipped to be congured to operate ideally in any environment
and with many varying source components. While the connection of
components and accessories are discussed in the following sections,
this area will explain the front panel features and basic operation
commands of the Suite 7.1 HD’s front panel. The text found in italic
type in this manual’s margins will act as a quick reference when
reviewing these materials.
Features
The Suite 7.1 HD acts as both an input selector and surround sound decoder. It is capable of decod-
ing Dolby TrueHD, DTS HD Master Audio, Multi-Channel PCM from sources that connected using
an HDMI cable as well as Dolby Pro Logic, Dolby Digital (AC-3), and DTS encoded formats and also
provide Lucaslm THX Ultra 2 enhancements and lters. While the Suite 7.1 HD can automatically
detect between Dolby Digital, DTS, Dolby Pro Logic, and Dolby Digital/Dolby Pro Logic (both decod-
ing formats are used when playing two-channel encoded DVD discs {typically older movies available
on DVD that are not mixed in six channels}), the option to engage either full THX enhancements or
only THX Re-EQ must be manually set on the Suite 7.1 HD. The Suite 7.1 HD also provides several
additional modes ideal for music playback. There are additional settings that permit the Suite 7.1 HD
to also operate in home theaters where a full eight channel speaker array may only be partially imple-
mented (i.e. no back surround and/or no center channel). Furthermore, the Suite 7.1 HD also permits
each channel to be set to its own volume level with respect to all other channels as well as have its
own delay setting. These features and more are discussed in the upcoming sections.

Page 7
When the Suite 7.1 HD is off, turning any knob or pushing any knob
other than the Volume knob will cause the Suite 7.1 HD’s center LCD
display to indicate that you need to push the knob to turn it on.
To turn on the Suite 7.1 HD, providing the unit is not in Mute,
press the Volume knob once.
Pressing of the Volume knob performs only three functions.
If the unit is off, pressing it will turn it on.
If the unit is on, pressing it once will engage Mute.
If the unit is in Mute, pressing it again will turn it off.
(To regain the audio (exit Mute), turn the Volume knob).
Once the Suite 7.1 HD is
on, turning the Volume knob
will only raise or lower the
system’s volume level. This
is considered the Master Vol-
ume Control as it will adjust
all eight channels of volume,
maintaining the balance of
levels that are preset between
channels.
Power On, Mute, Off, & Master Volume Control
Side View
Press Knob
To Turn On
Press Knob
Once To Mute
Press Knob
Twice For Off
Chassis Side
Front Plate
L
o
w
e
r
&
R
a
i
s
e
V
o
l
u
m
e
Front View
VOLUME
CONTROL
Power On
Press the Suite 7.1 HD’s
Volume knob to engage
power on.
Mute
While the Suite 7.1 HD is
on, pressing it’s Volume
knob once will mute all
channels.
Power Off
While the Suite 7.1 HD
is in Mute, pressing the
Volume knob a second
time will turn the Suite 7.1
HD off.
Un-Mute
While the Suite 7.1 HD
is in Mute, turning the
volume knob, will regain
audio.
Power On/Off Via AC
Control
If the Suite 7.1 HD is on
when it is unplugged or
when power is removed
through the use of an
AC Controller, it will also
automatically turn back on
when power is restored.
POWERING UP
IDLE O.O.O.O
OUT O.O.O.O
RELEASE 2.X1
VOL -17.O IDLE O.O.O.O
BLU-RAY 6 OUT O.O.O.O
PLII MVE+THX
VOL -17.O IDLE O.O.O.O
BLU-RAY 6 OUT O.O.O.O
PLII MVE+THX

Page 8
The Suite 7.1 HD permits you to scroll to the next input without hav-
ing all of the components you are passing actively process through
the Suite 7.1 HD. This prevents the clicking that is commonly as-
sociated with changing TV channels up and down. To best access
another component from the front of the Suite 7.1 HD, turn the Input
Selector knob. As you turn this knob, you will notice that the top
row of the LCD display will advance through the input names until
the desired component is displayed while the current component in
use (in this example, BLUE RAY DVD) remains unchanged in the
“Current Input” section.
Input Selector
T
u
r
n
T
o
S
e
l
e
c
t
A
n
o
t
h
e
r
Front View
C
o
m
p
o
n
e
n
t
INPUT
SELECTOR
Side View
Press Knob
To Activate
The New
Component
Selection
Chassis Side
Front Plate
1 Dial In New Input
Turn the Input Selector
knob until the top line of
the LCD display reads
the component you wish
to select. As you turn
the knob, you will notice
that the “Current Input”
section of the display
still indicates the current
source in play. Also, this
component is still being
routed and processed by
the Suite 7.1 HD.
2 Engage New Input
Once the top line of the
display indicates the next
component you wish to
access, press the Input
Selector knob to engage
this input. This method
permits you to select an
input without switching
all of the inputs you are
scrolling through.
Once the desired component is dis-
played on the LCD’s top row, press
the Input Selector knob to engage
that component. The display will
then return to read the new selection
(i.e. Video Game).
Feature You Are Changing
Volume # Input CHs
Input # Output Chs
Decode Mode Dialogue Nrm
BLU-RAY 1
VOL -17.O IDLE O.O.O.O
BLU-RAY OUT 3.2.1.2
PLII MVE+THX
SATELLITE 2
VOL -17.O IDLE O.O.O.O
BLU-RAY OUT 3.2.1.2
PLII MVE+THX
CABLE/TV 3
VOL -17.O IDLE O.O.O.O
BLU-RAY OUT 3.2.1.2
PLII MVE+THX
HD DVR/PVR 4
VOL -17.O IDLE O.O.O.O
BLU-RAY OUT 3.2.1.2
PLII MVE+THX
VIDEO LIB 5
VOL -17.O IDLE O.O.O.O
BLU-RAY OUT 3.2.1.2
PLII MVE+THX
VIDEO GAME 6
VOL -17.O IDLE O.O.O.O
BLU-RAY OUT 3.2.1.2
PLII MVE+THX
VOL -17.O IDLE O.O.O.O
VIDEO GAME 6 OUT 3.2.1.2
PLII MVE+THX

Page 9
Side View
Press Knob
To Activate
The New
Mode
Selection
Chassis Side
Front Plate
Mode Selector & Mode Descriptions
STEREO DNMX
VOL -17.O IDLE 3.2.1.O
BLU-RAY OUT 3.2.1.2
DIRECT 7.1
STEREO DNMX
VOL -17.O IDLE O.O.O.O
BLU-RAY OUT 3.2.1.2
DIRECT 7.1
Two-Channel Modes
Direct 2.0 LF/RF Two-channel & no audio processing, Fronts speakers Large
Stereo LF/RF/Sw Two-channel with Subwoofer
Mono C Center speaker down-mix to mono
DTS NEO Audio Stream Processing Algorithm
NEO6 3Channel LF/RF/C/Sw Front speakers with subwoofer
NEO6 Phantom LF/RF/LS/RS/Sw No Center speaker & Center channel to Front Right & Left speakers
NEO6 5Channel LF/RF/C/LS/RS/Sw No Back Surround Speakers
NEO6 Movie LF/RF/C/LS/RS/LB/RB/Sw Full Speaker array
NEO6 Mve +THX LF/RF/C/LS/RS/LB/RB/Sw Full Speaker array with THX filters
NEO6 Music LF/RF/C/LS/RS/LB/RB/Sw Full Speaker array design for music playback
Dolby Pro Logic Audio Stream Processing Algorithm
Pro Logic 3Ch LF/RF/C/Sw Front speakers with subwoofer
Pro Logic Phan LF/RF/LS/RS/Sw No Center speaker & Center channel to Front Right & Left speakers
Pro Logic LF/RF/C/LS/RS/LB/RB/Sw Full Speaker array
Pro Logic +THX LF/RF/C/LS/RS/LB/RB/Sw Original Pro Logic with full Speaker array with THX filters
Dolby Pro Logic IIx Audio Stream Processing Algorithm
PL2 Matrix LF/RF/C/LS/RS/LB/RB/Sw For Mono signals, fills speaker array
PL2 Game LF/RF/C/LS/RS/LB/RB/Sw For Video Games encoded by Dolby in 2-Channel
PL2 Music LF/RF/C/LS/RS/LB/RB/Sw For Music - permits adjustment of PLII features
PL2 Movie LF/RF/C/LS/RS/LB/RB/Sw For Film & TV - Greater spatial separation than PL, full bandwidth
T
u
r
n
T
o
S
e
l
e
c
t
A
n
o
t
h
e
r
Front View
M
o
d
e
MODE
SELECTOR
The Suite 7.1 HD permits you to scroll through available modes
without necessarily engaging the mode until you have found the one
you wish to use. As you turn the mode knob, the top line of the Suite
7.1 HD’s display will read the modes available. The lower left-hand
of the display indicates the current mode. When the desired mode
displayed on the top line, press the Mode knob. The new mode will
now engage and its name will display in the lower left-hand corner
of the display. The Suite 7.1 HD only displays Multi-Channel Modes
when it detects a multi-channel signal present (i.e. 5.1). Otherwise
it defaults to just displaying Two-Channel modes. When displaying
Multi-Channel modes, note that Direct and Discrete decode DTS or
Dolby Digital bit streams depending on the signal type.
MONO DNMX
VOL -17.O IDLE O.O.O.O
BLU-RAY OUT 3.2.1.2
DIRECT 7.1
3 CHANN DNMX
VOL -17.O IDLE O.O.O.O
BLU-RAY OUT 3.2.1.2
DIRECT 7.1
PHANTOM DNMX
VOL -17.O IDLE O.O.O.O
BLU-RAY OUT 3.2.1.2
DIRECT 7.1
DISCRETE
VOL -17.O IDLE O.O.O.O
BLU-RAY OUT 3.2.1.2
DIRECT 7.1
DISCRETE+THX
VOL -17.O IDLE O.O.O.O
BLU-RAY OUT 3.2.1.2
DIRECT 7.1
DISCRT+EX/ES
VOL -17.O IDLE 3.2.1.O
BLU-RAY OUT 3.2.1.2
DISCRT+EX/ES

Page 10
Dolby Pro Logic IIx Audio Stream Processing Algorithm (Continued)
PL2 Mve +THX LF/RF/C/LS/RS/LB/RB/Sw Adds THX filters to Pro Logic 2 Movie
PL2 Custom LF/RF/C/LS/RS/LB/RB/Sw Custom settings for Pro Logic 2 Movie - permits adjustment of PL II
PL2 Cstm1 +THX LF/RF/C/LS/RS/LB/RB/Sw Adds THX filters to PL Custom mode (above)
PL2 Custom 2 LF/RF/C/LS/RS/LB/RB/Sw Custom 2 settings for Pro Logic 2 Movie - permits adjustment of PL IIPL2
Cstm2 +THX LF/RF/C/LS/RS/LB/RB/Sw Adds THX filters to PL Custom mode (above)
PL2 Custom 3 LF/RF/C/LS/RS/LB/RB/Sw Custom 3 settings for Pro Logic 2 Movie - permits adjustment of PL IIPL2
Cstm3 +THX LF/RF/C/LS/RS/LB/RB/Sw Adds THX filters to PL Custom mode (above)
ADA Proprietary Modes (ADA’s Favorites)
AGL Enhanced LF/RF/C/LS/RS/LB/RB/Sw Based on Pro Logic, AGL is an auto-sensing 2-channel mode
Quad Bypass LF/RF/C/LS/RS/LB/RB/Sw For Music - Creates excellent music image using full speaker array
Stereo Enh LF/RF/C/LS/RS/LB/RB/Sw For Stereo Signals - Simulated surround w/control of room size
Mono Enh LF/RF/C/LS/RS/LB/RB/Sw For Mono Signals - Simulated surround w/control of room size
Stereo 5 LF/RF/C/LS/RS/LB/RB/Sw Distributes stereo to entire speaker array
Mono 5LF/RF/C/LS/RS/LB/RB/Sw Distributes mono to entire speaker array
Room Simulation Modes with Reverb Customization
Cinema LF/RF/C/LS/RS/LB/RB/Sw For Film - Uses the entire speaker array
Club LF/RF/C/LS/RS/LB/RB/Sw For Music - Uses the entire speaker array
Hall LF/RF/C/LS/RS/LB/RB/Sw For Music - Uses the entire speaker array
Arena LF/RF/C/LS/RS/LB/RB/Sw For Music - Uses the entire speaker array
Cathedral LF/RF/C/LS/RS/LB/RB/Sw For Music - Uses the entire speaker array
Quad Reverb LF/RF/C/LS/RS/LB/RB/Sw For Music - Uses the entire speaker array
Multi-Channel Modes
Direct 7.1 LF/RF/C/LS/RS/LB/RB/Sw 7.1 direct from source, LFE but no bass management
Dnmix Stereo LF/RF/Sw 2 Channel downmix with subwoofer
Dnmix Mono C 2 Channel downmix to mono with Center speaker & Subwoofer
Dnmix 3Channel LF/RF/C/Sw 2 Channel downmix to Front speakers & Subwoofer
Dnmix Phantom LF/RF/Sw 2 Channel downmix to Front right & left speakers and Subwoofer
Ideal Modes for DTS or Dolby Digital Signals
Discrete LF/RF/C/LS/RS/LB/RB/Sw DTS or Dolby Digital 7.1 direct from source with bass management
Discrete +THX LF/RF/C/LS/RS/LB/RB/Sw Above Mode with THX Enhancements
Discrete EX/ES LF/RF/C/LS/RS/LB/RB/Sw Same as Discrete but uses DTS ES or DD EX flags
THX Surr EX/ES LF/RF/C/LS/RS/LB/RB/Sw Above Mode with THX Enhancements
DTS NEO Audio Stream Processing Algorithm
NEO6 Movie LF/RF/C/LS/RS/Sw Downmix to 2-Channel & then processed via NEO6 Matrix
NEO6 Mve +THX LF/RF/C/LS/RS/Sw Above Mode with THX Enhancements
NEO6 Music LF/RF/C/LS/RS/Sw Downmix to 2-Channel & then processed via NEO6 Music Matrix
Dolby Pro Logic Audio Stream Processing Algorithm
PL2x Movie LF/RF/C/LS/RS/LB/RB/Sw Downmix to 2-Channel & then processed via PL II Movie Matrix
PL2x Mve +THX LF/RF/C/LS/RS/LB/RB/Sw Above Mode with THX Enhancements
PL2x Music LF/RF/C/LS/RS/LB/RB/Sw Downmix to 2-Channel & then processed via PL II Music Matrix
THX Modes
THX Ultra2 Mve LF/RF/C/LS/RS/LB/RB/Sw For Film - 7.1 direct from source with THX Ultra 2 Enhancements
THX Ultra2 Gme LF/RF/C/LS/RS/LB/RB/Sw For Games - 7.1 direct from source w/THX Ultra 2 Enhancements
THX Ultra2 Msc LF/RF/C/LS/RS/LB/RB/Sw For Music - 7.1 direct from source w/THX Ultra 2 Enhancements
Room Simulation Modes
Dmx Cinema LF/RF/C/LS/RS/LB/RB/Sw Downmix to 2-Channel then Cinema mode with Reverb
DmxClub LF/RF/C/LS/RS/LB/RB/Sw Downmix to 2-Channel then Club Mode with Reverb
DmxHall LF/RF/C/LS/RS/LB/RB/Sw Downmix to 2-Channel then Hall Mode with Reverb
DmxArena LF/RF/C/LS/RS/LB/RB/Sw Downmix to 2-Channel then Arena Mode with Reverb
DmxCathedral LF/RF/C/LS/RS/LB/RB/Sw Downmix to 2-Channel then Cathedral Mode with Reverb
DmxQuadReverb LF/RF/C/LS/RS/LB/RB/Sw Downmix to 2-Channel then Quad Mode with Reverb

Page 11
Rear Panel Connections
ANALOG AUDIO INPUTS
1
L R
234
L R L R L R
7.1 CHANNEL OUTPUTS
L R LS RS LBS RBS C SUB
123 4 5 6 78
Inputs
Outputs
AB
ADA BUS 12VDC
AC 50/60Hz
90-260VAC~
ATTENTION!
MADE IN U.S.A.
OPTICAL DIGITAL
INPUTS
12
DIGITAL INPUTS
123456
LAN 10/100
HDMI
Audio/Video
Input (8)
HDMI
Main
Video Output
HDMI
Slave (Mirror)
Video Output
Digital Audio
TOS-Link
Input (2)
Ethernet
10/100T
Jack
Analog Audio
Stereo
Input (4)
Main Eight
Channel Audio
Output (7.1)
ADA Bus
Data Port
Low
Voltage
Triggers (2)
EIC AC
Power
Input
Digital Audio
Coax
Input (6)
Out of the Box Input Conguration
The “Out of the Box” input conguration is easy to follow and offers connection of as many as 20
components without adjustment of the Suite 7.1 HD’s input congurations (providing that the sources
have the appropriate outputs). Below is a chart showing the Suite 7.1 HD’s 20 “input labels” and the
assignment of the HDMI (audio & video signal) and audio jacks on the rear panel of the unit. Also
shown here are the default surround sound modes for the respective inputs when playing 5.1 or 2
channel material.
INPUT # INPUT LABEL VIDEO INPUT AUDIO INPUT DEFAULT 5.1 DEFAULT 2.0
1 BLURAY 1 HDMI 1 HDIMI DISCRETE+EX/ES PLII MOVIE
2 SATELLITE 2 HDMI 2 HDMI DISCRETE+EX/ES PLII MOVIE
3 CABLE/TV 3 HDMI 3 HDMI DISCRETE+EX/ES PLII MOVIE
4 HD DVR/PVR 4 HDMI 4 HDMI DISCRETE+EX/ES PLII MOVIE
5 VIDEO LIB 5 HDMI 5 HDMI DISCRETE+EX/ES PLII MOVIE
6 VIDEO GAME 6 HDMI 6 HDMI THX GAMES PLII GAME
7 HD VCR 7 HDIM 7 HDMI DISCRETE+EX/ES PLII MOVIE
8 HD CAMERA 8 HDMI 8 HDMI DISCRETE+EX/ES PLII MOVIE
9 IPOD DOCK 9 OFF ANALOG 1 THX MUSIC QUAD BYPASS
10 RADIO 10 OFF ANALOG 2 THX MUSIC QUAD BYPASS
11 MULTIROOM 11 OFF ANALOG 3 THX MUSIC QUAD BYPASS
12 PHONO 12 OFF ANALOG 4 THX MUSIC QUAD BYPASS
13 CD PLAYER 13 OFF OPTICAL 1 THX MUSIC QUAD BYPASS
14 COMPUTER 14 OFF OPTICAL 2 THX MUSIC QUAD BYPASS
15 MUSIC LIB 15 OFF DIGITAL 1 THX MUSIC QUAD BYPASS
16 DVD AUDIO 16 OFF DIGITAL 2 THX MUSIC QUAD BYPASS
17 SACD 17 OFF DIGITAL 3 THX MUSIC QUAD BYPASS
18 DAT 18 OFF DIGITAL 4 THX MUSIC QUAD BYPASS
19 LASER AC3 19 OFF DIGITAL 5 DISCRETE+EX/ES PLII MOVIE
20 LASER DTS 20 OFF DIGITAL 6 DISCRETE+EX/ES PLII MOVIE

Page 12
Custom Input Conguration
The Suite 7.1 HD is an incredibly exible home theater controller that can accommodate a wide array
of components. For easy and quick setup, one can use the “Out of the Box” input conguration. One
can also elect to do a completely “Custom Input” conguration or a combination of “Out of the Box”
and “Custom Input” congurations.
There are several Suite 7.1 HD features specic to each input including:
Input Labeling - The ability to rename input labels to match more closely a specic setup. For example,
you can relabel the input labeled SATELLITE to read DSS SAT. You need to limit the input label to
12 characters including spaces, symbols and numbers. ADA strongly suggests that as you rename
inputs, you maintain their numeric reference (i.e. the 3 in CABLE/TV 3). From a control standpoint,
this will make it easier to maintain a link between the input and the input command.
Final Input - The ability to reduce from 20, the number of input labels seen turning the input knob. If
you have say only six components, you can limit the Final Input number to read 6. Please note that
this eliminates the display from showing input labels 7-20. If you had an input label that you wanted
to use above input label 6 (i.e. MULTI-ROOM), you would relabel one for the rst six inputs to read
MULTI-ROOM. Obviously, you may also need to re-assign input jacks (see below).
AV Input Jack Assignment - The ability to have HDMI & audio input jacks track input labels as they
are selected. If you are assigning an AV source using an HDMI input, you can opt to route the audio
via the HDMI input or alternately, via an analog or digital audio input. Typically you will select HDMI
for the audio input as this permits the Suite 7.1 to process the high-resolution audio formats (Dolby
TrueHD, DTS-HD Master Audio, or multi-channel PCM). For audio only sources (analog or digital),
you can turn the HDMI input OFF or alternately, you can select a specic video input. For example, if
while listening to the music playing in the multi-room system you wish to also watch the video image
of the satellite receiver (a sporting event), you could have the Satelllite’s HDMI jack track the audio
from the Multi-Room input.
Default Modes - When an input is selected, pre-assigned modes for 5.1 or 2 channel audio automati-
cally engage. This way, the best possible mode always engages.
Input Presets - There are a total of six features that can be engaged when an input is selected. These
include a starting volume preset, balance preset (includes levels and delays), tone preset, parametric
equalizer (PEQ) preset, and speaker preset which includes active speakers, whether they roll-off and
their roll-off frequency. The last feature involves setting an audio delay for that input.
HDMI Cable Equalizer - The ability to set an equalization level to compensate for the HDMI cable
between the source component and the Suite 7.1 HD. These settings are saved for each input indi-
vidually and there are also equalizer settings for each of the two HDMI outputs.
While you can limit the number of inputs to just the number of sources that are connected (using Final
Input) and then rename (Input Labeling), re-link the sources (AV Input Jack Assignment), and assign
surround modes (Default Modes), the ability to custom label inputs has other benets.
For example, if the DVD player is used for both lm and music playback, you could create an input
label called DVD FILM and a second input label called DVD MUSIC. While both labels would access
the same AV Input Jack, you could then set a set of Default Modes for DVD FILM that were lm like
(i.e. DISCRETE+EX/ES & PLII MOVIE) while the Default Modes for DVD MUSIC were set to THX
MUSIC and QUAD BYPASS. This way, the user simply selects the appropriate input and does not
think about then selecting modes. Note that if you are going to use multiple input labels for one or
more sources, your Final Input number will need to be increased.

Page 13
Setup - Entering & Navigation
The Suite 7.1HD can be setup using either the
unit’s front panel display and knobs or by using
the Suite 7.1 HD PC Program.
ADA strongly suggests using the PC program
when ever possible as it is more intuitive.
When setting up the Suite 7.1 HD from its front
panel, the Mode, Input and Volume knobs are
used to move the display’s cursor and to make
changes or selections.
To enter the Setup mode on the front of the Suite
7.1 HD, press and hold the Mode knob. The dis-
play will read as in the diagram to the right.
The cursor will be ashing on the arrow. To exit
this option, simply press the Mode knob while the
cursor is on the arrow. To proceed to the Setup
Mode, turn the mode knob (clockwise) one click.
The cursor will now ash on the rst “x”. Turn
the Input knob so that the number “1” is on the
display.
Using the Mode and Input knobs, repeat these
steps until the display reads “1867”. Then press
the Mode knob. The display will change to the
primary Setup Mode Screen. Here you can recall
Tone, Balance and Volume presets as well as turn-
ing Loudness on or off. You can also:
TN - Set tone levels and store presets 1-4.
BL - Set balance levels and store presets 1-4.
VL - Set the max volume level & store presets.
SETUP - Entering the Pro Setup menu.
By turning the Mode knob, you cycle through the
options with the cursor ashing on the rst letter
of that feature. Pressing the Mode knob while
on an feature selects it. Turning the Input knob
while on a feature that has options (Recalls or
Loudness) cycles through the options. In the case
of the “Recall” features, pressing the Input knob
engages the recall.
To exit the Setup mode from any page, navigate
the cursor to the arrow next to the letter M (Main)
and press the Mode knob.
MADE IN U.S.A.
OFF
DISPLAYPOWER
ON
M
O
D
E
I
N
P
U
T
V
O
L
U
M
E
VOL -17.0
DVD PLAYER 1
VOL -17.0
DVD PLAYER 1
IDLE 0.0.0.0
OUT IDLE 0.0.0.0
DNRM 0.0.0.0
M] xxxx
M] 1xxx
M] 1867
TRx BRx VRx
TONE RECALL1 TN BL VL EQ
BAL RECALL1 SETUP
VOL RECALL1 LOUDNESS M]
TRx BRx VRx
TONE RECALL1 TN BL VL EQ
BAL RECALL1 SETUP
VOL RECALL1 LOUDNESS M]
TRx BRx VRx
TONE RECALL1 TN BL VL EQ
BAL RECALL2 SETUP
VOL RECALL1 LOUDNESS M]
TRx BRx VRx B RECALLED 1
TONE RECALL1 TN BL VL EQ
BAL RECALL2 SETUP
VOL RECALL1 LOUDNESS M]

Page 14
Customizing Virtual Inputs
The Suite 7.1 features 20 virtual inputs that can
be limited in number, renamed, reassigned to dif-
ferent AV jacks, carry default modes along with
recalling presets for volume, balance (with delay),
tone, parametric EQ, speaker conguration, and
even audio delay.
While each input label is unique, several input
labels can be set to access the same source. For
example, an input labeled DVD FILM and another
labeled DVD MUSIC would access the same DVD
player but simply engage different sound elds
ideally suited for viewing the movies or listening
to music.
As an input is selected, the following Suite 7.1 HD
features can be accessed.
Default Modes - Set an ideal mode for both 2
channel audio detection and multi-channel audio
detection.
Volume Preset - Recall one of four volume presets
or simply remain on the last used volume.
Balance Preset - Recall one of four balance pre-
sets that also store delay levels or simply remain
on the last used setting.
Tone Presets - Recall one of four balance presets
or simply remain on the last used setting.
PEQ Presets - Recall one of four parametric EQ
presets or simply remain on the last used set-
ting.
Speaker Presets - Recall one of four speaker
conguration presets or simply use the current
speaker conguration (last used).
Delay - Measured in mili-seconds (up to 200) this
feature permits you to time align sources. This is
in addition to the global Lip Sync Delay.
From a hardware standpoint, while all other set-
tings occur in real-time in the Suite 7.1 HD, these
features are loaded into the motherboard of the
unit. Even the front panel control head acts only
like an external interface (like the PC program).
Once you have made adjustments on it, you will
still need to “load” these settings into the Suite
7.1 HD’s motherboard.
Before proceeding with the custom setup of your
Suite 7.1 HD, it is worth taking some time to
consider just how you intend to use your system.
Some considerations include:
Is your system going to be used solely for lm
playback or are you going to also use it to play
music?
If you are going to use it for music, do you want
to use the same speaker conguration as for
theater or do you prefer operating the system in
just two-channel mode?
If you are using the system to view TV, are there
times when you wish to defeat surround sound
such as when viewing the news?
Are you using your DVD player for both DVD
movies and music CDs?
Obviously there are many other possible consid-
erations. These are here to simply illustrate just
how exible the Suite 7.1 HD is. In the end, the
goal of the optimum setup is to make operating
the Suite 7.1 HD as easy as selecting an input.
Example 1: Using the DVD player for both
im and music.
Here you could opt to create an input labeled
DVD FILM and another labeled DVD MUSIC.
Both inputs would access the same jacks. The
difference between these two virtual inputs could
include default modes, starting volume level,
balance levels, tone settings, and parametric EQ
settings. As such, when inserting a DVD into your
player, all you do is select the DVD FILM input.
When you insert a CD, select DVD MUSIC. All
other settings then engage automatically.
Example 2: Using your speaker system for
both 7.1 (or 5.1) surround sound and strict
2-channel stereo.
When going to a source you want to play in just
stereo (CD STEREO), you could recall a speaker
preset that includes just the right and left front
speakers without any roll-off. You could also
bypass modes and change the starting volume
level, balance level and perhaps atten tones and
parametric EQ levels.

Page 15
Inputs Labels
To navigate to the LABELS/AV setup feature, turn
the Mode knob until the cursor is ashing on S
in SETUP and then press the Mode knob. The
rst option will be the LABELS/AV option and the
L in LABELS/AV will already by lit by the cursor.
Press the Mode knob again. Note that these
pages also feature an arrow pointing left next to
the letter P (Previous page). If you wish to return
to the prior screen, navigate the cursor using the
Mode knob until it rests on this arrow and press
the Mode knob. Doing the same on the letter M
exits setup.
The Suite 7.1 HD features 20 input labels or
virtual inputs. The Factory Default features 20
input labels. Features discussed in this section
include:
FINAL INPUT - Lowering the number of visible
inputs that are displayed as you turn the input
knob. Please note the PC program does this
elsewhere.
LABEL - Customizing the name of the input.
AUDIO - Linking the rear panel audio jack.
VIDEO - Linking the rear panel HDMI jack.
N - Setting up Input Presets
LOAD - Loading the settings. While most func-
tions take place in real time with the Suite 7.1
HD, this set of functions do not and must be
loaded (the nal step).
While the I in INPUT is underlined, turning the
Mode knob advances through other Input Labels.
If we are looking to relabel Input 5 “VIDEO LIB
5” to read “SERVER 5”, turn the Mode knob
until the screen reads INPUT 5 on the top left
line of text.
Turn the Mode knob so that the cursor is on the
letter L in LABEL and press the Mode knob. Now,
turning the Mode knob positions the cursor on a
character and turning the Input knob changes the
character. If you want to exit out of this feature,
turn the Mode knob to the letter S in SAVE and
press the Mode knob. ADA Strongly recommends
keeping the numeric sufx (i.e. 5) as it reminds
you of the control code or IR code that accesses
this input.
In the PC program, simply select the input on the
left and then highlight the input name and type in
the new input name.
TRx BRx VRx
TONE RECALL1 TN BL VL EQ
BAL RECALL1 SETUP
VOL RECALL1 LOUDNESS M]
LABELS/AV PL EH [P M]
SPEAKERS BASS ADABUS
LEVELS HDMI THX TURN ON
DELAYS SOLO TEST REVERB
INPUT 1 FINAL INPUT 2O
LABEL BLU-RAY 1 SAVE
AUDIO HDMI LOAD ALL
VIDEO HDMI 1 N [P M]
INPUT 5 FINAL INPUT 2O
LABEL VIDEO LIB 5 SAVE
AUDIO HDMI LOAD ALL
VIDEO HDMI 1 N [P M]
INPUT 5 FINAL INPUT 2O
LABEL SIDEO LIB 5 SAVE
AUDIO HDMI LOAD ALL
VIDEO SEI1 1 N [P M]
INPUT 5 FINAL INPUT 2O
LABEL SEDEO LIB 5 SAVE
AUDIO HDMI LOAD ALL
VIDEO HMI1 1 N [P M]
INPUT 5 FINAL INPUT 2O
LABEL SERVE LIB 5 SAVE
AUDIO HDMI LOAD ALL
VIDEO HMI1 1 N [P M]
INPUT 5 FINAL INPUT 2O
LABEL SERVER 5 SAVE
AUDIO HDMI LOAD ALL
VIDEO HDMI 1 N [P M]

Page 16
Audio Input Jack Assignment
The Suite 7.1 HD makes it possible to assign
any audio and video jack to an Input Label. For
audio, there are:
2 TOS-Link Optical inputs,
6 digital coax inputs
4 analog audio inputs
8 HDMI inputs (A/V)
When using an HDMI interconnect, you may still
opt to use any one of the analog or digital audio
inputs. If you want to extract the audio for that
source from the HDMI input used for video, in-
stead of selecting a digital or analog audio input,
select HDMI. The Input Label will then select the
audio associated to the HDMI input.
To change the Audio Input, rst select the input
you wish to setup. With the cursor on the I in IN-
PUT, turn the input knob until the desired INPUT
# is displayed. The turn the Mode knob so that
the cursor is under the letter A in Audio. Turn
the Input knob until the connection you require is
displayed. In this example, we want to alter the
SATELLITE input from HDMI to OPTICAL 1.
In the PC program, pull down on the rst window
to the left of the Input Label (source name) and
select the audio jack.
Note - If you are looking to extract audio present
on the HDMI cable, the audio option must be
HDMI.
Note - Changes are not effected until you have
performed a LOAD.
To assign audio jacks for other Input Labels, turn
the Mode knob so that the cursor is sitting under
the I in the word INPUT. Then turn the Input Knob
to select the desired input number. Repeat the
above steps.
Since several other features also need to be
“loaded” it is useful to set these rst. As such, you
will save time loading parameters such as Video
Input Jack Assignment, Input Presets, and Default
Modes. If you do not intend to change these other
settings and wish to simply Load the Input Labels
now, proceed to Loading Input Parameters.
INPUT 2 FINAL INPUT 2O
LABEL SATELLITE 2 SAVE
AUDIO HDMI LOAD ALL
VIDEO HMI1 2 N [P M]
INPUT 2 FINAL INPUT 2O
LABEL SATELLITE 2 SAVE
AUDIO OPTICAL 1 LOAD ALL
VIDEO HDMI 2 N [P M]

Page 17
Video Input Jack Assignment
The Suite 7.1 HD makes it possible to assign
any audio and video jack to an Input Label. For
video, there are eight HDMI inputs. There is also
a setting for VIDEO OFF which should be used for
sources that have no video signal corresponding
the source.
To change the Video Input, rst select the input
you wish to setup. With the cursor on the I in IN-
PUT, turn the input knob until the desired INPUT
# is displayed. The turn the Mode knob so that
the cursor is under the letter V in Video. In this
example, we want to change the HDMI jack for
the input labeled SATELLITE 2 from HDMI 1 to
HDMI 2.
To change the Video Input, turn the Input knob
and the screen will advance through the options
in the order shown here including OFF.
Remember that in order to play the audio off the
HDMI cable, HDMI needs to be selected as the
Audio Input.
In the PC program, pull down on the rst window
to the left of the Input Label (source name) and
select the video (HDMI) jack.
Note - If your source is audio only connected via
an analog, coaxial or TOS-Link cable, set the
HDMI video input to OFF.
Note - Changes are not effected until you have
performed a LOAD.
To assign video (HDMI) jacks for other Input
Labels, turn the Mode knob so that the cursor is
sitting under the I in the word INPUT. Then turn
the Input Knob to select the desired input number.
Repeat the above steps.
Since several other features also need to be
“loaded” it is useful to set these rst. As such, you
will save time loading parameters such as Input
Presets and Default Modes. If you do not intend
to change these other settings and wish to simply
Load the Input Labels now, proceed to Loading
Input Parameters.
INPUT 2 FINAL INPUT 2O
LABEL SATELLITE 2 SAVE
AUDIO OPTICAL 1 LOAD ALL
VIDEO HDMI 2 N [P M]
INPUT 2 FINAL INPUT 2O
LABEL SATELLITE 2 SAVE
AUDIO OPTICAL 1 LOAD ALL
VIDEO HDMI 3 N [P M]

Page 18
Input Presets
The Suite 7.1 HD has the ability to engage certain
feature sets when an input is selected. One of
these is:
Auto Delay - Rated in milliseconds (0-200).
In addition to setting the Audio Delay, you can
also assign one of four inputs for each of the
following.
Volume - The volume preset lets you assign a
starting volume level for a specic input. If the unit
is off and an input with a specic volume preset
is selected, the Turn On volume preset is ignored
and this input specic volume preset is used.
Balance - The balance preset stores channel
levels and delay levels.
Tone - The tone preset stores the parametric bass
and treble control.
PEQ - The multi-band parametric equalizer fea-
tures a 12 band EQ for all channels and an 8 band
EQ for the subwoofer.
Speakers - The speaker conguration lets you
determine which speakers are active, whether
they roll-off, and their roll-off frequency.
To change these settings in the PC program, click
on the button to the right of the option window.
On the Suite 7.1 HD, if you are in the LABELS/
AV screen navigate to the letter N (next) at the
bottom of the screen using the Mode knob and
then press the knob.
To select the input you wish to adjust, turn the
Input knob while the cursor is on the rst character
of the input’s name in the upper right hand corner
of the display.
Next, use the Mode knob to scroll through the six
preset options. When the cursor is on an option
you wish to adjust, turn the Input knob.
Note - Changes are not effected until you have
performed a LOAD.
If you are done assigning Input Presets, navigate
to the letter P (previous) at the bottom of the dis-
play using the Mode knob and press the knob.
INPUT 2 FINAL INPUT 2O
LABEL SATELLITE 2 SAVE
AUDIO HDMI LOAD ALL
VIDEO HDMI 2 N [P M]
PRESETS BLU-RAY 1
VOL LAST DELAY Oms
BAL LAST SPEAKER LAST
TONE LAST PEQ LAST ^P
PRESETS SATELLITE 2
VOL LAST DELAY Oms
BAL LAST SPEAKER LAST
TONE LAST PEQ LAST ^P
PRESETS SATELLITE 2
VOL LAST DELAY 2Oms
BAL 2 SPEAKER 1
TONE 4 PEQ 3 ^P

Page 19
Default Modes
The Suite 7.1 HD features ADA’s unique Double
Default Mode Auto-Detection that automatically
engages a surround sound mode for each input
- one for 7.1/5.1 and another for 2 channel au-
dio. This way, regardless of what mode was last
used, the right decoding takes place each time an
input is selected. Default Modes are loaded to
the Suite 7.1 HD along with the Input Labels, AV
Input Jack Assignments and Input Presets. As
such, before loading it is suggested that you set
the Default Modes for the Input Labels you have
created or modied.
While the PC program permits assignment of the
Default Modes on the same page as other input
assignments, this feature is located elsewhere in
the Suite 7.1 HD’s menu.
To set the Default Modes, if you are still on the
LABELS/AV screen, turn the Mode knob so that
the cursor is under the arrow to left of the letter P
(previous page) and press the Mode knob.
Turn the Mode knob so that the cursor is under the
letter T of TURN ON and press the Mode knob.
Turn the Mode knob so that the cursor is under the
arrow next to the text DEFAULT MODES PAGE
and press the Mode knob.
With the cursor under the I in INPUT SEL, you can
scroll through inputs by turning the Input knob. If
you have altered Input Label names (regardless
whether you loaded the Suite 7.1 HD), the new
Input Label names will appear on the screen
because the control head on the unit already
contains the changes even though the Suite 7.1
HD does not.
When you are on the desired input label, turn the
Mode knob to select DEFAULT 5.1 and DEFAULT
2.0. While on either of these features, the Input
Knob lets you change the Default Mode for that
input. Please note that “LAST USED” mode is an
option. For other inputs, navigate back to the IN-
PUT SEL using the Mode Knob and then selecting
another input using the Input knob and repeat.
When you are done, return to the LABELS/AV
screen by selecting P (previous screen) both on
this page and the TURN ON screen. You will then
be able to select the LABELS/AV page.
INPUT 2 FINAL INPUT 2O
LABEL SATELLITE 2 SAVE
AUDIO OPTICAL 1 LOAD ALL
VIDEO HDMI 3 N [P M]
LABELS/AV PL EH [P M]
SPEAKERS BASS ADABUS
LEVELS HDMI THX TURN ON
DELAYS SOLO TEST REVERB
TURN ON [P M]
TURN ON VOLUME RECALL1
TURN ON INP LAST USED
]DEFAULT MODES PAGE
DEFAULT MODES [P M]
INPUT SEL BLU-RAY 1
DEFAULT 5.1 DISCRT+EX/ES
DEFAULT 2.O PLII MOVIE
DEFAULT MODES [P M]
INPUT SEL BLU-RAY 1
DEFAULT 5.1 THX SurEX/ES
DEFAULT 2.O PLII MOVIE
DEFAULT MODES [P M]
INPUT SEL BLU-RAY 1
DEFAULT 5.1 THX SurEX/ES
DEFAULT 2.O PLII MVE+THX

Page 20
Loading Custom Input Congurations
As a reminder to how the Suite 7.1 HD operates,
when you adjust most every feature on the unit,
the changes occur in real time (immediately).
That is not the case when it comes to labeling of
inputs, assigning AV jacks, altering input presets,
or changing default modes.
For these specic features, you must load them
into the Suite 7.1 HD. Even if you are adjusting
them on the front panel control, these changes
are only being held in the front panel control and
have not yet been loaded into the motherboard.
As such, the front panel control works much like
the PC program which also needs to be “loaded”
into the Suite 7.1 HD.
When using the PC program, you have two load-
ing options which read Send Input or Send All.
Since Send All involves going through all 20 Input
Labels, the Send Input is a nice feature if you only
made a change to a few devices. While on that
Input, press the Send Input button and just that
input will be loaded to the Suite 7.1 HD. Also, you
save the conguration for all inputs by selecting
Save File. Inversely, you can load a previously
stored conguration using the Load File feature.
The Retrieve Input feature loads the settings in-
ternal to the Suite 7.1 HD into the PC Program.
From the front of the Suite 7.1 HD, while on the
LABELS/AV display, turn the Mode knob so that
the cursor is ashing on the “L” in LOAD ALL.
Then press the Mode knob.
The display will change from reading LOAD ALL
to LOADING and the inputs will scroll through all
20 Input Labels.
When the upload is completed, the display will
indicate revert to the rst Input Label and LOAD
ALL will be displayed.
At this time, you can choose to adjust the Final In-
put number, return the previous menu page (P) for
other settings, or exit the setup completely (M).
INPUT 2 FINAL INPUT 2O
LABEL SATELLITE 2 SAVE
AUDIO HDMI LOAD ALL
VIDEO HMI1 2 N [P M]
INPUT 2 FINAL INPUT 2O
LABEL SATELLITE 2 SAVE
AUDIO HDMI LOADING
VIDEO HMI1 2 N [P M]
INPUT 1 FINAL INPUT 2O
LABEL BLU-RAY 1 SAVE
AUDIO HDMI LOAD ALL
VIDEO HDMI 1 N [P M]
INPUT 1 FINAL INPUT 2O
LABEL BLU-RAY 1 SAVE
AUDIO HDMI LOAD ALL
VIDEO HMI1 1 N [P M]
INPUT 1 FINAL INPUT 12
LABEL BLU-RAY 1 SAVE
AUDIO HDMI LOAD ALL
VIDEO HDMI 1 N [P M]
Table of contents
Other A/DA Amplifier manuals

A/DA
A/DA Cinema Rhapsody Mach II User manual

A/DA
A/DA PTM-6150 User manual

A/DA
A/DA MB-1 User manual

A/DA
A/DA Cinema Rhapsody User manual

A/DA
A/DA MP-1 User manual

A/DA
A/DA MP-1-CHANNEL User manual

A/DA
A/DA T100S User manual

A/DA
A/DA APP-1 User manual

A/DA
A/DA MP-1 User manual

A/DA
A/DA Suite 7.1 Quick start guide