A-iPower PWE1600 Manual

Model : PWE1600
ELECTRIC PRESSURE WASHER
PWNER’S MANUAL AND OPERATING INSTRUCTIONS
WARNING: SAVE THIS MANUAL FOR FUTURE REFERENCE
This manual contains important information regarding safety. Operation,
maintenance and storage of this product. Before use, read carefully and
understand all cautions, warnings, instructions and product labels. Failure
to do so could result in serious personal injury and/or property damage.
A-iPower Corp.
Fontana, CA 92337 USA
www.a-ipower.com
CUSTOMER SERVICE: 1-855-888-3598
Visit Our Website at: www.a-ipower.com
Email Our Technical Support at:
support@a-ipower.com

Contents
Warnings.....................................................................................................................................3
Specifications..............................................................................................................................2
Product Brief & Accessories........................................................................................................5
Assembly & Operation.................................................................................................................7
Cautions.....................................................................................................................................10
Cleaning & Maintenance............................................................................................................10
Storage.......................................................................................................................................11
Trouble Shooting........................................................................................................................12
Warranties..................................................................................................................................13
Safety..........................................................................................................................................1
Specifications..............................................................................................................................4

Safety
1
Fire
Explosion
Electrical Shock
Projectile
Chemical Burns
Electrical Hazard
Slippery Surface
Fall
Safety Alert
Read Operators Manual
Asphyxiation Hazard
Eye Protection
Hot Surface
Fluid Injection
Kickback
Moving Parts
This Operating Manual has been designed to instruct you on the correct operation of
your A-iPower product. Your satisfaction with this product and its safe operation is our
ultimate concern. Therefore, please take the time to read the entire manual, especially the
safety symbols and instructions They will help you to avoid potential hazards that may exist
when working with this product. Every effort has been made to ensure that information
in this manual is accurate and current. However, we reserve the right to change, alter, or
otherwise improve the product and this document at any time without prior notice.
Safety Symbols and Warnings:
DANGER: indicates a hazard which, if
not avoided, will result in death or serious
injury.
WARNING: indicates a hazard which,
if not avoided, could result in death or
serious injury.
Safety symbols and their meanings:
The following symbols will appear in this manual and on the product. For safe use of this
product, be sure to study them and know their meanings.
CAUTION: indicates a hazard which,
if not avoided, could result in minor or
moderate injury.
NOTICE: Indicates information, or
addresses practices that are important, but
not related to personal injury.
WARNING:
California Proposition 65
This product, and other substances that may become airborne from its use contains
chemicals, including lead, known to the State of California to cause cancer, birth defects,
or other reproductive harm. Wash your hands after handling product.

Specifications
2
V Volts Voltage
A Amps Current
Hz Hertz Frequency (cycles per second)
W Watts Power
Alternating Type of current
No Load Speed Rotational speed, at no load
.../ min Per Minute Revolutions,strokes,surface speed,orbits
etc.,per minute
no
SYMBOL NAME DESIGATION / EXPLANATION
Some of the following symbols may be used on this product.Please study them and learn their
meaning.Proper interpretation of these symbols will allow you to operate the product better
and safer.

Read all safety warnings and all instructions before use. Failure to follow the warnings and
instructions may result in electric shock, fire or serious injury. You can save this manual for
future reference.
1. This appliance is not intended for persons (including children) with reduced physical, sensory
or mental capabilities, or lack of experience and knowledge, unless they have been given
supervision or instruction concerning the use of the appliance by a person responsible for their
safety.
2. Children should be supervised to ensure that they do not play with this appliance.
3. If the supply cord is damaged, it must be replaced by qualified persons in order to avoid a
hazard.
4. Safety boots, safety gloves, safety helmets with visors, hearing protection and other similar
products shall be worn while operating the machine.
5. When opening the spray gun, there is a danger of kickback force and a sudden torque,
please hold the nozzle tightly.
6. High pressure jet can be dangerous if operated by mistake. Do not aim the jet at persons,
electrical equipment or the machine itself directly.
7. Please disconnect the power supply before performing maintenance.
8. Do not spray with flammable liquid to reduce the risk of explosion.
9. To ensure machine safety, use only original spare parts from the manufacturer or approved
by the manufacturer.
10. High pressure hoses, fittings and couplings are important for the safety of the appliance.
Use only hoses, fittings and couplings recommended by the manufacturer.
11. The water passing through the backflow preventer is considered as non-potable water.
12. The machine shall be disconnected from its power source by removing the plug from outlet
during replacement or maintenance.
13. Do not use the machine if supply cord or important part like safety device/high pressure
hose/spray gun is damaged.
14. The plug and socket must be watertight if connected with extension cord.
15. It is recommended that the power supply for this machine should include a residual current
device, which will interrupt the power supply if current leaks.
Warnings
3

Specifications
Model
Max Pressure
Max Flow
Electric Current
Motor Power
Voltage / Frequency
Weight
PWE1600
1600PSI
1.2GPM
12A
1700W
120V/60Hz
8.5kg
4

Product Brief & Accessories
8
9
10
11
12
5
6
7
5
13
1
4
2
3

1. Handle
2. Spray gun holder
3. ON/OFF switch
4. Outlet with protective cap
5. 0° 15° 25° 40° nozzles
6. Garden adapter
7. Spray wand
8. Spray gun
9. High pressure hose
10. Soap bottle
11. Cleaning pin
12. Handle with hose reel
13. Inlet with protective cap
6

Assembly & Operation
7
c
H

8
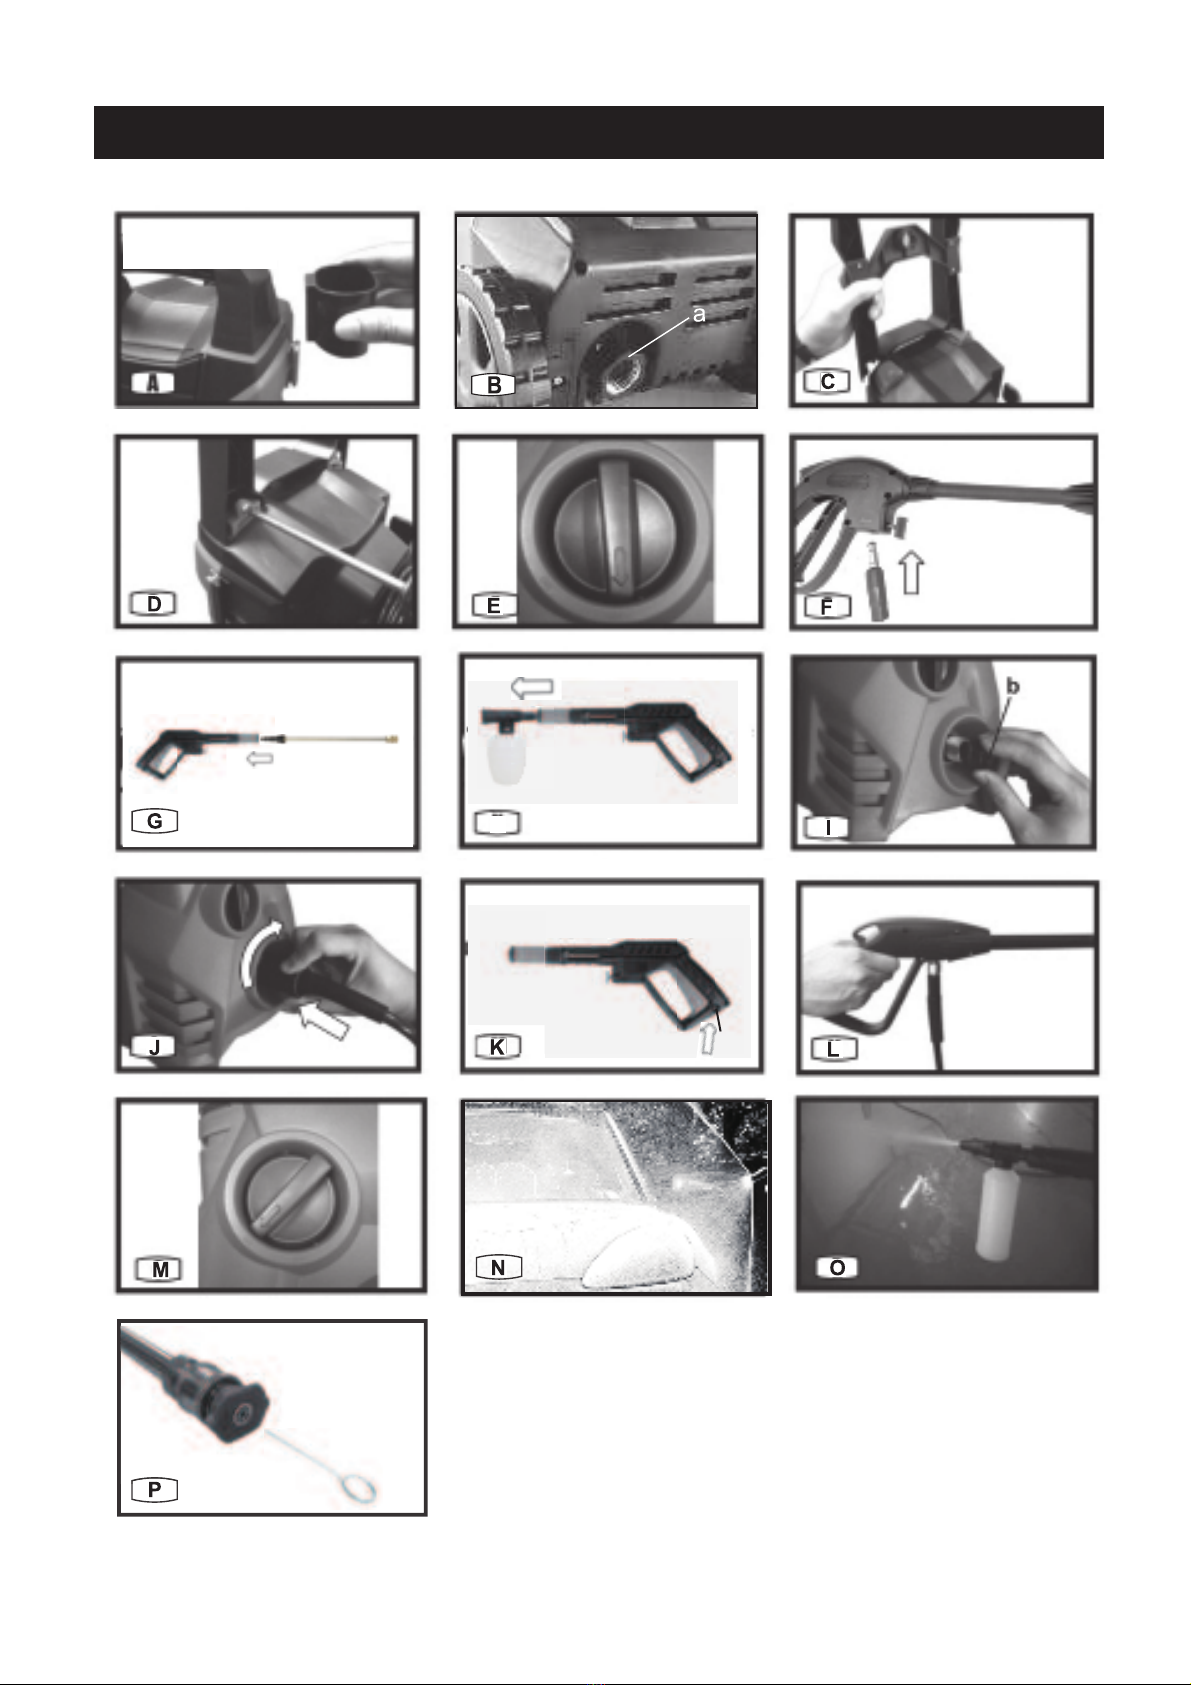
Press the spray gun holder (2) onto the machine. (Fig.A)
Attach garden adapter (6) to the inlet (a) of the machine. (Fig.B)
Press handle (1) to the machine, and fix the screws. (Fig.C, D)
1) Make sure the ON/OFF switch (3) is in "OFF" position. (Fig.E)
2) Tighten the high pressure extension hose (9) into spray gun (8), but do not over
tighten. (Fig. F)
3) Insert the adjustable spray wand (7) into spray gun (8), and twist 1/4 turns until
rectangular tab appears. (Fig.G)
4) Remove the protective cap (b) out of the outlet (4) first, and twist 1/4 turns until
rectangular tab appears. (Fig.H, I)
Insert the soap bottle (10) into spray gun (8), and twist 1/4 turns until rectangular tab
appears. (Fig.J)
1) Before starting any cleaning task, it is important to remove objects like toys or outdoor
furniture that may be tripped over by high pressure water from the work area. Ensure that
all doors and windows are closed tightly.
2) Connect the plug properly.
3) Trigger switch is in a locked off position to prevent being pressed accidentally. Depress
safety lock (c) to "unlocking" position, you can press the trigger switch. (Fig.K)
4) Before operating the high pressure washer, press the trigger switch to force any trapped air
out of the pump and hose. (Fig.L)
5) Start the pressure washer by turning ON/OFF switch to "ON" position, then press the trigger.
1. Select the right nozzle for the job.
Your product is supplied with a selection of quick connect nozzle tips. The nozzles are sized
specifically to give you maximum pressure at all times. Each nozzle is marked and rated in
degrees of fan. They are also color coded (see chart on opposite page). The higher the number
of the fan degree, the wider the fan pattern is. The tighter the spray fan the more impact on
the surface, which is good for cleaning tough jobs. The wider the spray fan, the more spread
out the impact on the surface, so they are better for easy jobs, or soft surfaces. Finding the
correct nozzle for the
job at hand make take some experimenting.
Always start with the widest
fan degree and continue to the lower degree fans until the best work result is achieved.
Always test the nozzle on an area that is not noticeable.
NOTICE: Not all models come with all nozzles described in this section. Use only the
information pertaining to the nozzles supplied with your product.(Nozzle selection Chart)
Spray gun holder assembling
Water inlet filter mounting
Handle mounting
High pressure hose assembling
Soap bottle assembling
Operating
Accessories using guide
Reminder: The motor cannot run continuously, only when the trigger is squeezed, the motor
runs. (Fig.M)

3) Soap bottle:
To penetrate and remove dirt more effectively, it is recommended to using with the soap bottle.
Connect the soap bottle to spray gun, turn the soap bottle clockwise until it locked in right
position. (Fig.0)
Note: Detergent needs to be diluted to achieve the most effective cleaning. It is recommended
to diluting detergent in a suitable container to the required concentration before use.
4) Cleaning pin:
Clean the nozzle with cleaning pin (11). (See Fig.P)
9
0° Nozzle - Red: This nozzle delivers a pinpoint stream of pressurized water and is
extremely powerful. Use it for the toughest cleaning jobs, although It covers only a
small area. This nozzle should only be directed at surfaces that can withstand intense
high pressure such as metal or concrete. Do not use this nozzle to clean wood or soft
surfaces.
15° Nozzle - Yellow: This nozzle delivers a 15-degree spray pattern for heavy duty
cleaning and stripping. It should only be used on surfaces that can withstand pressure
from this nozzle.
25° Nozzle - Green: This nozzle delivers a 25-degree spray pattern for general tasks. It
should only be used on surfaces that can withstand pressure from this nozzle.
40° Nozzle – White: This nozzle delivers a 40-degree spray pattern for easily damaged
surfaces. It should only be used on surfaces that can withstand pressure from this
nozzle.
2. Connect nozzle to spray wand.
WARNING:
• Never place hands in front of nozzle, or
point nozzle at your face.
• Never attempt to clean a clogged nozzle
while attached to the wand.
• Never attempt to attach or remove spray
Turn off Pressure Washer. While pointing
wand or hose fittings while Pressure
Washer system is pressurized.
•
spray in a save direction, release
pressure by squeezing trigger. Then lock
the Gun Trigger before attempting to
change pressure nozzles.
2.1 To attach, pull quick connect collar
back, insert nozzle into female quick-
disconnect spray wand and press to
lock in place. Make sure collar snaps
into place.
2.2 To detach, pull quick connect collar
Nozzle
Wand
Quick connect
collar
back and pull nozzle to remove.

1. Do not use the pressure washer with water contaminated by solvents like paint thinner,
gasoline, engine oil, etc.
2. Dirty water will damage the unit. To avoid this damage, we recommend checking the
water filter (located inside the water inlet) to clean it out, you can see maintenance
section briefly.
3. Always prevent debris from being drawn into the unit by using a clean water source
if required.
Before performing maintenance or cleaning, be sure to disconnect the power plug from the
socket. To ensure a long and problem-free working life, please adopt the following
suggestions:
1. Washwater hose, high pressure hose, spray lance and accessories before mounting.
2. Clean the dust and sand on connectors.
3. Rinse the detergent spraying attachment after use.
4. Clean the nozzles after each use.
5. Any repair should always be made in an authorized workshop with original spare parts.
6. If the power cord is damaged, it must be replaced by qualified persons in order to avoid
a hazard.
It should be kept clean so as to let cooling air freely pass through the machine vents.
The coupling should be greased regularly to ensure an easy connection and non-crack O-ring.
1. Clean the water inlet filter regularly once a month or more frequently according to use.
2. Unscrew quick connector and take water inlet out to clean the water inlet filter.
3. Before re-installing, please check if it is in good condition.
4. The inlet filter must always be fitted inside the water inlet pipe to filter out sand, limestone
and other impurities, as they will damage the pump valves.
Cautions: Failure to fit the filter well cannot filter out impurities.
A blockage in the nozzle will cause the pump pressure to be too high. This is why it needs to
be cleaned immediately:
1. Stop the machine and disconnect the nozzle.
2. Clean the nozzle, flush the nozzle backward with water.
Important: The cleaning tool should only be used when the nozzle is detached!
1. Do not use with non-water liquid, only use with cold water supply.
2. Water hose must be at least 1/2" in diameter.
3. The flow rate of water supply shall not be less than 5L/min.
4. Flow rate can be determined by running the water into an empty container for one minute.
5. The water supply temperature must not exceed 40℃(1040℉).
Cautions
Cleaning & Maintenance
10
About water supply
Water inlet filter cleaning and installation
Nozzle cleaning
Manchine vents cleaning
Greasing of couplings

1. The machine should be stored in a frost-free room! Never start-up a frozen machine.
2. Pump, hose and accessories should always be emptied of water prior to storing as follows:
3. To avoid accidents, the electric cable and the high pressure hose should always be carefully
winded up around the handle or to appropriate hook.
4. The wand and the nozzles can be stored on the pressure washer.
Storage
11
Stop the machine and detach water hose and accessory.
Restart the machine and activate the trigger.Let the machine work until no more water
runs through the spray gun.
Stop the machine ,unplug and wind up hose and cable.
Place spray handle,nozzles and other accessories in the holder of the machine.If the
machine is frozen by mistake,it is necessary to check whether it is damaged.

Disconnect the machine from the power source before making any repair. To avoid unnecessary
disappointments, you should check the following before connecting us:
Trouble Shooting
12
Problems Causes ^ŽůƵƟŽŶƐ
Machine refuses to
start 1. Machine is not plugged in
2. Defec ve socket
3. Defec ve extension cable
1. Plug in again
2. Try another socket
3. Try without the extension cable
Fluctuating pressure 1. Check if hoses and connec ons are
air ght
2. Clean or replace
Machine stops 1. Incorrect mains voltage
2. Thermal cut-out ac vated
3. Nozzle is par ally blocked
1. Check if the mains voltage
corresponds to speci ca on of this
machine
2. Leave the washer for 5 minutes to
cool down
3. Clean the nozzle
Machine pulsating 1. Air in inlet hose
2. Inadequate tap water
supply
3. The nozzle is par ally
blocked
4. The water lter is clogged
5. Hose kinks
1. Run the machine with trigger
opening un l regular working
pressure resumes
2. Check if the water supply
corresponds to speci ca ons
required
3. Avoid using long, thin hoses
(min.1/2")
4. Clean nozzle with cleaning pin
5. Clean the lter
6. Straighten out hose
Machine often starts
and stops by itself Pump/spray gun is leaking Connect your nearest service
Machine starts, but no
water comes out 1. Pump/hose or accessory is
frozen
2. No water supply
3. Water lter is blocked
4. Nozzle is blocked
1. Wait for pump/hose or accessory to
thaw
2. Connect water supply and turn on
3. Clean the lter
4. Clean the nozzle
1. Sucking pump leaks
2. Valves are dirty, worn out
or stuck
3. Pump seals are worn out

13
A-iPower Corp.
LIMITED WARRANTY
KEEP YOUR RECEIPT.
Proof of purchase will be required to substantiate any warranty claim.
WHAT IS COVERED:
A-iPower Corp. warrants to the original retail purchaser in the United States of America,
or Canada that this product is free of defects in material and workmanship and agrees,
at A-iPower Corp’.s direction, to either repair, provide replacement parts for, or replace
(without charge for parts or labor) any product or component with a material defect for a
period of 2 years from the date of purchase, except as limited below. Warranty service
and replacement parts are warranted only for the duration of the warranty on the original
product. All replaced parts or products become a property of A-iPower Corp. This product
is also covered by an Emissions Control System Warranty which is separate from and in
addition to the warranty.
Warranty
A-iPower Limited Warranty – 2 Years Residential and 1 Year Commercial
2 year Residential warranty applies as follow: 1st year Parts & Labor / 2nd year Parts ONLY
Thank you for choosing A-iPower products. To ensure proper registration of your product
warranty, please submit your warranty registration along with proof of purchase within 10
days of the date of purchase, this can be done by:
A. Completing the Warranty Registration
form at the back of this manual and
mailing to:
A-IPOWER CORP.
10887 COMMERCE WAY UNIT A
FONTANA CA 92337 USA
B. Visit us at www.a-ipower.com and click
the product registration icon.
Warranty Term
A-iPower will provide warranty for any of its products purchased through any authorized
A-iPower dealer in North America to the original purchaser and will be warranted against
defects in material or workmanship for a period of two (2) years for Consumer use from
date of purchase, subject to exclusions noted herein. Commercial and Rental applications
are warranted for a period of one (1) year from date of purchase.
“Consumer Use” – residential household use by a retail consumer
“Commercial Use” – all other use – commercial , business, industrial, or rental purpose.
How to Obtain Warranty Service
Please call our Customer Service Dept. 855-888-3598 or e-mail to support@a-ipower.com
Please have necessary information available – Model Number, Serial Number, Proof of
Purchase.

14
A-iPower Corp.
DO NOT RETURN THE PRODUCT TO THE PLACE OF PURCHASE
A-iPower Customer Service Dept. will assist with all product related questions and will
help troubleshoot issues and will send any replacement parts as necessary while product
is within the warranty period at no charge. If the issue cannot be resolved then A-iPower
Customer Service Dept .at its discretion determine and authorize diagnosis and repair
through one of its authorized Service Centers. A-iPower Corp. at its discretion may choose
to provide replace of part, component, or product. Service or replacement of parts at any
unauthorized repair facility without prior authorization will not be covered by this warranty.
Warranty Exclusions
This warranty does not cover the following:
Regular wear and maintenance – this warranty will not cover repair when normal use has
exhausted the lifetime of a part(s) or engine.
Installation and Maintenance - this warranty does not cover improper or unauthorized
assembly,alteration.modification or any other damage resulting from misuse or neglect.
Normal maintenance parts - this warranty does not cover spark plugs,air filters,
adjustments, or other related service due to obstructions and other build ups resulting from
improper maintenance
Additional exclusions - this warranty does not cover wearable parts such as filers,spark
plugs , o-rings, batteries etc. It does not cover any cosmetic defects such as scratches
to paint, decals etc. It does not cover any damage resulting from use of non-original
manufacturer’s parts, use of after-market parts. It does not cover any failures due to acts of
God and other force majeure events beyond the control of the manufacturer.
Warranty limits and Implications and Consequential Damages
A-iPower is not obligated to cover any loss of time, use of product, freight cost, or any other
incidental or consequential claim from the use of this product. This warranty is in Lieu of all
other warranties, express or implied
MERCHANDISE RETURN GUIDELINES
• All products must be returned in original or equivalent packaging. Improperly packaged
returns will not be accepted.
• Must have adequate packing for transportation
Federal law requires that all machines that utilize gasoline,oil,or other flammable•
liquids must be drained Completely & Thoroughly prior to shipment.
•
for this violation of the law resides with the sender of the shipment.
• Return to address provided in return authorization, using the parcel service required.
Units returned without authorization will not be honored.
Please Note:Refunds will not be granted for items that have been modified or damaged•
by abuse or usage not in accordance with product instructions.
This warranty gives you specific legal rights which vary from state to stats.
Gas caps and oil plugs must be left off for 24 hours prior to shipping. Please note:liability


Fontana, CA 92337 USA
Phone: 1-855-888-3598
support@a-ipower.com
www.a-ipower.com
Made in China

A-iPOWER WARRANTY REGISTRATION FORM
Register your product by emailing this form to support@a-ipower.com or register on-line at:
www.a-ipower.com.
Registering your product is important , it provides the following protections:
1. You have record of product purchased
2. Customer Service can Better serve you for Warranty related issues
3.
1.THE PRODUCT WAS PURCHASED FOR: A. Residential cleaning
B. Other ____________________
2.THIS PRODUCT IS A: (select one)
A. First time purchase B. Replacement
3.HOW DID YOU FIRST LEARN OF THIS PRODUCT: (select one)
A. Radio G. Direct Mail
B. Store Display H. From Friend/Relative/Neighbor
C. Contractor I. Internet
D. Trade Show J. Other ____________________
4. PLEASE RATE THE Completly
Satisfied
Not at all
SatisfiedFOLLOWING:
5 4 3 2 1
Product Value for Price Paid
Performance
Features
Product Appearance
Warranty
Ease of Maintenance
Noise Level
5 . HOW LIKELY ARE YOU TO RECOMMEND A-iPOWER TO FAMILY OR FRIENDS?
Extremely Not Likely
Likely at all
5 4 3 2 1
Privacy Statement: A-ipower is committed to respecting your privacy and to complying with
the regulations regarding the protection of personal data. The survey data we collect is for
the purposes of marketing or product support and demographic information about the entire
audience registering their products.
Customer Information:
Name: _________________________
Phone: _________________________
E-mail: _________________________
Address: _______________________
City, State: ______________________
Zip code: _______________________
Purchase Date: __________________
Product Information:
Serial #
Model #
The serial No. can be found on the engine.
PLEASE NOTE: Your product cannot be
registered without model & serial numbers.

Fontana, CA 92337 USA
Phone: 1-855-888-3598
support@a-ipower.com
www.a-ipower.com
Made in China
Table of contents
Languages:
Other A-iPower Pressure Washer manuals