A-rival PNC70 Active User manual

1
Hardwaremanual
a-r i val P NC 70 Ac ti ve
Hotline +49 (0) 511 / 123 83 506
www.a-rival.de * support@a-rival.de
Thank you for choosing an a-rival Navigationsyste m. A good choice.
We hope you´ll enjoy using your ne w an a-rival Navigationsystem.
Just in case that you are facing any problem s with your Device, please call
our support/service hotline 0049 (0)511 / 123 83 506 or send us an e-mail to support@a-rival.de !
For Updates and technical information please visit our website ww w.a-rival.de

2
Precautions and Notices
. For your own safety, do not operate the controls of the product while driving.
. Use this product prudently. The product is intended to be used only as a
navigation aid. It is not for precise measurement of direction, distance,
location or topography.
. The calculated route is for reference only. It is the user's responsibility to
follow the traffic signs and local regulations along the roads.
.When you get off the car, do not leave your device on the dashboard that is
subject to direct sunlight. The overheating of the battery can cause
malfunction and/or danger.
. GPS is operated by the United States government, which is solely
responsible for the performance of GPS. Any change to the GPS system can
affect the accuracy of all GPS equipments.
. GPS satellite signals cannot pass through solid materials (except glass).
When you are inside a tunnel or building, GPS positioning is not available.
. A minimum of 4 GPS satellite signals is needed to determine current GPS
position. Signal reception can be affected by situations such as bad weather
or dense overhead obstacles (e.g. trees and tall buildings).
. Other wireless devices in the vehicle might interfere with the reception of
satellite signals and cause the reception to be unstable.
. A car holder is needed when using the device in a car. Be sure to place
the device in an appropriate place, so as not to obstruct the driver's view or
deployment of air bags.

3
Table of Contents
Precautions and Notices....................................................................................2
1Getting Started................................................................................................4
1.1 Understanding Hardware Features............................................................4
Front and back components.............................................................................4
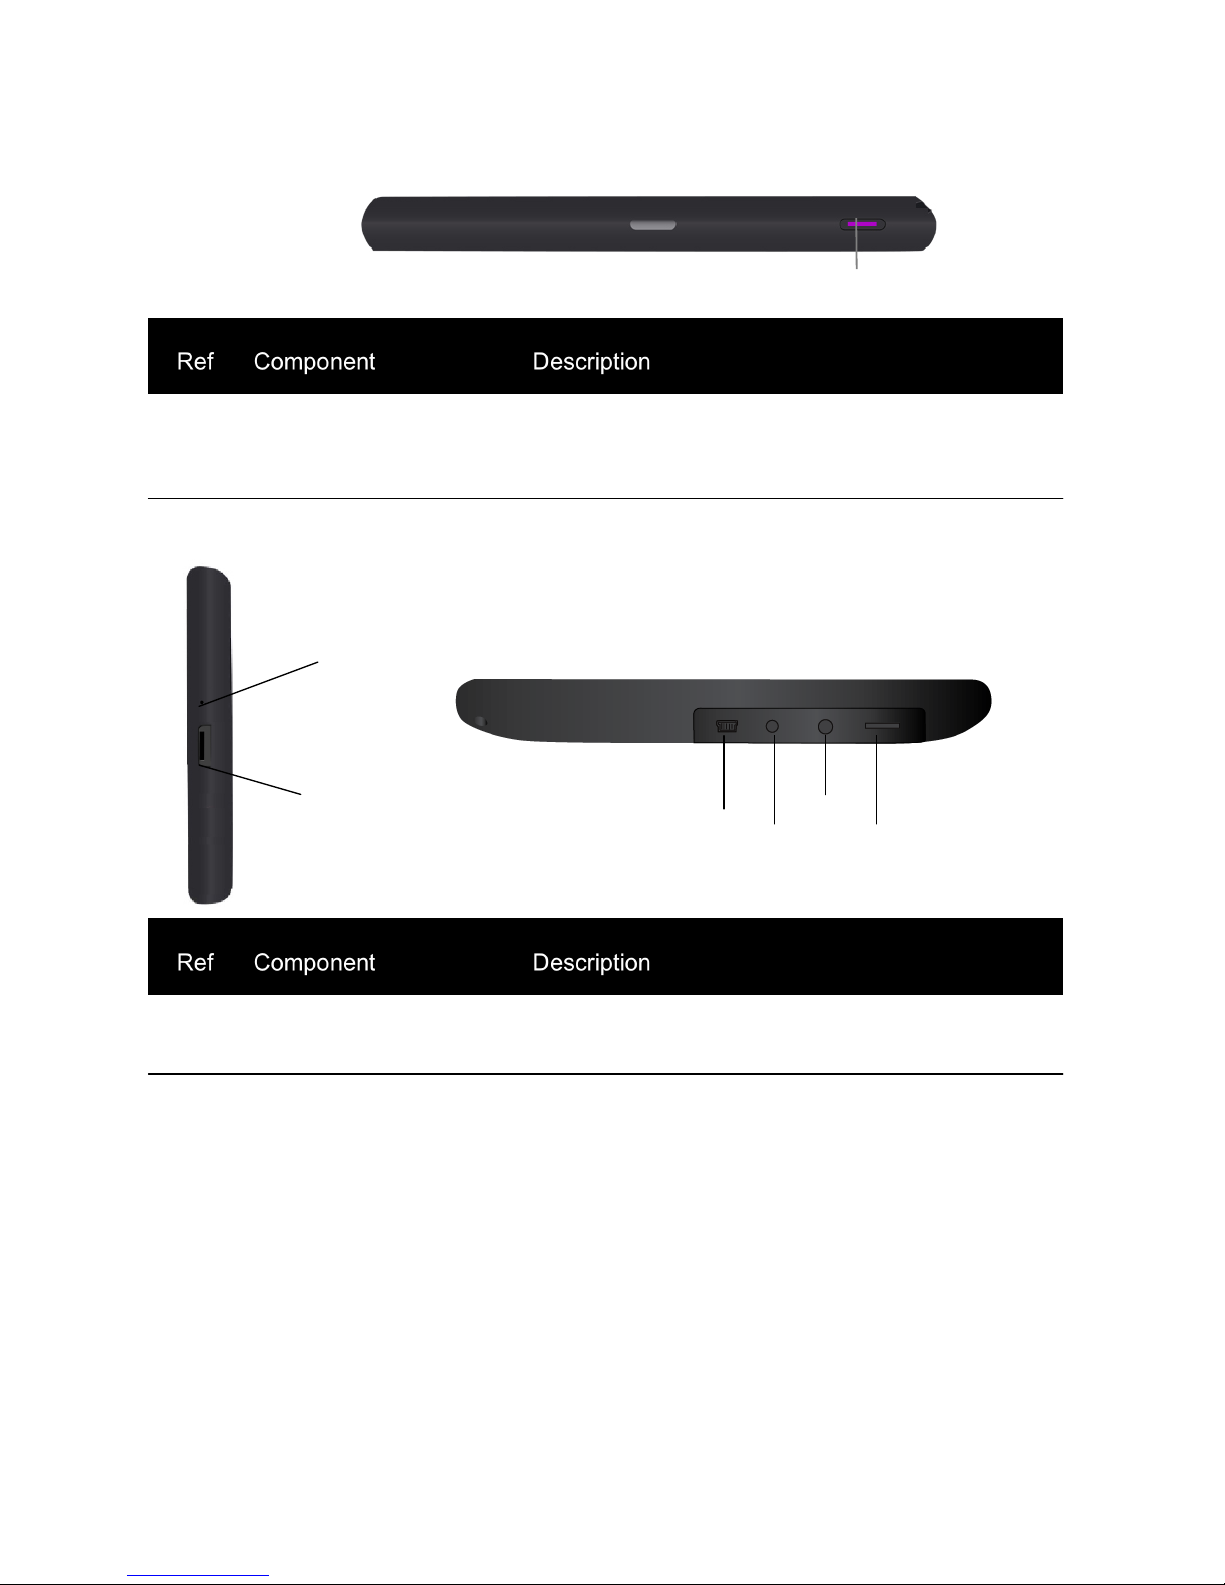
Top components................................................................................................5
Side components.................................................................................................5
1.2 Connecting to AC Power and Charging the Battery (Optional)......................6
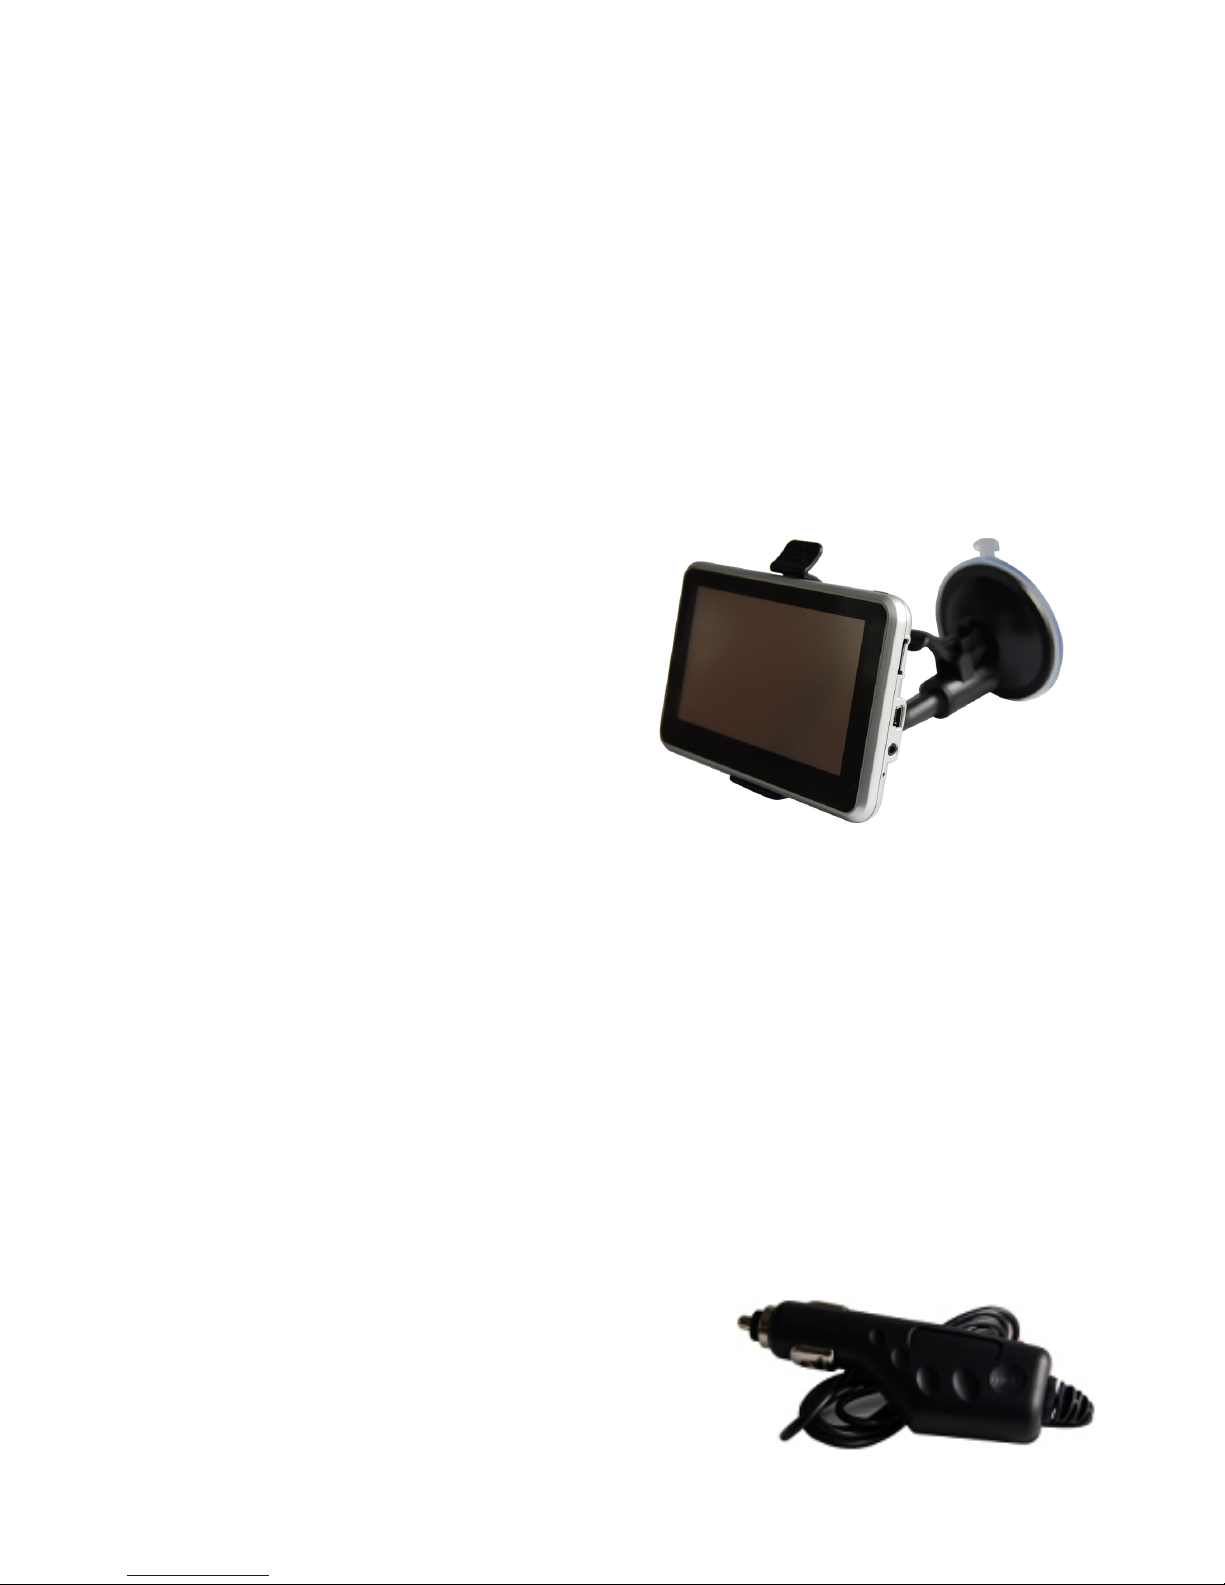
1.3 Using the Car Holder....................................................................................7
1.4 Connecting the Car Charger......................................................................7
2 Operating Basics........................................................................................8
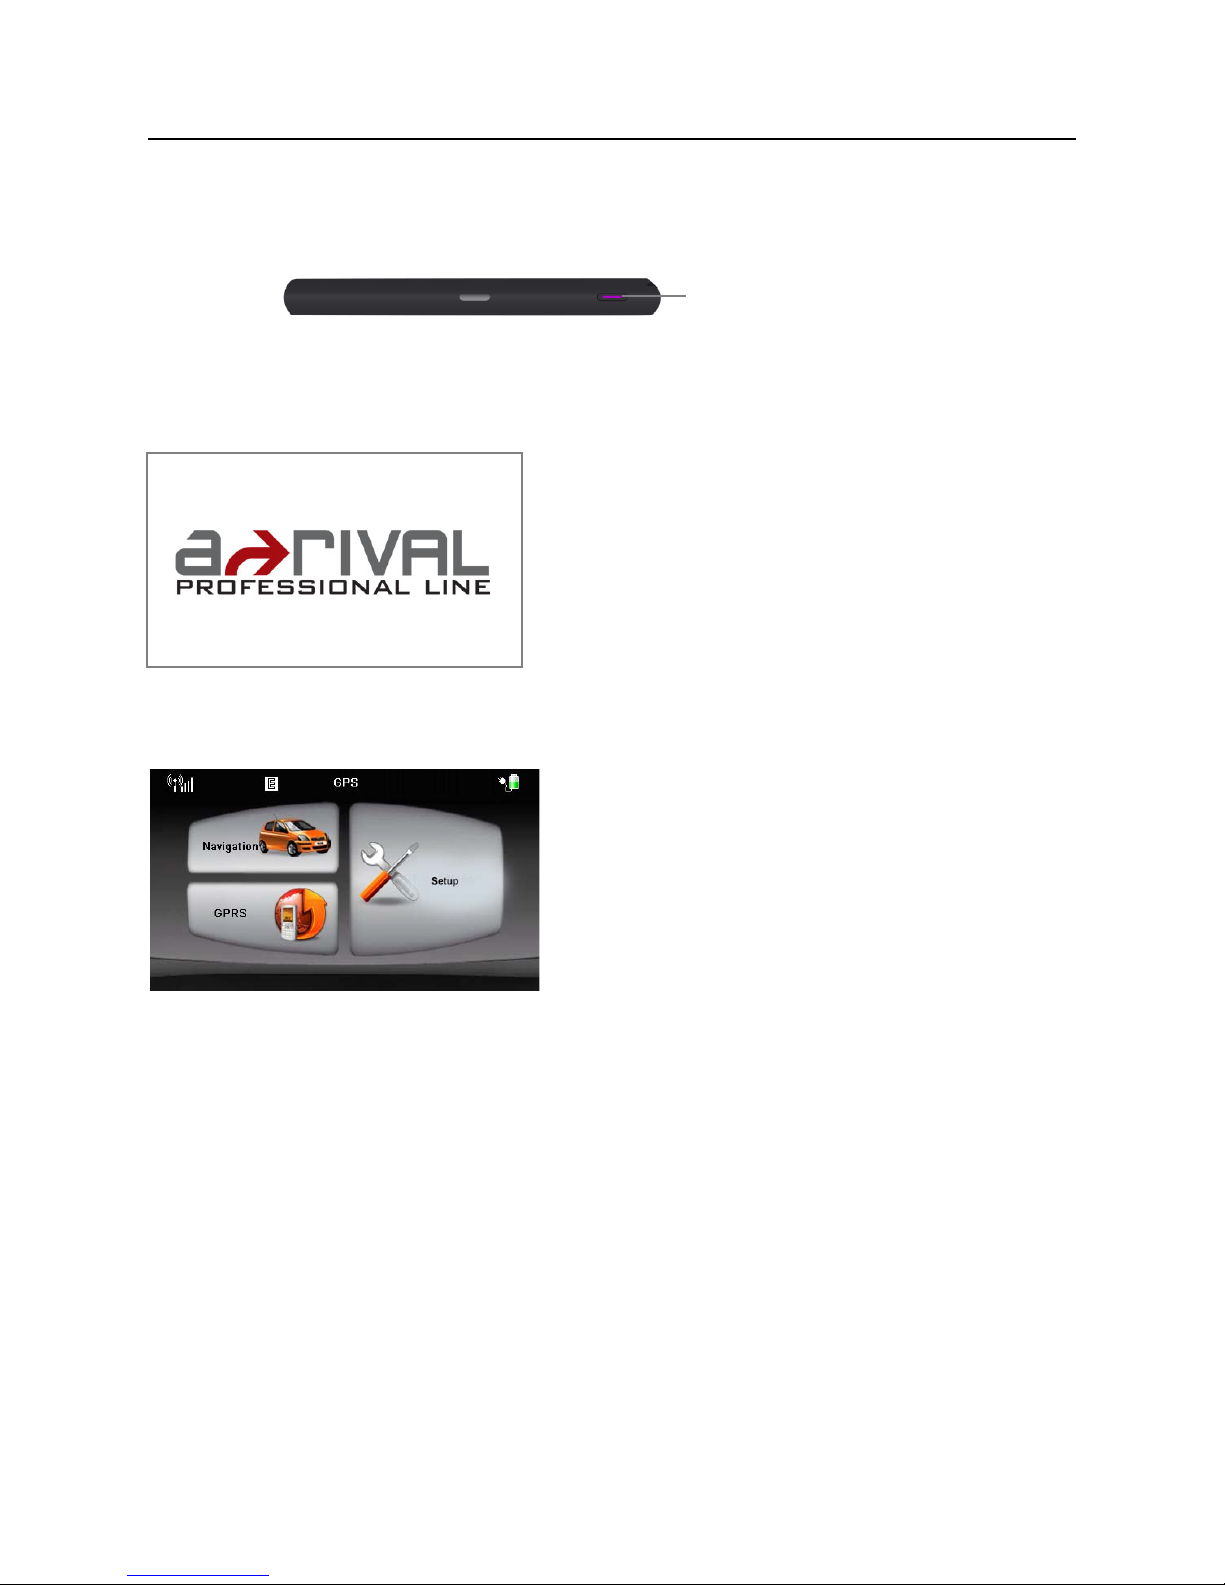
2.1 Performing the Initial Start Up.....................................................................9
2.2 Turning On and Off/sleeping mode...............................................................9
2.3 Operating the Device...................................................................................10
2.4 Main Menu...................................................................................................10
2.5 Inserting a microSD Card/SIM Card............................................................11
3 Device Settings..........................................................................................12
3.1 Using Device Settings................................................................................12
3.2 Volume........................................................................................................12
3.3 Date/time...................................................................................................13
3.3.1 Time zone.................................................................................................14
3.4 Backlight....................................................................................................14
3.5 Language..................................................................................................15
3.6 Calibrator...................................................................................................15
3.7 About..........................................................................................................16
4.0 GPS Receiver...........................................................................................17
5 Trouble shooting and maintenance...........................................................17
5.1 Resetting Your System..............................................................................18
5.2 Troubleshooting.........................................................................................18
Screen freezes......................................................................................19
GPS Problems......................................................................................20
5.3 Maintaining Your Device ...........................................................................20
6 Regulatory Information ...........................................................................21
6.1 Regulations Statements .........................................................................21
Canada.....................................................................................................21
7 Safety ..........................................................................................................23
7.1 Safety Precautions ....................................................................................23
About the Battery ....................................................................................23
8 Main Elements............................................................................................23

4
Getting Started
1.1 Understanding Hardware Features
NOTE: Depending upon the specific model purchased, the color of your device
exactly match the device shown in this manual.
Front Components
1 Touch Screen Displays the output of your device. Tap the Screen
with your fingertip to select menu commands or
enter information.
2 Charge Indicator Glows bright amber to indicate that the battery is
charging, and turns green when the battery is
fully charged.
Back Components
1 pen
2 Speaker Sends out music, sounds and voice.
Ref Component Description
1
2
1
2

5
Top Components
1 ON/OFF Switch The main power/battery cut off switch.
Side Components
1 Reset Button Restart system.
2 microSD Slot Accepts a microSD (Secure Digital) card
foraccessing data such as Map, Music and so
on.
3 USB Connector 4 AV Connector
5 Headphone Connector 6 SIM Card Slot
1
1
2
3
4
5
6

6
Getting Started
1.2 Connecting to AC Power and Charging the Battery (Optional)
When charging the battery for the first time, you should charge it for at least 8
hours.
1. Slide and click the connector converter onto the AC adapter.
2. Connect the adapter cable to the bottom of your device.
3. Plug the AC adapter into a wall outlet.
The charge indicator glows red when charging is in progress. Do not disconnect
your device from AC power until the battery is fully charged, when the charge
indicator turns amber. This will take a couple of hours.
NOTE:
. Do not immediately turn on your device after connecting the AC adapter to
charge a power-depleted battery. If you need to turn on the device again, wait
for at least one minute.
. Depending on your region of purchase, the connector converter may not look
exactly the same as the picture shown.
. Your device can also be charged when it is connected to a desktop computer
via the USB cable.
CAUTION: For optimal performance of the lithium battery, take note of the
following:
.Do not charge the battery where the temperature is high (e.g. in direct sunlight).
.There is no need to fully discharge the battery before charging. You can charge
the battery before it is discharged.
. If you will not use the product for a long period of time, be sure to fully charge
the battery at least once every two weeks. Over discharge of the battery can
affect the charging performance.

7
1.3 Using Your Device in a Vehicle
A car holder and a car charger are supplied with your device.
Using the Car Holder
CAUTION:
. Select an appropriate location for the car holder. Never place the holder where
the driver's field of vision is blocked.
. If the car's windshield is tinted with a reflective coating, an external antenna
(optional) may be needed to route the antenna to the top of the car through a
window. When closing the car window, be careful not to pinch the antenna
cable. (Cars with an anti-jam window design may automatically leave adequate
space as needed.)
The car holder consists of a bracket and
a stand. Use the car holder to fix your
device in a vehicle. Make sure that the
GPS antenna has a clear view of the sky.
(See the document supplied with the car
holder for the installation instruction.)
For initial positioning, remain at the same
spot with a clear view of the sky. The GPS may take a few minutes to find its
current location initially.
NOTE: Depending upon the specific model purchased, the car holder supplied
with your device may not look exactly the same as the picture shown.
1.4 Connecting the Car Charger
The car charger supplies power to your device when you are using the device
in a car.
CAUTION: To protect your device against sudden surges in current, connect the
car charger only after the car engine has been started.
1. Connect one end of the car charger to the power connector of your device.
2. Connect the other end to the cigarette lighter in the car to power and
charge your device.
The indicator on the car charger lights in green
to indicate that power is being supplied to your
device.

8
Operating Basics
2.1 Performing the Initial Start Up
1. press the ON/OFF button for several seconds.
2. Your device will automatically turn on. Connect the car charger as described
in the next section.
3. The opening screen appears.
4. The Main Menu appears as shown below. You can now use your device.
5. Fully charge the battery before using your device for the first time.
ON/OFF

9
2.2 Turning On and Off / sleeping mode
1. Use the ON/OFF button to turn on and off your device.
2. If want to turn off the device, press the ON/OFF button for several seconds.
Your device will appearing the next menu of turning off.
press button, the device is turned off.
3. If pressing button, the device will enter into sleeping state.
When you press the button to turn off the unit, your device
actually enters a suspend state and the system stops operating. Once you turn
on the system again, it resumes.
2.3 Operating the Device
To communicate with your device, touch the screen with your fingertip. You can
perform the following actions:
. Tap: Touch the screen once with your fingertip to open item or options.
. Drag: Hold your fingertip on the screen and drag up/down/left/right or across
the screen.
. Tap and hold: Tap and hold your fingertip until an action is complete, or a result
or menu is shown.

10
Operating Basics
2.4 Main Menu
The first time you initialize your device, the Main Menu appears. The Main Menu
is your starting place for various tasks. Tap a button to start a task or open other
menu.
1 Navigation Start navigation
2 Settings Device Settings
3 GPRS GPRS Settings
2.5 Inserting a microSD Card
Your device has a microSD slot where you can insert an optional Secure Digital
storage card.
To use a microSD card, insert it into the slot, with the connector pointing to the
slot and its label facing the front of the device.
To remove a card, first make sure that no application is accessing the card, then
slightly push the top edge of the card to release it and pull it out of the slot.
NOTE:
. Make sure that no foreign objects enter the slot.
. Keep a microSD card in a well-protected box to avoid dust and humidity
when you are not using it.
1
2
Ref Button Name Description For Detailed Information
3

11
Inserting a SIM Card
Your device has a GPRS function, so you need insert a SIM card.
To use a SIM card, insert it into the slot, seeing the below picture. Then please
cover the covering.
To remove a card, first make sure that no application is accessing the card, then
slightly push the top edge of the card to release it and pull it out of the slot.
NOTE: When you are not using SIM card slot, please cover the covering to
avoid anything enter into SIM card slot.
Caution: Don’t insert and remove a SIM Card, when the device is running.
GPRS function
Devices settings
3.1 Using Device Settings
To open the Device Settings menu, first tap the Settings button on the main
menu.
Tap to enter the “Input” menu
(seeing the front picture), select your
ASP.

12
The Device Settings menu appears as shown above. The following sections
describe these buttons and their functions.
You can customize the device settings such as backlight, volume, date and time.
Once you change the settings, your new settings will remain until you change
them again.
3.2 Volume
1. Tap button on the Device Settings menu. The volume function
menu appears as shown below.
2. Tap the knob and to adjust the volume. To decrease the
volume, tap the knob . To increase the volume, tap the knob .
3. Tap the button to accomplish modification.
4. Tap the button to quit modification to go back to the Device
Settings screen.
The optimal volume adjustment is 4 of 5 boxes activated.
3.3 Date/Time
1. Tap button on the Device Settings menu. The Date/Time
Function menu appears as shown below.

13
2. Tap the item of needing to modify, through clicking and on
the calendar, accomplish easily to adjustment ,such as: year, month and day.
3. Uniformity, clicking and on the calendar, you can accomplish
easily to adjustment of hour, minute and second.
4. Tap the button to save the changes and go back to the previous
menu.
3.3.1 Time zone
To set the time in your Time zone correctly, tap the Time zone button on the
bottom. Your Time zone is pre-set for Germany (GMT +1, see picture below).
Confirm your setting by pressing the OK button. You are returned to the prior
menu now. Winter/Summer time setting will be automatically changed.

14
3.4 Backlight
1. Tap button on the Device Settings menu. The backlight
Devices settings
Function menu appears as shown below.
2. Tap the knob to adjust the backlight. To decrease the backlight, tap .
To increase the backlight, tap .
3.5 Language
1. Tap button on the Device Settings menu. The Language
Function menu appears as shown below.
2. Tap the knob and to select language.
3. After accomplishing, tap the knob to exit.
3.6 Calibrate
You can calibrate the touch screen if it is not responding accurately to your
Taps.

15
Devices settings
1. Tap “calibrate” button on the Device Settings menu. The calibrate Function
menu appears as shown below .
2. Tap and hold the centre of the target, the target moves to the position of
left-up. When again tap and hold the centre of the target, the target moves the
Next position of left-down.
3. The target moves to five position (Left-up' left-down' right-up' right-down'
Center) in order, forming a period. If nicetily tap and hold the target each time,
after a period, the target is Disappear, the device completes the calibration
process and tap screen to back the Device Settings menu.
3.7About
1. Tap button on the Device Settings menu. The About Function
menu appears as shown below.
2. After accomplishing, tap the knob to exit.
4.1 GPS Receiver
NOTE: This page is for information only. You can view the number of satellite
signals the unit is receiving and also the strength of these signals.
1. Tap “GPS Receiver” button on the Device Settings menu.
2. The GPS Receiver Function menu appears as shown below.

16
This page gives your current position in degrees longitude and latitude, your
current speed and the status of your position, i.e. Fixed 3D or Fixed Invalid etc.
The compass circle shows the satellites that the unit is receiving and the bar
chart below shows the strength of the signal from each of these satellites.
5. Troubleshooting and maintenance
This chapter gives solutions to common problems you may encounter. It also
provides guidelines on taking care of your device.
NOTE: if you encounter a problem you can not solve, contact an authorized
service center for assistance.
5.1 Resetting Your System
Occasionally, you may need to reset your device. For example, you should reset
your system when it stops responding; or appears to be "frozen" or " locked up" .
Insert a small rod, such as a straightened paperclip, into the reset button on the
bottom of your device. This is called a "soft reset." The Main Menu should
appear after a soft reset.
If your device still does not respond after a soft reset, you can use the
following steps to perform a "hard reset."
1. Disconnect all cables, including the AC adapter, from your device.
2. Press the ON/OFF button to the OFF position.
3. Wait for l minute and then press the button back to the ON position.
4. Your device turns on.
ON/OFF
RESET

17
5.2 Troubleshooting
Power Problems
Power does not turn on when using battery power
The remaining battery power may be too low to run your device. Connect the AC
adapter to your device and to AC power. Then, turn on your device.
Troubleshooting and maintenance
Screen Problems
Screen is off
. If the screen does not respond even after you press the power button, try the
following in order until the problem is solved.
. Connect the AC adapter to your device and to external AC power.
. Reset your system.
Screen responds slowly
. Make sure that your device is not running out of battery power. If the problem
still exists, reset your system.
Screen freezes
. Reset your system.
Screen is hard to read
. Make sure that the backlight of the display is on.
. Move to a location with more light.
Inaccurate response to taps
. Recalibrate the touch screen. (See section 3.4 for instructions.)
Connection Problems
Cable Connection Problems
. Make sure that your device and your computer are both turned on before trying
to establish a connection.
. Make sure that the cable is securely plugged into the USB port on your
computer and on the device. Connect the USB cable directly to your computer
do not run the cable through a USB hub.

18
. Reset your device before connecting the cable. Always disconnect your device
before you restart your computer.
Troubleshooting and maintenance
GPS Problems
When there are no valid signals available, consider the following:
. Make sure that the GPS antenna has a clear view of the sky.
. Note that the GPS reception can be affected by:
√Bad weather
√Dense overhead obstacles (e.g. trees and tall buildings)
√Other wireless device in the car
√Reflective car window tint
Troubleshooting and maintenance
5.3 Maintaining Your Device
Taking good care of your device will ensure trouble-free operation and reduce
the risk of damage to your device.
. Keep your device away from excessive moisture and extreme temperatures.
. Avoid exposing your device to direct sunlight or strong ultraviolet light for
extended periods of time.
. Do not place anything on top of your device or drop objects on your device.
. Do not drop your device or subject it to severe shock.
. Do not subject your device to sudden and severe temperature changes.
this could cause moisture condensation inside the unit, which could damage
your device. In the event of moisture condensation, allow the device to dry out
completely before use.
. Take care not to sit on the device. We advise not to carry the device in one's
back pocket for that reason.

19
. The screen surface can easily be scratched. Avoid touching it with sharp
objects. Non-adhesive generic screen protectors designed specifically for use
on portable devices with LCD panels may be used to help protect the screen
from minor scratches.
. Never clean your device with it powered on. Use a soft, lint-free cloth
moistened with water to wipe the screen and the exterior of your device.
. Do not use paper towels to clean the screen.
. Never attempt to disassemble, repair or make any modifications to your device.
Disassembly, modification or any attempt at repair could cause damage to your
device and even bodily injury or property damage and will void any warranty.
. Do not store or carry flammable liquids, gases or explosive materials in the
same compartment as your device, its parts or accessories.
6. Regulatory information
NOTE: Marking labels located on the exterior of your device indicate the
regulations that your model complies with. Please check the marking labels on
your device and refer to the corresponding statements in this chapter.
Some notices apply to specific models only.
10.1 Regulations Statements
Class B Regulations
USA Federal Communications Commission Radio Frequency Interference
Statement
NOTE:
This equipment has been tested and found to comply with the limits for a Class
B digital device pursuant to Part 15 of the FCC Rules. These limits are designed
to provide reasonable protection against harmful interference in a residential in
stallation. This equipment generates, uses, and can radiate radio frequency
energy and, if not installed and used in accordance with the instructions, may
cause harmful interference to radio communications. However, there is no
guarantee that interference will not occur in a particular installation. If this

20
equipment does cause harmful interference to radio or television reception,
which can be determined by turning the equipment off and on, the user is
encouraged to try to correct the interference by one or more of the following
measures:
. Reorient or relocate the receiving antenna.
. Increase the separation between the equipment and receiver.
. Connect the equipment into an outlet on a circuit different from that to which
the receiver is connected.
. Consult the dealer or an experienced radio/TV technician for help.
Any changes or modifications not expressly approved by the manufacturer
could void the user's authority to operate the equipment.
Please note:
The use of a non-shielded interface cable with this equipment is prohibited.
Canada
Canadian Department Of Communications
6.1 Regulatory information
Radio Interference Regulations Class B Compliance Notice
This Class B digital apparatus meets all requirements of the Canada
Interference-Causing equipment regulations.
Cet appareil numérique de Classe B respecte toutes lesexigences duRèglement
Canadien sur le matériel brouileur.
European Notice
Products with the CE marking comply with Radio & Telecommunication
Terminal Equipment Directive (R&TTE) (1999/5/EEC), the Electromagnetic
Compatibility Directive (89/336/EEC) and the Low Voltage Directive
(73/23/EEC) as amended by Directive 93/68/ECC - issued by the
Commission of the European Community.
Table of contents
Popular Automobile Accessories manuals by other brands

Pyle
Pyle PLCMDVR 8 user manual

Porsche
Porsche Mobile Charger Connect Driver manual

Truck Champ
Truck Champ 22002 installation instructions

Whelen Engineering Company
Whelen Engineering Company LKH2 installation guide

Fiamma
Fiamma 05808-01 Series Installation and usage instructions

Directed
Directed Directechs DB3 installation guide

Thule
Thule Universal Flat Top Ski Carrier 91724 installation instructions

Henderson's Line-Up
Henderson's Line-Up SuperSteer SS308 installation instructions

Thule
Thule 1193 instructions

Desay SV Automotive
Desay SV Automotive CHG-WIRELESS product manual

Thule
Thule 1306 RAPID SYSTEM Fitting instructions

Westin
Westin HDX GRILLE GUARD instructions