A&E Axil VII User manual
- 1 -
INSTALLATION GUIDE
GUIDE D’INSTALLATION
RACK CABINET
ARMOIRE À LINGE
PLEASE NOTE THAT A FRENCH VERSION OF THE INSTRUCTIONS WILL FOLLOW THE ENGLISH VERSION
VEUILLEZ NOTER QU'UNE VERSION FRANÇAISE DES INSTRUCTIONS SUIT LA VERSION ANGLAISE

-2 -
POUR COMMENCER
Ce manuel est une référence graphique pour
l’installation. Certains éléments graphiques et
composantes peuvent différer.
Consultez le code du bâtiment de votre région,
afin que l’installation respecte les normes en
vigueur.
Lors de la réception, inspectez le produit afin de
vérifier qu e tout soit en bonne condition. Si un
problème survient, signalez immédiatement le
distributeur.
Si le dommage est causé par le transporteur,
contactez le immédiatement. Assurez-vous que
toutes les pièces sont incluses. (outils ne sont pas
inclus).
TO GET STARTED
This manual is a graphic reference for installation
purposes. Some graphic elements and components
may differ. Consult local building codes to ensure
that installation complies with standards in your
area.
Inspect unit carefully to ensure there is no damage
or defects. If such is the case, contact your
distributor. If damage has occurred during
transport, contact your carrier.
Make sure you have received all parts (tools not
included).

0:30
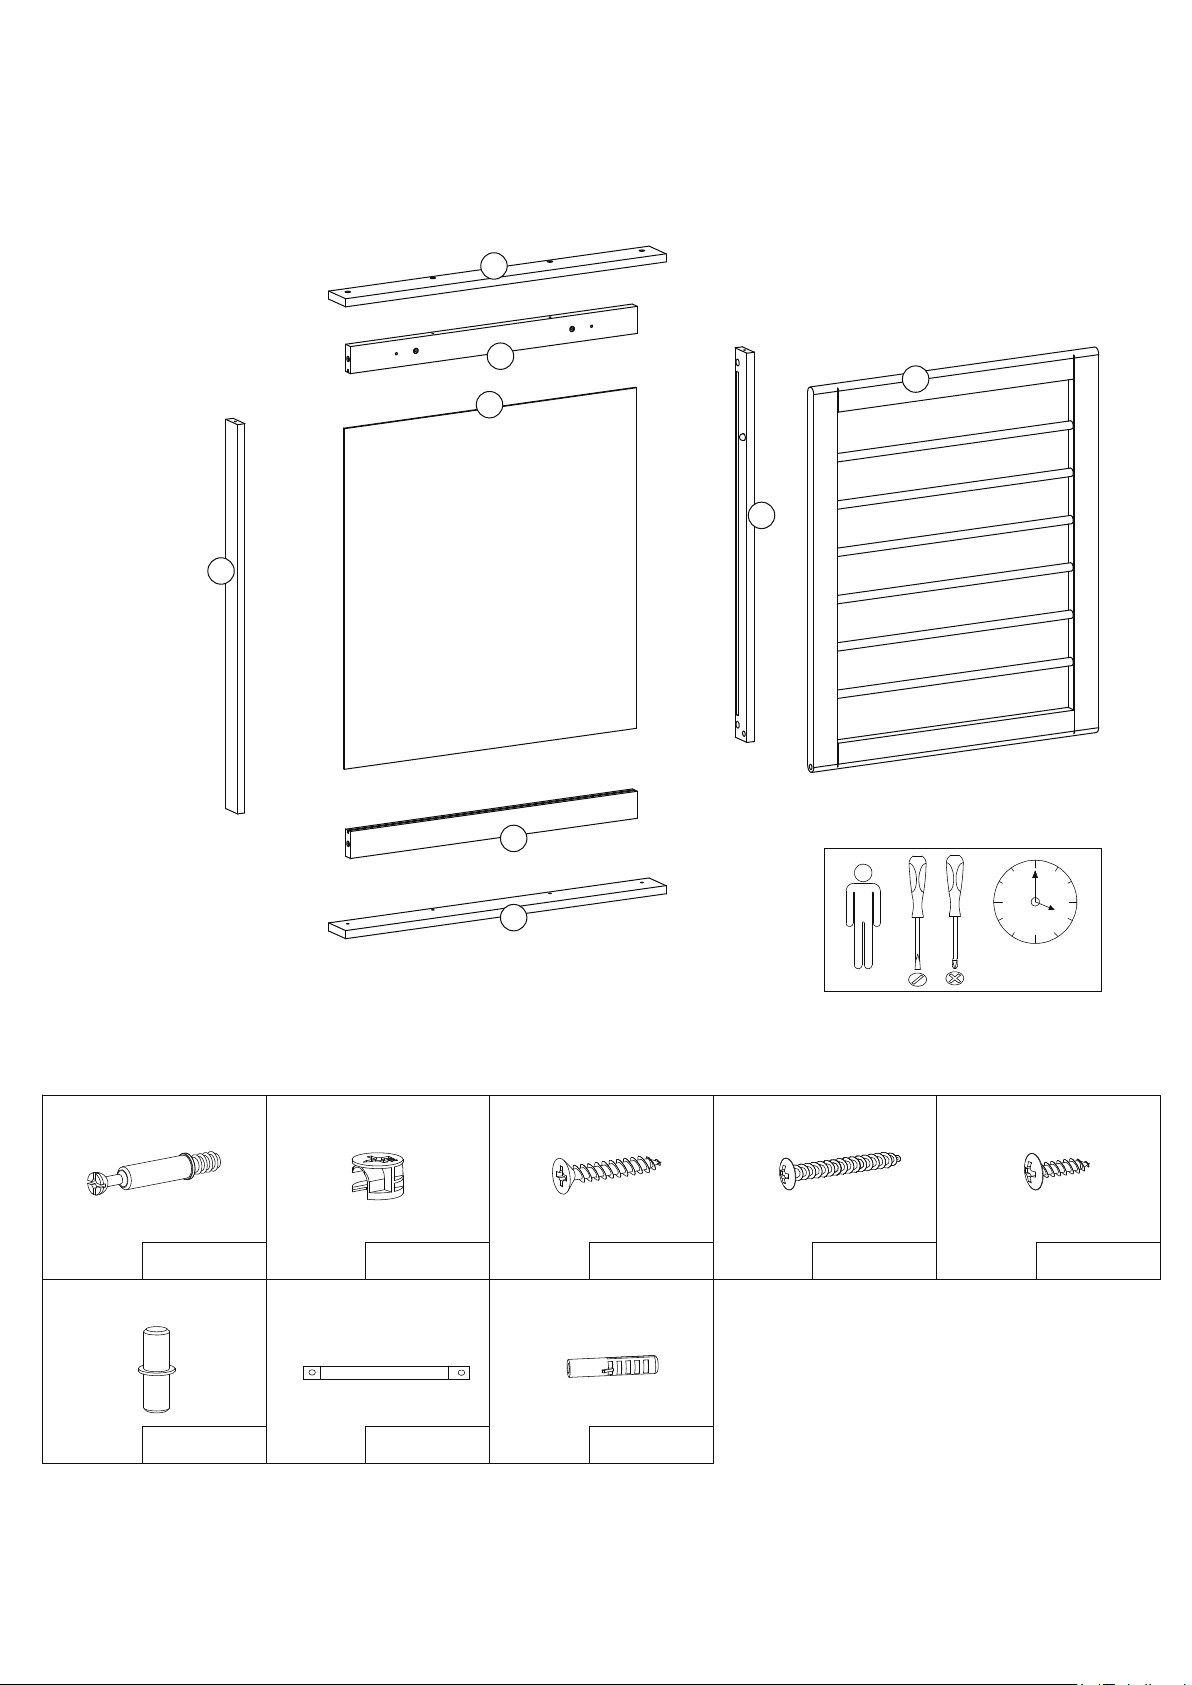
4PCS
Ф6x35mm
A
4PCS
Ф15x10mm
B
8PCS
C
2PCS
D
4PCS
Ф4x30mm Ф4x45mm Ф4x12mm
E
2PC 2PCS 2PCS
GH
F
1
2
7
3
6
4
5
8
PARTS LIST
-3 -
CAM BOLT CAM LOCK FLAT HEAD SCREW PAN HEAD SCREW PAN HEAD SCREW
SELF HOLDER SHELF BELT PLASTIC ANCHOR

- 4 -
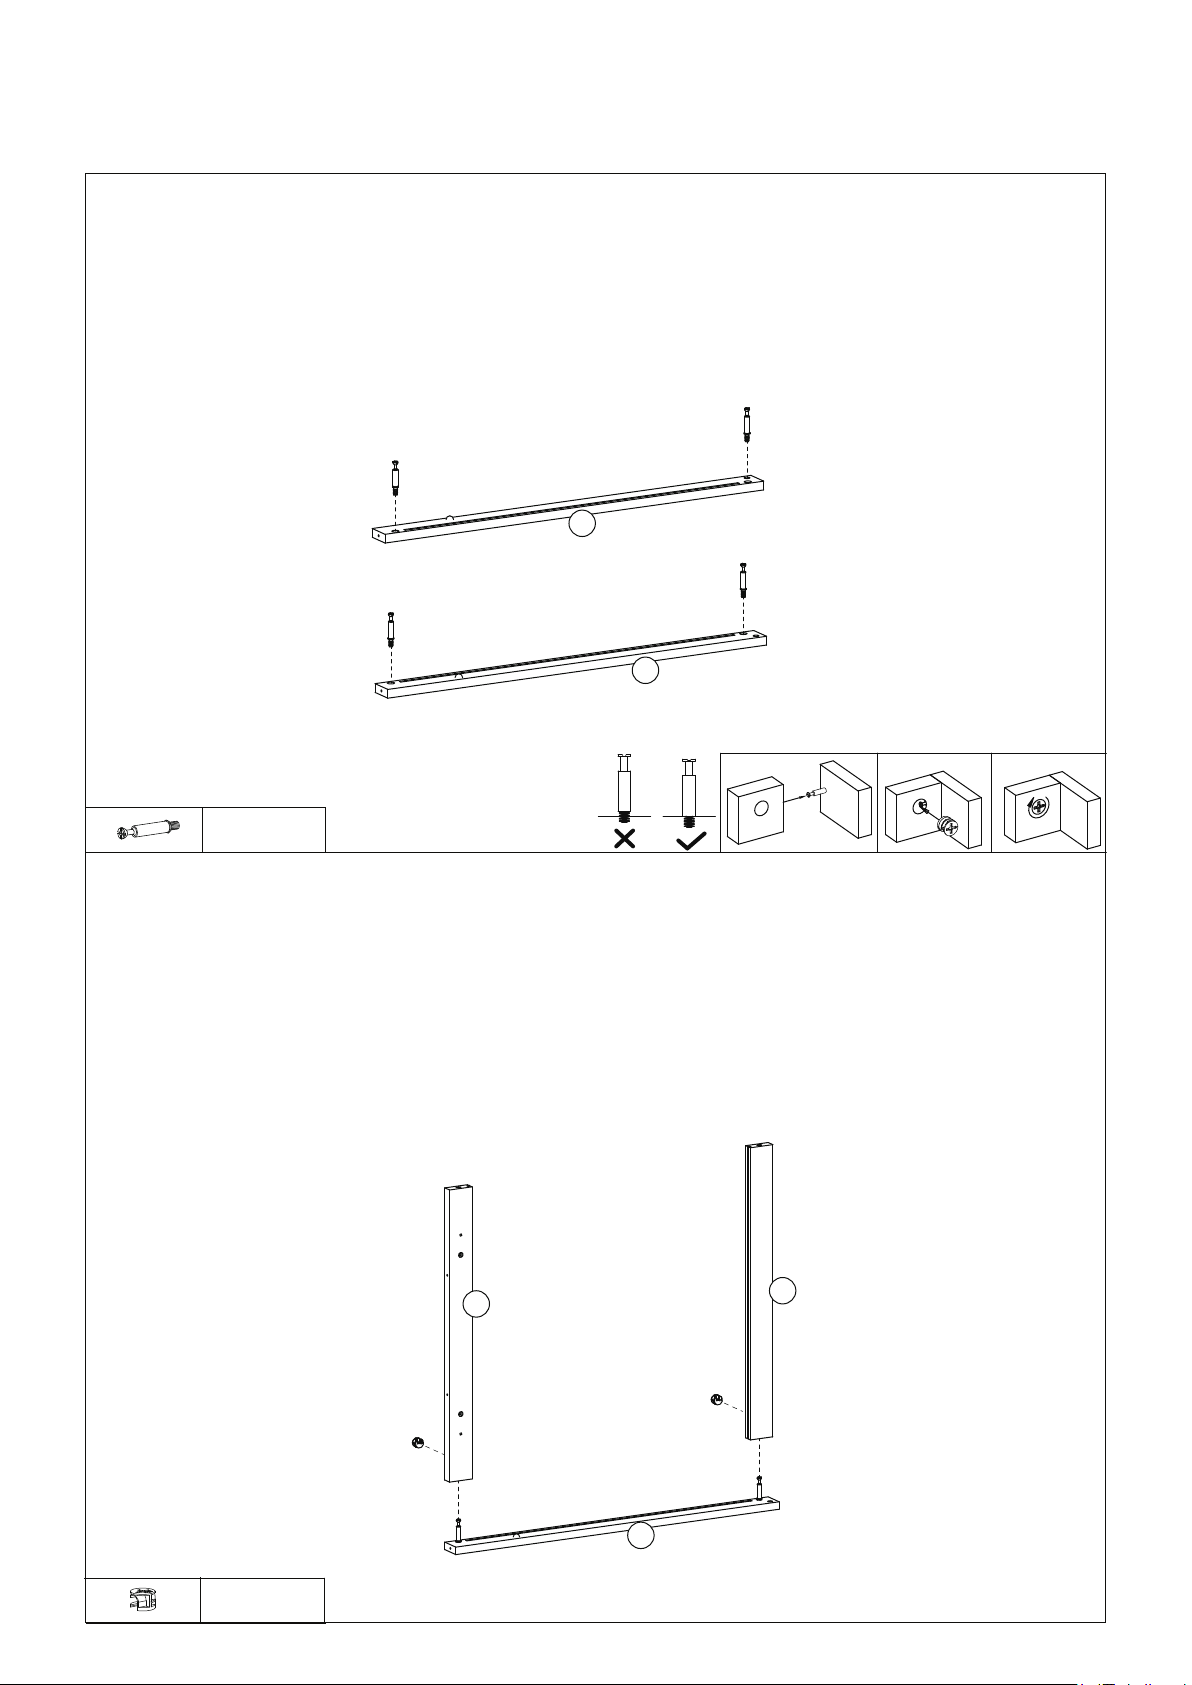
STEP 1
A
x 4PCS
6
5
ASSEMBLY STEPS
STEP 2
B
x 2PCS
5
23
a b c
1- Screw 2 cam bolts (A) into the pre-threaded holes of the left support board (5). Do not over tighten.
2- Repeat the step above for the right support board (6).
1- Attach bottom support (3) to left support (5) by inserting cam bolts (A) into cam lock holes on
bottom support (3)
2- Insert a cam lock (B) into the cam lock hole in support (3) then rotate cam lock clockwise to secure
cam bolt (A) in place
3- Repeat the steps above for the top support board (2) attaching it to left support (5)

- 5 -
STEP 4
C
x 8PCS
1
4
ASSEMBLY STEPS
STEP 3
2
3
8
5
6
7
F
x 2PCS
B
x 2PCS
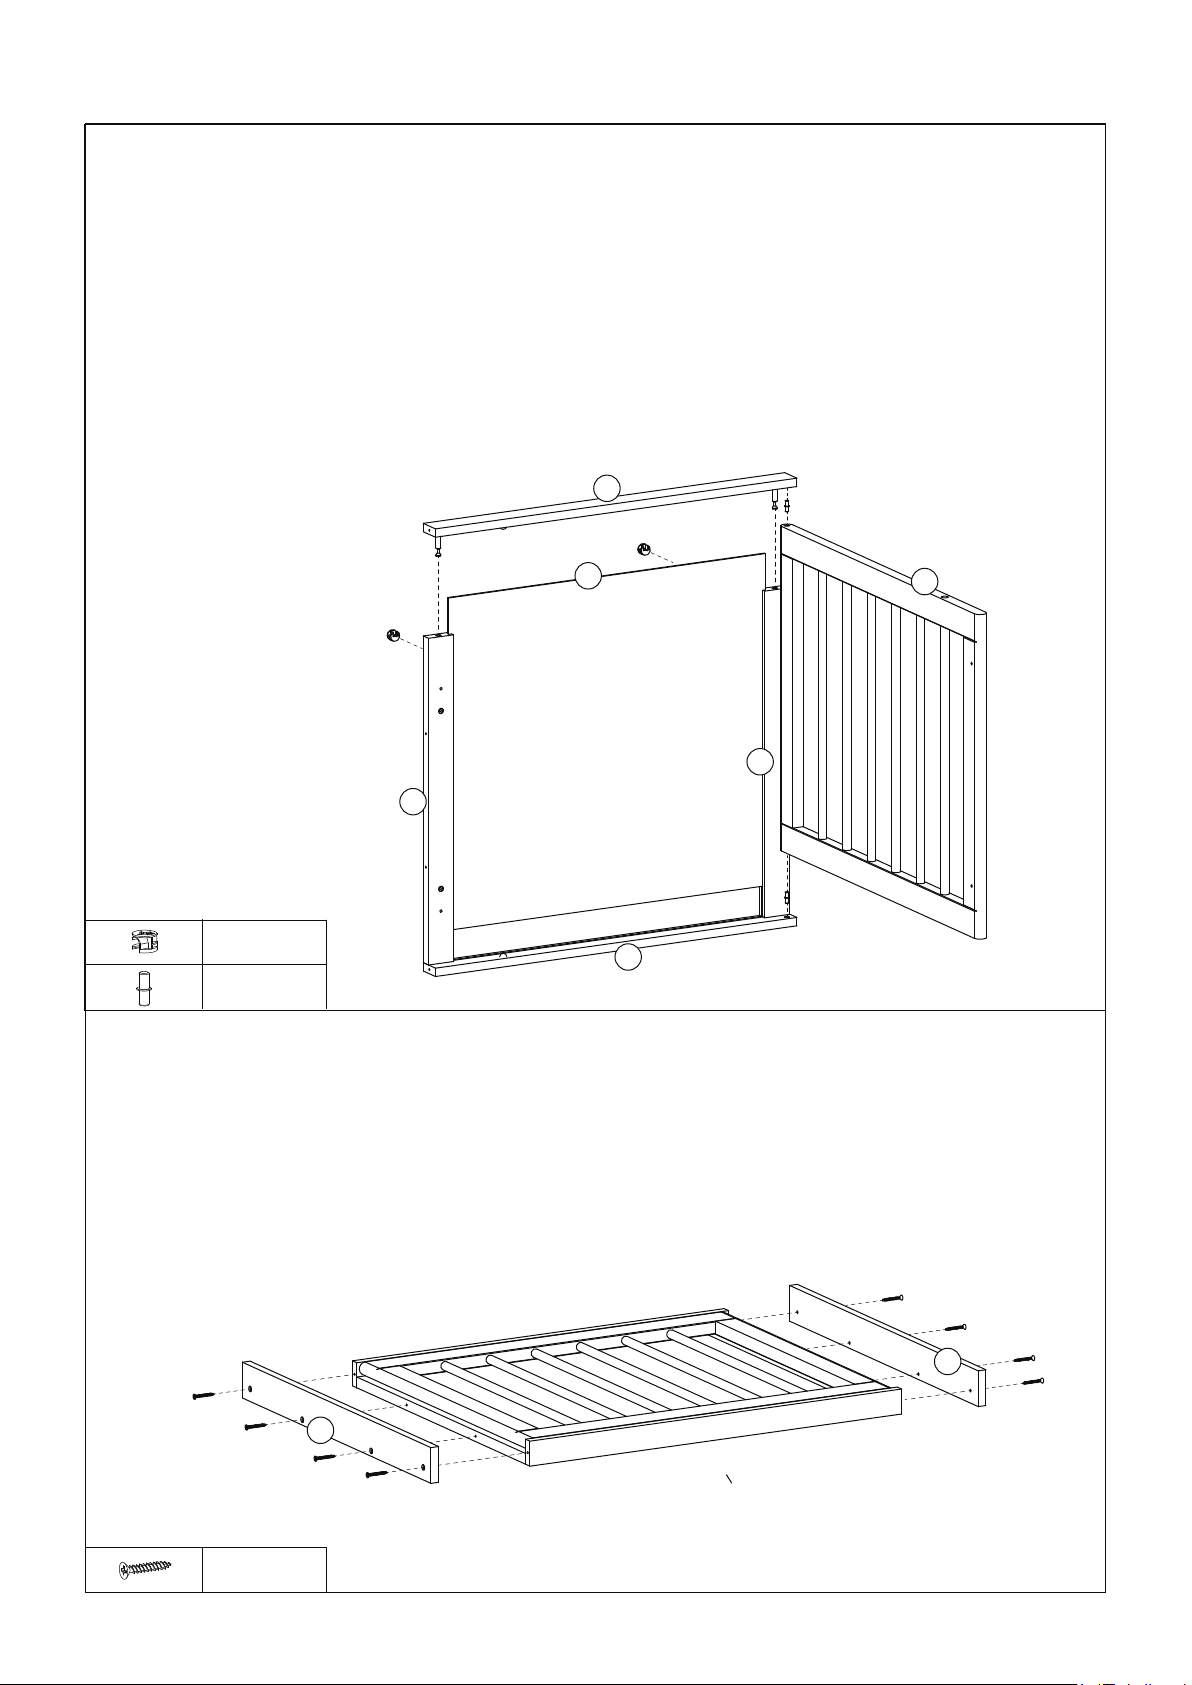
1- Slide the back board (8) into the grooves of the supports (2, 3, & 5).
2- Insert 1 cam lock on the right side of each of the supports (2&3) into the appropriate hole.
3- Insert shelf holder (F) into the designated holes on the shelf (7) shown in figure below.
4- Attach the shelf (7) into the frame by attaching the right support (6) into the assembly. This could
be done by inserting the cam blots of support (6) to the cam bolt holes on supports (2&3) while
ensuring that the shelf holders (F) are also inserted into their appropriate holes.
5- Rotate cam locks (B) clock wise to secure cam bolts (A) in place.
1- Attach board (1) to the top side of the assembly by inserting 4 screws (C) into their designated
holes on board 1 and tightening them to the assembly.
2- Repeat the step above for support (4) attaching it to the assembly from the bottom side.
STEP 6
H
x 2PCS
D
x 2PCS
STEP 5
E
x 4PCS
G
x 2PCS
1
ASSEMBLY STEPS
-6 -
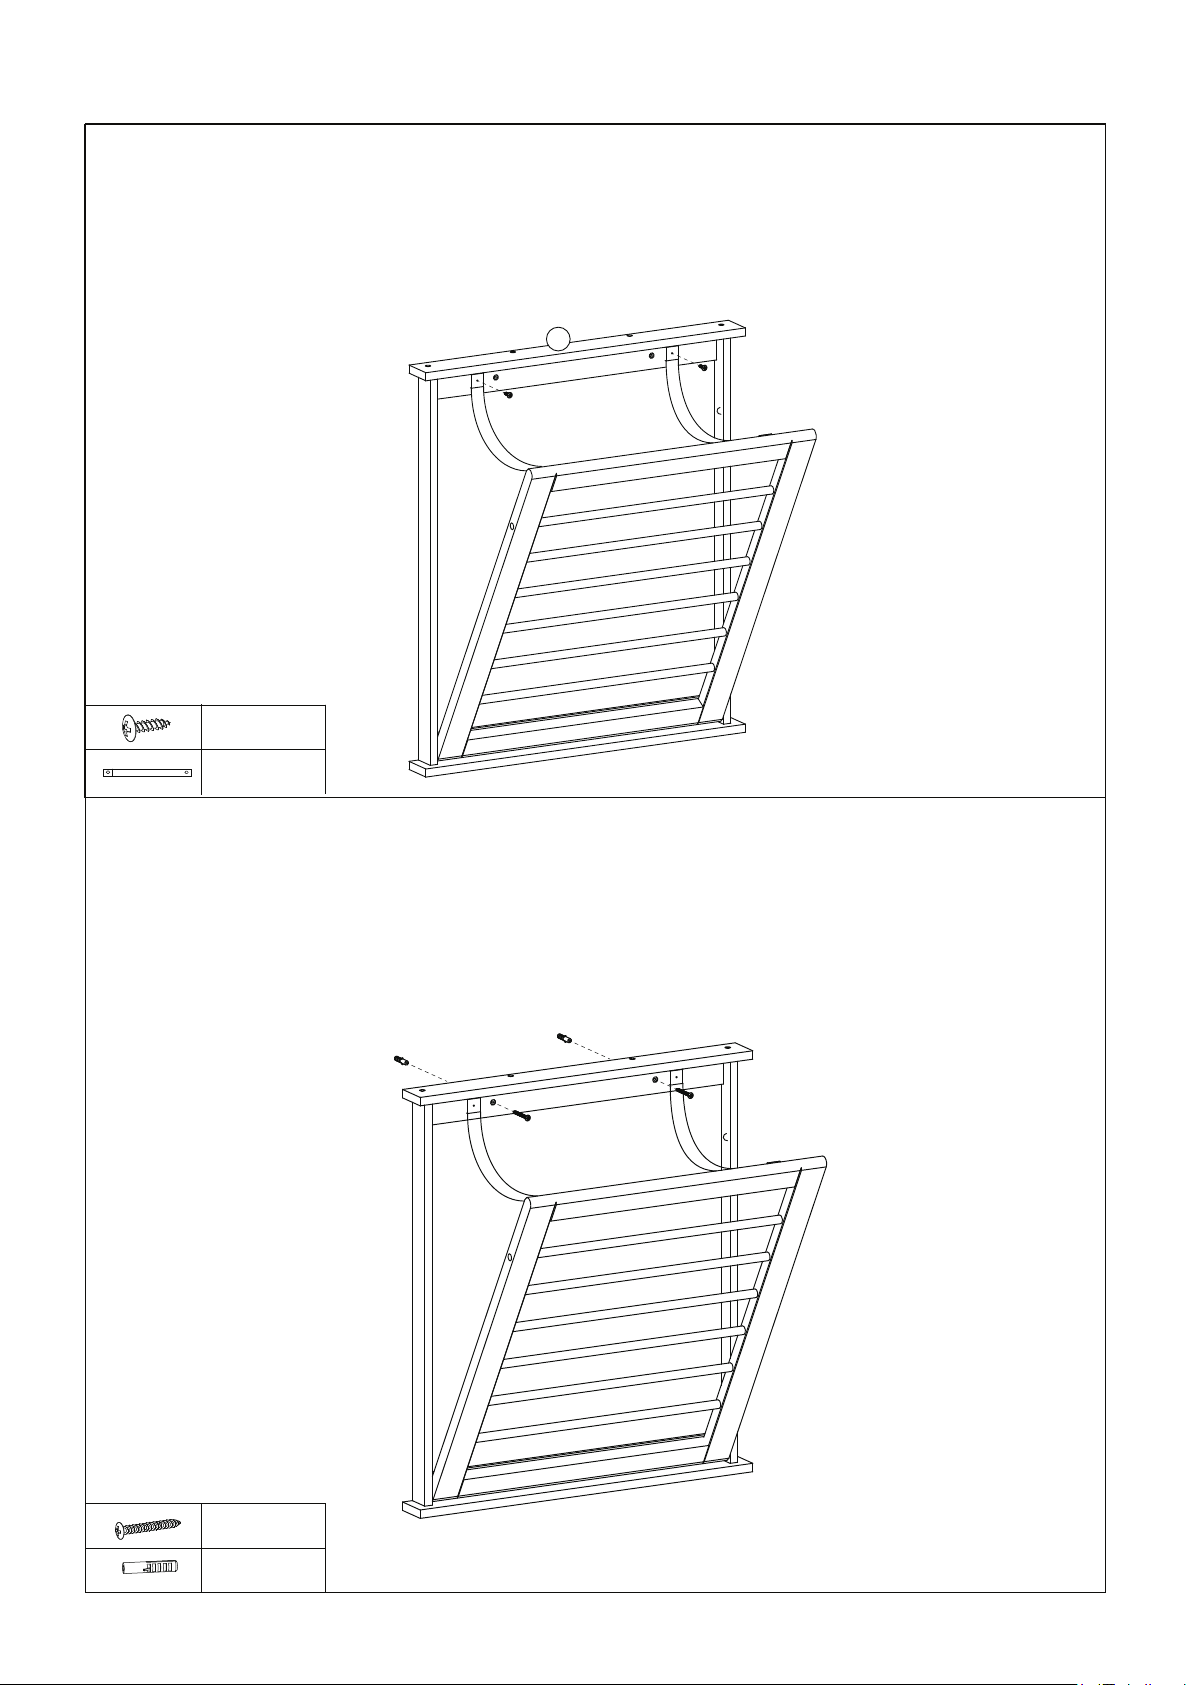
1- Attach 1 belt (G) from one side to the assembly as shown in figure below using 2 screws (E)
2- Attach the 1 belt (G) from the other side to the shelf using 2 screws (E)
1- With a nail or screw, mark 2 holes on the wall which will be used to attach the anchors and the screws
2-Drill 2 holes on the wall at the 2 marked spots and insert 2 plastic anchors (H) into those holes
3- Insert 2 screws (D) into the unit at the designated holes and then tighten the screws (D) into the anchors

FRENCH VERSION FOLLOWS :
LA VERSION FRANÇAISE SUIT :
-7 -
0:30
4PCS
Ф6x35mm
A
4PCS
Ф15x10mm
B
8PCS
C
2PCS
D
4PCS
Ф4x30mm Ф4x45mm Ф4x12mm
E
2PC 2PCS 2PCS
GH
F
1
2
7
3
6
4
5
8
LISTE DE PIÈCES
-8 -
BOULON À CAME VERROU À CAME VIS À TÊTE PLATE VIS À TÊTE PAN
SUPPORT D'ÉTAGÈRE SANGLE D'ÉTAGÈRE ANCRAGE
VIS À TÊTE PAN
-9 -
Étape 1
A
x 4PCS
6
5
ÉTAPES D'ASSEMBLAGE
B
x 2PCS
5
23
a b c
1- Visser 2 boulons à came (A) dans les trous pré-filetés de la plaque de support gauche (5). Ne pas
trop serrer.
2- Répétez l'étape ci-dessus pour le panneau de support droit (6).
1- Fixez le support inférieur (3) au support gauche (5) en insérant les boulons à came (A) dans les
trous de verrouillage du support inférieur (3).
2- Insérez un verrou à came (B) dans le trou du verrou de came du support (3), puis tournez le verrou
à came dans le sens horaire pour fixer le boulon à came (A) en place.
3- Répétez les étapes ci-dessus pour la carte de support supérieure (2) en la fixant au support gauche
(5).
Étape 2
-10 -
Étape 4
C
x 8PCS
1
4
ÉTAPES D'ASSEMBLAGE
Étape 3
2
3
8
5
6
7
F
x 2PCS
B
x 2PCS
1- Faites glisser le panneau arrière (8) dans les rainures des supports (2, 3 et 5).
2- Insérez 1 verrou à came sur le côté droit de chacun des supports (2 et 3) dans le trou approprié.
3- Insérez le support d'étagère (F) dans les trous désignés sur l'étagère (7) illustrée dans la figure ci-
dessous.
4- Fixez la tablette (7) au cadre en fixant le support approprié (6) à l’ensemble. Cela pourrait être
fait en insérant les boulons à came du support (6) dans les trous des boulons à came des supports (2
et 3) tout en veillant à ce que les porte-étagères (F) soient également insérés dans leurs trous
appropriés.
5- Tournez les verrous à came (B) dans le sens horaire pour fixer les boulons à came (A) en place.
1- Fixez la carte (1) sur la partie supérieure de l'assemblage en insérant 4 vis (C) dans les trous
prévus à cet effet sur la carte 1 et en les serrant à l'ensemble.
2- Répétez l'étape ci-dessus pour le support (4) en le fixant à l'assemblage par le bas.

Étape 6
H
x 2PCS
D
x 2PCS
Étape 5
E
x 4PCS
G
x 2PCS
1
ÉTAPES D'ASSEMBLAGE
-11 -
1- Fixez 1 sangle (G) d’un côté à l’assemblage, comme indiqué sur la figure ci-dessous, à l’aide de 2 vis (E).
2- Fixez les 1 sangle (G) de l’autre côté sur la tablette à l’aide de 2 vis (E).
1- Avec un crayon ou une vis, marquez 2 trous sur le mur qui seront utilisés pour fixer les ancrages et les vis
2- Percez 2 trous sur le mur aux 2 points marqués et insérez 2 ancrages en plastique (H) dans ces trous
3- Insérez 2 vis (D) dans l'unité aux trous indiqués puis serrez les vis (D) dans les ancrages

ENTRETIEN
Attention
Les détergents en poudre ou liquides
abrasifs peuvent endommager les surfaces.
Ne mettez jamais en contact la surface avec
des produits corrosifs contenant de l’acétone
(nettoyant de vernis à ongles), des solvants,
des décapants, de l’essence, etc.
Tout produit de nettoyage doit être testé sur
une petite surface non-apparente, avant de
procéder à un nettoyage complet.
Lisez la fiche signalétique du produit de
nettoyage et vous assurer qu’il convient aux
surfaces à nettoyer.
Surface abîmées et réparations: Contacter le
service à la clientèle A&E.
MAINTENANCE
Caution
Powdered detergents and abrasive liquid
cleaners may damage surfaces.
Do not allow the surface to come into contact
with corrosive products such as acetone, nail
polish remover, dry cleaning solution, lacquer,
paint thinner, gasoline, or etc.
Any cleaning product should be tested on an
inconspicuous surface before using to clean.
Read the data sheet of the cleaning product to
ensure it will not damage the surfaces.
Scratched surface & repairs:
Call A&E’s customer service.
6400A St.
Jacques West
Montreal , Québec
Canada
H4B 1T6
Please contact us by email
Veuillez nous contacter par email
Tel: (514) 482-5403
1-888-AEBATH5
(1-888-232-2845
(Toll Free/Sans frais)
www.aebath.com
-12 -

GARANTIE
WARRANTY
A&E Shower & Bath inc. (˝A&E˝) offre la
garantie limitée suivante sur ses produits. Cette
garantie s’applique uniquement au propriétaire
original pour une utilisation domestique. A&E
garantit ses produits contre tout défaut de
matériau ou de fabrication pour des conditions
normales d’utilisation et d’entretien pour une
période d’une (1) année à compter de la date
d’achat originale du produit par le propriétaire.
A&E procédera à la réparation ou au remplacement
(avec un produit de même valeur), à sa
discrétion, de tout produit dont le défaut sera
rapporté au détaillant autorisé ou à A&E durant
la période de garantie. Ni le distributeur, ni le
concessionnaire autorisé A&E Shower & Bath inc.,
ni personne d’autre n’est autorisée à faire
d’affirmations, de représentations ou de
garantie autres que celles stipulées aux présentes;
les affirmations, représentations et garanties
contrevenant à cette interdiction ne sauraient
s’appliquer à A&E ni a personne d’autre. A&E se
réserve le droit de modifier cette garantie en tout
temps; il est entendu que de telles modifications
ne changeront pas les conditions de la garantie
applicable au moment de la vente des produits en
cause. La présente garantie ne s’applique pas
dans le cas d’utilisations ou d’opérations non
conformes ou bris ou dommages causés par la
faute, la négligence, le mauvais emploi, usage,
entretien ou altération ou la modification du
produit, de même que par la corrosion
chimique ou naturelle, le feu, l’inondation, les
catastrophes naturelles ou tout autre cas fortuit.
La présente garantie ne s’applique pas aux taches
ou aux résultats provoqués par une eau ferreuse,
une eau dure ou une eau salée. Les frais de
transport des produits défectueux entre le lieu
d’installation et A&E, les frais pour le retour de
toutes pièces et les coûts encourus afin d’enlever
ou réinstaller une pièce ou produit seront à la
charge du client. A&E ne sera pas responsable ni
redevable pour les dommages indirects, ni pour
les dommages causés ou résultants de cas
fortuits, perte de temps, perte d’usage,
inconvénients, dépenses fortuites, frais de main-
d’oeuvre, de matériaux ou tout les autres coûts
relatifs à l’application de cette garantie et à
l’enlèvement ou au remplacement de produits
défectueux. A&E et ses employés ou représentants
ne pourront en aucune circonstance être tenus
responsables des dommages causés à une
personne ou a des biens, quel que soit la source
de ces dommages.
A&E Shower and Baths Inc. (hereafter “A&E”)
offers the following limited warranty on
each of its products. This warranty extends only to
the original owner/end-user for personal household
use. A&E warrants their products to be free from
defects in workmanship and materials under
normal use and service for a period of one (1) year
from the original date of purchase by the owner/
end-user. Any product reported to an authorized
dealer or to A&E as being defective within the
warranty period will be repaired or replaced (with a
product of equal value) at the discretion of A&E.
This warranty is not transferable to a
subsequent owner. Neither the distributor,
authorized A&E dealer, nor any other person has
been authorized to make any affirmation or
representation of this warranty; any affirmation,
representation or warranty other than those
contained in this warranty shall not be
enforceable against A&E or any other person.
A&E reserves the right to modify this warranty at
any time, it being understood that such
modification will not alter the warranty conditions
applicable at the time of the sale of the product in
question. This warranty shall not apply following
incorrect operating procedures, breakage or
damages caused by fault, carelessness, abuse,
misuse, misapplication, improper
maintenance, alteration or modification of the
unit, as well as chemical or natural corrosion,
accident, fire, flood, act of God, or any other
casualty. This warranty shall not apply to stain or
malfunction caused by ferrous water, hard water,
or salty water. A&E is not responsible for
transportation costs of the defective product
from the installation site to A&E, or for the
return of any part, or for the cost of labour or
services incurred in the removal or reinstallation of
any part. A&E expressly disclaims and excludes
any liability for the consequential or incidental
damage caused or resulting from incidental
event, loss of time, loss of use, inconvenience,
unnecessary expenses, labour, material of
other costs with respect to the application of this
warranty or with respect to the removal or
replacement of a defective product. Under no
circumstances shall A&E or any of its
representatives be held liable for injury to any
person or damage to any property however
arising.
-13 -
Table of contents
Languages:
Other A&E Bathroom Fixture manuals

Popular Bathroom Fixture manuals by other brands

Spectrum Brands
Spectrum Brands Pfister Courant LF-049-CO Quick installation guide

Radaway
Radaway ARGOS C Assembly instruction

Helvex
Helvex LV CASSINI installation guide

DURAVIT
DURAVIT Fogo Mounting instructions

Laura Ashley
Laura Ashley LA1013 Installation & Aftercare Instructions

Pfister
Pfister 16 Series manual

Porcelanosa
Porcelanosa noken SQUARE 100251837 N806718582 manual

Victorian Plumbing
Victorian Plumbing Chatsworth Traditional VP003 installation guide

Svedbergs
Svedbergs 9082 manual

Eurotech
Eurotech Regency installation manual

Grohe
Grohe 26 485 manual

Canadian Timber Collection
Canadian Timber Collection CTC105 Parts Identification & Assembly Instructions


